Transcription
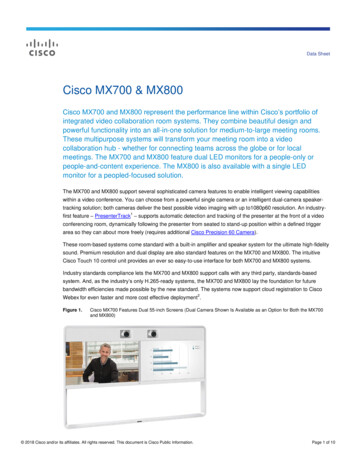
Master CAM Add-In for SolidWorksInstallation time: 30 minutes depending on network connectionTo Install the MasterCAM x7 Add-in for SolidWorks1. MasterCAM x7 installation files are located here: F:\install\MasterCAM\MasterCAM x7 for SW2. There are two folders. ‘x64’ is for 64-bit operating systems. ‘x86’ is for 32-bit operatingsystems. The x64 version is what most students will want.3. Open the appropriate folder and run the setup.exe application.
4. Once the MasterCAM installation program begins press the “Mastercam X7 Installs” button5.Press next6. Click the configure button
7. In the configuration window click the radio button next to NetHASP and press Done8. Click next
9. Click “Yes” that you agree to the license agreement and then click Install10. Installation will begin. This may take up to 15 minutes.11. When the installation has completed press Exit.
Updating MasterCAM X7 for SolidWorks1. Now we need to check for updates for the MasterCAM program. Find and run MasterCAM’sCheck for Updates program and run it (under MasterCAM on the start menu)2. If there any updates click Install. This will start the downloading process and run the installationprogram.3. If the User Access Controls window pops up asking if you would like to run this program click Yes4. The program installation will begin. Click Yes to continue installation
5. Click Next. This will start the update installing.6. When the installation is complete click Finish7. Your MasterCAM X7 is now installed and updated.
To add the MasterCAM Solidworks Add-in for the first time1. Start the Solidworks program2. Click the Solidworks menu in the top left corner, click Tools and then click Add-Ins3. Check the two check boxes on either side of Mastercam X7 for Solidworks4. You will receive an error saying “No SIM found”.
5. To resolve this error, close Solidworks completely. Now open the install location for MasterCAMthat we used above (F:\Install\MasterCAM). Copy the nethasp.ini file.6. Now paste this nethasp file to your desktop. Next right-click this file and select “Cut”
7. Next navigate to the location where MasterCAM was installed on your computer: C:\ProgramFiles\McamforSWx7 and paste the nethasp.ini file in this folder.8. If asked if you want to replace the existing file click “Replace”.9. Click “Continue” if asked for Administrative permissions to move this file.
10. Now from the Start Menu run the NHasp X program located under the Mastercam X7 folder andunder the Utilities folder11. In the NHaspX program select the NetHASP radio button. Click OK to close this program.
12. Rerun Solidworks and Mastercam X7 will display a license agreement in a browser window. Justclose this window and click the green check box in the License Agreement window13. Now the Mastercam Add-In for SolidWorks should be successfully enabled and licensed. Youwill only be able to run SolidWorks with the MasterCAM add on while connected to the SDSM&Tcampus network (either on campus or via VPN).
Master CAM Add-In for SolidWorks Installation time: 30 minutes depending on network connection To Install the MasterCAM x7 Add-in for SolidWorks 1. MasterCAM x7 installation files are located here: F:\install\MasterCAM\MasterCAM x7 for SW 2. There are two folders. 'x64' is for 64-bit operating systems. 'x86' is for 32-bit operating systems.