Transcription
Basic AnswersWhat have I gotten myself into?Some basic questions and simple answers aboutSony Movie Studio 13 and how it worksWhat is non-linear editing (NLE)?Non-linear editing is basically another term for editing video on a computer.“Non-linear” is in contrast to linear editing – the way video and film used to beedited in the days of tape and film reels. In those days, if you wanted to takea scene from the beginning of a reel of film or tape and you wanted to cut itwith another at the end, you’d need to go through the entire reel to grab eachscene. That’s linear editing. In order to get from this piece to that piece, youhave to go through everything in between.In non-linear video, your scenes or clips appear in a catalog (the ProjectMedia window) and you just grab and mix them in any order you want. Amuch easier way to work, don’t you think?What’s the difference between Sony Movie Studio, Sony Movie StudioPlatinum and Vegas Pro?Well, in terms of the quality of the results, absolutely nothing. They all producethe same excellent quality of video outputs.The Pro version, however, includes a number of higher-end features (such assupport for XDCAMs and RED ONE camcorders).Sony Movie Studio Platinum’s bundle includes DVD Architect Studio DVD/BluRay authoring software, a slideshow creator tool and advanced colorcorrection tools that are not included with plain vanilla Sony Movie Studio.(Among the Studio line, the Movie Studio Platinum Suite is far and away thebest value.)Sony has a chart listing all of the major feature differences pe/compare1
Basic QuestionsCan I mix more than one type of video in my Movie Studio project?You certainly can – and the results are usually very good (particularly if you tweakyour Project Properties, as we recommend on page 257). However, you’ll alwaysget the best performance and the best results from the program when your projectsettings match your source video as closely as possible, as we discuss in Chapter 2,Start a New Project.What is an Event?Video and audio, while on your hard drive or in the Project Media window, arecalled media clips. Once they are added to your project’s timeline, they becomeevents. Timeline events can be split and trimmed, or they can be set up to interactwith other events on the timeline.Video editing in Movie Studio, by the way, is a non-destructive process. That meansthat nothing you do to the events on your timeline will have any effect on youroriginal video and audio clips. They will not be changed or damaged in any way.What is an Envelope?When you create an Envelope on your Movie Studio timeline, you create aworkspace in which certain audio and video levels can be set to vary over time. Youcan use envelopes, for instance, to vary the volume level at specific points on anaudio track or to lower the opacity level of a video track.We’ll show you how to use an envelope to control audio levels on your timelineat specific points in Chapter 9, Edit Audio on the Timeline. And we’ll show youhow to use envelopes to control video properties in Chapter 15, Vary Effects withKeyframes.What is keyframed animation?Like an envelope, a keyframed animation can be used to vary the levels or othercharacteristics of an effect or transition over time. A keyframed animation, forinstance, can be used to create a pan and zoom motion path in a slideshow orto create an effect or title that changes in intensity or shape over time. Usingkeyframes, you can create an animation in which a clip starts out normal, thenmorphs into a swirl – then goes back to normal again.Keyframing is one of the most powerful tools for creating effects and mixing audioin this program. Fortunately, Sony has designed the tools for making, creating andediting keyframes and animations very intuitive and easy to use.We’ll show you how to unleash the power of keyframing and animation inChapter 15, Vary Effects with Keyframes.What is an Instance?An Instance is, basically, an open Movie Studio project. By opening severalinstances of Sony Movie Studio at the same time, you can cut and paste events oreven entire sequences from one project to another. We’ll show you how to do thisin Chapter 7, More Timeline Tools.2Basic AnswersWhat’s the difference between the Sony Movie Studio Explorer window andthe Project Media window?The Movie Studio Explorer window shows you all of the media that is on yourcomputer’s hard drive. The Project Media window, on the other hand, lists only thevideo, audio clips or stills that you’ve actually added to your Movie Studio project.We’ll show you how to add media to your Project Media window in Chapter 3, GetMedia Into Your Project.What is a Media Bin?Media Bins are folders and sub-folders that you create in order to organize themedia clips in your Project Media window.Media Bins can be very helpful if your project includes dozens of media clips. Youcan, for instance, create one Media Bin folder for your titles, another for your audio,another for video clips shot at the Grand Canyon, etc. Media Bins make it easy foryour to manage and locate the media in your project.We’ll show you how to organize your clips with Media Bins in Chapter 4, Order andPrep Clips in the Project Media Window.What is the Trimmer?The Trimmer in Movie Studio 13 is hidden by default, but in Advanced mode itlaunches automatically whenever it’s needed. In the Trimmer, you can preview clipsthat are in the Explorer or Project Media window. You can also pre-trim your videoor audio clips before adding them to your timeline (isolating a small segment ofa longer clip, for instance) or save a pre-trimmed clip back to your Project Mediawindow as a sub-clip.We’ll show you how to use the tools in this window in Chapter 5, Prepare YourMedia in the Trimmer.What is the Loop Region?A Loop Region is a segment you define on your timeline. Isolating segments ofyour timeline as Loop Regions, you can define which portion of your movie will berendered and/or output. Using this feature, for instance, you can opt to output avideo of only a portion of a longer movie.We’ll show you how to set up and use a Loop Region in Chapter 6, Edit Video onthe Timeline and Chapter 7, More Timeline Tools.What are the Snapping and Quantize to Frame features?The Snapping feature controls how your media clips align when you place themon your timeline. When Snapping is enabled, any clips you add to or trim on yourtimeline will automatically “snap” to align themselves with the playhead, grid otherclips or the Timeline.3
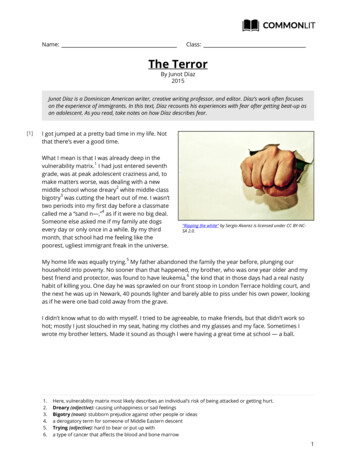
The Muvipix.com Guide to Sony Movie Studio Platinum 13Basic QuestionsGet to Know the WorkspaceCustomizing Your WorkspaceThe Quantize to Frames feature ensures that any trims that you make to thevideo or audio on your timeline are no smaller than a video frame. As withSnapping, it’s probably best to leave this feature toggled on except for specialsituations.Basic Editing MovesThe Snapping and Quantize to Frames options are turned on or off either on theToolbar that appears at the top of the program’s interface or under the Optionsmenu.What is Pre-Rendering and why should I do it?Pre-rendering means creating a fully-rendered preview of an event clip to whicheffects have been added. The program will then use the pre-rendered segment inplace of the effects-laden segment.This is as opposed to “soft rendering,” or letting your computer just play yourtimeline without rendering. If you’ve got a lot of clips on your timeline that havehad effects added to them, playing them without pre-rendering them can reallyburden your computer. Pre-rendering your timeline as you work allows theprogram to work more efficiently.Pre-rendering falls into the category of good housekeeping, and we highlyrecommend you do it whenever you’ve added visual effects, your system starts tolug or your timeline doesn’t play back at full speed.We discuss why and how to pre-render your timeline in much more detail inChapter 6, Edit Video on the Timeline.Where can I learn more about Sony Movie Studio 13?There are not a lot of online resources for Movie Studio and DVD Architect Studio.However, those that exist are very good.Most notably, Sony Creative Software (www.sonycreativesoftware.com/training)offers online tutorials as well as a helpful user-to-user forum.Chapter 1Get to know Sony Movie StudioPlatinum 13What’s what and what it doesAlthough the interface for Sony MovieStudio may seem a bit intimidating at first,you’ll likely feel very comfortable with it in avery short time.Sony has done a wonderful job of bothmimicking the look of a professional videoeditor and keeping the tools simple andeasy to access.Rob Strobbe also offers excellent help for DVD Architect and Vegas and MovieStudio users on his www.vegasvideohelp.com.And, of course, my site, Muvipix.com offers both an extremely helpful forumand an ever-growing number of helpful tutorials for both basic and advancedfunctions of a number of popular video editing and DVD authoring programs.You’ll likely find me there, day or night, helping out where I can and answeringquestions.Even if you’re not finding the program challenging, I hope you’ll drop by and sayhello! We love to see our videomaker community grow!Steve and the Muvipix team45
CHAPTER 1The Interface and Individual WindowsGet to Know Sony Movie Studio 13We’ll look at both of these interface modes and how to use each to put togetheryour movie in Chapter 6, Edit Video on the Timeline.The Project Media windowThe Project Media window, in the upper left of the interface, lists all of the media(video, audio, stills, etc.) that you’ve imported into your Sony Movie Studio project.Media can be added to your project in a number of ways, usually using the toolsalong the top of the window. You can: Capture video from a tape-based camcorder. When video is captured, it isstreamed into the project in real time, the video recorded to your computer’shard drive as it is added to the project’s media. Download video or stills from a hard drive or memory storage camcorder.When video is imported into your project using a tool like the Device Explorer,the video or other media files are simultaneously downloaded to yourcomputer’s hard drive and added to your Movie Studio project. Rip video or audio from a disc. This method saves the media from the DVD orCD to your hard drive while adding it to your project. Import media from your hard drive. In many cases, the video, still photos oraudio files are already on your computer. Importing adds these files to yourProject Media list.We’ll look into all of the methods of adding media to your project and when andhow to use each in Chapter 3, Get Media Into Your Project.The Sony Movie Studio 13 interfaceUnlike many consumer-based video editing programs available today, Sony Movie Studio looksand behaves like a full-blown professional editor. Its timeline looks and functions just like thatof a professional editing system, its windows and toolbars offer access to a wealth of high-levelfeatures and its interface is crowded with easily-accessible tools.In fact, once you’ve become familiar with what’s here and how it all works, you’ll likely find itrelatively easy to transition to a professional editor like Adobe’s Premiere Pro, Apple’s Final Cut or,of course, Sony’s Vegas Pro.If you feel a need to, of course.You may well find that this deep and affordable program is fully capable of doing everythingyou’ll ever need!Sony Movie Studio’s default workspace is designed to keep all of your tools within easy reach.Even its high-level tools are only a click or two away. Yet, as we’ll soon demonstrate, it’s also a veryeasily customizable workspace. And, once you have created a custom layout for your interface,you can even save that configuration and recall it whenever you’d like. In fact, you can save up tonine different interface configurations!New to version 13 is Simple Mode, a simplified interface with big, clear buttons for use in quicklyassembling simple movie projects and for working on a touch -screen monitor.The Platinum version of the program includes both Simple and Advanced modes.67
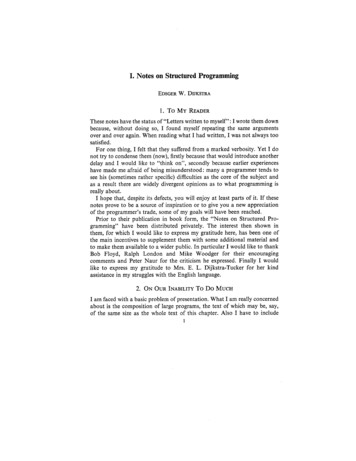
CHAPTER 1The Interface and Individual WindowsGet to Know Sony Movie Studio 13The Transitions windowAs illustrated at the bottom of the previous page, the Transitions window(which also shares the tabbed space with the Explorer and Project Mediawindows) lists 25 categories of Sony transitions (as well as third-partyplug-ins), each of which includes a number of individual transitions,bringing the total number of transitions included with the program to over230.Each of these transitions can be customized in a number of ways, so there’sreally no limit to the number of possible transitions you can create for yourmovie!We’ll tell you all about transitions and how to use them in Movie Studioproject in Chapter 13, Add and Customize Transitions.The Explorer windowSharing a tabbed space with the Project Media window, the Explorer is abrowse screen for locating media files on your computer’s hard drive.As we’ll show you in Chapter 3, video, stills, graphics and audio can beadded directly from the Explorer to your timeline. Doing this automaticallyadds these media clips to your Sony Movie Studio project and your ProjectMedia list.The Video FX windowSony Movie Studio Platinum comes loaded with over 300 preset videoeffects in over 50 categories. Like transitions, these effects can becustomized in a number of ways and can even be combined in a chain tocreate any number of possible special effects.The effects in the Video FX window are presets based on the Sony MovieStudio plug-in effects set – a set you can easily add to, if you’d like. Infact, if you have the Platinum version of the program, you’ll find someadditional effects from HitFilms among those listed.We’ll define each of these effects and show you how to use and customizethem in Chapter 12, Add and Adjust Video Effects.89
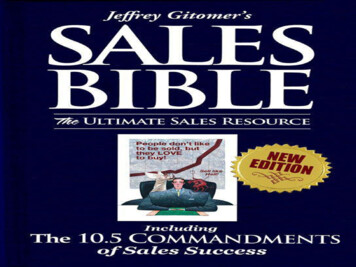
CHAPTER 1The Interface and Individual WindowsGet to Know Sony Movie Studio 13The Preview windowThe Preview window, illustrated to theright, displays the playback of the videoyou’ve assembled on your timeline.This window also includes a number ofimportant tools, and we’ll show you howthey all work in Chapter 10, PreviewWindow Tools.The TimelineThe Timeline, illustrated below, is the mainwork area for assembling your movie. It’swhere your media clips are arranged, wheremost of the effects are added and whereyour clips interact with each other.Media GeneratorsMedia Generators are pre-composed clips that you can add to yourtimeline as is or customize as needed. Among these are solid color clips,checkerboards and color test patterns as well as a number of title templates.We’ll show you how to use and modify clips from the Media Generator inChapter 3, Get Media Into Your Project. And, in Chapter 11, Add andCustomize Your Titles, we’ll show you how to use Media Generator titletemplates to create basic, scrolling or even animated titles.In Movie Studio Platinum 13, you can haveup to 20 video and 20 audio tracks on yourtimeline, and you can arrange them in anyorder you’d like.Since this workspace plays such a major role in the video editing process, no singlechapter could say everything there is to say about it. So, in Chapter 6, we’ll show youhow to Edit Video on the Timeline and, in Chapter 7, we’ll show you More TimelineTools. Then, in Chapter 9, we’ll show you how to Edit Audio on the Timeline.The TrimmerHidden by default but launched by selecting the option from the View/Window menu (and commonly positioned between the Project Mediawindow and the Previewwindow), the Trimmer is aworkspace in which you canprepare or pre-trim yourmedia clips prior to addingthem to your timeline. TheTrimmer includes its ownplayback window as well asits own mini-timeline andtool set.We’ll show you all of thegreat things you can do inthis workspace in Chapter 5,Prepare Your Media in theTrimmer Window.1011
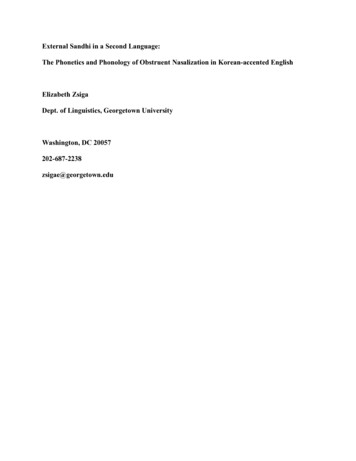
CHAPTER 1Additional “Pop-up” WindowsGet to Know Sony Movie Studio 13Additional “Pop-up” windowsIn addition to the windows that make up the basic interface, there areseveral windows that “pop up” as needed:The Plug-in ChooserThe Plug-in Chooser lists all of the video effects, audio effects andtransitions that have been loaded into your program. In fact, the effectslisted on the Video FX panel (page 9) are actually just presets of theprogram’s video effects plug-ins.Whenever you select the option to add a video effect, audio effect ortransition to a media clip, event, audio or video track or an entire project,the big Plug-in Chooser window will pop open. (There is one list of plugins for video effects, another for audio effects and another for transitions.)Once you select the effect to apply, the Plug-in Chooser will close and youwill have access to the Video FX or Audio FX dialog window (described onthe facing page) in which you can customize the effect.The Video FX dialog windowWhenever you add an effect to video clip, the Video FX dialog windowwill pop open. On this window, you can add or remove effects fromyour effects “chain,” customize the effect to your specific need or addkeyframed animation.You don’t need to close this window, by the way, once you’ve madeadjustments to an effect. Any adjustments you make are added to yourclip in “real time,” and the results immediately appear in the Previewwindow. In fact, if you’ve got room on your computer’s desktop, you canleave this window open and it will automatically update when you add anew effect or edit an effect added to another clip.We discuss this window in detail in Chapter 12, Add and Adjust VideoEffects.The Audio FX dialog windowThe Audio FX dialog window functions similarly to the Video FX window.We’ll show you how to add effects to your audio in Chapter 12, Add andAdjust Audio Effects.12We’ll tell you more about these effects and how to use them inChapter 12, Add and Adjust Video Effects and in Chapter 13, Add andAdjust Audio Effects.By the way, you can easily add more effects to your plug-in set. We showyou how on page 186.The Pan/Crop Motion dialog windowTo add some interest and movement to yourslidehows, you may want to pan and zoomaround your still photos a la Ken Burns. ThePan/Crop Motion dialog window is MovieStudio’s very intuitive interface for creatinganimated motion paths around your videoor stills.We’ll show you how to use this great tool forcreating pans, zooms and crops around yourclips in Chapter 8, Work With Photos.13
CHAPTER 1Customizing Your WorkspaceGet to Know Sony Movie Studio 13Customize your workspaceAlthough the default set-up for the interfacemakes fairly efficient use of your computerdesktop space, you can easily customize it(temporarily or permanently) so that you canfocus on a particular window or two.Resize the windowsTo resize the program’s windows, hover your mouse over the seamsbetween them. When you see a double-headed arrow resizer indicator(illustrated above), click and drag. As you drag one window larger, theother windows will resize to allow for it.Save and load a Window LayoutA very nice bonus feature in Sony Movie Studio is its ability to save yourvarious Window Layouts.Occasionally, for instance, you may need to rearrange the windows in theprogram’s interface in order to allow more space for the Timeline. Or youmay want to sometimes make the Preview window larger so that you cansee the detail in the playback.To save or recall a custom layout, just go to the View menu at the top of theinterface and select the option to save or recall a layout in the sub-menuWindow Layouts.Movie Studio 13 allows you to save up to ten different interfaceconfigurations in addition to the program’s Default Layout.Maximize/Minimize the windowsThe arrow buttons at the top left of each window are single-click ways totemporarily maximize or minimize a window’s size.Click on the arrow at the upper left of the Explorer window, for instance,it will snap to the full width of the program’s interface. Click again on thearrow and the window snaps back to its original size.Dock or undock the windows“ .” at the top or left side of any windowIf you click and drag on the (officially called the “gripper”), you can pull that window completely freefrom the interface so that it becomes a “floating” window. Once you’ve dragged the window free from the interface, you canplace it anywhere you’d like on your desktop. If you’re using a twomonitor system on your computer, you can undock any or all of theprogram’s windows and spread them out over your desktop. If you hold down the Ctrl key and drag a window into any of the “dropzones” in the program (areas of the interfaces in which windowsalready reside), when you release your mouse button the window willdrop right into this space – becoming a tabbed window set or a newwindow panel in the interface.1415
CHAPTER 1Basic Editing MovesGet to Know Sony Movie Studio 13Basic editing movesNo matter what you plan to do with your video and no matter howcreatively you plan to do it, the video editing process itself will still followthe same basic structure.Here’s a brief walk-through of the basic steps you’ll take for creating anyvideo project in Sony Movie Studio 13.2Gather your mediaThe assets, or media,you gather to create yourmovie can come from avariety of sources. Theseassets can include video,audio, music, photos andgraphics.As you gather, or import,your assets into yourproject, they will appear inthe Project Media window.There are three basic waysto get your media into yourproject, and which methodyou’ll use depends onwhere your media files arelocated. Tape-based digital video is captured into your project.MiniDV and HDV camcorders connect to your computer overa FireWire, or IEEE-1394 cable, connection. The camcorder’splayback is controlled by Movie Studio’s capture software, andthe video segments you choose to capture are streamed ontoyour computer and into your project in real time. Video, stills and other media are downloaded from hard drivecamcorders, cameras and other devices.1Start a projectYou can start a new project by selecting the option on theWelcome Screen or by selecting the option under the Projectmenu at the top of the program.A project should be set up to match, as closely as possible, thesource footage you’re using to build your movie. Movie Studio 13also includes the option to create “Match Media Settings” tool forautomatically setting your project properties to match the specsof the video you’ll be working with.In Chapter 2, Start a New Project, we’ll show you how toproperly set up a new project and ensure that its settings provideyou with the best performance and results possible.16Hard drive camcorders, including high-definition AVCHD unitsand those that record to flash memory cards, download theirvideo to your computer as whole files rather than stream itin. Media files can also be downloaded from other sources,including DVDs, digital still cameras and phones. MovieStudio includes a Device Explorer tool (available under View/Window) for locating and downloading media from hard drivecamcorders and other media storage devices. Media that is already on your computer is imported into yourproject.Video, stills, music and other media files that are already on yourcomputer are imported into your project and added to yourProject Media catalog.We’ll show you how to use each of these methods to bring video, audio andstills photos into your project in Chapter 3, Get Media Into Your Project.17
CHAPTER 1Basic Editing MovesGet to Know Sony Movie Studio 13The use of multiple tracks of video is key, for instance, tothe creation of many of the more advanced video effects,including the Chroma Keyer (see page 183).We’ll show you how to build a timeline and how to usemultiple tracks of video in Chapter 6, Edit Video on theTimeline, and in Chapter 7, More Timeline Tools.3Assemble your media clips on your timelineOnce you’ve imported your media clips into a project, they willappear listed in the Project Media window and you can beginthe process of assembling your movie. This process is as simple,and as intuitive, as dragging the clips from the Project Mediawindow to your timeline and then arranging them in the orderyou’d like them to appear.Once you add your files to your timeline, you’ll have a number ofoptions: Trim your clips. Trimming means removing footage fromeither the beginning or the end of a clip. To trim a clip, clickto select the clip on your timeline and then drag in either thebeginning or end (as discussed on page 78). Split your clips. Splitting means slicing through your clips sothat you can remove footage from the middle or delete onesliced-off segment completely. To split a clip, position theTimeline Cursor (playhead) over your clip(s) at the point atwhich you’d like the slice to occur and click the Split buttonbelow the timeline (as discussed on page 79). Place your clip on an upper video or audio track. On a multitrack timeline, your clips don’t just follow one another – theyalso interact with each other. Your video tracks behave likelayers of images. And how the clips are arranged on yourupper tracks (or if they include transparent areas) determineshow and how much of the clips on your lower tracks appeararound or through them.184Add and adjust effectsMovie Studio comes loaded with dozens of video and audioeffects. These effects can be added to a clip prior to adding it tothe timeline, to an event or group of events on your timeline, toan entire video or audio track at once or to your project overall.Once an effect has been added to your video or audio clip(s), adialog window will open in which you can customize the effect oruse keyframe to create an effect animation.We’ll show you how to work with effects in Chapter 12, Add andAdjust Video Effects, and Chapter 13, Add and Adjust AudioEffects.In addition to video and audio effects, Movie Studio includestools for creating motion paths – pans and zooms (or crop) overyour video or still photos. As with the other effects, you can usethe Pan/Crop Motion tool to either create a pan and crop overan individual event on your timeline or use it to create this visualeffect for an entire video track.We’ll show you how to work the Pan/Crop Motion tool inChapter 8, Work with Photos.19
CHAPTER 1Basic Editing MovesGet to Know Sony Movie Studio 13There is more than one way to create a title. And, once you havecreated it, you can customize it in a number of ways. As with othervideo events on your timeline, you can add effects, like fade ins andfade outs, animation and even motion paths, to your titles.We’ll show you how to do lots of great tricks with your titles inChapter 11, Add and Customize Your Titles.5Add and adjust transitionsTransitions are visual effects that take us from one timeline eventto another. Some are subtle and nearly invisible – others areshowy and draw attention to themselves.As with effects, once you add a transition to your timeline,a dialog window will open, allowing you to customize yourtransition in a number of ways.You might be surprised to learn how many different ways thereare to add and customize transitions – and we’ll show them toyou in Chapter 14, Add and Customize Transitions.6Add titlesTitles are text placed over your clips to provide additional visualinformation for your video story.7Output your movieOnce you’ve finished editing your Sony Movie Studio project, you’llfind lots of options for sharing it. From outputting your video forthe web to exporting your movie to a portable device to sendingyour project to DVD Architect Studio for production as a DVD orBluRay disc, Movie Studio 13 offers a wealth of options for makingyour movie.We’ll show you how to use these options and what the advantagesof each output format are in Chapter 17, Make Your Movie.And that’s basically it!You gather your assets; you assemble them on your timeline; you add effects,transitions and titles; you share it with the world. But between the linesof this simplicity are the countless variations that can elevate your movieproject from the realm of a basic home movie to something truly amazing!2021
offers online tutorials as well as a helpful user-to-user forum. Rob Strobbe also offers excellent help for DVD Architect and Vegas and Movie Studio users on his www.vegasvideohelp.com. And, of course, my site, Muvipix.com offers both an extremely helpful forum and an ever-growing number of helpf