Transcription
USER BULLETINCustom dye calibration for StepOne andStepOnePlus Real-Time PCR SystemsPublication Number MAN0014609Revision AThis user bulletin is for use with the StepOne and StepOnePlus Real-Time PCRSystems.For detailed instructions, refer to the StepOne and StepOnePlus Real-Time PCRSystems Installation, Networking, and Maintenance Guide (Pub. no. 4376782G).Custom dyes overviewThe StepOne and StepOnePlus Real-Time PCR Systems support the use of customdyes (not supplied by Thermo Fisher Scientific) that excite at 470 nm and emit withinthe spectral range of 505–637 nm. Do not use additional red dye with an emissionbetween 623 14 nm in combination with a master mix containing ROX .Custom dyecalibrationFor each custom dye, determine the optimal dye concentration. Use this concentrationfor preparing all subsequent custom dye calibration plates.Prepare a custom dye dilution plate.qRun the dilution plate as an experiment.qDetermine the optimal dye concentration.Custom dye dilution guidelinesPrepare a 2– or 3–fold dilution series for each custom dye. Dilute the dye concentrations to a range of 100–2000 nM. Dispense 10–20 µL per well for 96–well plates or 5 µL per well for 384–wellplates. Dilute the dye in nuclease–free water or in a buffer that is compatible with yourmaster mix. (Intercalating dyes only) Add the appropriate amount of amplified PCR product togenerate fluorescence.For Research Use Only. Not for use in diagnostic procedures.
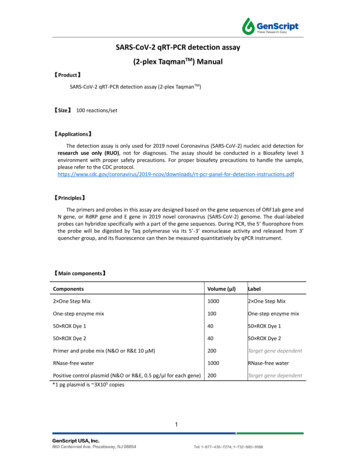
Calibrate custom dyesPrepare a custom dye dilution platePrepare a custom dye dilution plateIMPORTANT! Wear powder-free gloves throughout the procedure.1. Prepare a 2 or 3–fold dilution series of the custom dye.1600 nM800 nM1600 nM800 nM200 nM400 nM100 nM400 nM1600 nM200 nM800 nM400 nM200 nM100 nM100 nM2. Dispense aliquots of each dilution into the center of a reaction plate, then seal theplate.A full plate is not needed. See the figures below for suggested replicates.3. Vortex the plate for 5 seconds, then centrifuge for 2 minutes at 750 to 1000 g.2Custom dye calibration for StepOne and StepOnePlus Real-Time PCR Systems
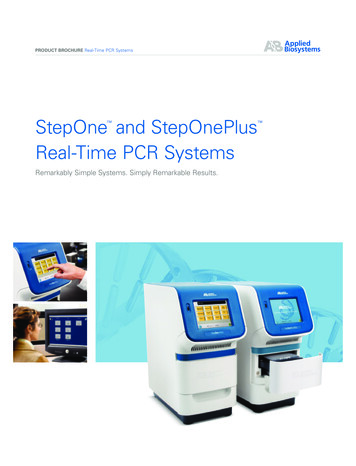
Calibrate custom dyesPrepare a custom dye dilution plate4. Confirm that the liquid in each well is at the bottom of the well and free ofbubbles. If it is not, centrifuge the plate again.GR13043700well 2GR13033700well 1GR13053700well 3IMPORTANT! Keep the bottom of the plate clean. Fluids and other contaminantson the bottom of the plate can contaminate the sample block and cause anabnormally high background signal.Custom dye calibration for StepOne and StepOnePlus Real-Time PCR Systems3
Calibrate custom dyesRun the dilution plate as an experimentRun the dilution plate as an experiment1. Load the plate into the instrument.2. Access Advanced Setup from the home screen of the desktop software in one oftwo ways. Click Advanced Setup.Note: If this option is not visible, click the down arrow under Design Wizardto expand the Set Up options. In the toolbar across the top, use the New Experiment drop-down list toselect Advanced Setup.3. Enter the experiment properties.a. In the Setup panel, click Experiment Properties.b. Enter an experiment name.c. Select the instrument you will use.4Custom dye calibration for StepOne and StepOnePlus Real-Time PCR Systems
Calibrate custom dyesDetermine the optimal dye concentrationd. Select the Genotyping experiment type.e. Select Other as the reagents used to detect the target sequence.f. Select the Standard ramp speed.g. Scroll to the bottom of the page and de-select inclusion of Pre-PCR Readand Amplification.Only a Post-PCR Read is needed.4. Configure the plate setup.a. In the Setup panel, clickPlate Setup.b. In the Assign Sample to the Selected Wells table, enter the dye concentrationas the sample name.c. Assign a placeholder SNP assay to each well containing a sample.d. Select None as the passive reference.5. Configure the method.a. In the Setup panel, clickRun Method.b. Set the Post-PCR Read hold to 60 C for 2 minutes.c. Enter the appropriate reaction volume.6. Click Save.7. Click Start Run.8. Download the experiment results.9. Unload the plate from the instrument.CAUTION! PHYSICAL INJURY HAZARD. During instrument operation,the plate temperature can reach 100 C. Allow it to cool to roomtemperature before handling.Determine the optimal dye concentrationWhen the run is complete, review the dye signal data.1. In the Analysis tab of the software, select Raw Data Plot.This plot displays the raw fluorescence signal of each dye, for individual wellsover the duration of the PCR run.2. For each replicate population of dilutions, select the wells in the View PlateLayout tab to view in the plot.Custom dye calibration for StepOne and StepOnePlus Real-Time PCR Systems5
Calibrate custom dyesLimited product warranty3. Identify the well(s) yielding signals in the acceptable range of 250,000–1,000,000.4. Select the lowest concentration that falls within the acceptable signal range as theoptimal dye concentration.Limited product warrantyLife Technologies Corporation and/or its affiliate(s) warrant their products as set forthin the Life Technologies' General Terms and Conditions of Sale found on LifeTechnologies' website at onditions.html. If you have any questions, please contact LifeTechnologies at www.thermofisher.com/support.6Custom dye calibration for StepOne and StepOnePlus Real-Time PCR Systems
The information in this guide is subject to change without notice.DISCLAIMERTO THE EXTENT ALLOWED BY LAW, LIFE TECHNOLOGIES AND/OR ITS AFFILIATE(S) WILL NOT BE LIABLE FOR SPECIAL, INCIDENTAL, INDIRECT, PUNITIVE,MULTIPLE, OR CONSEQUENTIAL DAMAGES IN CONNECTION WITH OR ARISING FROM THIS DOCUMENT, INCLUDING YOUR USE OF IT.Important Licensing InformationThese products may be covered by one or more Limited Use Label Licenses. By use of these products, you accept the terms and conditions of all applicable LimitedUse Label Licenses.TRADEMARKSAll trademarks are the property of Thermo Fisher Scientific and its subsidiaries unless otherwise specified. 2015 Thermo Fisher Scientific Inc. All rights reserved.For support visit thermofisher.com/support or email techsupport@lifetech.comthermofisher.com7 October 2015
StepOnePlus Real-Time PCR Systems Publication Number MAN0014609 Revision A This user bulletin is for use with the StepOne and StepOnePlus Real-Time PCR Systems. For detailed instructions, refer to the StepOne and StepOnePlus Real-Time PCR Systems Installation, Networking, and Maintenance Guide (Pub. no. 4376782G). Custom dyes .