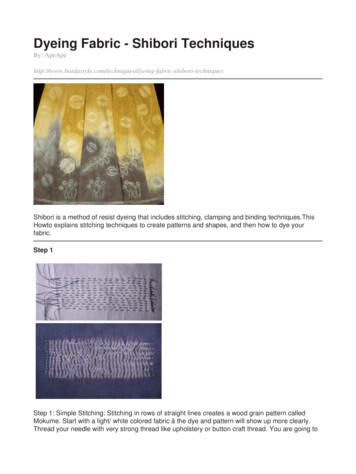
Transcription
Tie-and-DyeThe African, Indian, and Japanese words, adire, bandhana, and shibori, meaning to tie and dye, havebeen used for centuries. The words describe a method of fabric design that is called tie dyeing.In this process, parts of a piece of fabric are pulled into tufts which are bound with string orelastic bands. The material is then saturated with dye. Where the fabric is bound, it resists thedye; elsewhere, dye is absorbed.Materials and EquipmentFabricSuitable fabrics include cotton, burlap, silk, some rayon, linen and wool.Synthetic fabrics (nylon, ployester, acrylics) will not take a dye, so cannot be used.Permanent press finish on cottons will not allow dye to penetrate so choose untreatedcottons. Dye intensity is determined partly by the tightness of the twist of yarns in the fabric. Forexample, burlap with its loosely twisted yarns dyes much more brilliantly than tightly twistedbroadcloth. Wash the fabric first to remove sizing. If left in, the sizing or starch will prevent the dye fromattaching to the fabric. Bindings String, twine, cord, thread, and elastic bands can be used as binders.The finer the cord, the more lacy and delicate lines are produced.Dyes Household dyes are satisfactory. They must be mixed stronger than the directions say.Generally for bril1iant colors use one package dye to four cups boiling water and add oneteaspoon salt to help make material colorfast. Keep dye hot but not boiling.Newspapers (to protect the floor or work surface)Rubber glovesWear old clothes, an old apron., or large garbage bag to protect clothes.Rags (for cleaning up)4‐H Manitoba 2015
MethodsGeneral NotesBindings must be wrapped and tied TIGHTLY to get good color variations.For consistent results the fabric should be damp when it is tied and when it is dyed.Fabric may be rinsed under cold water after dyeing. This gives a more hazy effect thanunrinsed work. When dyeing with two or more colors, fabric may be dyed one color, then dried, then dyedthe other color or may be dipped in one color immediately after the other. The latter methodgives softer edges and a more evenly mixed color when the two colors overlap. Recycling Note: Save the binding strings after dyeing and use them for gift wrap ribbons or formaking a yarn geometry picture. When dyeing several colors, dip just the part where you want each color to be - not thewhole thing. (se diagram to left). Dipping into Dye: A quick dip into the dyebath means the dye has less time to penetrate andyou get bigger white and light areas. A longer time in the dye (3 or 4 minutes) allows dye topenetrate more so you get more dark areas and less white and light areas. Lines fromcrisscross bindings are less noticeable in a longer dip than in a quick dunk. Dip small areas intothe dye at one time or the background color will be splotchy from overcrowding.Applying BindingsFor solid wide bands, wrap string around fabric several times.For a single thin line, wrap string around once or twice.For a lacey "spiderwebby" effect t wrap string up the fabric and backdown again in a crisscross manner. To make sure no dye will penetrate in one area of binding, paintband of binding with thick flour and water paste. Leave some areas free from binding. Binding MethodsSpot Technique Plan carefully where they are to go because the spotsaren't too exciting.Pick up tiny piece of fabric with needle.Wrap sewing thread around directly below needle.Tie tight.Remove needle.Dip in dye.Remove thread.2themselves
Circle Technique Pick up centre of circle and smooth folds formed from it.Bind, dye, untie, dry.Radius of the circle is determined by the distance from the point to thebottom of the bindings.Square TechniqueFold fabric lengthwise throughcentre. Fold crosswise. Bind, dye, untie, dry. Pleated Oval:Fold fabric in half along centre line of oval.Using cardboard pattern of half an oval, trace outline on fabric.With fingers, pleat both thicknesses together along this line,forming a fan shape. Bind, tie, untie, dry. Marbling Makes a beautifully hazy background for other media such as stitcheryand block printing.Squash fabric up into a ball.Bind in all directions until it is fairly hard.Dip in dye, remove, untie, dry.For second and/or third color, repeat bunching and binding, trying toget cloth not already colored close to the surface.Lines of StripesTo make irz'egu1ar stripes, randomly (not carefully) pleat or fold fabriclenthwise, crosswise, or diagonally. Bind, dye, untie, dry. RuchingFold fabric along centre of stripe.Place a line of machine stitching below fold, forming a casing.only large enough to slip a ruler or piece of wood through. Slip casing over wood and gather all the fabric up at one end ofthe stick. Bind and dye. Remove binding and machine stitching (and the ruler!). Little Boxes Accuracy in folding is most important.Fold fabric once in direction of stripe.Accordion pleat at right angles to the first fold.Pleat in opposite direction to pleats just made.Bind and dye.Open unbound ends during dyeing to let dye reach inner folds.3
k) Lattice Accordion pleat in one direction.Bind at even spaces, and dye; untie and dry.Accordion pleat in opposite direction.Bind in the same way, dye, untie, dry.Beauty of this method is its accuracy.l) KnottingUse fine fabric for these. Burlap and other heavy fabricswon't tie well. Roll or fold up fabric into a string, then tie it into knots anddye. An alternate method is to tie a thick rope into knots androll or fold cloth around it. Bind to the rope and dye. m) Rope Technique Fabric may be rolled, twisted, or bunched into a rope.Add bindings, dye, untie, let dry.n) TritukBegin with a design of simple lines.Use strong sewing thread and make a big knot in the end.Follow the outline with small running stitches. Gather the fabric verytightly on these threads and secure with a big knot. Dip quickly in and out of dye. Remove threads, dry. o) OverstitchingFold fabric where design is to be.Taking deep stitches into the fabric, sew over top ofthe folds. Draw thread so tightly that it straightens out and thefold coils around it. Dip in dye; remove thread, let dry. Dyeing To prepare the dye bath, calculate how big a pot you need to accommodate the fabric – bigenough so that the material is not crowded.Fill the pot with hot water; then add the dye mixing according to instructions on the dyepacket.Follow the instructions on the packet or tin of dye that you have bought. Readthis carefully before you do this activity because some dyes need salt and somecold fix. And make sure that you have enough time to do this - some dyes requirethings to be soaked for 3 hours, some for only 1/2 an hour.After the fabric has soaked for the required time, remove it from the pot. Without removingbands, etc., rinse the fabric under cool running water until all excess dye has been washedaway. When the water runs clear, remove the resist materials and rinse the fabric once more,again until the water runs clear.Hang up to dry but keep out of direct sunlight. Put plastic on the floor under it to avoidstains. Hand launder tie-dyed garments several times, or machine wash them separately incool water, before you wash them with other clothes.4
IV. EvaluationIs it made correctly into something that doesn't have to be washed?Is the color combination pleasing, without some areas standing too far out from the others?(This could happen if one color was too dark.) Is the fabric used in a way whereby the design shows off to advantage? (eg: a round article fora large circle; a rectangle for stripes, etc) Is there a good variation in value and intensity in each color? (eg: very dark areas, mediumareas, and white areas) Is the pattern fairly definite? (wishy-washy patterns are caused by not binding tightly enough) Project Resources:Pinterest – The Visual Discovery ToolPinterest is a social media bulletin board for you to virtually pin pictures of thingsthat interest you to your own personal boards – Pin-Explore-Discover! 4-HManitoba has a Pinterest account. Each project series has a board full of fun andinteresting ideas. There are also boards for 4-H Awesome, Community Service,Volunteers, Communications and Building Blocks. Check it out atwww.pinterest.com/4hmanitoba/.Sections of the Tie-and-Dye Fact Sheets were adapted with the permission ofMAFRD from the publications Creative Craft Techniques - Manitoba Department ofAgriculture and the Manitoba 4-H Project: Crafts Around the World - 2004.Manitoba 4-H Contact Information1129 Queens Avenue Brandon, MB R7A 1L9Ph: (204) 726-6613 Fax: (204) hwww.4h.mb.ca5
The words describe a method of fabric design that is called tie dyeing. In this process, parts of a piece of fabric are pulled into tufts which are bound with string or elastic bands. The material is then saturated with dye. Where the fabric is bound, it resists the dye; elsewhere, dye is

![BCA160 Macrame [2015] - NDSU](/img/19/bca160.jpg)