Transcription
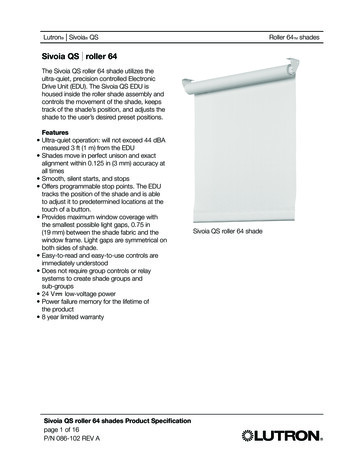
Roller ShadesMOTORIZED SHADESimplicity with rechargeable motorInstallation & Care Instructions152709 C4/26/2017
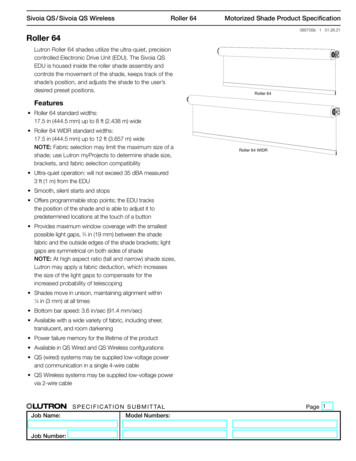
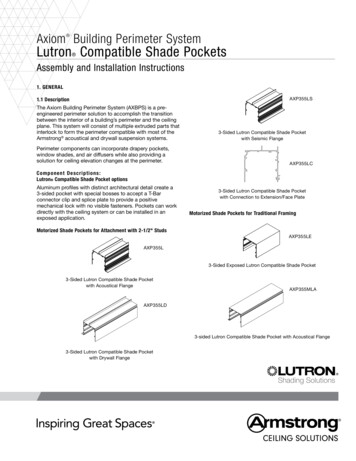
GETTING STARTEDIMPORTANT: The remote control has not been linked to the shades.Install all shades prior to linking the remote.A few simple tools are required:- Measuring tape- Power drill, drill bits- 1 4” Hex head and/or Phillips driver bit- PencilAdditional fasteners other than thosesent with your shade may be requireddepending on the mounting surface.Wallboard and plaster require theuse of anchors such as expansionor toggle bolts. Brick, tile or stoneneed special plugs and drill bits.Remember to always pre-drill holesin wood to avoid splitting.PN: CS5402MountingBracketPN: CS5002(W or BLK)CS5008 (W or BLK)CS5529CS5530Depends on size ofPN: 20201012shadeMountingBrackets forShades withouthead railPN: CS1000PN: CS2000PN: CS5199PN: CS11011 1 4”Head railSpacerHoldHex HeadExtensionBlockDownBracket and Sidemount (optional) BracketScrewBracket(optional)(optional)ChargerSTEP 1: BRACKET INSTALLATIONSHADES WITH HEAD RAILShades are shipped with the required number of bracketsfor proper installation. End brackets should be locatedapproximately 3” from either end. Depending on the width ofthe shade, additional brackets may be necessary, evenly spacedbetween the two end brackets.Shade Width# of BracketsUp to 40”2 40” - 72”3 72”- 84”4 84” and up5Using the installation bracket as a template, measure to theedge of the bracket and mark the hole locations with a pencilfor drilling.Brackets must be in line and level. Shim brackets on insidemounts if necessary. The head rail must be level for the shadeto operate properly.3”13”
INSIDE MOUNTThe minimum mounting depth for an inside mount is 1”.A minimum of 3 3 4” is needed to fully recess the shade.1”Make sure the brackets are level and aligned.Attach using two screws.Inside MountShallow Mount - Minimum 1” surfaceFlush Mount - Minimum 3 3 4” surfaceOUTSIDE MOUNTThe minimum mounting height for outside mounted shades is1”.1”Make sure the brackets are level and aligned.Attach using two screws.Outside MountMinimum 1” surfaceSPACER BLOCKS (OPTIONAL)Each spacer block projects brackets 3 8” away from mountingsurface.Make sure the brackets are level and aligned.Outside Mount with Spacer BlocksAttach using two screws. Screws should be long enough tosecure the bracket to the mounting surface.EXTENSION BRACKETS (OPTIONAL)Optional extension brackets are used to project the back of theshade up to 2 1 2” from the mounting surface.Attach the mounting bracket to the extension bracket with thenut and bolt provided.2”2 1 2”Outside Mount with Extension BracketsMinimum 2” surfaceSIDE MOUNT (OPTIONAL)Measure from window sill up to desired mounting position oneach side of the window frame. Mark position.Mount side mount brackets on each side of window frame asshown. Make sure to confirm the head rail will sit perfectlylevel.2”Side MountMinimum 2” surfaceOnce side mount brackets are installed and properlypositioned, attach the mounting brackets using the nuts andbolts provided.2
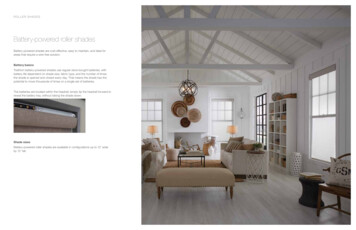
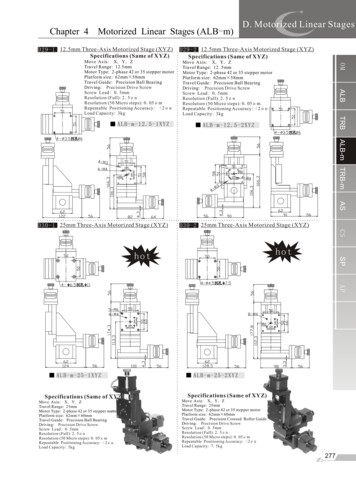
SHADES WITH NO HEAD RAILThe installation brackets are always mounted so that theinner surfaces face each other.Idler Side Bracket Motor Side bracketT-HookBrackets must be in line and level. Shim brackets on insidemounts if necessary. The head rail must be level for the shadeto operate properly.Foot1 1 2”1 1 2”Inside MountMinimum 1 1 2” surfaceOutside MountMinimum 1 1 2” surfaceSTEP 2: SHADE INSTALLATIONSHADES WITH HEAD RAILCenter the shade in the window opening andpush the head rail into the mounting brackets asshown.Push the rail back until itis fully engagedSHADES WITH NO HEAD RAILOnce the brackets are secured and level, the fabric roll can beinserted. Make sure your hands are clean to avoid soiling thefabric.Insert the foot of the motor-side bracket into the slotted centerhole of the motor end of the fabric roll. The wire should bepositioned so that it goes up on an inside mount or back onan outside mount. This will provide easy access to the settingbutton.Set the post of the idler end into the V of the support bracket.Rotate the T-hook on the support bracket to lock in the postand secure the fabric roll.3SupportBracketNubV slotIdler PostFig.15
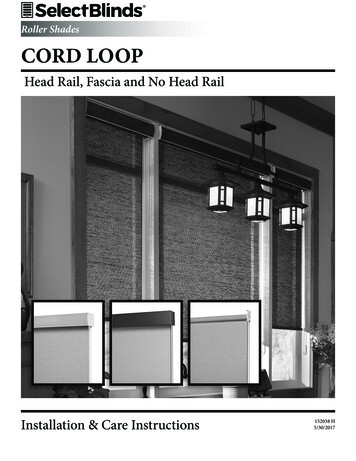
STEP 3: LINK REMOTEThe remote control has multiple channels. Beforelinking the remote, determine which shade(s) you wanton which channel. The standard remote has 5 channels,the remote with timer has 6 channels. All shades linkedto a remote will also automatically be programmed tothe “ALL” channel.PRemove plastic film from the front of the remote.Setting(red button)If battery is not already installed in the remote follow theinstructions on page 12.Setting(red button)If using a timer remote, Turn the remote on using thepower button on the right side of the remote. Then,tap the clock button until you see “MANUAL” in thedisplay.1. Press the SETTING button on the motor until theshade jogs once. Release the button immediately afterthe first jog - this should not be more than 3 seconds.2. Repeat this step for all shades that will becontrolled by the same channel.1235ChannelDisplayUpStop/FavoriteDown3. Select the channel that you want to program using the CHANNEL selector button.CChannel 4. Press and hold the CONFIRM buttonuntil the shade(s) jogs once. The shade isnow linked to the remote.5. Repeat steps 1-4 to program the rest ofthe channels.4LConfirmChannel -LimitStandard Remote (front)Standard Remote UAL06:42UpCHChannelClockConfirm LimitTimer Remote4
OPERATIONSTANDARD REMOTE1Select the desired channel with the CHANNEL buttons. The channelindicator light will illuminate the channel that is on. If all 5 lights are lit,the remote will control all 5 channels at once.2345ChannelDisplayUpStop/FavoriteDownTapping the UP or DOWN buttons for less than 2 seconds will movethe shade in short steps. Holding the UP or DOWN buttons down formore than 2 seconds before releasing will operate the shade in the fasterstandard speed.Channel Channel -Press the UP or DOWN buttons to raise or lower the shade.Press the STOP button to stop the shade anywhere along the travel.Standard Remote (front)DisplayScreenTIMER REMOTEShades can be manually operated while in manual mode. Tap the clockbutton until you see “MANUAL” in the display.UpSelect the desired channel with the CHANNEL buttons. The channelwill show in the display screen. If all 6 channel numbers are shown, theremote will control all 6 channels at once.Press the UP or DOWN buttons to raise or lower the shade.Press the STOP button to stop the shade anywhere along the travel.Note: The timer remote does not have fine adjustment CHChannelClockConfirm LimitTimer RemoteMANUAL00:00Timer Remote Display Screen5
ADJUST MOTOR LIMITS (IF DESIRED)If using a timer remote, tap the clock button untilyou see “MANUAL” in the display.12345ChannelDisplayThe lower and upper limits have been set at the factory.If you need to make adjustments to the limits, followthe instructions below.UpStop/FavoriteDownPlease Note: When clearing the factory set limits, boththe upper and lower limits will need to be reset.Channel Channel -Use the CHANNEL buttons to select the channel forthe shade that needs to be adjusted. Then follow thedirections below.CConfirmLimitStandard Remote (front)When adjusting one shade, the other shades on thatchannel need to be temporarily unlinked from theremote.LStandard Remote UAL06:42UpTo unlink a shade, press and hold the red SETTINGbutton on the motor until it completes one jog - jog/jog cycle and then release the SETTING button.Repeat for all other shades on that channel.CHChannelClockFollow the limit setting instructions below and thenrelink “turned off ” shades by following the steps insection 3 LINK REMOTE found on page 4.Confirm LimitTimer RemoteLOWER LIMITHold the LIMIT button until the shade stops jogging.Use the DOWN button to lower the shade. Press stop when the shade is near the desired lower limit.Use the UP and DOWN buttons to adjust the length more accurately.Hold the CONFIRM button until the shade jogs. This locks in the lower limit.UPPER LIMITUse the UP button to raise the shade. Press stop when the shade is near the desired upper limit.Use the UP and DOWN buttons to adjust the upper limit more accurately.Hold the CONFIRM button until the shade jogs. This locks in the upper limit.Note: If you also desire to set a favorite position you should do so prior to relinking other shades on that channel. See thenext page for setting favorites.6
FAVORITE POSITIONWhen adding a favorite position to one shade, the othershades on that channel need to be temporarily unlinkedfrom the remote.PTo unlink a shade, press and hold the SETTINGbutton until it completes one jog - jog/jog cycle andthen release the SETTING button. Repeat for all othershades on that channel.Setting(red button)Setting(red button)SETTING A FAVORITE POSITIONUse the UP or DOWN buttons to position the shadeat the desired “favorite” position. While holding theLIMIT button, quickly press and hold the UP button.Release both buttons when the shade jogs.12345ChannelDisplayUpStop/FavoriteDownWhen complete, relink “turned off ” shades by followingthe steps in section 3 LINK REMOTE found on page 4.Channel Channel -USING A FAVORITE POSITIONWith the shade at either the upper or lower limit,simply press the STOP/FAVORITE button to bring theshade to the “favorite” position. To go to the “favorite”position from any other location, make sure the shadehas been stopped for at least three seconds beforepressing the STOP/FAVORITE button.Standard Remote (front)DisplayScreenCConfirmLimitStandard Remote NGING A FAVORITE POSITIONUnlink all other shades on the same channel beforechanging/erasing the favorite position.LCHChannelClockUse the UP or DOWN buttons to position the shadeat the desired “favorite” position. While holding theLIMIT button, quickly press and hold the UP button.Release both buttons when the shade jogs.Confirm LimitTimer RemoteTo erase a “favorite” position, bring the shade tothe upper limit. Press and hold the LIMIT buttonon the back of the remote, then press and hold the UPbutton. Release both buttons when the shade jogs.7
ADVANCED PROGRAMMINGREPLACE ORIGINAL REMOTE, ADDADDITIONAL REMOTE OR ADD SHADE TO ANADDITIONAL CHANNEL1. Press the SETTING button on the motor until theshade jogs once. Release the button immediately afterthe first jog - this should not be more than 3 seconds.PSetting(red button)2. Repeat this step for all shades that will be controlledby a single channel.Setting(red button)3. Select the channel that you want to program using theCHANNEL selector button.4. Press and hold the CONFIRM button until theshade(s) jogs once.12345ChannelDisplayUpStop/FavoriteDown5. Repeat steps 1-4 to program the rest of the channelson a multi-channel remote.Channel Channel -REMOVE A SHADE FROM A REMOTE ORCHANNEL AND LINK IT TO A DIFFERENTREMOTE OR CHANNELStandard Remote (front)CLConfirmLimitStandard Remote (back)1. Press and hold the SETTING until it completes onejog - jog/jog cycle.DisplayScreen2. Release the “Setting” button. The original remote orchannels have been Link the motor to the new remote or channel1. Follow the steps for replacing the remote above.CHChannelClockConfirm LimitTimer Remote8
PROGRAMMING TIMER REMOTESETTING CLOCKUse the power button to turn on the remote.DisplayScreenTap the CLOCK button until you see “MANUAL” in the ush and hold the LIMIT button. While holding the LIMIT button, pushthe CLOCK button for 3 seconds and release. The hour digits will flash.CHChannelClockUse the UP and DOWN buttons to set the current hour. NOTE: Time is in24 hour format (military time). For example: 1:00 PM will be displayed as13:00.Confirm LimitPress CHANNEL button to confirm hour and advance to minutes.Timer RemoteUse the UP and DOWN buttons to set the current minute.Press CHANNEL button to confirm minute and advance to day.Use the UP and DOWN buttons to set the current day.Hold the CLOCK button for 3 seconds. Display will flash and then displaythe current time and day.SETTING TIMER SCHEDULESThe timer remote allows up to 18 different timer schedules. Eachtimer schedule can be set for multiple channels and days, but onlyone function can happen at each time.Use the power button to turn on the remote.Tap the CLOCK button until you see “AUTO” in the display.While holding the LIMIT button, push the CLOCK button for3 seconds and release. The time will flash, then display “NO 1”and the flash “FF:FF”. If you want to set a different timer schedulepress CLOCK for 1 second to scroll through the schedules (NO 1,NO 2, NO 3 etc.). Unprogrammed schedules will display FF:FF.Press STOP button and the channel number display along thebottom of the screen will flash.Use the STOP button to select the channel and move on to thenext one. Use the UP arrow to skip a channel and the DOWNarrow to back up. You must press STOP for each channel thatyou want to select. If the channel is still flashing, it has not beenselected.Press CHANNEL button to confirm channels and advance to dayselection.9STOP SelectCH ConfirmAutoFF:FF1Channel
Use the STOP button to select the day and move on to the nextone. Use the UP arrow to skip a channel and the DOWN arrowto back up. You must press STOP for each day that you want toselect. If the day is still flashing, it has not been selected.Press CHANNEL button to confirm days and advance to hourselection.Use the UP and DOWN buttons to set the hour. NOTE: Time isin 24 hour format (military time). For example: 1:00 PM will bedisplayed as 13:00.Press STOP button to confirm hour and advance to minutes.STOP SelectCH ConfirmMOAutoFF:FF1Day SelectMOAutoFF:FFSTOP1 ConfirmHourUse the UP and DOWN buttons to set the minutes.Press STOP button to confirm minutes and advance to shadeoperation.Shade operation symbols are to the right of the time. Use theUP and DOWN buttons to select the operation. pwill raisethe shade, qwill lower the shade, pwill bring the shade to theqfavorite position. SelectMOAuto06:FFSTOP1 ConfirmMinutePress STOP button to confirm operation. SelectMOPush the CLOCK button for 3 seconds and release. The displaywill flash to confirm settings are saved and advance to the nextschedule. Repeat the steps above for each desired schedule.06:00When finished turn the power off to exit the set up mode.OperationAuto1STOP ConfirmIMPORTANT NOTES Remote must be in “AUTO” mode for the set schedules to operate. To return to “MANUAL” mode, tap the CLOCKbutton. When remote is in Auto mode, the display will alternate between the current time/day and the time/day/channel forthe next upcoming schedule. To disable a schedule, simply reset the scheduled time to FF:FF.SAMPLE SCHEDULENO 1: CH1 & CH2, MO TU WE TH FR, 6:00, pNO 2: CH1 & CH2, MO TU WE TH FR, 21:00, qNO 3: CH1 & CH2, SA SU, 9:00, pNO 4: CH1 & CH2, SA SU, 22:00, qpNO 5: CH3, MO TU WE TH FR SA SU, 10:00, qNO 6: CH3, MO TU WE TH FR SA SU, 21:00, q10
SKEW ADJUSTMENT (IF NECESSARY)If the shade does not raise evenly, first make sure the mountingbrackets are mounted level with each other.If the shade is level and it still skews, roll the shade all the waydown. Prepare a strip of masking tape approximately 5” long.On the side of the shade opposite of the skewing direction, andas close to the end of the roller as possible, apply the tape withthe sticky side facing the fabric. The tape should be placed onthe back of the roller, out of sight.Roll the shade up and check for skewing. If the shade is stillskewing, add another strip of tape on top of the first one. If theshade is now skewing in the opposite direction, tear off about1” of tape from the last strip installed.HOLD DOWN BRACKETS (OPTIONAL)Optional hold down brackets are mounted with the suppliedscrews.With the shade at its proper drop, place the pin of each holddown into the hole in each end cap and mark the screw holes.Make sure the pins are level and aligned.Raise the shade, then screw the hold down bracket into themounting surface.11Place tape at this end
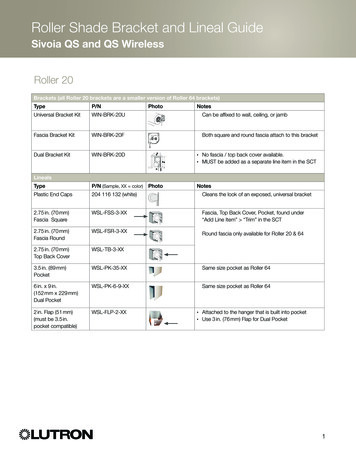
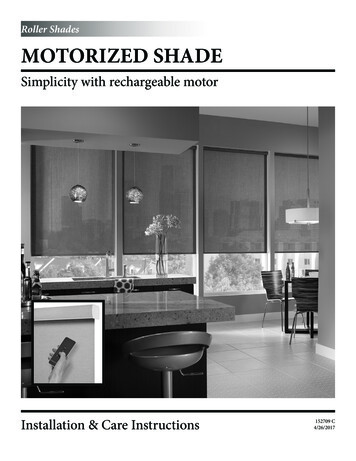
CHARGING THE MOTORWhen the shade begins to operate slower than normal it is timeto charge the motor.Plug the 8.4v charger into the port on the motor.Plug the charger into an electrical outlet.To fully charge the batteries, allow the batteries to charge for atleast 1 hour after the light on the charger turns green.A typical charge cycle can take between 4-6 hours.PA red light on the charger indicates that the motor is charging.ChargingPortSetting(red button)Charging SettingPort(red button)REPLACING THE BATTERY IN THE REMOTESTANDARD REMOTERemove the battery tray from the remote by inserting afingernail into the indentation on the back of the remote. Toavoid the battery falling out of the remote, remove the traywhile the remote is face up.Insert fingernail hereInsert the new battery (CR2430 lithium) into the battery trayso that the writing is facing up (positive up) when the remote isface up. Slide the tray back into the remote.TIMER REMOTESlide the back of the remote down and then lift off the backcover.LITHIUM BATTERYCR2430 3VStandard RemoteOPENCR2450Insert the new battery (CR2450 lithium) into the battery compartment so that the writing is facing up (positive up) when theremote is face down.Replace the back cover on the remote.Timer Remote12
SHADE REMOVALIf you need to remove your shade, follow the instructionsbelow.Partially lower the shade and insert a flat head screwdriver asshown.Twist the screwdriver until the head rail disengages from thebracket.As you release the brackets, support the head rail to keep itfrom falling.CLEANING AND CAREThe shade fabric is easy to care for. Regular dusting with a feather duster or vacuum cleaner brush is recommended. Moststains can be blotted with a damp sponge and mild detergent. Before using anything stronger than mild detergent andlukewarm water, test an unobtrusive corner of the shade. If you have any questions, call your dealer for advice.TROUBLE SHOOTINGPROBLEMThe motor does not work or runs slowSOLUTIONRecharge motorThe motor continues to run in one directionThe indicator light on the remote does not shine or theremote-controlling range becomes shorterThe limit setting was unsuccessful and needs to be resetReplace the battery in the remote (CR2430 for standardremote, CR2450 for timer remote)13
shades on that channel need to be temporarily unlinked from the remote. To unlink a shade, press and hold the SETTING button until it completes one jog - jog/jog cycle and then release the SETTING button. Repeat for all other shades on that channel. CH 06:42 MANUAL Power Up Button Stop/Favorite Down Channel Clock Confirm Limit Timer Remote .