Transcription
User’s GuideDell S2419H/S2419HN/S2419NX/S2719H/S2719HN/S2719NXModel No.: atory model: S2419Hc/S2419Nc/S2719Hc/S2719Nc
Notes, cautions, and warningsNOTE: A NOTE indicates important information that helps you make betteruse of your computer.CAUTION: A CAUTION indicates potential damage to hardware or loss ofdata if instructions are not followed.WARNING: A WARNING indicates a potential for property damage, personalinjury or death.Copyright 2018–2019 Dell Inc. or its subsidiaries. All rights reserved. Dell, EMC, andother trademarks are trademarks of Dell Inc. or its subsidiaries. Other trademarks may betrademarks of their respective owners.2019 - 8Rev. A02
Contents.About your monitor. 5Package contents. 5Product features.6Identifying parts and controls. 7Monitor specifications.10Plug and play capability.19LCD monitor quality and pixel policy.19Maintenance guidelines.19.Setting up the monitor.20Connecting the stand. 20Connecting your monitor.22Organizing cables.23Removing the stand.23.Operating your monitor. 25Power on the monitor.25Using the control buttons.25Using the on-screen display (OSD) menu.27Setting up your monitor.36Using tilt.38Contents 3
.Troubleshooting.39Self-Test.39Built-in diagnostics. 40Common problems.41Product-specific problems.43.Appendix.44FCC notices (U.S. Only) and other regulatory information. 44Contacting Dell. 444
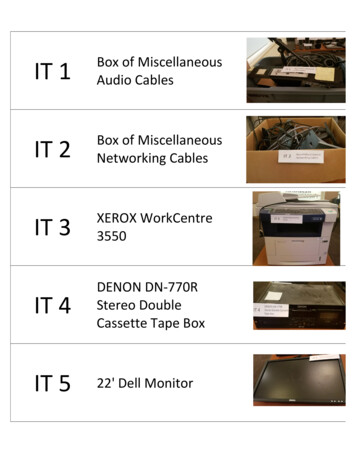
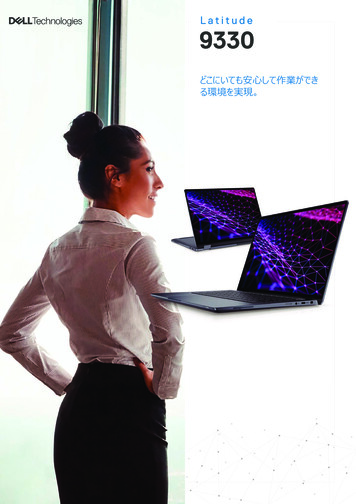
About your monitorPackage contentsYour monitor ships with the components shown below. Ensure that you havereceived all the components and see Contacting Dell for more information ifsomething is missing.NOTE: Some items may be optional and may not ship with your monitor. Somefeatures or media may not be available in certain countries.NOTE: To set up with any other stand, please refer to the respective stand setupguide for setup instructions. Monitor Stand riser Stand base Power Cable (Varies byCountries) Power AdapterAbout your monitor 5
HDMI Cable Quick Setup Guide Safety and RegulatoryInformationProduct featuresThe Dell S2419H/S2419HN/S2419NX/S2719H/S2719HN/S2719NX flat panel displayhas an active matrix, Thin-Film Transistor (TFT), Liquid Crystal Display (LCD), antistatic, and LED backlight. The monitor features include: S2419H/S2419HN/S2419NX: 60.47 cm (23.8 inch) viewable area display(measured diagonally). 1920 x 1080 resolution, plus full-screen support forlower resolutions. S2719H/S2719HN/S2719NX: 68.6 cm (27 inch) viewable area display (measureddiagonally). 1920 x 1080 resolution, plus full-screen support for lowerresolutions. Borderless monitor. Wide viewing angle to allow viewing from a sitting or standing position, or whilemoving from side-to-side. HDMI connectivity makes it simple and easy to connect with legacy and newsystems. S2419H/S2719H:Build-in Speaker (5 W)x2 Plug and play capability if supported by your system. On-Screen Display (OSD) adjustments for ease of set-up and screenoptimization. Energy Saver feature for Energy Star compliance. Security-lock slot. TCO-Certified Displays. BFR/PVC-Reduced (Its circuit boards are made from BFR/PVC-free laminates.) Arsenic-Free glass and Mercury-Free for the panel only. High Dynamic Contrast Ratio (8,000,000:1). 0.3 W standby power when in the sleep mode. Energy Gauge shows the energy level being consumed by the monitor in realtime. Optimize eye comfort with a flicker-free screen and ComfortView feature whichminimizes blue light emission.6 About your monitor
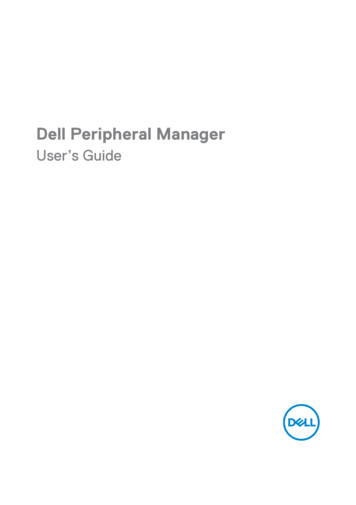
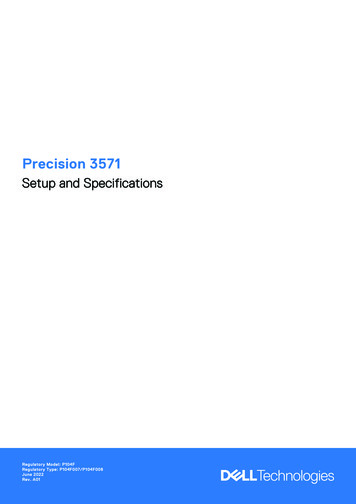
Identifying parts and controlsFront view12Control buttonsLabelDescription1Function buttons (For more information, see Operating your monitor)2Power On/Off buttonAbout your monitor 7
Back view4S2419HSVC Tag:1234567Express ServiceCode:123 456 789 0S2419H12V3.33AS2419Hc12V3.33AS2419H䆜䃔 ֵ 䚄ᓜᚆۭᇩ㿌 ȾCAN ICES-3 (B)/NMB-3(B)For applicable power supplies see user manual.SVC Tag:1234567Express ServiceCode:123 456 789 0S2419H12V3.33AS/N: CN-12MWYTV100-7B1-001L-A00XXXXX23.33A䆜䃔 ֵ 䚄ᓜᚆۭᇩ㿌 ȾCAN ICES-3 (B)/NMB-3(B)For applicable power supplies see user manual.MSIP-REM-TPF-S2419Hc 㐔㷡㢬 ڊ 㥐㦤㣄 ڕ TPV Electronics (Fujian) Co., Ltd.080-200-38001S2419Hc12VS/N: CN-12MWYTV100-7B1-001L-A00MSIP-REM-TPF-S2419Hc XXXXX㐔㷡㢬 ڊ 㥐㦤㣄 ڕ TPV Electronics (Fujian) Co., Ltd.080-200-3800Date of Mfg/ ӝᰛᵕ Consumo de energía: XX Wh ᰛᵕ: Nov. 2017Consumo de energía en modo de espera: X.X WhУдельная мощность рабочего режима - X.XXX Вт/см²Потребляемая мощность изделием в режиме ожидания - X.X ВтПотребляемая мощность изделием в выключенном режиме - X.XВтQ40G024N-700-14ADate of Mfg/ ӝᰛᵕ Consumo de energía: XX Wh ᰛᵕ: Nov. 2017Consumo de energía en modo de espera: X.X WhУдельная мощность рабочего режима - X.XXX Вт/см²Потребляемая мощность изделием в режиме ожидания - X.X ВтПотребляемая мощность изделием в выключенном режиме - X.XВтQ40G024N-700-14A35Back View with monitor standLabelDescriptionUse1Security-lock slotSecures monitor with security lock(security lock not included).2Regulatory label (includingBarcode serial number andService Tag label)Lists the regulatory approvals. Refer tothis label if you need to contact Dell fortechnical support. The Dell service tagis used for Dell warranty and customerservice management purposes and forrecords of the base system.3Regulatory information engraving. Lists the regulatory approvals.4Stand release buttonReleases stand from monitor.5Cable management slotUses to organize cables by placing themthrough the slot.Side view8 About your monitor
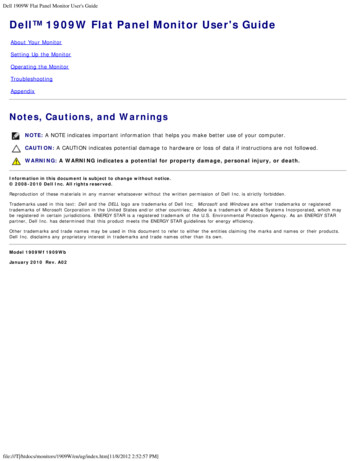
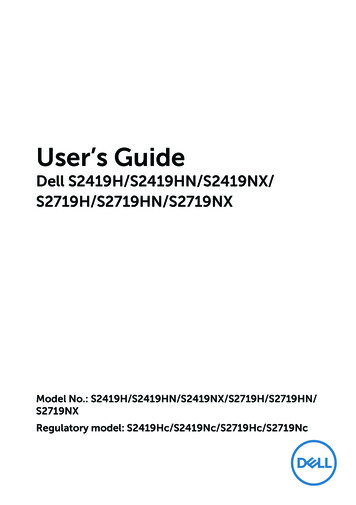
Bottom view123415Bottom view without monitor stand (S2419H/S2719H)2345Bottom view without monitor stand Use1SpeakersSpeakers2Power-adapter portTo connect the monitor power cable using a12V DC adapter.3HDMI1 portConnect your computer with HDMI cable.4HDMI2 portConnect your computer with HDMI cable.5Audio Line out portConnect to external speakers (OptionalPurchase)**Headphone usage is not supported for the audio line out port.About your monitor 9
Monitor specificationsModelS2419H/S2419HN/S2419NXScreen typeActive matrix-TFT LCDPanel typeIn-Plane SwitchingS2719H/S2719HN/S2719NXViewable imageDiagonal604.70 mm (23.81 in)686.00 mm (27 in)Horizontal, Active Area527.04 mm (20.75 in)597.89 mm (23.54 in)Vertical, Active Area296.46 mm (11.67 in)Area1562.46 cm2 (242.15 in )2010.76 cm² (311.67 in²)Pixel pitch0.2745 mm0.3114 mmPixel per inch (PPI)9281Viewing angle178 (vertical) typical178 (vertical) typical178 (horizontal) typical178 (horizontal) typicalBrightness250 cd/m² (typical)250 cd/m² (typical)Contrast ratio1000 to 1 (typical)1000 to 1 (typical)8,000,000 to 1 (DynamicContrast)8,000,000 to 1 (DynamicContrast)336.31 mm (13.24 in)2Faceplate coatingLow Haze with 3H hardnessBacklightLED edgelight systemResponse time5 ms typical (G to G)Color depth16.7 million colorsColor gamutCIE 1976 (84%), CIE 1931 (72%), 99% sRGBDell display managercompatibilityYesConnectivity2xHDMI 1.4 (HDCP)Border width (edge ofmonitor to active area)5.3 mm (Top)6.7 mm (Top)5.3 mm (Left/Right)6.8 mm (Left/Right)8.3 mm (Bottom)8.4 mm (Bottom)SecuritySecurity lock slot (cable lock optional purchase)AdjustabilityTilt (5 /21 )10 About your monitor
Resolution 719HN/S2719NXHorizontal scan range31 kHz to 83 kHz(automatic)31 kHz to 83 kHz(automatic)Vertical scan range56 Hz to 76 Hz (automatic) 56 Hz to 76 Hz (automatic)Maximum preset resolution1920 x 1080 at 60 Hz forHDMI 1.4 (HDCP) port.1920 x 1080 at 60 Hz forHDMI 1.4 (HDCP) port.Supported video 19NXVideo display capabilities(HDMI)480p, 480i, 576p, 720p,1080p, 576i, 1080i480p, 480i, 576p, 720p,1080p, 576i, 1080iPreset display Display ixel Clock(MHz)Sync Polarity(Horizontal /Vertical)VESA, 720 x 40031.570.128.3-/ VESA, 640 x 48031.560.025.2-/-VESA, 640 x 48037.575.031.5-/-VESA, 800 x 60037.960.340.0 / VESA, 800 x 60046.975.049.5 / VESA, 1024 x 76848.460.065.0-/-VESA, 1024 x 76860.075.078.8 / VESA, 1152 x 86467.575.0108.0 / VESA, 1280 x 102464.060.0108.0 / VESA, 1280 x 102480.075.0135.0 / VESA, 1600 x 90060.060.0108.0 / VESA, 1600 x 108067.560.0148.5 / About your monitor 11
Electrical 2719HN/S2719NXVideo input signalsHDMI 1.4 (HDCP), 600mV for each differential line,100 ohm input impedance per differential pairAC/DCAdapterDelta adapter ADP-40DD B: 100 VAC to 240 VAC/50Hz to 60 Hz 3 Hz/1.5 A (Max.).Input voltage/frequency/currentLite-On adapter PA-1041-81: 100 VAC to 240VAC/50 Hz to 60 Hz 3 Hz/1.2 A (Max).Output voltage/currentInrush currentOutput: 12VDC/3.33ANo damage when cold start at 100 VAC 240 VACPhysical characteristicsModelS2419H/S2419HN/S2419NXSignal cable typeDigital: detachable, HDMI, 19 pinsFront-frame gloss (minimum)Black frame - 85 gloss unitsDimensions (with stand)Height413.4 mm (16.28 in)Width539.0 mm (21.22 in)Depth152.8 mm (6.01 in)Dimensions (without stand)Height315.2 mm (12.41 in)Width539.0 mm (21.22 in)Depth47.4 mm (1.87 in)Stand dimensionsHeight171.6 mm (6.76 in)Width249.0 mm (9.80 in)Depth152.8 mm (6.01 in)WeightS2419HS2419HN/S2419NXWeight with packaging6.02 kg (13.27 lb)5.81 kg (12.81 lb)Weight with stand assemblyand cables4.08 kg (8.99 lb)3.87 kg (8.53 lb)Weight without standassembly (no cables)3.09 kg (6.81 lb)2.88 kg (6.35 lb)Weight of stand assembly0.52 kg (1.15 lb)0.52 kg (1.15 lb)12 About your monitor
ModelS2719H/S2719HN/S2719NXSignal cable typeDigital: detachable, HDMI, 19 pinsFront-frame gloss (minimum)Black frame - 85 gloss unitsDimensions (with stand)Height454.6 mm (17.9 in)Width612.7 mm (24.12 in)Depth186.7 mm (7.35 in)Dimensions (without stand)Height356.5 mm (14.04 in)Width612.7 mm (24.12 in)Depth45.8 mm (1.8 in)Stand dimensionsHeight176.7 mm (6.96 in)Width257.2 mm (10.13 in)Depth186.7 mm (7.35 in)WeightS2719HS2719HN/S2719NXWeight with packaging7.86 kg (17.33 lb)7.65 kg (16.87 lb)Weight with stand assemblyand cables5.17 kg (11.40 lb)4.96 kg (10.93 lb)Weight without standassembly (no cables)4.05 kg (8.93 lb)3.84 kg (8.47 lb)Weight of stand assembly0.66 kg (1.46 lb)0.66 kg (1.46 lb)About your monitor 13
Environmental 19HN/S2719NXTemperatureOperating0 C to 40 C (32 F to 104 F)Non-operating Storage: -20 C to 60 C (-4 F to 140 F) Shipping: -20 C to 60 C (-4 F to 140 F)HumidityOperating10% to 80% (non-condensing)Non-operating Storage 5% to 90% (non-condensing) Shipping 5% to 90% (non-condensing)AltitudeOperating(maximum)5,000 m (16,400 ft)Non-operating(maximum)12,192 m (40,000 ft)Thermaldissipation 112.60BTU/hour(maximum) 71.65BTU/hour(maximum) 122.84BTU/hour(maximum) 81.89BTU/hour(maximum) 81.89 BTU/ 61.42 BTU/ 88.72 BTU/ 68.24 BTU/hour (typical)hour (typical)hour (typical)hour (typical)14 About your monitor
Power management modesIf you have VESA's DPM compliance display card or software installed in your PC, themonitor can automatically reduce its power consumption when not in use. This isreferred to as Power Save Mode*. If the computer detects input from the keyboard,mouse or other input devices, the monitor automatically resumes functioning. Thefollowing table shows the power consumption and signaling of this automatic powersaving feature.* Zero power consumption in off mode can only be achieved by disconnecting thepower cable from the ctiveActiveActiveWhite33 W e(Glowing )Less than 0.3 WSwitch off---OffLess than 0.3 W24 W (typical)Power Consumption PON17 WTotal Energy Consumption (TEC)53.83 ptionNormaloperationActive21 W e(Glowing )Less than 0.3 WSwitch off---OffLess than 0.3 W18 W (typical)Power Consumption PON17 WTotal Energy Consumption (TEC)53.83 kWhAbout your monitor 15
iveActiveWhite36 W e(Glowing )Less than 0.3 WSwitch off---OffLess than 0.3 W26 W (typical)Power Consumption PON20 WTotal Energy Consumption (TEC)63.03 ionActiveActiveActiveWhite24 W e(Glowing )Less than 0.3 WSwitch off---OffLess than 0.3 W20 W (typical)Power Consumption PON20 WTotal Energy Consumption (TEC)63.03 kWh** Maximum power consumption with max luminance, and USB active.This document is informational only and reflects laboratory performance. Yourproduct may perform differently, depending on the software, components andperipherals you ordered and shall have no obligation to update such information.Accordingly, the customer should not rely upon this information in making decisionsabout electrical tolerances or otherwise. No warranty as to accuracy or completenessis expressed or implied.NOTE:PON: Power consumption of On Mode measured with reference to Energy Star test.TEC: Total energy consumption in kWh measured with reference to Energy Star testmethod.16 About your monitor
The OSD functions only in the normal operation mode. When any button is pressedin the Active-off mode, one of the following messages will be displayed:Dell P2418HZDell 24 Monitor?No HDMI1 signal from your device.Press any key on the keyboard or move the mouse to wake it up.If there is no display, press the monitor button again to selectthe correct input source.S2419HDell P2418HZDell 27 Monitor?No HDMI1 signal from your device.Press any key on the keyboard or move the mouse to wake it up.If there is no display, press the monitor button again to selectthe correct input source.S2719HActivate the computer and the monitor to gain access to the OSD.About your monitor 17
Pin assignmentsHDMI connectorPin Number19-pin Side of the Connected Signal Cable1TMDS DATA 2 2TMDS DATA 2 SHIELD3TMDS DATA 2-4TMDS DATA 1 5TMDS DATA 1 SHIELD6TMDS DATA 1-7TMDS DATA 0 8TMDS DATA 0 SHIELD9TMDS DATA 0-10TMDS CLOCK 11TMDS CLOCK SHIELD12TMDS CLOCK-13CEC14Reserved (N.C. on device)15DDC CLOCK (SCL)16DDC DATA (SDA)17DDC/CEC Ground18 5V POWER19HOT PLUG DETECT18 About your monitor
Plug and play capabilityYou can install the monitor in any Plug and Play-compatible system. The monitorautomatically provides the computer system with its Extended Display IdentificationData (EDID) using Display Data Channel (DDC) protocols so the system can configureitself and optimize the monitor settings. Most monitor installations are automatic,you can select different settings if desired. For more information about changing themonitor settings, see Operating your monitor.LCD monitor quality and pixel policyDuring the LCD Monitor manufacturing process, it is not uncommon for one or morepixels to become fixed in an unchanging state which are hard to see and do not affectthe display quality or usability. For more information on Dell Monitor Quality and PixelPolicy, see Dell Support site at www.dell.com/support/monitors.Maintenance guidelinesCleaning your monitorWARNING: Before cleaning the monitor, unplug the monitor power cable fromthe electrical outlet.CAUTION: Read and follow the Safety Instructions before cleaning the monitor.For best practices, follow the instructions in the list below while unpacking, cleaningor handling your monitor: To clean your screen, lightly dampen a soft, clean cloth with water. Ifpossible, use a special screen-cleaning tissue or solution suitable for the antistatic coating. Do not use benzene, thinner, ammonia, abrasive cleaners orcompressed air. Use a lightly-dampened cloth to clean the monitor. Avoid using detergent ofany kind as some detergents leave a milky film on the monitor. If you notice white powder when you unpack your monitor, wipe it off with acloth. Handle your monitor with care as the black-colored monitor may get scratchedand show white scuff marks. To help maintain the best image quality on your monitor, use a dynamicallychanging screen saver and turn Off your monitor when not in use.About your monitor 19
Setting up the monitorConnecting the standNOTE: The stand is detached when the monitor is shipped from the factory.NOTE: This is applicable for a monitor with a stand. When any other standis bought, please refer to the respective stand setup guide for the set upinstructions.To attach the monitor stand:1. Place the monitor on a soft cloth or cushion.2. Fit the stand riser and stand base together, and then turn the screw in the standbase.3. Fit the two tabs on the upper part of the stand to the groove on the back of themonitor. Press the stand until it snaps into place.20 Setting up the monitor
4. Inserting the stand until the snap locked.Setting up the monitor 21
Connecting your monitorWARNING: Before you begin any of the procedures in this section, follow theSafety Instructions.NOTE: Do not connect all cables to the computer at the same time. It isrecommend to route the cables through the cable-management slot before youconnect them to the monitor.To connect your monitor to the computer:1. Turn Off your computer and disconnect the power cable.2. Connect the audio or HDMI cable from your monitor to the computer.Connecting the HDMI cable22 Setting up the monitor
Organizing cablesUse the cable-management slot to organize the cables connected to your monitor.Removing the standNOTE: To prevent scratches on the LCD screen while removing the stand,ensure that the monitor is placed on a soft and clean surface.NOTE: This is applicable for a monitor with a stand. When any other standis bought, please refer to the respective stand setup guide for the set-upinstructions.To remove the stand:1. Place the monitor on a soft cloth or cushion along the desk.2. Tilt the stand downwards to access to the release button.Setting up the monitor 23
3. Use a long screwdriver to press on the release button.4. While pressing on the release button, pull the stand out.24 Setting up the monitor
Operating your monitorPower on the monitorPress thebutton to turn on the monitor.Using the control buttonsUse the control buttons on the bottom of the monitor to adjust the image beingdisplayed.112342345Control buttonsThe following table describes the control buttons:Control Buttons1DescriptionUse this button to choose from a list of preset modes.Shortcut key/PresetModesOperating your monitor 25
2Use the buttons to adjust the volume. Minimum is ‘0’(-). Maximum is ‘100’ ( ).Shortcut key/InputSource3Menu4Use the Menu button to launch the On-Screen Display(OSD) and select the OSD Menu. See Accessing theOSD menu.Use this button to go back to the main menu or exitthe OSD main menu.Exit5Use the Power button to turn the monitor on and off.Solid white light indicates the monitor is On and fullyPower On/Off button functional. Blinking white light indicates the power(with LED indicator) save mode.OSD controlsUse the buttons on the bottom of the monitor to adjust the image settings.1 2 34Contorl ButtonsDescriptionUse the Up button to increase values or move up in amenu.1UpUse the Down button to decrease values or movedown in a menu.2DownUse the OK button to confirm your selection in amenu.3OKUse the Back button to go back to the previous menu.4Back26 Operating your monitor
Using the on-screen display (OSD) menuAccessing the OSD menuNOTE: Any changes you make are automatically saved when you move to anothermenu, exit the OSD menu, or wait for the OSD menu to automatically close.1. Press thebutton to display the OSD main menu.Main Menu for HDMI inputDell 24 MonitorDell 27 MonitorBrightness / ContrastBrightness / ContrastInput Source75%Input enuMenuPersonalizePersonalizeOthersOthers2. Press theandbuttons to move between the setting options. As you movefrom one icon to another, the option name is highlighted. See the following tablefor a complete list of all the options available for the monitor.3. Press the4. Pressbutton once to activate the highlighted option.andbutton to select the desired parameter.5. Pressand then use theandmenu, to make your changes.6. Select thebuttons, according to the indicators on thebutton to return to the main menu.Operating your monitor 27
IconMenu andSubmenusBrightness/ContrastDescriptionUse this menu to activate brightness/contrast adjustment.Dell 24 MonitorDell 27 MonitorBrightness / ContrastBrightness / ContrastInput Source75%75%DisplayBrightnessInput sonalizePersonalizeOthersOthersBrightness adjusts the luminance of the backlight.Press thebutton to increase the brightness and press thebutton to decrease the brightness (min. 0 / max. 100).NOTE: Manual adjustment of brightness is disabled whendynamic contrast is switched on.ContrastAdjust the brightness first, and then adjust the contrast only iffurther adjustment is necessary.Press thebutton to increase the contrast and press thebutton to decrease the contrast (min. 0 / max. 100).The contrast function adjusts the degree of differencebetween darkness and lightness on the monitor screen.Input SourceUse the input source menu to select between the differentvideo signals that may be connected to your monitor.Dell 27 MonitorDell 24 MonitorBrightness / ContrastHDMI 1Brightness / ContrastHDMI 1Input SourceHDMI 2Input SourceHDMI 2ColorAuto SelectColorAuto SelectDisplayReset Input SourceDisplayReset Input hersOthersOnHDMI 1Select HDMI 1 input when you are using the HDMI1 connector.HDMI 2Pushto select the HDMI 1 input source.Select HDMI 2 input when you are using the HDMI2connector. Pushto select the HDMI 2 input source.Select auto select to scan for available input signals.Reset Input Source Select this option to restore default Input Source.Auto Select28 Operating your monitor
ColorUse color to adjust the color setting mode.Dell 27 MonitorDell 24 MonitorPreset ModesBrightness / ContrastPreset ModesStandardBrightness / ContrastPreset ModesStandardInput SourceInput Color FormatRGBInput SourceInput Color FormatRGBColorReset ColorColorReset rsonalizeOthersOthersWhen you select preset modes, you can choose Standard,ComfortView, Movie, Game, Warm, Cool or Custom Colorfrom the list. Standard: Loads the monitor's default color settings. This isthe default preset mode. ComfortView: Decreases the level of blue light emittedfrom the screen to make viewing more comfortable foryour eyes. Movie: Loads color settings ideal for movies. Game: Loads color settings ideal for most gamingapplications. Warm: Increases the color temperature. The screen appearswarmer with a red/yellow tint. Cool: Decreases the color temperature. The screen appearscooler with a blue tint. Custom Color: Allows you to manually adjust the colorsettings.Press theandbuttons to adjust the three colors(R, G, B) values and create your own preset color mode.Dell 24 MonitorBrightness / ContrastDell 27 MonitorBrightness / ContrastPreset ModesStandardPreset ModesStandardInput SourceInput Color FormatComfortViewInput SourceInput Color FormatComfortViewColorReset ColorMovieColorReset MenuCoolMenuCoolPersonalizeCustom ColorPersonalizeCustom ColorOthersOthersOperating your monitor 29
Input ColorFormatAllows you to set the video input mode to: RGB: Select this option if your monitor is connected to acomputer or DVD player using the HDMI cable. YPbPr: Select this option if your DVD player supports onlyYPbPr output.Dell 24 MonitorHueDell 27 MonitorBrightness / ContrastPreset ModesInput SourceInput Color FormatRGBInput SourceInput Color FormatRGBColorReset ColorYPbPrColorReset ColorYPbPrBrightness / ePersonalizeOthersOthersPreset ModesThis feature can shift the color of the video image to green orpurple. This is used to adjust the desired flesh tone color. Useorto adjust the hue from 0 to 100.Pressto increase the green shade of the video image.Pressto increase the purple shade of the video image.NOTE: Hue adjustment is available only when you selectMovie or Game preset mode.SaturationThis feature can adjust the color saturation of the videoimage. Useorto adjust the saturation from 0 to 100.Pressto increase the monochrome appearance of thevideo image.Pressimage.Reset Colorto increase the colorful appearance of the videoNOTE: Saturation adjustment is available only when youselect movie or game preset mode.Allows your monitor color settings to the factory settings.30 Operating your monitor
DisplayUse the display to adjust image.Dell 24 MonitorAspect RatioSharpnessAspect RatioWide 16:9Brightness / ContrastAspect RatioWide 16:9Input SourceSharpness50Input SourceSharpness50ColorDynamic ContrastColorDynamic ContrastDisplayResponse TimeAudioReset DisplayNormalDisplayResponse TimeAudioReset ormalAdjusts the image ratio to Wide 16:9, 4:3 or 5:4.This feature can make the image look sharper or softer. UseorDynamicContrastDell 27 MonitorBrightness / Contrastto adjust the sharpness from 0 to 100.Allows you to increase the level of contrast to provide sharperand more detailed image quality.Press thebutton to select the dynamic contrast on or off.NOTE: Dynamic contrast provides higher contrast if youselect game or movie preset mode.Response Time User can select between Normal, Fast or Super fast.Reset DisplayAudioSelect this option to restore default display settings.Dell 27 MonitorDell 24 MonitorBrightness / ContrastVolume50Brightness / ContrastInput SourceSpeakerEnableInput nDisplayReset AudioDisplayReset sOthersVolume50VolumeUse the buttons to adjust the volume. Minimum is ‘0’ (-).Maximum is ‘100’ ( ).SpeakerAllows you to enable or disable speaker function.MaxxAudioMaxxAudio is a suite of advanced audio enhancement tools.This item is to define the action which is used to On/OffMaxxAudio.Reset AudioSelect this option to restore default display settings.Operating your monitor 31
MenuSelect this option to adjust the settings of the OSD, such as,the languages of the OSD, the amount of time the menuremains on screen and so on.Dell 24 MonitorBrightness / ContrastLanguageTransparencyDell 27 MonitorLanguageBrightness / ContrastLanguageEnglishInput SourceTransparency20Input SourceTransparency20ColorTimer20 sColorTimer20 sDisplayReset MenuDisplayReset OthersLanguage options set the OSD display to one of the eightlanguages (English, Spanish, French, German, BrazilianPortuguese, Russian, Simplified Chinese, or Japanese).Select this option to change the menu transparency bypressing theTimerEnglishorbuttons from 0 to 100.OSD hold time: sets the length of time the OSD will remainactive after the last time you pressed a button.Useorto adjust the slider in 1 second increments,from 5 to 60 seconds.Reset MenuReset all OSD settings to the factory preset values.PersonalizeUsers can choose a feature from Shortcut key 1, Shortcut key2, Power Button LED or Reset Personalization, Preset Modesor Volume and set it as a shortcut key.Dell 24 MonitorBrightness / ContrastDell 27 MonitorShortcut Key 1Preset ModesBrightness / ContrastShortcut Key 1Preset ModesInput SourceShortcut Key 2VolumeInput SourceShortcut Key 2VolumeColorPower Button LEDOn During ActiveColorPower Button LEDOn During ActiveDisplayReset PersonalizationDisplayReset alizeOthersO
Delta adapter ADP-40DD B: 100 VAC to 240 VAC/50 Hz to 60 Hz 3 Hz/1.5 A (Max.). Lite-On adapter PA-1041-81: 100 VAC to 240 VAC/50 Hz to 60 Hz 3 Hz/1.2 A (Max). Output voltage/ current Output: 12VDC/3.33A Inrush current No damage when cold start at 100 VAC 240 VAC Physical characteristics Model S2419H/S2419HN/S2419NX