Transcription
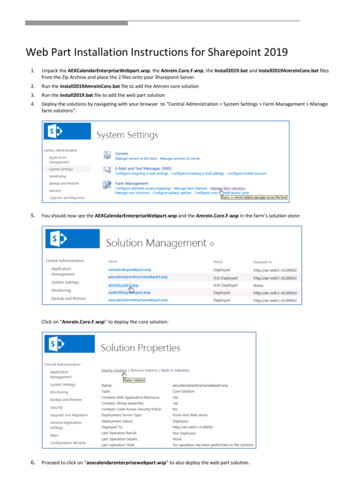
Web Part Installation Instructions for Sharepoint 20191.Unpack the AEXCalendarEnterpriseWebpart.wsp, the Amrein.Core.F.wsp, the Install2019.bat and install2019AmreinCore.bat filesfrom the Zip Archive and place the 2 files onto your Sharepoint Server.2.Run the install2019AmreinCore.bat file to add the Amrein core solution3.Run the install2019.bat file to add the web part solution4.Deploy the solutions by navigating with your browser to “Central Administration System Settings Farm Management Managefarm solutions”:5.You should now see the AEXCalendarEnterpriseWebpart.wsp and the Amrein.Core.F.wsp in the farm’s solution store:Click on “Amrein.Core.F.wsp” to deploy the core solution:6.Proceed to click on “aexcalendarenterprisewebpart.wsp” to also deploy the web part solution.
7.Proceed to activate the feature by navigating to the “Site Actions/Site Settings” page in your top-level Sharepoint site:Choose “Site collection features” to navigate to the Site Collection Features page:Activate the “AE Calendar Enterprise Web Part” featureAdding the Web Part to a PageNavigate to a page where you would like to place the web part and choose "Site Actions/Edit Page"Select “Web Part” form the “INSERT” tab in the ribbon and add the “AE Calendar Web Part (SP 2013 Version)” to the appropriatezone. The web part is listed in the "Amrein Engineering" gallery section:
Web Part ConfigurationConfigure the following Web Part properties in the Web Part Editor "Miscellaneous" pane section as needed:oUser ID: enter the name of the Windows account under which the calendar data will be fetched from the Exchange server.oUser Password: enter the password of the above user accountoExchange Server URL:enter the web domain name of your Exchange web frontend server (do also include the leading "http://" or "https://"). Thistypically is the same address as your Outlook Web Access (OWA) URL but without "/owa". Please do NOT enter the trailing “/EWS”or the trailing "/OWA".Example:https://yourserver.comExamples with yourserver.yourdomain:https:// yourserver. yourdomain.comYou can check the validity of the above URL with your browser by entering e.g.http(s)://yourserver.com/EWS/Exchange.asmx
The Exchange Server should now return an XML page:ooExchange Server Version: select the version of your Microsoft Exchange Server.Mailbox Calendar(s):enter the mailbox name(s) of the calendar(s) to be displayed (separate the names with semicolons).Use the {uid} placeholder to inject the current user's name.You can alternatively use a web part connection to select the mailbox calendar to be displayed.Example:john;{uid};Room707Calendar Color Coding:You can optionally individually color the calendar entries for each calendar user by adding the desired color (preceded by acolon) to each mailbox name as redEnter either the HTML color names (as eg. "red" etc.) or use hexadecimal RRGGBB coding (as eg. "#CCFFCC")oPublic Folder Calendar(s):enter the public folder name(s) of the calendar(s) to be displayed (separate the names with semicolons).Optionally apply color coding as described above for the “Mailbox Calendars” setting.Examples:Meeting Room 101Meeting Room 101:orangeoMail Domain:enter the domain name of your Exchange mail server. This typically corresponds with the part of your mail addresses right to the @character.oWindows Time Zone Name:
Enter the optional desired time zone if you want to adjust the event dates for a specific time zone.Please use this link to look up the time zone names: 3.aspxoTime Zone Offset: enter the optional desired time zone offset in minutes to shift all event dates by the specified amount.oWork Day Start Hour: enter the Calendar Work Day Start Hour, as e.g. 7 or 8.5 (use military notation)oWork Day End Hour: enter the Calendar Work Day Start Hour, as e.g. 17 or 18.5 (use military notation)oFirst Day Of Week: select the first day of the week to be displayed in the calendaroLast Day Of Week: select the last day of the week to be displayed in the calendaroCalendar Skin: select one of the available calendar styles (skins).oVisible Appointments per Day:Enter the number of calendar entries to be shown per day. If there are more entries, then a "more link" is displayed.oCalendar Height: enter the desired calendar height in pixels (set to “0” for automatic adjustment).oCalendar Width: enter the desired calendar width in pixels (set to “0” to use the available web part zone).oMonth View Entry Height:enter the desired “month View” calendar entry height in pixels (set to “0” for automatic adjustment ort to “34” to display tworows).oAllow Appointment Editing: enable editing of appointments: Start, End, Subject, LocationoAllow Appointment Deleting: enable deleting of appointments.oBusy Type Colors:Enter the desired Busy Type color codings (either as HTML color names or #RRGGBB values) in the following order:free;tentative;busy;out of office.The default values reflect the standard Microsoft Outlook color settings.ooDefault View: choose the desired startup calendar view (Month, Week or Day)Subject Color Coding:allows you to optionally color code the events by subject.The web part checks if one of the words (or strings) defined in this setting are part of the “Subject” and applies the specified color ifit finds a match.Example:Sales red;Accounting orange;Private yellowthis will produce the following color codes:Sales Meeting - redWeekly Sales Team Meeting - redPrivate Party - yellowoLocation Color Coding:allows you to optionally color code the events by location.The web part checks if one of the words (or strings) defined in this setting are part of the “Location” and applies the specified colorif it finds a match.If you for example specify:Miami red;New York orangethis will produce the following color codes:Miami Office - redNew York Office - orange
oHide Appointment Location: allows to show or hide the display of the appointment's location.oHide Start Time: allows to show or hide the display of the appointment's start time.ooHide End Time: allows to show or hide the display of the appointment's end time.Properties Template:allows to customize the tooltip displayed when hovering over a calendar tc. (Placeholders: Body, Attendees, tendees;Message:BodyoSuppress View Tabs:shows or hides the calendar's "View" tabs (Day, Week, Month)oExport to CSV:Show/hide the "Export" button for exporting the calendar items to Excel/CSV.oCSV Separator:Enter the desired CSV field separator character (Default Comma). Specify a semicolon in countries which use the comma as adecimal separator.oCache Retention Time:Enter the public folder cache retention time in minutesooOptions: enter additional settings as needed.License Key:enter your Product License Key (as supplied after purchase of the "Exchange Calendar Enterprise Web Part" license key). Leave thisfield empty if you are using the free 30 day evaluation version or if you choose one of the License Activation described below.License ActivationYou have the following 3 options to enter your License Key:1. Enter the License Key into the corresponding “License Key” field in the web part configuration pane (See Description above).2. WSP Solution Deployment:Add the License.txt file (as supplied by AMREIN ENGINEERING after having purchased a license) to the Solution at the following location:c:\Program Files\Common Files\Microsoft Shared\Web Server iseWebpart3. Manual Deployment:Add the License Key to your web.config (typically found at c:\inetpub\wwwroot\wss\virtualdirectories\80) appSettings section asfollows: appSettings . add key "AEEX" value "AEEX-x-xxxxx-xxxxx-xx-xx" / /appSettings Replace the “x” characters with your actual key values.Please note that this method requires you to manually add the key to each Sharepoint application. A M R E I N E N G I N E E R I N G A G 2021
You should now see the AEXCalendarEnterpriseWebpart.wsp and the Amrein.Core.F.wsp in the farm's solution store: Click on "Amrein.Core.F.wsp" to deploy the core solution: 6. Proceed to click on "aexcalendarenterprisewebpart.wsp" to also deploy the web part solution.