Transcription
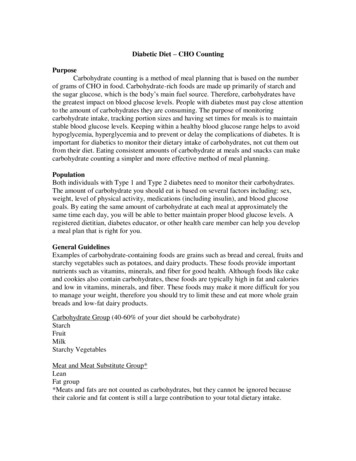
An efficient method for counting DAPI-stained cells usingFijiIan LevenfusStem Cell Biology, Medical Clinic III, Medical Faculty Carl Gustav CarusAbstract: Counting cells is a crucial procedure in evaluating the success of a treatment. Afast yet exact way of doing this for DAPI-stained cells with the ImageJ-derivate ‘Fiji’ isdescribed in this paper, written as a step-by-step tutorial with screenshots.Keywords: cell counting, quantity, DAPI, Fiji, ImageJ, tutorialCounting Process1. After taking the usual pictures and the DAPI 1 -stained pictures at the same places (useat least 2 places per well) and putting them into explicitly labelled directories, you areready to conduct a cell counting.2. Get Fiji 2 , an enhanced and extended version of ImageJ. The program offers severaldifferent ways to count the cells in an open picture. One of the most exact ways is touse the Fiji plugin ‘Cell counter’ (http://pacific.mpicbg.de/wiki/index.php/Cell Counter).3. Before you start Fiji, download the plugin from the page mentioned above and put the.jar-file into the ‘plugins’ directory of the Fiji program folder (this directory is full of.jar-files, all of them are plugins).4. Now you can start Fiji (usually fiji-win32.exe) and open the DAPI-picture where youwant to count cells using the ‘File’-menu or just dragging your picture to the programwindow.Figure 1: Fiji main window with opened DAPI-picture1DAPI (4',6-Diamidino-2-phenylindole) is a fluorescent stain binding exspecially on DNA.Fiji can be downloaded at http://pacific.mpi-cbg.de/wiki/index.php. For this paper, Fiji Heidelberg and FijiMadison were used.2
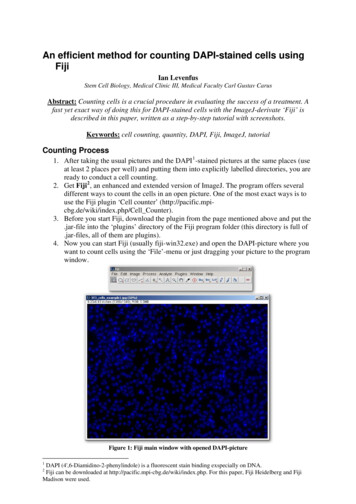
5. It is better to have the microscopic picture opened alongside the DAPI-picture torecognize places of accumulated dead cells. Yellow squares in the figure below markplaces with a big amount of dead cells which should not be counted in most cases orcounted separately.During cell counting, however, you work only with your DAPI-picture where you cancount the DAPI-stained nuclei of your cells.Figure 2: Microscopic picture with yellow squares marking areas of dead cells in high density6. At first, you need to split the channels of the original DAPI-RGB-image. In the‘Image’-menu, go to the ‘Color’-submenu and choose ‘Split Channels’.Image - Color - Split Channels7. This function creates three 8-bit grayscale pictures containing red, green and bluecomponents of the original image. As DAPI has its emission maximum in the bluearea, only the grayscale picture with the blue components will have a signal: grayand white dots showing the nuclei of the cells (cf. Figure 1). Windows with greenand red signals will be empty (black background), hence you can close them.8. Now you should have a picture like the one in Figure 4 in front of you. This is yourworkspace.
9. If the contrast does not fit, you may adjust thebrightness and other values of the picture. In the‘Image’-menu, go to the ‘Adjust’-submenu and choose‘Brightness/Contrast’. Play with the slides until thevalues fit.Image - Adjust - Brightness/ContrastFigure 3: Brightness and Contrast windowFigure 4: Picture after channel split with only blue signal. This is the workspace for counting the cells.Now use the ‘Cell Counter’-plugin. Go to the ‘Plugins’-menu andchoose ‘Cell Counter’. A window like the one in Figure 5 emerges.Click on ‘Initialize’ and choose the ‘Type 1’ counter.Plugins - Cell Counter - ‘Initialize’ button - ‘Type 1’ controlboxFigure 5: Window of the cell counter with all controls. Different typesrepresent different colours. The result is shown right to the respective typeradio button.10. Count the cells by clicking on them. As you see there are
eight types of counters. Each of them has a different colour. If the blue colour of thecounter type 1 is not optimal for you, chose ‘Type 2’ or something else. Distinguishbetween the types or colours, respectively, to count different types of cells (e. g. stuckcells and dead cells).This is one of the most effective ways to count the cells since it is fast yet exact.Eventually, you can use the described techniques to count also cells not stainedwith DAPI.Figure 5: Counting different types of cellsResults You may check your results automatically. To do this, just go toAnalyze - Analyze ParticlesAdjust the necessary values. Usually the images have to be thresholded before. UseImage - Adjust - Color Thresholdfor this. To document your results, use any spreadsheet program you want and log the numberof ‘cells alive’, ‘cells dead’ and the total number. Now you can calculate thepercentages which show a perfect overview of the status of your cells after a certaintreatment.
Useful suggestions It is very useful to display the number of the colour you are counting (e. g. ‘1’ for type1 etc.)If a mistake occurred, i. e. a miscalculation, use the ‘Delete Mode’ (activated in Figure5) to revert it. Just click on the cell which was counted by mistake and it is subtracted form thetotal number.References[1] Ferreira, T., and Rasband, W.: The ImageJ User Guide. February , 22/02/2011 15:28).
Protocol on how to count (DAPI-stained) cells using FijiThis is a short laboratory version (protocol). For a more comprehensive overview, see thewhole paper.1. Get Fiji (http://pacific.mpi-cbg.de/wiki/index.php), an enhanced and extended versionof ImageJ, and use the Fiji plugin ‘Cell counter’ (http://pacific.mpicbg.de/wiki/index.php/Cell Counter).2. Before you start Fiji, download the plugin from the page mentioned above and put the.jar-file into the ‘plugins’ directory of the Fiji program folder (this directory is full of.jar-files, all of them are plugins).3. Now you can start Fiji (usually fiji-win32.exe) and open the DAPI-picture where youwant to count cells using the ‘File’-menu or just dragging your picture to the programwindow.4. It is better to have the microscopic picture opened alongside the DAPI-picture torecognize places of accumulated dead cells.5. At first, you need to split the channels of the original DAPI-RGB-image.Image - Color - Split Channels6. Three 8-bit grayscale pictures containing red, green and blue components of theoriginal image are created. As DAPI has its emission maximum in the blue area,only the grayscale picture with the blue components will have a signal. Windowswith green and red signals will be empty (black background), hence you can closethem.7. If the contrast does not fit, you may adjust the brightness and other values of thepicture.Image - Adjust - Brightness/ContrastPlay with the slides until the values fit.8. Now use the ‘Cell Counter’-plugin. Go to the ‘Plugins’-menu and choose ‘CellCounter’. Click on ‘Initialize’ and choose the ‘Type 1’ counter or any other type. Eachtype has a different colour.Plugins - Cell Counter - ‘Initialize’ button - ‘Type 1’ control box or any other type9. Count the cells by clicking on them. If the blue colour of the counter type 1 is notoptimal for you, chose ‘Type 2’ or something else. Distinguish between the types orcolours, respectively, to count different types of cells (e. g. stuck cells and dead cells).This is one of the most effective ways to count the cells since it is fast yet exact.Eventually, you can use the described techniques to count also cells not stainedwith DAPI.Useful suggestions It is very useful to display the number of the colour you are counting (e. g. ‘1’ for type1 etc.)If a mistake occurred, i. e. a miscalculation, use the ‘Delete Mode’ to revert it. Just clickon the cell which was counted by mistake and it is subtracted form the total number.
Now use the 'Cell Counter'-plugin. Go to the 'Plugins'-menu and choose 'Cell Counter'. A window like the one in Figure 5 emerges. Click on 'Initialize' and choose the 'Type 1' counter. Plugins - Cell Counter - 'Initialize' button - 'Type 1' control . box . Figure 5: Window of the cell counter with all controls .