Transcription
Google Cloud Print Setup AppQuick GuideThis guide contains:Usage of the Google Cloud Print Setup AppJuly 2016
Quick GuideTable of contents1. Before Installation. 41-1. Required Options. 41-2. Free Space on Hard Disk . 41-3. Preliminary MFP/System Settings . 41-3-1. Confirmation of Network Settings . 41-3-2. Confirmation of IP Filtering Setting . 51-3-3. Confirmation of IWS Setting. 51-3-4. Restrictions when Fiery is installed . 51-3-5. Restrictions at Setting Authentication Method. 51-3-6. Settings for Enabling Local Printing . 61-3-6-1. Bonjour Settings. 61-3-6-2. SSL Settings for WebDAV Server Function. 61-3-6-3. Quick Security Settings . 62. Installation of the Application on MFP . 72-1. Installation of the Application . 72-2. Display of the Application Button on the Menu screen. 72-3. Web Browser Setting . 82-3-1. Proxy Setting . 82-4. Device Registration . 92-4-1. Registering from Local Network . 92-4-2. Registering from Application . 143. Operating Procedure of the Application . 203-1. Confirmation of Registration Status . 203-2. Sign in . 213-3. Administrator Settings Screen . 223-3-1. Registering. 233-3-1-1. If the device has not been registered . 233-3-1-2. If the device has been registered . 243-3-2. Setting . 253-3-3. Proxy Setting . 263-3-4. Log. 273-4. Printing . 283-4-1. Printing through Google Cloud Print . 283-4-2. Local Printing . 313-5. Deletion of Device . 333-5-1. Deleting with this application . 333-5-2. Deleting through Google Cloud Print management web page . 334. Uninstall of the Application . 351
Quick Guide4-1. Uninstall of the Application . 355. Frequently Asked Questions . 356. Copyright / License Information / Trademarks . 366-1. Google Cloud Print Setup . 366-2. Tempita . 366-3. JsonCpp . 362
Quick GuideTrademarks and registered trademarksTrademark acknowledgmentsKONICA MINOLTA, KONICA MINOLTA logo are registered trademarks or trademarks of KONICA MINOLTA, INC.Google, Google Cloud Print and Google Drive are trademarks of Google Inc.All other company and product names are either trademarks or registered trademarks of their respective companies.Services provided by GoogleAccess the following URL for services provided by Google.This document describes Google Cloud Print.http://www.google.com/about/products/Google Cloud PrintAccess the following URL for Google Cloud ry of this applicationGoogle Cloud Print Setup is such an application that is used to link services provided by Google Cloud Print with the MFP.Using services provided by Google Cloud Print enables you to register a machine on the Cloud, delete a machineregistered on Cloud, also enables you to check and control the service status.ReminderThe dialog boxes that appear in this document may differ from those that appear on your computer and MFP, dependingon the installed devices and specified settings.The explanation of this application in this manual and all screen images are as of September, 2014.These may be changed without prior notice.NoteUnauthorized reproduction, translation or duplication of this document, whether in its entirety or in part, is strictlyprohibited.The contents of this document are subject to change without notice.Copyright 2014 KONICA MINOLTA, INC. All rights reserved.3
Quick Guide1. Before InstallationThis chapter describes the settings required for running the application.1-1. Required OptionsThe following option is required to use the application.Without installing the option, you cannot use the application. Web browser function (LK-101 v3) in the i-Option license kit[Confirmation method]1.Press the Menu key on the machine to open the Menu screen.2.Tap the Utility button to open the Utility screen.3.Tap the Administrator Settings button to open the Administrator Settings screen. On this screen, enter theadministrator password.4.Tap the License Settings button to open the License Settings screen.5.Tap the List of Enabled Functions button to open the List of Enabled Functions screen.6.Confirm that “Web browser” is displayed on the list of function names.1-2. Free Space on Hard DiskTo use this application, a 50MB free space of storage is required for the IWS application installation field.Without sufficient free space, the application may not work properly.1-3. Preliminary MFP/System SettingsBefore using the application, confirm that the following settings are configured correctly.If the settings are wrong, then the application may not work properly.1-3-1. Confirmation of Network SettingsConfirm with the network administrator that the following hosts and ports are available. www.google.com: 80, 443 talk.google.com: 5222When using a proxy server, make sure that the proxy server port is open.4
Quick Guide1-3-2. Confirmation of IP Filtering SettingIf the IP filtering setting is enabled, then configure so that the IP address “127.0.0.1” is available.Settings described here are configured via Web Connection, but it also can be configured through the administratorsetting screen of this machine.[Confirmation method]1. Check the administrator setting screen of the MFP for that if setting has been configured to enablecommunication from the PC in the network.2. Access Web Connection (http(s)://IP address of each machine) from the browser of the PC.3. Sign in as an administrator, and select Network - TCP/IP Setting - IPv4 Filtering.4. If IP Filtering (Permit Access) is enabled,add the IP address “127.0.0.1” to [Set].5. If IP Filtering (Deny Access) is enabled,and the IP address “127.0.0.1” is included in [Set], delete the IP address.1-3-3. Confirmation of IWS SettingIf IWS Settings is disabled, set up so that IWS Settings is enabled.Settings described here are configured through Web Connection, but it also can be configured through the administratorsetting screen of this machine.[Confirmation method]1. Access Web Connection (http(s)://IP address of each machine) from the browser of the PC.2. Sign in as an administrator, select Network - IWS Settings, and change “OFF” to “ON” for IWS Settings.3. If the Connect IWS Apps to Network settings is “Restrict”, change it to “Allow”.1-3-4. Restrictions when Fiery is installedThis application cannot scan when Fiery is installed.Remove Fiery as necessary.1-3-5. Restrictions at Setting Authentication MethodWhen setting authentication method (Device authentication or External server authentication), it is required to permit apublic user.5
Quick Guide1-3-6. Settings for Enabling Local PrintingWhen using local printing, enable the Bonjour function and set SSL Setting to “SSL/Non-SSL” for the WebDAV serverfunction, or set to “Non-SSL Only”. If the Bonjour function has been disabled, no devices will be displayed on the devicelist (See “2-4-1. Registering from Local Network”).Besides, select “No Filtering” for Quick Security Settings.Settings described here are configured via Web Connection, but it also can be configured through the administratorsetting screen of this machine.1-3-6-1. Bonjour Settings[Confirmation method]1. Access Web Connection (http(s)://IP address of each machine) from the browser of the PC.2. Sign in as an administrator, select Network - IWS Settings, and change “OFF” to “ON” for Bonjour Settings.1-3-6-2. SSL Settings for WebDAV Server Function[Confirmation method]1. Access Web Connection (http(s)://IP address of each machine) from the browser of the PC.2. Sign in as an administrator, select Network - WebDAV Settings - WebDAV Server Settings, and change “SSLOnly” to “SSL/Non-SSL” or “Non-SSL Only” for SSL Settings.1-3-6-3. Quick Security Settings[Confirmation method]1. Access Web Connection (http(s)://IP address of each machine) from the browser of the PC.2. Sign in as an administrator, and set the IP address of the terminal where local printing is to be performed inavailable range, or change setting to “No filtering” at Security - Quick Security Settings - Quick IP Filtering.6
Quick Guide2. Installation of the Application on MFPThis chapter describes how to install the application and its initial settings.Please refer to the dstore manual for further details of the installation. Please keep in mind that depending on the dstoreconfiguration only MFP administrators may install applications2-1. Installation of the ApplicationDisplay Install the application using the IWS Install Tool.For the installation procedure, see the IWS Install Tool Manual.Specify “Google Cloud Print Setup.iws” for the file name of the application. The application can be installed on the MFPwithout using token.(Note)Do not turn the main power of the MFP off during installation of the application.In case the main power of the MFP was turned off by accident during installation of the application, install the applicationagain.2-2. Display of the Application Button on the Menu screen.Display the application button on the Menu screen (displayed when the Menu key is pressed).This function is not specified as essential.(Note)Please install the Application at first to the MFP via dstore. In order to so Admin Login to dstore is required. Please referto the dstore Manual for further information.(1) Press the “Menu key” on the machine to open the Menu screen, and tap the “Utility” button to open the Utility screen.(2) Tap the “Administrator Settings” button to open the Administrator Settings screen. On this screen, enter theadministrator password.(3) Tap the “System Settings” button to open the System Settings screen.(4) Tap the “Custom Display Settings” button to open the Custom Display Settings screen.(5) Tap the “Main Menu Default Settings” button to open the Main Menu Default Settings screen.(6) Tap any button among Main Menu Key buttons that are set to “Do Not Use”.(7) Tap the “ON” button, and then tap the “Registered Application” button on the screen.(8) Select “Google Cloud Print”, and then tap the “OK” button.(Note) Not displayed when the application is not installed.(9) On the standard top menu setting screen, check that “Google Cloud Print” is assigned to the top menu key, then tapthe “OK” button.(10) The setting is complete if the application button appears on the Menu screen.7
Quick Guide2-3. Web Browser SettingConfigure various Web browser settings to use the application.Configure the settings according to the following procedures.2-3-1. Proxy SettingConfigure this setting when connecting to the Google service (external) via a proxy server.(1) Select “Menu” – “Settings” and tap “Settings”.(2) Enter the administrator password and tap “OK”.(3) Tap “Proxy Settings”.(4) Select “Use Proxy” checkbox, enter the required information and tap “OK”.Please enter “127.0.0.1” into “No Proxy for following domain”.8
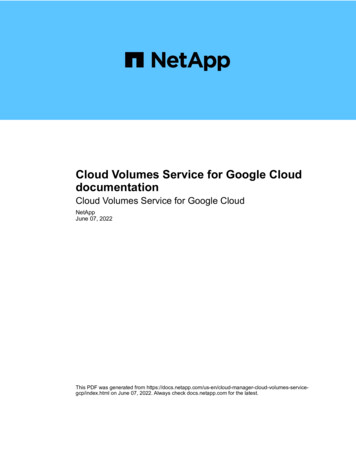
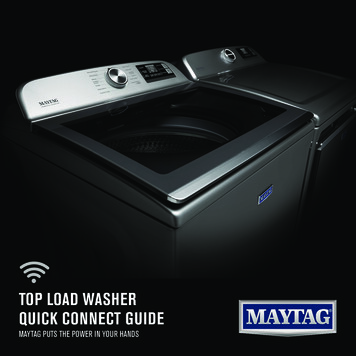
Quick Guide2-4. Device RegistrationAfter installing the application, the device is required to be registered on the Google Cloud Print.Registration can be made in the following two patterns. Registering from application Registering from local network2-4-1. Registering from Local Network(1) Start Google Chrome from the PC, and access chrome://devices/.Check that the device to be registered is displayed.(Note)Sign in to Google Services if it has not been done.If no device is displayed, see “1-2-5. Settings for Enabling Local Printing”.If the proxy setting is required, configure settings according to descriptions in “3-3-3. Proxy Setting”.(2) Press the “Register” button beside the device to be added.9
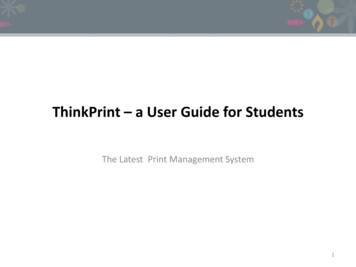
Quick Guide(3) When a dialog message for confirming registration appears, select “Register”.If Google Cloud Print described in “3-3-2. Setting” is OFF, the printer is failed to be registered.(4) Check the status when adding printer.10
Quick Guide(5) Start the Google Cloud Print Setup application on MFP, and tap “Setting”.(6) Enter the administrator password registered on the MFP, then tap “Sign in”.11
Quick Guide(7) Check the account used to sign in, and tap “Approval”.(8) Start adding printer through Google Chrome. It may take a moment until adding starts.12
Quick Guide(9) The device disappears from the new devices field, and the device added to my devices appears.After that, press “Manage” to check if the desired device has been registered, then finish device registration.The following screen appears after pressing the “Manage” button.13
Quick Guide2-4-2. Registering from Application(1) After starting application, if the device is not registered to Google Cloud Print, the following screen will be displayed.Tap “Setting”.(2) Enter the administrator password registered on the MFP, then tap “Sign in”.14
Quick Guide(3) To connect with the external Google Cloud Print through the proxy server, tap “Proxy Setting”.If Proxy Setting is not required, tap “Skip” and go to step (6).(4) Settings shown here are required for connecting with the external Google Cloud Print through the proxy server.Enter the required information, then tap “Save”.If proxy authentication is required, enter the user name and password.15
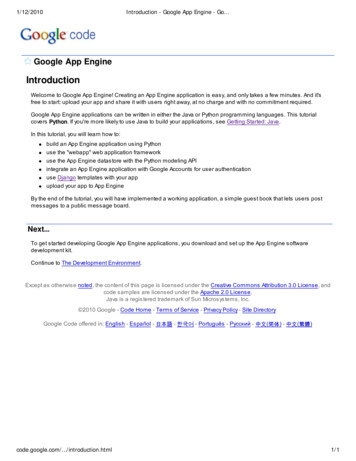
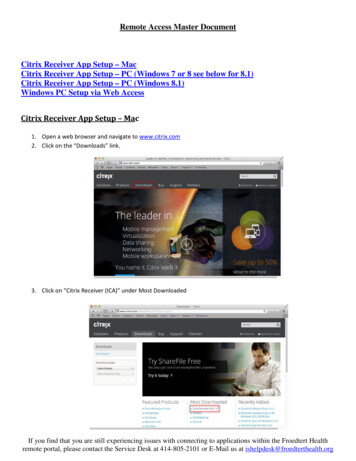
Quick Guide(5) The setting completion screen appears. Tap “Close”.(6) Tap the “Register” tab and tap “Show” to display the Google authentication registration screen.The device name can be edited as necessary.If the screen is displayed after skipping Proxy Setting, the “Register” tab is selected by default.16
Quick Guide(7) Tap the authentication destination URL.(8) Tap “Finish printer registration”.Sign in to Google Services if it has not been done.(9) Device registration to Google Cloud Print is complete.When the following screen appears, press “Menu” on this machine and restart the application from APP.17
Quick Guide(10) After restarting the application, the following screen will be displayed.Tap “Close” and check that the MFP has been registered.(11) When the following screen appears, the registration on MFP is complete.18
Quick Guide(12) Start Google Chrome from the PC, access https://www.google.com/cloudprint/ , and select a printer from the menu onthe left area. Make sure that the device has been registered, and then finish device registration.Sign in to Google Services if it has not been done.19
Quick Guide3. Operating Procedure of the ApplicationThis chapter describes the operating procedure of the application.3-1. Confirmation of Registration StatusThis is the first screen displayed after starting the application. The status of device registration can be checked.Items“Google Cloud Print” labelDetailsShows the ON/OFF status of each Google Cloud Print function.In case of the OFF status, the Google Cloud Print function is disabled.* The setting can be changed according to descriptions in “3-3-2. Settings”.* If the device has not been registered, this item is not displayed.“Printing through Cloud Server” labelShows whether or not printing through Cloud server is available.* If the device has not been registered, this item is not displayed.“Device Name” labelShows the name of the registered device.If the device has not been registered, “Not registered” is displayed.“Registration Status” labelShows whether or not the device has been registered to Google CloudPrint.“Setting” buttonSwitches to the sign-in screen of Administrator Settings.20
Quick Guide3-2. Sign inThis is the sign-in screen of Administrator Settings. The following functions are available. Function that enables the user to sign in to the administrator setting function of the application using theadministrator password registered on the MFP Function that enables the user to switch languages used at the application.ItemsDetails“Password” textboxEnter the administrator password registered on this MFP.“Language” dropdown listSpecify the language of the application.“Sign in” buttonSign in with the entered administrator password.If you succeed in sign-in, the Administrator Settings screen will bedisplayed.21
Quick Guide3-3. Administrator Settings ScreenThis is the screen to configure administrator settings. The following functions are available. Registration: Function that enables the user to register/delete devices on/from Google Cloud Print Setting: Function that enables the user to configure each setting of Google Cloud Print Proxy Setting: Function that enables user to connect with the external Google Cloud Print through the proxy server Log: Function that enables user to print an exception trace logButton used in common on each setting screenItems“Sign out” buttonDetailsLog out from the Administrator Settings screen.After logout, go to the screen where the application has been started(“3-1. Confirmation of Registration Status”).“Switch tab” buttonSwitch tabs to be displayed.[Register] [Setting] [Log] [Proxy Setting] [Register] [Setting]22
Quick Guide3-3-1. RegisteringIf the device has not been registered, a screen for registering the device name will be displayed.If the device has been registered, the device name and the account of who registered the device will be displayed, andthe button for deleting the device will also be displayed.3-3-1-1. If the device has not been registeredItemsDetails“Device Name” textboxEnter the device name to be registered.“Show” buttonGo to the authentication destination URL screen.* For details, see “2-3-2. Registering from Application”.23
Quick Guide3-3-1-2. If the device has been registeredItems“Device Name” textboxDetailsShows the registered device name.* Disable to input.“Delete” buttonDelete the registered device.24
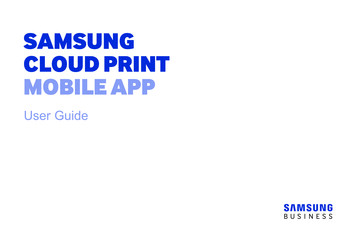
Quick Guide3-3-2. SettingConfigure each setting for Google Cloud Print.Items“Google Cloud Print” dropdown listDetailsShows the ON/OFF status of Google Cloud Print function.In case of the OFF status, the Google Cloud Printing is disabled.“Retry Interval” textboxWhen a network error occurs, set the interval at re-connection with theGoogle server.Setting range: 5 to 300 seconds“Save” buttonSave settings.25
Quick Guide3-3-3. Proxy SettingProxy Setting is configured to connect with the external Google Cloud Print through the proxy server.ItemsDetails“Server Address” textboxEnter the address of the proxy server.“Port Number” textboxEnter the port number of the proxy server.“User Name” textboxEnter the user name when the proxy authentication is required.“Password” textboxEnter the password when the proxy authentication is required.“Save” buttonSave settings.26
Quick Guide3-3-4. LogPrint an exception trace log at occurrence of any problem.Items“Start” buttonDetailsPrint the exception trace log.27
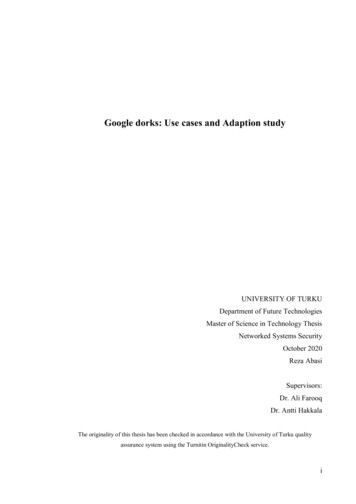
Quick Guide3-4. PrintingDocument saved on Google Cloud can be printed.Also, in a local network environment where the terminal cannot be connected with Google Cloud, printing can also beperformed through Google Chrome without using any driver.(Note)Device registration must be completed.All screen images in this document are captured from Google Chrome on the PC, so that they can only be used asreference.3-4-1. Printing through Google Cloud PrintAccess the device through the Google Cloud Print to print.As an example, it shows the method to upload a file to the Google Cloud Print and print it.(1) Sign in by accessing the Google Cloud Print management web page (https://www.google.com/cloudprint/) from theterminal.(2) After sign-in, Cloud Print information linked with the account will be displayed.Select “PRINT” and “Upload file to print".28
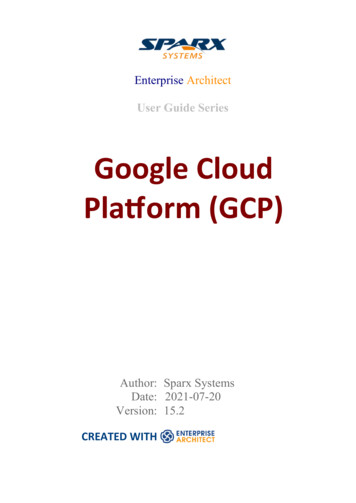
Quick Guide(3) Select a file.(4) After selecting a file, select a device to print the file.29
Quick Guide5) After configuring the required print settings, press the “Print” button to start printing.30
Quick Guide3-4-2. Local PrintingIn a local network environment where the terminal cannot be connected with Google Cloud, printing can also beperformed through Google Chrome without using any driver.(1) Start Google Chrome from the PC, and display the screen to be printed.It is possible to print a PDF file by dragging and dropping it to Google Chrome.(2) Display the print screen, and press the “Change.” button.This step is not required when the device registered on Google Cloud Print has already been selected.To display the print screen using Google Chrome, press Ctrl P ( P for Mac). Also, it can be displayed by clickingPrint (P) in the Google Chrome menu. For details, access the Google support web page.31
Quick Guide(3) Select a device from local destinations.(4) After configuring the required print settings, press the “Print” button to start printing.32
Quick Guide3-5. Deletion of DeviceThis function is used to delete the registered devices. Deletion can be made in the following two patterns. Deleting with this application Deleting through Google Cloud Print management web page3-5-1. Deleting with this applicationThe screen described in “3-3-1-2. If the device has been registered” is displayed, tap “Delete” button to start deleting.3-5-2. Deleting through Google Cloud Print management web page(1) Access the Google Cloud Print management web page (https://www.google.com/cloudprint/) from the terminal, andthen press “Printers”.Sign in to Google Services if it has not been done.33
Quick Guide(2) Select the device to be deleted, then press “Delete”.(3) Press “OK” to delete the device.34
Quick Guide4. Uninstall of the ApplicationThis chapter describes how to uninstall the application.4-1. Uninstall of the ApplicationFor uninstallation of the application, please refer to the dstore manual. Please keep in mind that only MFPadministrators are able to uninstall applications.Furthermore, to uninstall the application, Google Cloud Print is required to be set to OFF as described in “3-3-2.Settings”.(Note)Uninstalling the application will delete all information set with the application.(Note)When uninstalling the application, make sure that the application is not displayed on the control panel.(Example: Display the Menu screen by pressing the Menu key.)If the application is uninstalled while it is displayed, then the MFP may not work properly.In that case, turn the power off and on, and then uninstall the application again.(Note)Do not turn the main power of the MFP off during uninstallation of the application.In case the main power of the MFP was turned off by accident during uninstallation of the application, uninstall theapplication again.5. Frequently Asked QuestionsDepending on the specifications of Google Cloud Print, the document to be printed may differ from that has beenexpected.For details of Google Cloud Print (including methods for printing and sharing a printer, troubleshooting, and etc.), seethe following support web page for Google: https://support.google.com/cloudprint/?rd 135
Quick Guide6. Copyright / License Information / Trademarks6-1. Google Cloud Print SetupCopyright (C) 2014 KONICA MINOLTA, INC.All Rights Reserved.6-2. TempitaTempita Software LicenseCopyright (c) 2008 Ian Bicking and ContributorsPermission is hereby granted, free of charge, to any person obtaining a copy of this software and associateddocumentation files (the “Software”), to deal in the Software without restriction, including without limitation the rights to use,copy, modify, merge, publish, distribute, sublicense, and/or sell copies of the Software, and to permit persons to whom theSoftware is furnished to do so, subject to the following conditions:The above copyright notice and this permission notice shall be included in all copies or substantial portions of theSoftware.THE SOFTWARE IS PROVIDED “AS IS”, WITHOUT WARRANTY OF ANY KIND, EXPRESS OR IMPLIED, INCLUDINGBUT NOT LIMITED TO THE WARRANTIES OF MERCHANTABILITY, FITNESS FOR A PARTICULAR PURPOSE ANDNONINFRINGEMENT.IN NO EVENT SHALL THE AUTHORS OR COPYRIGHT HOLDERS BE LIABLE FOR ANY CLAIM, DAMAGES OROTHER LIABILITY, WHETHER IN AN ACTION OF CONTRACT, TORT OR OTHERWISE, ARISING FROM, OUT OF ORIN CONNECTION WITH THE SOFTWARE OR THE USE OR OTHER DEALINGS IN THE SOFTWARE.6-3. JsonCppCopyright (c) 2007-2010 Baptiste LepilleurPermission is hereby granted, free of charge, to any person obtaining a copy of this software and associateddocumentation files (the “Software”), to deal in the Software without restriction, including without limitation the rights to use,copy, modify, merge, publish, distribute, sublicense, and/or sell copies of the Software, and to permit persons to whom theSoftware is furnish
Google Cloud Print Setup is such an application that is used to link services provided by Google Cloud Print with the MFP. Using services provided by Google Cloud Print enables you to register a machine on the Cloud, delete a machine registered on Cloud, also enables you to check and control the service status. Reminder