Transcription
Viewer 6.5Installation GuideAir Force Departmental Publishing OfficeApril 2006
1.VIEWER 6.5 INSTALLATION . 31.1SYSTEM REQUIREMENTS. 31.2CLIENT-SIDE INSTALLATION. 31.2.1Installing Viewer Under Windows 98/ME/NT 4.0/2000/XP . 31.2.2Licensing Viewer 6. 5. 41.2.3Using the Viewer Under Different User Profiles. 41.2.4Using the Viewer with a Browser . 51.2.5Using the Viewer with Netscape and Mozilla . 51.2.6Using the Viewer with JAWS 5.0 . 61.2.7Using Signature Pads . 71.2.8Using Silanis Signatures . 71.2.9Rolling Back To Previous Versions . 71.2.10Uninstalling Older Viewers . 81.2.11Server-Side Installation (If Applicable) . 81.2.12Proxy Servers . 82.WHAT'S NEW AND KNOWN ISSUES . 92.12.22.3XFDL NON-CONFORMITIES . 9UNINSTALLING VIEWER . 9TROUBLESHOOTING . 9Viewer Installation Guide2
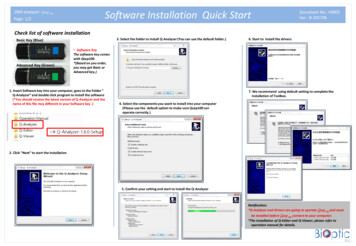
1. Viewer 6.5 Installation1.1 System Requirements.Before installing the Viewer, ensure that your computer meets the following systemrequirements: Operating Systems supported: Windows 98/ME Windows NT 4.0 sp6a Windows 2000 sp2, sp3, sp4 Windows XP sp1, sp2 Hardware Requirements: Processor: 500 MHz RAM: 128 MB Disk space: 40 MB Resolution: 800 x 600 in 16-bit color Web Browsers supported: Internet Explorer 5.0 sp3, 5.5 sp2, 6 sp1 Netscape Communicator 4.5 - 4.8 Netscape 6.1, 6.2, 7, 7.1, 7.2 3rd Party Products supported (optional): MSAA compliant screen readers, such as JAWS, Window-Eyes, orNarrator. Entrust Desktop Solutions 6.0 Silanis ApproveIt Desktop 5.7.1 Interlink ePad Signature Pad with version 6.22 drivers Topaz electronic signature hardware with version 3.61 drivers Any signature capture device compliant with WinTab version 1.1 Terminal Services supported (optional): Windows Server 2003 Terminal Services (must be set to more than 8-bitcolor)1.2Client-Side Installation.1.2.1 Installing Viewer Under Windows 98/ME/NT 4.0/2000/XPBefore you can install the Viewer, you must log on to Windows using the correct userprofile: Windows 98/ME — You can install the Viewer under any user profile. Windows NT 4.0/2000/XP — You must install the Viewer as an administrator.In either case, the installer will create a copy of the Viewer that is available to allusers on that computer, regardless of which profile they use to log on.Viewer Installation Guide3
NOTE: In some cases the auto-uninstaller did not completely uninstall previous versionsfrom the registry and therefore resulting in an error when opening an IMT/Form. Werecommend uninstalling any previous versions of Viewer manually via the Control Panelbefore installing Viewer 6.5.To install the Viewer:1. Using Windows Explorer, double-click the Viewer’s install package. The Viewer Installer starts.2. Follow the prompts to install the Viewer. You must agree to the terms of the end-user license agreement orthe Viewer installation will be cancelled. Unless you have a specific reason to do otherwise, we suggestyou accept the default directory; doing so simplifies filemanagement.3. When the installation is complete, select Launch the Application inthe final dialog box and click Finish. The Viewer launches and opens the PureEdge Viewer Helpform.1.2.2 Licensing Viewer 6. 5Once you have installed the Viewer, you will have to license it for each user profile. Todo this, you first need a serial number and license key for each user.NOTE: If you are working exclusively with licensed forms, you do not need to licensethe Viewer.To license the Viewer:1. Log on to Windows under the appropriate user profile.2. Launch the Viewer. A blank form opens.3. Click the About button in the toolbar, and then click License. The PureEdge License Agreement appears.4. Click Accept to agree to the terms of the license agreement.5. Click OK to apply your choice. A confirmation message appears.6. Click OK to complete the licensing and return to the Viewer.Note: Once you have licensed the Viewer for a user profile, that profile will be able toopen and work with forms freely. However, other user profiles on the computer will notbe able to access forms until they are also licensed.1.2.3 Using the Viewer Under Different User ProfilesViewer Installation Guide4
Once the Viewer is installed, it will be available to all user profiles on that computer.When the Viewer is first launched under a new profile, the Viewer’s preferences anddictionaries are copied to that profile. The preferences and dictionaries are thenmaintained separately for that profile, which means that each profile will have custompreferences and dictionary settings.Note: If you install IE or upgrade to version 5.0 or later after installing the Viewer, werecommend that you uninstall and re-install the Viewer. This will minimize installationand setup problems.1.2.4 Using the Viewer with a BrowserViewing forms in Microsoft and Netscape browsers requires an extension to be installedin those browsers. Normally, the Viewer’s install package automatically installs this file.However, if the installer is unable to locate your browser, the extension file may not beinstalled correctly. In these cases, you will have to copy the extension file yourself. Referto the readme.txt file included in the Viewer’s installation for more information.If you install a new browser after installing the Viewer, we recommend that you uninstalland re-install the Viewer. This will ensure that the correct software is installed for thebrowser version you are using, and will eliminate conflicts with the original installation.1.2.5 Using the Viewer with Netscape and MozillaThe Viewer works with Netscape Communicator 4.5 and 4.8, Netscape 6.1, 6.2, 7, 7.1,and 7.2, and Mozilla 1.7. When used with Netscape and Mozilla, the Viewer operates asa plugin. This requires that the file npmfv.dll be installed in the correct browserdirectory:For Netscape versions before 6.0, this is the Plugins directory:\Program Files\Netscape\Communicator\Program\Plugins\For Netscape version 6.x, this is the Components directory:\Program Files\Netscape\Netscape 6\Components\For Netscape version 7.x, the plugin directory is different depending onwhether you upgraded from Netscape 6 or installed a new copy ofNetscape 7.x.If you upgraded from Netscape 6, the directory is:\Program Files\Netscape\Netscape 6\Plugins\Viewer Installation Guide5
If you installed a new copy of Netscape 7.x, the directory is:\Program Files\Netscape\Netscape\Plugins\For Mozilla version 1.7, this is the plugins directory:\Program Files\mozilla.org\Mozilla\pluginsThe installer will install this file automatically; however, if the installer cannot locateyour browser you will have to copy the file manually.The plugin file is always installed with the Viewer in the following location: Viewer Install Directory \Plugin\npmfv.dllYou can copy it from this folder to the correct Netscape folder.If you are using Netscape version 6.x, you must also register the plugin with Windows.To do this:1. From the Start menu, select Run.2. In the Open field, type command and press Enter.3. At the command prompt, type:c:\ Netscape installation folder \regxpcom"c:\ Netscape installation folder \Components\npmfv.dll"4. Press Enter.Note: If you upgrade from an earlier version of Netscape to version 6.1 or later, werecommend that you uninstall and re-install the Viewer. This will minimize installationand setup problems.1.2.6 Using the Viewer with JAWS 5.0If you are using a release of JAWS 5.0 prior to build 813, JAWS will not work properlywhen the Viewer is embedded in a browser. To correct this problem, we recommendupgrading to a later build of JAWS. If that is not an option, you can install a specialJAWS script that has been provided.The JAWS script is installed with the Viewer in the following location: Installation Directory /Viewer x.x/JAWS/Viewer Installation Guide6
To enable JAWS through the script, copy all of the files to: JAWS Installation Directory /JAWSxx/Settings/ENU/1.2.7 Using Signature PadsThe Viewer will validate Signature Pad signatures without any additional hardware orsoftware. However, to capture signatures using Signature Pads, you require the signaturepad hardware and drivers, as well as the following .ifx files that are distributed as aseparate add-on to the Viewer:- tablet wintab.ifx (for generic WinTab signing)- tablet interlink.ifx (for Interlink signing)- tablet topaz.ifx(for Topaz signing)These .ifx files must be located in the following folder on your computer: Viewer installation directory \API\ version \System\1.2.8 Using Silanis SignaturesTo use Silanis signatures, you must install the Silanis ApproveIt Desktop software.1.2.9 Rolling Back To Previous VersionsIf you install a newer version of the Viewer on your computer, then decide that you wantto roll back to an older version; you must first uninstall all versions of the Viewer fromyour computer. You can then install the version you want to use.If you do not uninstall all versions first, you will encounter problems using the Viewer.Furthermore, if you install Viewer 6.5 on a computer with multiple users, roll back to anearlier version of the Viewer, and then reinstall Viewer 6.5, you may encounter problemsrunning the Viewer. In this case, the Viewer will not run under any profiles that havepreviously run the version 6.5 Viewer (with the exception of the account that installedViewer). If this has happened, you must locate and delete the "RunOnce" file for eachuser, as follows:1. Locate the user's application data for the Viewer. For example under Windows XPthis is located at:C:\Documents and Settings\ user \Application Data\PureEdge\Viewer x.x\prefsViewer Installation Guide7
2. Delete the RunOnce file in that folder.The next time that user logs in; the Viewer will run properly.1.2.10 Uninstalling Older ViewersThe Installer will attempt to uninstall older Viewers. This is intended to ensure that usersdo not run older Viewers, because they will reset the registry keys and prevent the currentof the Viewer from working properly.1.2.11 Server-Side Installation (If Applicable)1.2.11.1Mapping XFDL Form File ExtensionWhen you set up your server, make sure you map the XFDL form file extensions (.xfdland .xfd) to the MIME type for XFDL forms (application/vnd.xfdl). You need to enterthis map in the same file you enter all other MIME type maps. This file is different foreach kind of web server. (For example, some products place this information in aconfiguration file, others place it in a MIME types file, and still others place itelsewhere.)1.2.12 Proxy ServersIf your system uses a proxy server for Internet access, make sure you also set up theproxy server to allow the transmission of XFDL forms. The file extension for XFDLforms is .xfdl and .xfd, and the MIME type is application/vnd.xfdl.Viewer Installation Guide8
2. What's New And Known IssuesBe sure to read the 'ReleaseNotes en US.txt' file for complete information about newfeatures, changes, and known issues.2.1XFDL Non-ConformitiesPureEdge Viewer does NOT support the following:1. Using the next option to direct the focus to a new page.2. Justify for images in buttons and labels (images are centered).3. A printpages option with a border width setting greater than 1. If integersgreater than 1 are used then the border width around pages will remain at 1pixel.4. Bounding Box Around ItemsIn the Viewer, the size option in check and radio items changes the size of the boundingbox around the checkbox and radio button, not the item's actual drawn size. To changethe drawn size of a check or radio item, change the font size.2.2Uninstalling ViewerTo uninstall Viewer, use the Add/Remove Programs option under Windows Control Panel.2.3TroubleshootingIf you experience problems with the Viewer or an XFDL form, refer to this section for help.I get a ‘working offline’ error when I click buttons while in “Offline” modeSometimes when buttons are added to a form, the action the button performs is not setproperly (the type defaults to link, but in many cases should be changed to select). This isoften true of buttons that trigger an action in the form, such as the creation of a new rowof items. This can result in error messages while working in offline mode, since theViewer cannot perform a link action when in “Offline” mode. As this is a mistake in formdesign, you should notify the appropriate personnel in your organization. You can workaround this problem in two ways:1. Ignore the error messages and continue working. The error messages will notaffect the performance of the form.Viewer Installation Guide9
2. Switch to “Offline with Archiving” mode. In this mode, the Viewer will allowlink actions.However, remember that if you submit the form the Viewer will automaticallyarchive it.My browser is not displaying the correct version of the formIf you fill in a form using your browser and then close the browser window or use theBack button to exit the Viewer, your browser’s cache still only contains the originalversion of the form. When you try to view the modified form, the browser gets the formfrom the cache and does not display the correct version of the form. To prevent thisproblem, you need to clear your browser’s cache.Netscape Navigator (version 4.x or higher)In Netscape Navigator, you must clear both the memory cache and disk cache. To do this:1. Open Netscape Navigator.2. From the Edit menu, select Preferences. The Preferences window opens.3. From the Category list on the left side of the window, open the Advanceddirectory and select Cache. The right side of the window displays the Cache settings option.4. To clear the Cache, click both Clear Cache (or Clear Memory Cache andClear Disk Cache for earlier versions of Netscape).5. Click OK to save the settings.Internet Explorer (version 5.0 or higher)To clear the temporary cache:1. Open Internet Explorer.2. From the Tools menu, select Internet Options. The Internet Options dialog box opens.3. On the General tab, click Delete Files and click OK.To change Internet Explorer’s cache settings:1. Open Internet Explorer.2. From the Tools menu, select Internet Options. The Internet Options dialog box opens.3. Click Settings and select Every visit to the page.For additional assistance with Viewer installation, contact the AFDPO Help Desk atDSN 754-2438 (Commercial 202-404-2438) or email e-publishing@pentagon.af.mil.Viewer Installation Guide10
earlier version of the Viewer, and then reinstall Viewer 6.5, you may encounter problems running the Viewer. In this case, the Viewer will not run under any profiles that have previously run the version 6.5 Viewer (with the exception of the account that installed Viewer). If this has happened, you must locate and delete the "RunOnce" file for each




![Radiant Dicom Viewer Cracked Rib [REPACK]](/img/39/evemelt.jpg)
