Transcription
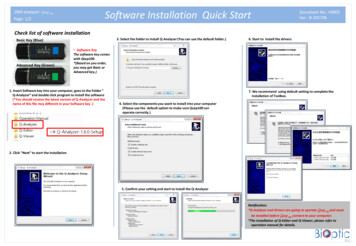
DNA analyzer: Qsep100Software Installation Quick StartPage: 1/2Document No.: F0002Ver.: B-201706Check list of software installation3. Select the folder to install Q-Analyzer (You can use the default folder.)Basic Key (Blue)Advanced Key (Green)6. Start to install the drivers Software KeyThe software key comeswith Qsep100.*(Based on you order,you may get Basic orAdvanced key.)1. Insert Software key into your computer, goes to the Folder ”Q-Analyzer” and double click program to install the software(*You should receive the latest version of Q-Analyzer and thename of this file may different in your Software key .)7. We recommend using default setting to complete theinstallation of Toolbox4. Select the components you want to install into your computer(Please use the default option to make sure Qsep100 canoperate correctly.)2. Click “Next” to start the installation5. Confirm your setting and start to install the Q-AnalyzerNotification:*Q-Analyzer and Drivers are going to operate Qsep100 and mustbe installed before Qsep100 connect to your computer.*The installation of Q-Editor and Q-Viewer, please refer tooperation manual for details.
DNA analyzer: Qsep100Page: 2/2Document No.: F0002Ver.: B-201706Software Installation Quick Start8A. Run without Software key(Run as Q-Analyzer “Basic”)* Please make sure that “Qsep100” is connected tothe computer.8A-1. Double click Q-Analyzer icon on thedesktop8B. Run with Software key(For Q-Analyzer “Basic” and “Advanced”)8B-4. Enter your password andstart to use Q-Analyzer* “WARNING”: After 15 errorsof password, Software keywill be locked.*All software key must be registered before useKey Registration :8B-1. Double click Q-Analyzer icon on the desktop8A-2. Use Q-Analyzer “Basic” to operate Qsep100 or analyzeyour data (Please refer to “Quick start – Operation” oroperation manual for details)Please go to support at BiOptic inc. s/support.aspx ormail to “service@bioptic.com.tw” for help.8B-5. Use Q-Analyzer to operate Qsep100 or analyzeyour data (Please refer to “Quick start – Operation”or operation manual for details)8 characters (characters and/or numbers)8 characters (characters and/or numbers)Notification:This window will pop up when you try to start Q-Analyzer withoutsoftware key or Qsep100 connecting.8B-2. Using Q-Analyzer “WITH” software key, you need to Fulfill theinformation in these columns.* Password comprises 8 characters in length contained characters and/ornumbers only and is case-sensitive*The information will store at software key but not in your computer. YouCANNOT change these information after press” OK”. Please be careful.If you have any question, please go to support at BiOptic inc. s/support.aspx or mail to“service@bioptic.com.tw” and seek for help.For using Q-Analyzer “Basic”, you need toconnect at least one device below to yourcomputerORSoftware keyQsep100For using Q-Analyzer “Advanced”, you need toconnect software key with/without Qsep100 to yourcomputer.8B-3. Double click Q-Analyzer icon on the desktop You can import the license code or enter the Q-Analyzer Viewerby clicking “Close” To activate “Advanced version” of Q-Analyzer, You have toconnect the software key to the computer with or withoutQsep100.Advanced Key (Green)*Software key is required to activate Q-Analyzer Advanced
DNA analyzer: Qsep100Operation Quick StartPage: 1/31. Turn On the power5. Cartridge and Buffer preparation:2. Launch Q-Analyzer 5-1. Unpacking Cartridge:Please follow the steps on the document of “Certification ofAnalysis “ (COA) that comes with cartridgeDocument No.: F0004Ver.: B-2017069. Click “Change Sample” and place your samples ( 20μl)*Spin down and make sure there is no air bubble in yoursample solution5-2. Add Separation buffer into “S” wellAdd dIH2O into other wells*buffers level and the indicating lineshould be the same5-3. Alignment marker preparation:Add 20 μl “20&1K DNA Alignment Marker” (C109100-60) into tubeincluded in the cartridge box. Add 10 μl “MINERAL OIL” on the topof DNA Alignment Marker.3. Main Window appears10. After unpacking cartridge, open thecartridge door and insert cartridge(Guiding groove facing front)6. Click “Change Buffer”4. Click “Connect” to establish the linkDisconnectedItem list of the Cartridge pack:CartridgeAlignment makerMineral oilDilution bufferSeparation bufferBuffer trayDropsTubes for Alignment MarkerConnected7. Place 20&1K DNA Alignment MarkerC109100-60 ( 20μl) at MA1 positionand the buffer tray on the trayholder.*Please make sure buffer tray havebeen placed correctly and fitted inthe holder*Spin down and make sure there isno air bubble in your DNA AlignmentMarker8. Secure Alignment marker (MA1):Hold the plate by your hand andpress down the tube of Alignmentmarker tightly into the well bythumb.11. Close the cartridge door*The door uses “presslock/press-release” mechanism12. Click “Latch”LatchThis box will give you the details of Cartridge
DNA analyzer: Qsep100Operation Quick StartPage: 2/312-1. New Cartridge Calibration:New cartridge need to be calibrated before using.Please proceed with the following steps13-2. Click on “Method” to select condition of electrophoresisDocument No.: F0004Ver.: B-20170614. Click “Run” to start the process*1. Click “Confirm”2. Click “HV Check”* The Storage and transportationcondition may influence the Gelmatrix and cause unstable current.Check current and see if stable ornot. After HV check, if current is stillunstable, please repeat this step 2-3times* You may run “Alignment Marker” with your samples by Check“Alignment Marker” and select marker that fit with sample range.3. Click “Calibrate”13-3. Click on “Result Name ” and type the name of result files For trouble shooting, please refer tooperation manual for details.NotificationPlease check the Alignment Marker has been locatedin correct position.Software will recognize two peaks in AlignmentMarker. DO NOT use sizing marker or DNA sampledoing “Calibrate” in new cartridge.13. Click on the blank column and designate the samplelocations, test method, sample duration, runs and resultname following steps 13-1, 13-2, 13-3 and 13-4①②③④13-4. Click “Para” and you can set the parameters (Baseline Factor, PeakThreshold, Calculate etc.)Introduction of the Signal Chart:Please refer to operation manual for details.Fluorescence Unit13-1. Click on “Sample Position” mark the position of sampleon the plate then press “OK”CurrentFluorescence IntensityCurrent Unit
DNA analyzer: Qsep100Operation Quick StartPage: 3/3Document No.: F0004Ver.: B-201706Introduction of the Control PanelFinishedProceedingNumber: Remaining runsPendingNumber: Remaining runsCBAEDA: System ControlB: Cartridge ControlC: Information BoxD: Testing StatusE: Testing SequencePrefix of the result name:Tool tip will show up the previewing of the result namePrefix of the result name:Sequence Number/Position/RunsCartridge Number:Contact Information:Company Name: BiOptic Inc.Address: 4F, No.108-3, Minquan Rd., Hsin-Tien District, New Taipei City, Taiwan (23141)Tel: 886-2-2218-8726, Fax: 886-2-2218-8727, E-mail: service@bioptic.com.tw
DNA analyzer: Qsep100Page: 1/1Software Installation Q-Viewer & Q-EditorBefore installation:*Q-Viewer and Q-Editor are the software that allow5-2. The Active Code will show up, if the Q-Editor is unregistered. Use “copy to clipboard” to copy thisactive codeuser to read data (Q-viewer) and to analyze data(Q-Editor) without software key or connectingQsep100 to the computer.*Q-Viewer is a Freeware, but Q-Editor is NOT.* Q-Analyzer installation is REQUIREDbefore Q-Editor & Q-Viewer installation.Check list of software installationBasic Key (Blue)Advanced Key (Green)Document No.: F0006Ver.: B-20150324232. Select the folder to save your results and settings ofexperiment3. Select the folder to install the software(You can use the default folder.)6. Go to BiOptic Inc. ort/qeditorlicense.aspx “ register an account and followthe steps to register Q-Editor. System will send thelicense to registered E-mail address. Software KeyThe software key shouldcome with Qsep100.*(Based on you order,you may get Basic orAdvanced key.)7. Download the license key and click “Import License”Install Q-Viewer and Q- Editor(The installation process of Q-Viewer and Q-Editor are identical.)4. We recommend using default setting to complete theinstallationRegister the Q-EditorNotification:*Each software key provides 5 Q-Editor license.If you need more license of Q-Editor, please contact localdistributor.1. Insert the software key into your computer, goes to the Folder ”Q-Viewer”, “Q-Editor” and double click program to install thesoftware(*You should receive the latest version of software and thename of this file may different in your software key.)5-1. The S/N number of Software key is required forregistration. You can find this number on the USB Plug ofSoftware key.Here is the S/N number of Software key8. Select the download file inthe “Dialog Box” and openit.9. The Q-Editor has been activated and ready to use
name of this file may different in your software key.) Before installation: *Q-Viewer and Q-Editor are the software that allow user to read data (Q-viewer) and to analyze data (Q-Editor) without software key or connecting Qsep100 to the computer. *Q -Viewer is a Freeware, but Q Editor is NOT. * Q-Analyzer installation is REQUIRED before Q .