Transcription
PCB ArtistIntroduction and Tutorial
2 PCB Artist TutorialCopyright NoticeCopyright WestDev Ltd. 1997-2008PCB Artist is a Trademark of Advanced Circuits. All rights reserved. E&OECopyright in the whole and every part of this software and manual belongs to WestDev Ltd.and may not be used, sold, transferred, copied or reproduced in whole or in part in anymanner or in any media to any person, without the prior written consent of WestDev Ltd. Ifyou use this manual you do so at your own risk and on the understanding that neitherWestDev Ltd. nor associated companies shall be liable for any loss or damage of any kind.WestDev Ltd. does not warrant that the software package will function properly in everyhardware software environment.Although WestDev Ltd. has tested the software and reviewed the documentation, WestDevLtd. makes no warranty or representation, either express or implied, with respect to thissoftware or documentation, their quality, performance, merchantability, or fitness for aparticular purpose. This software and documentation are licensed 'as is', and you thelicensee, by making use thereof, are assuming the entire risk as to their quality andperformance.In no event will WestDev Ltd. be liable for direct, indirect, special, incidental, orconsequential damage arising out of the use or inability to use the software ordocumentation, even if advised of the possibility of such damages.WestDev Ltd. reserves the right to alter, modify, correct and upgrade our software programsand publications without notice and without incurring liability.Microsoft, Windows, Windows NT and Intellimouse are either registered trademarks ortrademarks of Microsoft Corporation.All other trademarks are acknowledged to their respective owners.Number One Systems & PCB Artist are trademarks of Westdev Ltd and Advanced Circuitsrespectively.Issue date: 18/09/08 iss 3Advanced Circuits Inc.21101 East 32nd ParkwayAurora, CO 80011Toll free: 800-979-4PCB (4722)1-303-576-6610Fax: 1-888-224-3291
PCB Artist Tutorial 3ContentsCONTENTS .3CHAPTER 1. GETTING STARTED .5Introduction to PCB Artist . 5Introduction to the Tutorial . 5Additional Help .5System Requirements . 5Installation .5Removing the Software . 6Starting PCB Artist .6The PCB Artist Desktop. 6Toolbars . 7Cancelling Commands . 8Shortcut Keys .8Units . 8Grids. 9Shortcut Menus . 10Undo/Redo. 10Properties of items. 11Status Bar . 11Dockable Windows and Browsers . 12CHAPTER 2. CREATING THE SCHEMATIC . 13Schematic Design Tutorial. 13Starting a New Schematic . 13Adding Components . 14Placing Components . 25Adding Connections . 26Adding Power & Ground Symbols . 27Adding Connectors . 28Naming Connections . 30Your Schematic is Finished. 32CHAPTER 3. CONVERTING YOUR SCHEMATIC TO PCB . 33Converting the Schematic to PCB . 33Starting a New PCB Design . 33The New PCB Wizard . 34Schematic Design Completed . 38CHAPTER 4. PCB DESIGN EDITOR . 39Getting Started with the Design. 39Converting the Schematic to PCB . 39Changing the Number of Layers. 40Creating a Board Outline Interactively . 40Placing Components . 40Routing the Design . 41Automatic Routing . 42Unrouting the design . 43Manual Routing . 43Picking in tight areas. 46Pouring Copper into Areas . 46Checking the Design Integrity . 50Design Rules Checking . 51
4 PCB Artist TutorialViewing Power Plane Layers . 52Reports, Part Lists and Net Lists . 53Manufacturing the PCB . 53
Chapter 1 – Getting Started 5Chapter 1. Getting StartedIntroduction to PCB ArtistWelcome to the PCB Artist electronic design system. The system is built on an integrateddesign environment providing all the tools required to capture a schematic through to thedesign and layout of the printed circuit board (PCB).Introduction to the TutorialYou can quickly familiarize yourself with the PCB Artist features available and its designmethodology by working your way through this tutorial and using the Online Help for moredetail.This tutorial is broken down into logical sections following a typical Schematic and PCB designcycle.The Schematic design editor is used to capture your logical design and ‘drive’ the PCB design.However, the PCB design editor can be used with or without the schematic design as youwish.An important aspect of the PCB design is the production of professional manufacturing data,and hence the final PCB. PCB Artist has the facility to send the manufacturing data directly toyour PCB supplier. From this data they can produce the final physical PCBs.Additional HelpHelp is available in a number of formats; on-line help available by pressing the F1 key onyour keyboard at any time when using PCB Artist or by emailing/calling Advanced Circuits.System RequirementsPCB Artist runs under the Windows operating systems but it is recommended that WindowsXP is used. It cannot run under Windows 3.1x or Linux. A Pentium processor faster than 1Ghzand with at least 256Mb of RAM is recommended. It should be emphasized that PCB Artistdoes not require particularly ‘high-powered’ hardware to achieve good performance, a regularoff-the-shelf PC should be sufficient. A complete product installation requires at least 100Mbof hard drive space. A mouse with a wheel is recommended and an internet connection fordownloading the product from the PCB Artist web site. A CD-ROM drive is an option to loadthe product CD if it has been supplied this way.InstallationIt is assumed that you have successfully installed the PCB Artist product to your computerfrom the web download. The installation is straight forward using the wizard provided. Followthe instructions and use the default settings provided. The tutorial designs are also installedto allow you to pick up at key stages of the design process.
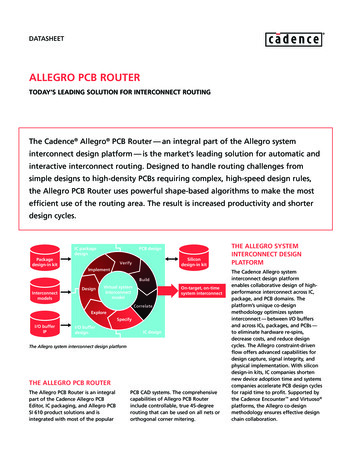
6 Chapter 1 – Getting StartedRemoving the SoftwareIf for any reason you need to remove PCB Artist from your computer, you should do this byselecting the Add/Remove Programs icon from the Control Panel on the Start menu.Select PCB Artist from the list of installed programs and click the Change/Remove button.Starting PCB ArtistDuring installation, a PCB Artist program icon is automatically addedto your desktop and a Advanced Circuits program group added to theStart menu and Programs.To start PCB Artist, simply double-click on the PCB Artist icon onyour desktop or select the PCB Artist menu item.The PCB Artist DesktopWhen you run PCB Artist, the main application window appears. You can open any numberand combination of different designs and library items together in this.The picture below shows you the major framework facets by name so that as they are usedin this tutorial you will understand what is being talked about.
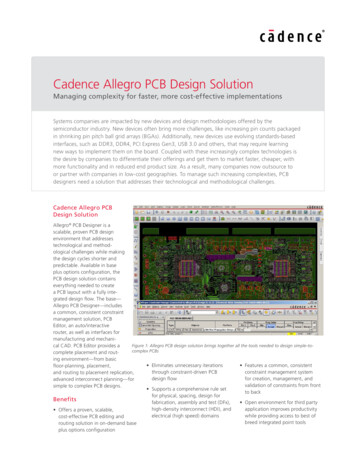
Chapter 1 – Getting Started 7ToolbarsPCB Artist is installed with a set of commonly used tools on the toolbars for you to use.General ToolbarSchematic Design ToolbarIf you hover the mouse over the toolbarbuttons a small tooltip is displayed showing thebutton function and its keyboard shortcut if onehas been defined.PCB Design Toolbar
8 Chapter 1 – Getting StartedCancelling CommandsAll dialogs and commands can be cancelled at any time by clicking the ESC key on thekeyboard. Sometimes this will need to be clicked a couple of times if you are ‘down’ in a submenu or lower-level option.Shortcut KeysAs well as the toolbars, PCB Artist has the ability for you to program your keyboard forcommonly used options or commands. This means that once programmed, you can press akey or key combination to enter a function or option. For experienced users, this makes theprogram's operation far more efficient.When PCB Artist is installed, you will find a set of shortcuts defined for you. A full report of allthe assigned keys can be obtained from the Help menu and Shortcut Keys option. Adialog is displayed to allow you to choose how the shortcut keys are reported.UnitsThe Units option on the Settings menu is used to define the units and the precision at whichthe co-ordinates and lengths displayed in the dialogs and edited by you are displayed. Thebasic working units can be changed using the Units: drop down list.For each type of units, you can specify aPrecision:. This is the number of decimalplaces displayed; the value is simplyrounded to the nearest last digit.
Chapter 1 – Getting Started 9GridsGrids are used in PCB Artist for defining the points or steps that items will snap to when theyare placed and for visible references in the design. For this, the Grids dialog on the Settingsmenu contains two sets of grid types: Working Grid and Screen Grid.The Working Grid page will allow you todefine the grid used for placement of designitems during manual interaction. The workinggrid is not visible but the Screen Grid (whichis visible) can be the same value, hencemaking it appear to be visible.The Screen Grid page is used to define thedisplay of 'dots' to guide you while designing.Size Steps: is used to define the ‘pitch’ ofthe grid and uses the Secondary Color todisplay them. The Primary Color is used todisplay another grid based on a 10 timeslarger size than the Secondary Grid.The Visible check box enables the grids to bedisplayed on or off, this can be set at anytime in the design using the shortcut key G .Snapping to GridThe Snap Mode shortcut can be displayed during editing by selecting the direct keyboardcommand Ctrl-G . By selecting the snap mode setting you can use predefined multiples ofthe Working Grid to move items for example.
10 Chapter 1 – Getting StartedShortcut MenusThe right hand mouse button can be used extensively throughout PCB Artist to displayshortcut menus, these are also known as context menus. These menus can be accessedduring an operation and contain a set of relevant 'context' commands.Once familiar with the system, you can access the shortcut menus by right clicking directly onthe item and picking the option from the menu.Undo/RedoPCB Artist contains unlimited multi-level Undo and Redo capabilities for use through theproduct. Undo can be used to reverse the last operations that have been completed. Undocan be used sequentially to undo more than one operation. It can also be a useful andflexible tool to interactively try different iterations of an operation, manual componentplacement for example.Undo and Redo are invoked using the standard Windows shortcut keys Ctrl-Z (and AltBackspace) and Ctrl-Y respectively. These are also available on the Edit toolbar as buttons.Redo is only available once an Undo has been performed, until then, it remains on the menubut is grayed out as unavailable. The number of undo levels can be set in the Preferencesdialog.
Chapter 1 – Getting Started 11Properties of itemsEach item in the design contains a set of characteristics which can be viewed or edited usingthe Properties option. Some items within the design are made up of several entities, each ofwhich is individually selectable and has its own properties that can be viewed.Item properties can be viewed byselecting the item and clicking onthe Properties option from theshortcut menu. It is quicker thoughto select the item and click theshortcut key Alt-Enter. Theexample left shows the Componentpage properties of a PCBComponent pad. You’ll notice thatother properties of the componentare available, such as Componentand Component Values.Status BarThe status bar at the bottom of the design window displays useful information about thedesign item selected. More detailed information is also available by selecting the item andusing the Properties dialog from the shortcut menu (key shortcut Alt-Enter).
12 Chapter 1 – Getting StartedDockable Windows and BrowsersAs part of the design toolset, you have a number of browsers available through theInteraction Bar.Each individual browser can be opened by selecting one of the three tabs at the bottom edgeof the browser. You can access Layers (in PCB only), Component Bin (in Schematics only),Goto and Add Component options.The Interaction Bar is available through the View menu and Interaction Bar F9 or byright clicking the mouse over one of the toolbars or menu bar and selecting it from theshortcut menu.
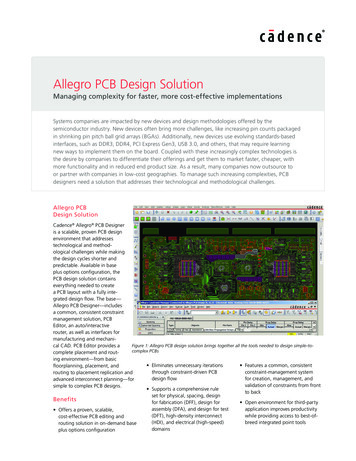
Chapter 2 – Schematic Capture Editor 13Chapter 2. Creating The SchematicSchematic Design TutorialDuring the tutorial we will create a Schematic design; this is how the engineer ‘conceived’ it:Obviously, once the sketch has been drawn properly as a PCB Artist Schematic it will lookquite a bit different.Starting a New Schematic To start a new Schematic design or a PCB designFrom the File menu, click New (shortcut key Ctrl-N)Check the New Schematic Design button and the Use Template button. The Default.stftemplate will help you get started quicker. More detail about Template files is available in theOnline Help.
14 Chapter 2 – Schematic Capture EditorClick the OK button to start a new Schematic design.Note: If you intend creating a PCB without a Schematic design (which you can do), just clickthe New PCB Design button and OK. Then skip to the chapter headed, Starting a NewPCB Design.Your PCB Artist window will look like this ready to start:For now, we will progress on to adding components to the design.Adding Components To add a ComponentThere are two methods for adding components; we will use the Interaction bar to startwith, you can also use the Add Component option as well.The Interaction bar has automatically been started when creating a new Schematic design. Ifit hasn’t, click the F9 shortcut key to display it.Select the Add Component browser tab at the bottom of the Interaction bar.
Chapter 2 – Schematic Capture Editor 15From the list of available libraries, select the Discrete library. Click on the small down arrowto reveal the drop down list and then make the selection.
16 Chapter 2 – Schematic Capture EditorThe Component list will be populated with components. Selecting this library willautomatically select the first component in the list as well.Scroll down the list of components using the vertical scroll bar. The first in the list is thegeneric ‘C’ component. You can also click in this list and type the first and subsequent lettersand numbers of the item required.Scroll down and select the component R. This is a generic resistor that we will change theValue for later on. You can also work with specific named parts if you prefer, both methodsare acceptable in PCB Artist.
Chapter 2 – Schematic Capture Editor 17A preview of both the Schematic and PCB symbols will be displayed (the PCB symbol is topmost in the preview).Once you have the correct component, you can add it by selecting the symbol preview anddragging it into the design. You can also add the component by selecting and dragging itsname.This is a one-shot process. If you wish to add more of the same type, drag another from thebin.The component is currently on the end of your cursor. To place it in the design, click the leftmouse button once.You need 3 resistors in total for the final circuit. Once the first one has been placed, pick anddrag 2 more from the Component Browser window. Position then in a stack like the picturebelow: To pan & zoom in the designTo view the resistors closer, roll the mouse wheel button forward to zoom in. If you zoom intoo fast (and too far), roll the mouse wheel button backwards (slowly). If you zoom too fareither way, press A on the keyboard to View All and then zoom in or out again. Shortcutkeys are also available for Zoom in Z and Zoom out U .You can zoom while the component is active on the end of your cursor.Zoom out to give yourself space around the resistors in which to place more components.
18 Chapter 2 – Schematic Capture Editor To add the capacitorsWe need 4 capacitors for this circuit. From the Add Component browser option again typeC in the component list. The component name will jump back to the C component in the list.The preview windows confirm this is the correct component. As with the resistors, this is ageneric component and we will change its value later on.As before, dragging a component from the browser will add another to the design. This timeonly drag out one capacitor to add C1 and then pause. The design will look like this:We will use a different technique to add more capacitors.Select the capacitor C1 in the design. Press the Ctrl-C keys on your keyboard at the sametime to Copy the capacitor. Now press Ctrl-V to Paste a copy of the capacitor into the design.You will see that an identical copy of C1 has been made and is named C2. These arestandard Windows commands.
Chapter 2 – Schematic Capture Editor 19Move C2 into position and just underneath C1 by moving the mouse. Single click to release.Now use Ctrl-V again, to add another capacitor C3 and then again to add C4.Your design now looks like this:Obviously in a design as simple as this, it would have been quicker to drag out 4 capacitorsbut the Copy/Paste principle is worth demonstrating. To switch off the displayed gridAt this stage we don’t really need to see the displayed grid dots so let’s switch them off. Click G to toggle the grid off. Press this key again will switch it back on at any time. To add the Op-AmpOur design requires an Op-Amp. We will use another technique to add this component.Click the Add Component button on the toolbar, shortcut key F8 .
20 Chapter 2 – Schematic Capture EditorThe Add Component dialog will display [All Libraries] in the library path.We need to swap libraries to use a different one. Click the small ‘down’ arrow on the rightside of Libraries: to reveal the fully libraries listing.From the list, select the AD.cml library.In the Component: list, type in AD844, this will select the name AD844AN on the list.
Chapter 2 – Schematic Capture Editor 21Click the Preview button to display previews of the Schematic symbol and PCB footprint.Click the Add button to add an opamp to the design.Depending on your current zoom level, you may need to roll the mouse wheel to zoom out alittle. You will need to give yourself some space on the design in which to place this newcomponent.Our Op-Amp (U1) is shown in the design on the end of your cursor as two gates (a & b).Gate a is defined as the logic gate and gate b is the power gate for this component.Click the mouse once to place the first gate. The second gate (power) will now be dynamic onthe end of your cursor ready for placing. Place it near gate a, we will move it later on.Click the Esc key to cancel this option.Your design should look something like this:
22 Chapter 2 – Schematic Capture EditorBefore we make the connections we should change the component values to be the onesrequired. This is easy to do because we’ve used ‘generic’ components. If you prefer to usespecific Part named components, you can also work this way with PCB Artist. To edit component ValuesDouble-click on the Value field (1K), the Text tab of the Properties dialog is displayed.Click on the Component Values tab.The Value field shows the current 1K value and is already highlighted. Simply click the Editbutton or double-click the blue highlighted field to edit the value required.
Chapter 2 – Schematic Capture Editor 23Type in 11K.When done, click the OK button to exit this dialog and OK again to exit Properties. Whenthe value of R2 is changed to 11K the design is updated.Using the same process (double-clicking on the Value name), edit the Value fields for all R’sand C’s in the design as shown below:R1 1KR2 11KR3 1.6KC1 68nFC2 200nFC3 0.22uFC4 0.22uFOur design now looks like this:If you select the whole component by mistake, you can still edit the Value field by clickingComponent Values tab on the Properties dialog. To add a drawing border to the designAt any time you can add a drawing border to the design. We will add one now.
24 Chapter 2 – Schematic Capture EditorUsing the Add Component Browser again ( F9 ), select the Schema library from thedrop down list. For reference, this is a schematic only component library and will not haveany PCB symbols associated with them.Scroll down the list and select the Letter drawing border. This has been previously created tofit a Letter page size.Like other components, pick Letter from the list or from the preview. Drag it into the designand position it on top of the existing components. You may need to zoom out a bit to see it.Use the Z key to zoom out or A to view all of the design. For speed you can also rollthe mouse wheel.As with other components, this can be moved later if you need to.
Chapter 2 – Schematic Capture Editor 25 To save the designAt this stage it might be a good idea to save your design. Go to the File menu and selectSave As. Save it to the Examples folder and call it something sensible, like Tutorial.sch.Placing ComponentsThe position of the components currently is as they were placed after adding them to thedesign. We need to place them around the Op-Amp so they can be used in our circuit. On areal design, this would be how you would work in practice. To remind you, the original‘drawn’ circuit looks like this:As before, move the components into position by picking and dragging them in one moveusing the mouse.Components can be rotated during move by clicking the R key. A single click of the R keywill rotate the component by 90 degrees. Click R more than once to rotate it by another 90degrees and so on.Note: You can also change the placement to fine tune it after adding the connections as well.The design will now look like this:You are now ready to add connections.
26 Chapter 2 – Schematic Capture EditorAdding ConnectionsConnections are added to the Schematic design to make connectivity between electrical pins.When translated to the PCB design, these connections give you your net list.You can add connections in a number of ways: Using the Add Connection option from the Add menu or from the SchematicToolbar, click on the pin to start adding a connection, or; Double-clicking on a component pin to start a new connection, or; 'Dragging' off an unconnected component pin to start a new connection.For this tutorial we will use the ‘dragging off pins’ method as this is the easiest to start with. To add connections by dragging off pinsTo aid the addition of connections to a schematic, you can simply ‘drag’ off an electrical pin,each click of the mouse will then add a corner. Moving over another electrical pin will allowyou to finish the connection.Using the design that you have created so far, zoom in on the area around R1 like the picturebelow.Click and drag (keeping the mouse button pressed down) off pin 2 of R1, this will start a newconnection. Move the mouse over U1a pin 2 and single click to finish.You do not have to be exactly over a pin to finish a connection; as long as the cursor is withinrange then it will snap onto the terminal.Click the mouse button once to finish. You’ll notice that the component pin terminals Xdisappear when you connect to it; this indicates that it is connected. To join connections togetherThere are a couple of connections which must be connected together. Let’s assume thatyou’ve made a connection and now you need to connect another to it using a junction dot.When you attempt to finish a connection on an existing connection, when you release themouse, the connection will automatically be added (as if it were an electrical terminal) and ajunction dot displayed to indicate it is connected.Following our sketched design above, complete the design adding the connections required.
Chapter 2 – Schematic Capture Editor 27Adding Power & Ground SymbolsPower and ground symbols are used in the Schematic to indicate a connection to a powersource. These symbols are required for aesthetic purposes and are not translated to the PCB(because they do not have PCB footprints associated with them). The signals they representare connected together at the translate stage by ‘implied’ connectivity. The power & groundsymbols themselves can contain inherent net name properties that are automatically usedwhen the symbol is attached to the net. To add Power symbolsUsing the Add Component browser on the Interaction bar F9 .The Schema library will still be selected after using it previously when adding the Lettercomponent. If for some reason it isn’t, select it now from the library list.In the Component list select 0V. You will see the symbol selected in the preview box.Remember, all of these symbols have no PCB Symbol associated with them, they areSchematic only symbols.Drag the 0V symbol into the design from the browser. Move it near to C4 and click themouse to release it.
28 Chapter 2 – Schematic Capture EditorUsing our working design, add 2 more 0V symbols. From the Add Component browser, thistime add one 15V symbol and place near C3. Now add one -15V symbol, place it near C4.Drag a connection off the end of the symbol terminal and connect as shown below.Your design will look something like this:Generally speaking you would now need to add some connector pins to connect the circuit tothe outside world.Adding ConnectorsFor this example, we will use a connector component from the library. To add Connector pinsUsing the Add Component browser from the Interaction bar F9 . Choose a new library,select the Conn std component library.
Chapter 2 – Schematic Capture Editor 29Select the 5WP connector component from the list. The PCB Symbol and Schematic Symbolpreviews will be displayed.Drag it into
6 Chapter 1 - Getting Started Removing the Software If for any reason you need to remove PCB Artist from your computer, you should do this by selecting the Add/Remove Programs icon from the Control Panel on the Start menu. Select PCB Artist from the list of installed programs and click the Change/Remove button. Starting PCB Artist