Transcription
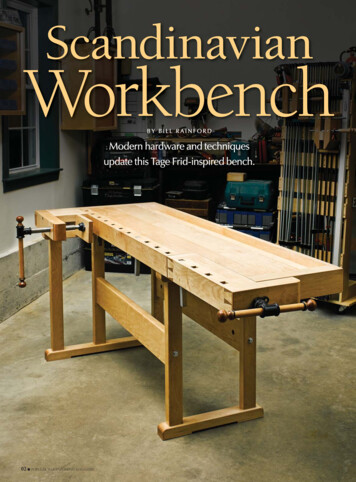
ScandinavianWorkbenchBY BILL RAINFORDModern hardware and techniquesupdate this Tage Frid-inspired bench.02 POPULAR WOODWORKING MAGAZINE
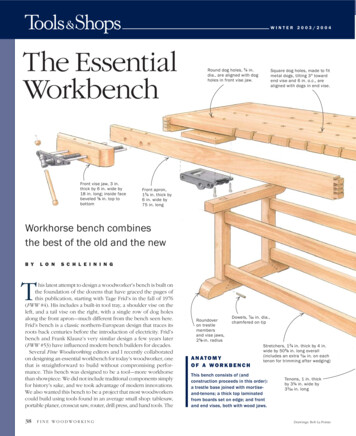
Scandinavian- or Continentalstyle workbenches are the vinylLP records of the woodworkingworld. These iconic benches have neverleft the scene. A few are classics and others are the flavor of the month. Somebenches in this style are masterworksand some are poor approximations ofan archetypical form. The trick is finding the workbench that hits all the rightnotes for how you work so you can goon to create your own opus.What’s Old is New AgainMuch as how Roubo and Nicholsonbenches have re-surfaced in recentyears and have their merits – they wereproducts of their times, the needs of thecraftsman and the availability of woodand hardware – so too has the Scandinavian style of workbench, most popular in the late 19th and 20th centuries.This newer style of bench made use ofa changing tool landscape and scarcityof wood, and often required a higherlevel of skill and/or mechanization toproduce. All of those forces are stillpresent in our modern world, wherewe want to conserve natural resources,mix old and new techniques and tooling and build something that is bothfunctional and aesthetically pleasing.When Tage Frid wrote about workbenches in the third volume of hisiconic “Tage Frid Teaches Woodworking” (Taunton) he described a state oftime (1948) wherein a good workbenchcould not be obtained in this country.His solution was to design and build abench similar to the one he was trainedon. Almost 70 years later, things are notmuch better on the retail front, with themajority of mass-produced bencheslacking in heft, design and quality.Thankfully we’ve had a resurgence intraditional woodworking and have amuch wider variety of tools, hardwareand literature, making today one of thebest times to be a woodworker sinceWorld War II.Design ConsiderationsMy formal training at the North BennetStreet School was on a German workbench in a classroom setting, so when itcame time to build my own workbench,“Take a piece of wood – plane,sand, and oil it, and you will find ita beautiful thing. The more you doto it from then on, the more chancethat you will make it worse.”Tage Frid (1915-2004),Danish-born woodworking teacher,furniture maker and authorI was inspired by Frid’s bench – but Ialso listened to the criticisms. Somefolks complained about the relativelyshort length, which was designed fora modest cabinetmaker in a classroomsetting, and the fact that larger folksaggressively planing could potentiallymove the middle-weight bench aroundif it wasn’t bolted to the floor. Otherssuggested that the joinery for the tailvise was too complex, and some notedthat the hardware Frid used is no longeravailable.To address some of those issues,I made several design modificationsand incorporated some new hardwareto build a bench that I am very happywith. I have, however, used the same orsimilar part names, listed in the sameorder, as Frid did in his book (in caseyou wish to view them side by side).Here are the highlights of my revisedbench: It is almost 2' longer than the original, coming in at about 7' long. It is a few inches wider (making itperfect for my armspan). I incorporated modern hardware– a Dieter Schmid shoulder and tailvise (Lie-Nielsen Toolworks has simlarvises), square metal bench dogs, theVeritas Bench Bolt Kit, slotted washersand more. The traditional joinery – dovetailed vises and skirt board, wedgedtenons, etc – cut by hand. I beefed up the stretchers to add additional weight, and decided on largershoulders to further stiffen the trestlelegs to resist racking. (The thickerstretchers also allow me to conceal thebench bolts for a cleaner look.)Supplies & Raw MaterialsI took my time to select nice, dense,clear and straight-grained hard maple;LEAD PHOTO BY DOUGLAS LEVY (@DOUGLEVY); DOG HOLE JIG PHOTO COURTESY OF JAMEEL ABRAHAM;ALL OTHER STEP PHOTOS BY THE AUTHOR; ILLUSTRATIONS BY DAN PESSELL FROM THE AUTHOR’S MODELit’s well-suited for workbench buildingand relatively plentiful in New England,where I live. Buy your wood well inadvance so that you can bring it intoyour shop, sticker it and allow it to acclimate to your shop for at least a week.While the wood acclimates, gatherall your hardware and vises, and noteany changes you need to make to yourjoinery or design to fit your hardware.Once the wood is acclimated, plane, ripand buck the pieces close to their finalsizes – but leave them a bit oversizedand again sticker them for a couple ofdays. (If you have a moisture meter,you can monitor the wood as it reachesequilibrium.)I built the bench in three major assemblies: the benchtop, the trestle legsand the vises.Benchtop & Square DogsI started with the large slab that makesup the majority of the top surface (itfinishes at 13 4" x 121 4" x 741 2"). You’llwant at least two 8/4 boards for this.If you can’t find wide clear stock, youcan use three narrower boards to makeup the blank. Make sure that the grainis oriented in the same direction forhandplaning during the final flattening.Joint the boards, thickness planethem to 1 32" heavy, then rip a littlewider than needed. I used my jointerSlightly off. With a simple jig, you can routthen repeat for a matching row of dog holesangled at 4 , then square the corners with achisel. My holes are 13 16" from side to side atthe top, and 7 8" front to back – but measureyours off your dogs.popularwoodworking.com 03
plane to further true up the edge(s) thatwill be glued up. At almost 2" thick, theedges provide plenty of glue surface,but I used some biscuits to aid in liningup the pieces and reinforce the joint.Once the glue dries, cut the slab toits final length, making sure to leavesufficient length for the tenons for theend caps.For the end caps and left vise (thestationary block through which the visescrew rides), I laminated an 8/4 and a5/4 board to get the required thickness.1"The 8/4 piece is oriented so it will bein the inside of the joint and receivethe groove; the 5/4 piece makes up theexposed face of the piece. Make surethe grain is going in the same direction for ease of planing and try to pickclean, clear grain – this will show inthe finished bench.I’ve worked on benches with squaredogs, round dogs or a mixture of both.I prefer square bench dogs becausethey’re in my opinion stronger, taller,have more surface area on the face to23 4"engage the wood you’re holding andless finicky than round ones. (If youprefer round dogs, you can always adda few well-placed 3 4" round holes toyour bench for them and for holdfasts.)I chose 8/4 stock and used a shopmade template and plunge router torout the square holes, which are angled4 to the right off vertical. Note: Theslots in the tail vise lean 4 to the left –the opposite direction to those on thebenchtop. Cut these two runs fromthe same board (with plenty of waste23 4"741 2"51 2"163 8"121 4"321 2"27 8"17 8"227 8"5 8"8"23 4"23 4"555 8"20"PLAN82"9"4"351 8"61 2"16"443 8"23 4"17 8"ELEVATION04 POPULAR WOODWORKING MAGAZINE23 4"
Scandinavian BenchNO.TDIMENSIONS (INCHES)WLBenchtop13 4123 4 1Cap piece5 8 1Left doghole strip17 8 1ITEMMATERIALCOMMENTS741 2Hard maple5 8" tenon both ends4555 8Hard maple4555 8Hard maple3 423 4321 2Hard mapleHard maple 1Left end cap 1Right end cap423 4163 8 1Back apron14771 2Hard maple 1Tool tray1 27731 2Maple ply 2Tool tray ramps13 413 451 2Hard mapleStretchers11 461 2443 8Hard maple 5*Legs17 827 8311 4Hard maple 2Base right13 423 4213 4Hard maple 2Base left13 423 4321 2Hard maple 4Foot pads3 823 46Hard maple 2Filler blocks13 421 4181 4Hard maple 1Left vise filler block13 473 883 4Hard maple 1Left vise23 4420Hard maple 1Left vise jaw1516Hard maple 1Right doghole strip17 84227 8Hard maple 1Right vise cap5 84227 8Hard maple 1Right vise long jaw23 4412Hard maple 1Right vise short jaw23 4453 8Hard maple 1Right vise large filler15 3231 8171 4Hard maple 1Right vise top filler7 827 8187 8Hard maple 1Right vise small filler7 831 823 8Hard mapleRight vise bench filler21 457 8211 2Hard maple 2 13 8" tenon both ends13 4" tenon both ends1 2" x 6" notch one end3 8" tenon both ends & left sideCut at same time as top strip; reverse jigL-shape; can make from 2 pieces*Four legs get 1"-wide x 5"-long stretcher mortises centered across width, 113 8" from top shoulder111 4"147 8"4"13 4"311 4"77 8"13"27 8"13 4"1 322"LEFT PROFILE3 8"213 4"RIGHT PROFILE; END VISE REMOVEDpopularwoodworking.com 05
Keep it square. As you glue on the dog-hole assembly, be sure to attachit square and level to the benchtop.Slice it clean. Make sure to engage the nicker on your rabbet planewhen starting this joint and retract it before the joint reaches its fulldepth (so as not to cut the fibers in the tenon and weaken the joint).Knife then cut. Use a cutting gauge and knife to lay out the stopped dado for the left vise filler,then chop it out.Hip to be square.There will be a lot ofpressure on this left visefiller block, so you wantclean tenons on bothends and the left edge.between) and simply flip the jig for thetail-vise portion.For the 5/4 cap piece that is gluedon over the dog holes, choose a cleanpiece and be careful during your glueup to avoid getting glue into the slots.I used a pneumatic nailer to shoot acouple of nails into the waste on eachof these blanks to help ensure thingsdid not move around during clamping.Once the glue is dry, cut the waste offthe end of the blank that will be affi xedto the benchtop and glue and clamp06 POPULAR WOODWORKING MAGAZINEit to the benchtop. (Here again I usedbiscuits to help line everything up.)Make sure to remove any mill marksfrom the cap.Once the glue is dry, rip the assembly, at the back edge, to final width(151 4" for me) and clean up that edgewith a handplane.Benchtop JoineryI used a router bit in a router table tocut the grooves on the end caps. But Iturned to my skew rabbet plane to cutthe rabbets that form the tenons on theends of the benchtop blank; that waseasier than trying to muscle this largeassembly onto machinery. The resultwas a nice crisp joint with no tear-out.Work carefully and test-fit as yougo to make sure the end caps fit nicely.At the front of the bench is a spacerblock – what Frid called the “left visefiller” – that supports the shoulder vise.To cut the groove for it in the front ofthe benchtop, after laying out the location with a cutting gauge and knife, Iremoved the material with a mortisingchisel, then cleaned up the stoppeddado sides with a wide chisel and thebottom with a router plane.Next, cut rabbets to form 3 8"-longtenons on both ends and the left side ofthe filler block. Orient the grain frontto back so that when this piece expandsand contracts, it does so from left toright, thus expanding into open spacerather than into the joint.The front of the shoulder vise – a23 4"-thick x 4"-wide x 20"-long block,which Frid calls simply the “left vise”– is connected to the left end cap viaone massive dovetail (pin on the cap,socket on the vise). I laid that out witha 1:7 ratio and cut it by hand.After dry-fitting the dovetail, cut astopped dado in the back of the left visefor the spacer block, then fine-tune thefit (shape the profile on the right endlater, after fitting the vise hardware).Now clamp up all the pieces you’vecut for the benchtop so far: shouldervise arm, filler block, main benchtopslab and both end caps.Lay out the three bolt holes – one on
either end and one through the shouldervise filler block – that will eventuallysecure these parts to the benchtop (seethe illustrations on pages 32 and 33).Take the end caps and shoulder visearm to the drill press and use a bradpoint bit to drill the through- bolt holes,then drill shallow counterbored holeswith a Forstner bit to accommodatethe bolt heads and washers. Make surethese holes go through the center of thedados on each of these pieces. Thenre-assemble and re-clamp the pieces.Using a 3 8" brad-point bit and thehole in the end cap as a guide, drillwith a hand drill as far into the topas you can. Remove the end cap andcontinue the hole using a longer drillbit with some tape to mark the depth,and drill the hole a little deeper than themax length you expect the bolt to enterthe benchtop. (Note: You’ll need a long3 8" bit or bit extender for these holes.)When drilling through the shoulder vise filler block, once you get theinitial hole started, you might want toremove it from the bench and use a drillpress or doweling jig to ensure the holegoes straight through. This hole needsto pass through the fi ller block intothe dado slot in the bench and into thebenchtop. (Make the hole in the fillerblock a little wider than the bolt to accommodate wood movement; you cancorrect for a little bit of being off whendrilling this hole without affecting thestrength of the joint.)From the underside of the benchtop, lay out the Forstner-bit holes thatwill accommodate the square nuts andwasher used to secure the ends of thebolts. To make sure they are drilled perpendicular to the bench bottom, I useda portable drill guide with a depth stop.I was not able to find a bolt longenough to go through the shoulder visesupport arm, through the support blockand into the benchtop, so I had to makemy own from 3 8"-threaded rod by usinfthread locker to secure a nut to one end.Know your depth. Test the hole depth with a bolt taped off at the maxdepth you expect it to reach, given the depth it will be into the end cap.(If you go this route, file off any roughedges because this frozen nut will bevisible from the front of the bench.)Re-assemble the benchtop and testout the fit of your bolts.To cut the top to accommodate thetail vise (and save my back), I used atrack saw, then finished up the insidecorner of the joint with a handsaw andcleaned it up with a chisel.The rear skirt board is made from5/4-thick maple. After milling it to size,remove any tool marks with a handplane, then use it as a straightedge tomake sure the en
When Tage Frid wrote about work-benches in the third volume of his iconic “Tage Frid Teaches Woodwork-ing” (Taunton) he described a state of time (1948) wherein a good workbench could not be obtained in this country. His solution was to design and build a bench similar to the one he was trained on. Almost 70 years later, things are not