Transcription
Chapter 10LampasLampas, also known as tissue or diasper, is a compound structure thatuses two warp systems and two or more weft systems. In a historicallampas, you will see a warp-faced ground, usually a satin structure,that is covered with motifs in one or more colors, rendered in a weft-facedstructure, usually a twill. The cloth has a distinct front and back side, thoughyarns have reasonable tacking points on both sides. Depending on the use ofthe finished cloth, a lampas can be used as a two-sided fabric, though moreoften it has a specified front. Pattern wefts work across the full width of thecloth, but discontinuous brocaded wefts may also be combined with patternwefts that work selvedge to selvedge.Lampas is such a versatile structure, with many variations possible. It hasbeen woven across the centuries by weavers in diverse cultures; among themthe superb 13th century Italian weavers of Lucca and Venice, the 16th centurySafavid weavers of Persia, and the French court weavers of the 17th and 18thcenturies. Theo Moorman, a 20th century English weaver of wall art, createda variation of this structure known as the Moorman technique in which shebrocaded pattern wefts into a translucent ground.Lampas has been used to create highly decorative, often narrative, textileson drawlooms and jacquard looms. Geometric loom-controlled patterns aswell as free-form motifs are possible on dobby and shaft looms, if you arewilling to handpick the designs. We will show you how to design both jacquardand dobby fabrics in lampas using Photoshop, but first we will discuss someissues involved with setting up the loom for lampas.Basic Structural IngredientsFirst we will describe a traditional structure used to create lampas, andthen we will explore some possible modifications.167
Two Warp Systems and Multiple WeftsThere are two warp systems in the structure—a warp-faced ground (ormain warp) and a thin, almost invisible, tie-down warp (sometimes called apattern warp). If you read the previous chapter on taqueté and samitum, thenyou are already familiar with the two warp systems of the tie-down warp andthe inner warp. In those structures, you never see the inner warp and it doesnot interlace with a weft to create a structure. The inner warp just acts as aplane within the center of the cloth, to hide or expose the wefts. In lampas,the inner warp becomes known as the ground (or main) warp. The groundwarp now becomes an important visible element. It also continues to performthe function of the inner warp in that it separates the pattern wefts so theyfall above or below it.Lampas also has an additional weft system, the ground weft, whichinterlaces with the ground warp in a structure. Unlike taqueté or samitum,the structures used for lampas can vary. Often you find a satin ground witha twill patterning, but it can be any combination of weaves: a plain weavewith a plain weave, a twill with a twill, a satin with a plain weave, a twillwith a plain weave, and so on. When the ground warp is a traditional warpfaced structure, and the pattern wefts weave as weft-faced structures, lampasproduces the light reflective quality of a damask–warp-faced versus weftfaced structures. In lampas, it is also possible to create a damask or shadedsatin in the ground structure with the weft-faced pattern yarns floating on topof it. French and English fabrics from the 18th century used this possibility,including discontinuous brocaded wefts, with inspiring results. We willexplain this possibility below.The Ground WarpThe ground warp is a visible element in lampas, usually sett for a warpfaced cloth. All the visual choices you would normally consider with asingle cloth are available when making the ground warp. In terms of color,you can use a solid warp, a striped warp, a painted warp, an ikat warp, aprinted or discharged warp, or any other variation you can conceive. Sincethe ground becomes the field on which the pattern motifs are displayed, it hastraditionally been a monochromatic silk, whose luster is emphasized by thesatin structure. However, dyeing or modifying the field into different colorareas can become a powerful and unexpected element, which contrast, evencompete with, the images created by the pattern wefts.Using different types of yarn in the ground warp can also affect the visualaspect of the cloth. If you use stripes of cotton interspersed with stripes ofsilk, you are setting up a dynamic shift between light reflection and lightabsorption. If you use yarns of varying materials that are compatible with asingle dye type, and paint the warp, you will see that yarns will absorb thedye differently, creating modulation of color in the cloth. The yarns do nothave to be the same grist either. Stripes of these different yarns can be sett atappropriate, varying densities across the width of the warp.168Chapter 10
Two Back Beams are BestFor centuries drawlooms were used to create beautiful historical lampasfabrics, so it was a natural progression for jacquard weavers to also producethem. It required setting up the loom with two back beams, and adjustingthe tension of the two warp systems separately. Since this required carefulmonitoring of looms and slowed down production, most mills today haveturned to weft-back structures, using only one warp for their polychromeweft fabrics (see Chapter 11). If speed is not essential to your work, don’t letthis issue dissuade you from trying lampas.Ideally, the two warps are beamed separately, since their take-up isdifferent. If you have two beams on your loom, and one has a finer tensiondevice than the other (a friction brake versus a ratchet), use the beam thatallows the subtlest changes for the tie-down warp.If you only have one beam on your loom, you can wind the ground warpon that and weight the tie-down (pattern) warp off the back of the loom. SeeAppendix B for more details on working this way.Using One Beam is PossibleYou can also beam the two warps together, as we have successfully doneon a TC-1 loom with one back beam. As you roll back the warps, separatethem by periodically inserting rods over the ground warp and under the tiedown warp. You can use dowel sticks or lengths of molding that are flat onone side and curved on the other. This will give the tie-down warp a slightincrease in circumference. As you weave, the tie-down warp will get tighter,but as you remove each rod, it will give the tie-down warp some slack andease the tension. This method worked fine for us, and we encourage you totry it.Structures for the Jacquard LoomRatio of the Two WarpsYou will have to make weaves that work according to the relationship ofyour warps. If you want a 5-shaft satin for the ground, and a 1/2 twill for thetie-down warp, you have to design the combination of structures according totheir ratio in the cloth. You can build up libraries of Pattern Presets for lampasthat are grouped according to this ratio. Have a folder of lampas weaves thatare 1:1, another at 2:1, another at 3:1, and folders for any other ratios that youmake. It will take time, but once you make and save these weaves as PatternPresets they are available to you for future work.Consider the Number of Weft SystemsYou also have to make the structures considering the number of patternwefts you will use. The structure for three pattern wefts, which is smaller thanthe structure for four pattern wefts, will not accommodate all the wefts in acloth that uses more than three pattern wefts. You don’t have to make all theLampas169
structures at once, just create new ones as you need them. Please rememberto save them, so you only have to make them once.Satin Ground with Twill Patterning10-1 4/1 Satin10-2 1/2 Twill10-310-4170Chapter 10First we will make a structure that has the two warp systems at a ratioof 1:1, using a 5-shaft satin for the ground and a 1/2 twill for the patternwefts. We will make versions of this using 2, 3 and 4 pattern wefts. The root5-shaft satin and 1/2 twill are shown to the left in Figures 10-1 and 10-2.These two structures do not repeat on the same number of ends andpicks, so when we combine them, we have to repeat them until theycomplete at the same time. If we repeat the five-end satin three times,and the three-end twill five times, it comes to 15 each. Since the ratio is1:1, we add them together and find that we need 30 ends in our template.We are using two pattern wefts, which work with the 3-end twill, so weneed 30 picks for pattern weft, plus 15 picks for the ground weft. Addedtogether, that comes to 45 picks in the structure. We also want to add twocolumns and two rows so we can make marks indicating the warp andweft systems.Create a template 32 pixels wide by 47 high. Pencil in the warp (Penciltool), using two different colors, on the top two rows, and pencil in theweft, using three different colors, on the left two columns. We used salmonto denote the tie-down warp and yellow for the ground warp. We usedyellow for the ground weft, purple for the first pattern weft, and green forthe second pattern weft. It should look like Figure 10-3.Now, make a new layer and draw in the satin structure on the groundwarps only. The easiest way to do this is to draw it once, putting the blackmarks on the intersection points of the yellow warp and yellow weft; thencopy and paste it. You are going to need three repeats in both the verticaland horizontal directions. After you have them all filled in, click off theeye next to the Background layer, so only the layers created by cutting andpasting the structure are visible, and go to Layers Merge Visible. Nameyour new layer 4/1 Satin or something that clearly identifies it to you. Yourtemplate should look like Figure 10-4.Now make another new layer. If you rename your layers, it will helpremind you what the data is on each of them. Name this one Twill. Weare going to have the tie-down warp work with all the wefts, includingthe ground weft. This means you have to expand the twill so each riserextends over three picks. (Lampas can be woven with different variations.By raising the tie-down warp over the ground weft, you enable thepattern picks to beat down and float over the ground weft, fully and easilycovering the ground warp.) It is probably clearer to dot in the twill withthe visibility of the satin layer turned off. Pencil in one repeat and copyand paste until it fills the field. You will have five repeats of the twill inboth the vertical and horizontal directions. Turn off the visibility of alllayers except the twill layers (cut and paste will create new layers). Havethe layer labeled Twill highlighted. This will ensure that the new merged
layer is still named Twill. Go to Layers Merge Visible and now you have onlyone layer for this structure. Your image will look like Figure 10-5 with theBackground layer visible and the satin layer turned off; and it will look likeFigure 10-6 with all three layers showing:Now you want to make a layer where the ground warp is raised for thesecond weft (this will allow pattern weft 1 to show on the face, and patternweft 2 to go to the back of the cloth). Name this new layer Pattern 1 Shows.10-5Again, you can pencil in one row and copy and paste untilyou have marks on every row for the second pattern weft.When finished, go through the process of turning off alllayers except this new raised pattern, and merge the newlayers. The image will now look like this when only theBackground layer and the new Pattern 1 Shows layer isshowing (Figure 10-7) and it will look like Figure 10-8 withall four layers showing.10-710-6Note: Follow alongwith the color imagessaved on the CDin the Chapter 10folder.10-8Lampas171
Now duplicate the layer you justmade, by dragging it down onto theMake New Layer button at the bottomof the Layers palette. Rename the newlayer Pattern 2 Shows. Turn off thevisibility of the previous layer so itdoesn’t confuse you. Make sure yournew layer is the active one. With theMove tool and the down arrow, movethe risers down one row so they fall on10-10the pattern weft 1 rows (purple in ourtemplate). Now you have a structurewhere the first pattern weft will go to the back of the cloth and the secondpattern weft will show on the face. It is shown in Figure 10-9. The Layerspalette for the complete lampas template, 10-10a.psd is going to look likeFigure 10-10.10-9Save the Pattern Presets10-11a Lampas 00110-11b Lampas 002172Chapter 10Now you want to save the lampas structures as Pattern Presets. Youneed to make a rectangular selection of 30 wide by 45 high. Place it overthe structural part of the design. Turn off the Pattern 2 Shows layer, andsave the first structure (Edit Define Pattern). Then turn off the Pattern1 Shows layer and turn on the Pattern 2 Shows layer. Save this structure.Now turn off both Pattern Weft Showing layers and save this structure.Now turn on both Pattern Weft Showing layers and save this structure.As you can see, we have four lampas structures from this one template.You can create a design with four conditions in the cloth: areas with theground warp showing (Lampas 004), areas with pattern weft 1 showing(Lampas 001), areas with pattern weft 2 showing (Lampas 002), and areaswhere both pattern wefts work together on the face of the cloth (Lampas003). Unlike taqueté and samitum, when you have all the pattern weftsworking on the face of the cloth, you will not see warp floats on the back,10-11c Lampas 00310-11d Lampas 004
since the ground warp in lampas (called the inner warp in those structures)weaves a structure with the ground weft. The Pattern Presets are shown onthe previous page.Damask Ground10-12a 4/1 SatinYou can have another variation in your lampas cloth, an area where theground warp weaves as a weft-face satin. There really isn’t any need to createstructures that have either of the pattern wefts working together or alonecovering the weft-face satin, since you won’t see the ground cloth under themanyway. Therefore we only need to create one structure, Lampas 005, whichis similar to Lampas 004, except the ground structure is weft-faced instead of10-12b Satin Flippedwarp-faced.A simple way to make this structure is to add another layer to yourtemplate. Name it Weft-face Satin, turn off the Satin layer, and pencil in yournew structure. If you flip your original satin horizontally, then invert it, youwill have a weft-face structure that meets the warp-faced structure so thatvertical and horizontal lines will tack each other. Often this is irrelevant for10-12c Flipped Satin Invertedjacquard design with highly organic, curving forms. However, if you haveany areas with verticals or horizontals, it will make the weaving appearcrisp. Since it is easy to do, why not do it? Here is the original structure,then flipped, then inverted, and an example of the two structures meetingand tacking each other correctly (Figures 10-12a–d).Your weft-faced satin, which you will pencil in on the ground warps andground wefts is going to look like Figure 10-12c.The new layer will look like Figure 10-13, and the new weave structure,Lampas 005, will look like Figure 10-14. The template is found on the CDas 10-14a.psd.10-12d Two Structures CombinedSave the template for future reference. If you find later that you madea mistake, you can easily make corrections. Also, we will start from thistemplate to make lampas with 3 or 4 pattern wefts.If you want to be reallycreative, you can also makeground structures for the othervariations of five shaft satin,the 2/3 satin and the 3/2 satin.Having four structures for theground warp means you cando a shaded satin image in theground, as well as have patternweft imagery. We will leave it upto you to make those structures,if you decide you want to try thistype of lampas.10-1310-14 Lampas 005Lampas173
Structures for More than Two Pattern WeftsThe structures we created can only be used with two pattern wefts, and thetwo warps having a ratio of 1 to 1. If you want to use three pattern wefts, orfour, or seven (Safavid weavers used this many), using the same combinationof satin and twill, then you need to create new structures for each possibility.Here is one way to do this, without redoing everything.Make a duplicate of your final layered 1:1, three weft lampas (one groundpick and two pattern wefts). We want to increase the size of the file so it addsa pick at even intervals, copying one of the pattern picks. If you followed oursuggestions for making your template, you will see it is only 47 rows high.We need it to be a number divisible by three, so go to Image Canvas Size.Change the height from 47 to 48. Be sure to anchor your image to the loweredge of the Anchor map, so that the new row will be added at the top of thefile. Click OK.Now go to Image Image Size. Make sure Constrain Proportions isunchecked, but Resample Image is checked with Nearest Neighbor showing.Change the height from 48 to 64. This number (48 16 64) will add onerow for every three rows in the current file. Photoshop will start at the top ofthe file and add the extra 16 rows in an even manner by copying and addingrows. Click OK and see what happens. In our template, Photoshop copied therows that were marked by green, our first pattern wefts. For some reason, italso added the top marks on our satin structure layer. So we have a few thingsto correct, but it is simpler than starting with nothing. The new file will looklike Figure 10-15 when the layers for background, satin, twill and Pattern 2shows are visible.Now we want to recolor the weft sequence. Let’s say we want to keep theprevious sequence (yellow, purple, green) and add a third pattern weft color ofblue. Make a new file one pixel wide by four pixels high. Dot in the four colorweft sequence you want and save as a Pattern Preset (Edit Define Pattern).It will represent the ground pick at the bottom, then the three pattern wefts.It is shown in Figure 10-16.Working on the Background layer, make a fixed sized rectangular marquee2 pixels wide by 60 pixels high and select your weft indicators. Now go to Fill,and choose the four-color Preset you just made. Your weft marks have beenre-colored to reflect the sequence of four weft systems—yellow as ground andpurple, green, and blue as pattern wefts.Let’s make sure each layer is correct. Leaving the Background layer visible,highlight the Satin layer. In our expanded file, the top row of the satin has beencopied onto the purple weft row also. Be sure you are working on the Satinlayer (it is highlighted in your Layers palette). Make a normal RectangularMarquee that encloses the row of black and white marks that you need toerase and hit Delete. They are now gone.Now turn off the Satin layer and turn on the Weft-Face Satin layer. Onceagain, Photoshop has added marks on the top purple row in this layer.Make sure you are working on the correct layer (the Weft-Face Satin layer is10-1510-16174Chapter 10
highlighted). The marquee is still showing, since we didn’t deselect it. Again,hit Delete. Now that layer is correct.Turn off the visibility of that layer, and turn on the visibility of the Twilllayer. Our Twill layer is fine, so there is nothing to fix. If you notice a problemin your file, fix it now.Individually, look at both your Pattern 1 Shows and your Pattern 2 Showslayers. Does one of them have single rows of marks while the other hasduplicate rows of marks? That is what has happened to our file. What we wantis to have the same pattern of single marks that land on a specific pattern weft.We can make one layer correct, copy it and duplicate it twice, then move itinto correct alignment for each pattern weft. Let’s do that.In our file, the Pattern 1 Shows layer is almost correct. For some reasonthe extra marks here are at the bottom of the file. Make sure you are workingon the correct layer, and drag your Rectangular Marquee (which you haven’tdeselected yet) down to the row you want to eliminate. Hit Delete. The layeris now correct and you can go to Select Deselect and remove the marquee.It turns out that these marks are falling on the third pattern weft rows. Let’schange the name of the layer to Hide Pattern Weft 3. Now, drag the layer overthe button at the bottom of the Layers palette for Create a New Layer. Youhave just made a copy of the layer. Do it again, either dragging the copy orthe original.Turn off the visibility of the Hide Pattern Weft 3 and one of the copies,having only one copy layer show. Make sure this is the active layer, and choosethe Move tool. With the down arrow, move the position of the marks downone row. Now they are falling on the green weft rows, your second patternweft rows. Change the name of the layer to Hide Pattern Weft 2.Turn off the visibility of that layer, and turn on the visibility of theremaining copy. Make sure this is the active layer. The Move tool should stillbe selected. Use your down arrow to move the marks until they fall on thepurple rows, your first pattern weft. Change the name of the layer to HidePattern Weft 1.These marks, on all the Hide layers, should be falling on the ground warpcolumns (the yellow columns). Remember, you are raising the ground warpto push those wefts to the back of the cloth.We still have a layer called Pattern 2 Shows, remaining from the originalfile, which we do not need. Drag that layer into the Trashcan at the bottomof the Layers palette. Save this file as a .psd, giving it a name such as3weft1to1.psd. From this file, we are going to make the lampas Pattern Presetsfor three pattern wefts at a warp ratio of 1:1. The extra pattern weft will enableus to make more Presets. We still have the possibility of a satin ground withall wefts at the back, or a weft-face satin ground with all wefts at the back.We also have three possibilities of a single pattern weft working on top of thesatin ground. There are three possibilities of showing two of the pattern weftswith the third going to the back, and there is one possibility of showing allthree wefts on the top. This means we can create a total of 9 Pattern Presets.Again, you can make the other satin configurations of 2/3 satin or 3/2 satinLampas175
for the ground structure, pushing the pattern wefts to the back, if you want tocreate a shaded satin ground for your lampas.Currently, our template looks like Figure 10-17, when the structure thatbrings pattern weft 1 to the surface is showing.The Layers palette for this template (10-17.psd) looks like Figure 10-18.Making Pattern Presets for a 3 PatternWeft Satin/Twill Lampas at a 1:1 RatioLet’s make the Pattern Presets working with 10-17.psd. Make a Fixed SizeRectangular Marquee the size of the weave structures, which is 30 pixels wideby 60 pixels high. Place it over the area of your template where the structureis. By choosing the rectangular marquee, then clicking anywhere near thelower right corner of the image, the selection will fall where it belongs. Besure you are not including the colored marks indicating either warp orweft. Have your Satin layer, your Twill layer, and all three Hide Pattern Weftlayers visible. The image looks like it has extremely long warp floats. Don’tworry, they are correct. In the cloth, picks will pack down together at theback of the cloth and the warp floats will not be exaggerated. Sometimes aflat representation is misleading to express the dynamics of compression andinterlacement in the actual fabric. Save this configuration as a Pattern Presetby going to Edit Define Pattern. We called ours Lampas 006, continuing thenumber sequence. Eventually we are going to save all our lampas structureswith a warp ratio of 1:1 as a subset under Lampas in the master Weave Presetsfolder (as well as the Chapter 10 folder) of the CD.Now turn off the layer for Satin and click on the layer for Weft-Face Satin,keeping the other layers, Twill and the three Hide Pattern Wefts, visible. Savethis as pattern Lampas 007.Now turn on the Satin layer again, and turn off the Weft-Face Satin (youactually have a choice which of these to use under your pattern wefts, butwe generally choose the satin structure). Keep the Twill layer visible. We aregoing to turn off the visibility of the Hide Pattern Weft 1 layer, but keep theother two Hide Pattern Weft layers visible. This structure will let PatternWeft 1 show on the face of the cloth. Save it as Lampas 008. Now turn onthe visibility of Hide Pattern Weft 1 layer, and turn off the visibility of HidePattern Weft 2 layer. Save this as Lampas 009, which brings pattern weft 2 tothe face of the cloth. Turn off the visibility of Hide Pattern Weft 3 layer andturn on the visibility of Hide Pattern Weft 2 layer. Save this as Lampas 010,which will be a structure that brings the third pattern weft to the surface.Go through the other combinations and save them. Make Pattern Presetsthat bring combinations of two pattern wefts to the surface. Make a Preset10-1710-18176Chapter 10
that brings all three pattern wefts to the surface (turn off the visibility of allthree Hide Pattern Weft layers). Here are the final Pattern Presets.10-19a Lampas 00610-19b Lampas 00710-19c Lampas 00810-19d Lampas 00910-19e Lampas 01010-19f Lampas 011Lampas177
10-19g Lampas 01210-19h Lampas 01310-19i Lampas 014We also made and saved structures (Lampas 015, 016, 017) for a lampasusing the satin ground, twill tie-down and only one pattern weft. They areillustrated below as Figures 10-20a-c, and you can find them on the CD as10-20a-c.psd. We saved the template for these structures as 10-20.psd.10-20a Lampas 01510-20b Lampas 01610-20c Lampas 017If you want to create a lampas cloth with the same structures of satinand twill, but use more than three pattern wefts, you have to expand yourtemplate and add the extra weft picks, then save new Presets. We haven’t doneit here, but encourage you to follow the procedure we just covered to makeadditional templates and structures using more than three pattern wefts.Satin/Twill Lampas at Warp Ratios of 2:1So far we have only made lampas structures that can be used with a warpratio of 1 to 1. If you have a different ratio, 2 ground to 1 tie-down, or 3ground to 1 tie-down, or something even greater, you also need to modifyyour templates and save each structural possibility as a Pattern Preset. The178Chapter 10
width of a template using a 4/1 satin ground and a 1/2 twill tie-down witha ratio of 2 ground to 1 tie-down needs to be 45 ends wide in the structuralarea. In the 1:1 template, each structure divided evenly into 15. Now you havetwo ground for every tie-down, so you double the number of ground ends to30 and add that to the 5 repeats of the twill to get 45 as the number of endsrequired for each of the two structures to return to their starting places atthe same time. Below are the structures we have saved on the CD for warpratios of 2:1 using the same satin and twill combinations in lampas as the 1:1Pattern Presets.2:1 Structures using 2 Wefts (ground and 1 pattern weft)10-21a Lampas 01810-21b Lampas 01910-21c Lampas 0202:1 Structures using 3 Wefts (ground and 2 pattern wefts)10-22a Lampas 02110-22b Lampas 02210-22d Lampas 02410-22e Lampas 02510-22c Lampas 023Lampas179
2:1 Structures using 4 Wefts (ground and 3 pattern wefts)10-23a Lampas 02610-23-b Lampas 02710-23c Lampas 02810-23d Lampas 02910-23e Lampas 03010-23f Lampas 03110-23g Lampas 03210-23h Lampas 03310-23i Lampas 034180Chapter 10
Satin/Twill Lampas at Warp Ratios of 3:1The template for the 3:1 ratio using these weaves needs to be 60 pixelswide in the structural area to accomplish the combined repeat of the twostructures (3 x 15 45 for the satin 15 for the twill 60). Here are thestructural diagrams for 3:1 Pattern Presets.3:1 Structures using 2 Wefts (ground and 1 pattern weft)10-24a Lampas 03510-24b Lampas 03610-24c Lampas 0373:1 Structures using 3 Wefts (ground and 2 pattern wefts)10-25a Lampas 03810-25b Lampas 03910-25d Lampas 04110-25e Lampas 04210-25c Lampas 040Lampas181
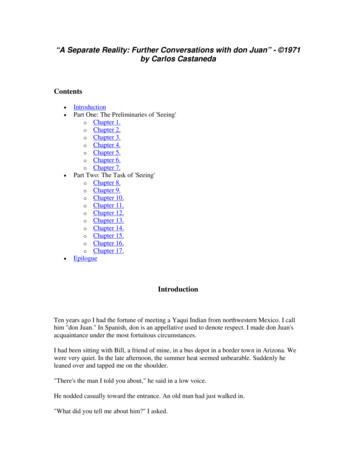
3:1 Structures using 4 Wefts (ground and 3 pattern wefts)10-26a Lampas 04310-26b Lampas 04410-26c Lampas 04510-26d Lampas 04610-26e Lampas 04710-26f Lampas 04810-26g Lampas 04910-26h Lampas 05010-26i Lampas 051The charts on the following page explain what is happening in each lampasPattern Preset that you can find on our CD.182Chapter 10
2 Weft Systems (1 Ground and 1 Pattern)Preset Number(Lampas #)NumberRatio of Warpsof WeftGroundTie-Down(Ground to 3524/1 Satin1/2 Twill01601903621/4 Satin1/2 Twill01702003724/1 Satin1/2 Twillnonenone13 Weft Systems (1 Ground and 2 Pattern)Preset Number(Lampas #)Ratio of WarpsNumber(Ground to Tie-down)of re00302103834/1 Satin1/2 Twill00502203931/4 Satin1/2 Twill00102304034/1 Satin1/2 Twill00202404134/1 Satin1/2 Twill00402504234/1 Satin1/2 TwillPatternWeft(s)To Topnonenone121&24 Weft Systems (1 Ground and 3 Pattern)Preset Number(Lampas #)Ratio of WarpsNumber(Ground to Tie-Down)of re00602604344/1 Satin1/2 Twill00702704441/4 Satin1/2 Twill00802804544/1 Satin1/2 Twill00902904644/1 Satin1/2 Twill01003004744/1 Satin1/2 Twill01103104844/1 Satin1/2 Twill01203204944/1 Satin1/2 Twill01303305044/1 Satin1/2 Twill01403405144/1 Satin1/2 TwillPatternWeft(s)To Topnonenone1231&22&31&31, 2 & 3PatternWeft(s)To TopImage DesignAs in the case with most compound structures, we suggest you design forthe face of the cloth. In lampas, this means designing for the total number ofends of the ground warp and thinking of all weft systems as one. Use squarepixels if you lack experience to know the true ppi of your final cloth. If you doLampas183
have that information, you can design using the real face Pixel Aspect Ratioof your cloth (face ppi/face epi).Expand for Total Number of EndsAfter finalizing your design, and reducing it to the number of colors thatrepresent the number of structures you will use, you have to expand
uses two warp systems and two or more weft systems. In a historical lampas, you will see a warp-faced ground, usually a satin structure, that is covered with motifs in one or more colors, rendered in a weft-faced structure, usually a twill. The cloth has a distinct front and back side, though yarns have reasonable tacking points on both sides.