Transcription
Connected Components Workbench Software Guide for Studio 5000 LogixDesigner Software UsersTerminology and Workflow Comparison
Table of ContentsConnected Components Workbench Software Terms in Studio 5000 Logix Designer Software3Studio 5000 Logix Designer Software Terms in Connected Components Workbench Software4Uploading from an Existing Controller for the First Time5Opening an Existing Offline Project7Opening a Saved Offline Project8Downloading an Offline Project to a Controller9Going Online with a Controller10Password Protecting Future Controller Access11Online Monitoring of Programs and Tags12Forcing I/O14Making Online Edits15Going Offline from a Controller17Saving an Offline Project18Generating a Project Printout19Changing the Offline File Controller Catalog Number and/or Version20Creating a New Controller Project22Select the Controller Catalog Number and Version22Configure the Communication Parameters24Add and Configure Any Plug-in and/or Expansion Modules25Verify Rung Settings for Optimal Viewing27Add a New Ladder Program28Open a Ladder Program29Select Logix Theme and View Instruction Mapping30Add a Ladder Instruction on a Rung31Assign a Tag to a Ladder Instruction32Add an Instruction Block on a Rung and Assign Its Input and Output Parameters33Add a Rung and Ladder Instructions Using LD Text Input36Copy and Paste a Ladder Rung from Studio 500038Password Protect Program, If Desired40Verify Controller Before Downloading42Importing an Add-On Instruction (AOI) or Subroutine to a Project43Using an AOI or Subroutine in a Program45Exporting and Importing Tags47Keyboard Toggle Bit Shortcut51Cross Referencing Tags52Renaming Tags53Data Types54Appendix A – Additional Micro800 Instruction Set Resources55
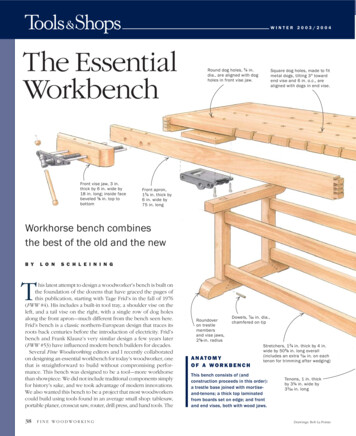
Connected Components Workbench Software Terms inStudio 5000 Logix Designer SoftwareConnected Components Workbench SoftwareStudio 5000 Logix Designer SoftwareAccept ChangesAccept EditsBuildVerify and AssembleCCWARC FileACD FileConnectGo OnlineConnectedOnlineConnection BrowserRSWhoConnection PathProject PathDiscard ChangesCancel EditsDisconnectGo OfflineDisconnectedOfflineDiscoverUpload and Go OnlineDownload with Project ValuesDownloadGlobal VariableController TagLockForceProject OrganizerController OrganizerRun Mode Change (RMC)Online EditingTest ChangesTest EditsToolbox, Instruction ToolbarLanguage Element ToolbarUpload with Project ValuesUploadUser-Defined Functions (UDFs)SubroutineUser-Defined Function Blocks (UDFBs)Add-On Instructions (AOIs)VariableTag3.BACK
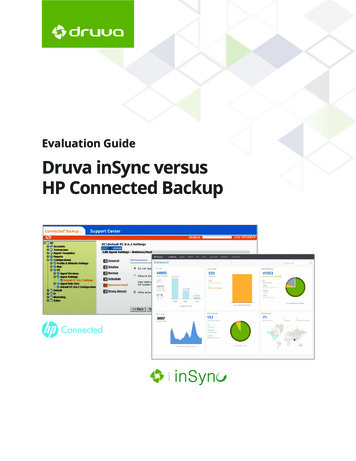
Studio 5000 Logix Designer Software Terms inConnected Components Workbench SoftwareStudio 5000 Logix Designer SoftwareConnected Components Workbench SoftwareAccept EditsAccept ChangesACD FileCCWARC FileAdd-On Instructions (AOIs)User-Defined Function Blocks (UDFBs)Cancel EditsDiscard ChangesController OrganizerProject OrganizerController TagGlobal VariableDownloadDownload with Project ValuesForceLockGo OfflineDisconnectGo OnlineConnectLanguage Element line EditingRun Mode Change (RMC)Project PathConnection PathRSWhoConnection BrowserSubroutineUDFTagVariableTest EditsTest ChangesUploadUpload with Project ValuesUpload and Go OnlineDiscoverVerify and AssembleBuild4.BACK
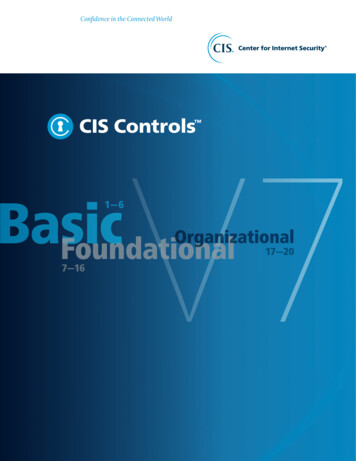
Uploading from an Existing Controller for the First TimeThe term Discover in Connected Components Workbench software is used for uploading from an existing controller for the first time.1.Open Connected Components Workbench software (under All Programs/Rockwell Automation/CCW).2.Click Discover on the Start Page.3.Find and click the desired Micro800 controller in the Connection Browser (RSWho) window, then click OK. Connectyour PC to a Micro810 controller using a USB cable and a 2080-USBADAPTER; to a Micro820 controller via Ethernet; to aMicro830 controller via USB; and to a Micro850 or Micro870 controller with either USB or Ethernet.5.BACK
If you get a Connection Error popup window or if the upload fails because “The imported databaseversion is more recent than the product database version.”, then most likely the controller wasprogrammed with a newer version of Connected Components Workbench software. Update yourConnected Components Workbench software to the latest version before trying again.4.The controller image will be uploaded into a new project, including any plug-in and expansion I/O modules physicallyfound connected to the controller. If the project in the controller does not have all of those physical modules that areconfigured within the image, then you will get the following error message: “The current project content does not matchthe content in the connected controller. The software will not automatically go online (‘Connect’) with the controller.”In this case, the best thing to do is to follow up with an Upload from the controller, which will sync up the offline imagewith the online image. The software will then automatically go online (‘Connect’) with the controller.5.You can save the offline project under a name of your choosing by selecting File- Save Project As 6.BACK
Opening an Existing Offline ProjectA Connected Components Workbench software project consists of a ProjectName folder containing a number of subdirectoryfolders and files. They must all be present to open the ProjectName.ccwsln file.1.Open Connected Components Workbench software (under All Programs/Rockwell Automation/CCW).2.Click Open Existing on the Start Page.3.Browse to and double-click the desired controller project folder, then double-click the CCWSLN file within that folder toopen the project.7.BACK
Opening a Saved Offline ProjectA Connected Components Workbench software CCWARC archive file is equivalent to a Logix ACD file in that the one file containseverything that you need to open up the Connected Components Workbench software project. However, you must import it first.1.Open Connected Components Workbench software (under All Programs/Rockwell Automation/CCW).2.Select File- Import Project and browse to and double-click the desired *.ccwarc file to import and open the project.TIP: It is recommended to use the single CCWARC archivefile for copying and sharing projects, instead of copying theentire folder that contains the CCWSLN file.8.BACK
Downloading an Offline Project to a Controller1.With the offline project open and the Micro800 controller window displayed, check if there is a connection (‘project’) pathdisplayed for the controller on the upper right-hand corner of the screen. If so, when you click Download, it will use thatpath to attempt to connect with the controller. If the path is no longer valid, click the eraser icon to delete it. Once thepath is deleted, or if no path is displayed to begin with, click Download and the Connection Browser (RSWho) windowwill open for selecting the controller to download. The path will be updated automatically once you select the controller.2.There are two options presented for downloading – with Project Values or without Project Values. Project Values area snapshot of the values of each tag (‘variable’) when the project was last uploaded (assuming the upload used was‘Discover’ or ‘Upload with Project Values’). Any tag (‘variable’) may also be assigned an initial value, in which case theinitial value is always used after a download. Any tag (‘variable’) that doesn’t have an initial value is set to zero whenDownload (without Project Values) is selected. Unless you actually want to zero out every non-initialized tag (‘variable’),click Download with Project Values.TIP: Downloading with Project Values isequivalent to the Studio 5000 behavior fordownloading tag values, but it does takelonger than without Project Values sincealmost all tags values must be downloaded.Using Initial Values on select tags anddownloading without Project Values willdecrease download time.TIP: To preserve a tag value in the controllerfrom being overwritten or zeroed duringdownload, use the download Data Protectionfeature accessible by right-clicking on thecontroller in the project organizer. DataProtection has precedence over Initial Valueand Project Value.TIP: During download, Data Protection hasprecedence over Initial Value, which then hasprecedence over Project Value.3.When the download is completed, a window to change the controller to run mode pops up (whether the controller waspreviously in run mode or not). Click Yes or No. The software will automatically go online with the controller at this point.9.BACK
Going Online with a ControllerThe Connected Components Workbench software term for going online with a controller is Connect.1.With the offline project open, check if there is a project (‘connection’) path displayed for the controller. If so, when youclick Connect, it will use that path to attempt to connect with the controller. If the path is no longer valid, click the erasericon to delete it. Once the path is deleted, or if no path is displayed to begin with, click Connect and the ConnectionBrowser (RSWho) window will open for selecting the controller to go online with. The path will be updated automatically.2.If there are any differences between the offline project and the online project, the Download/Upload confirmationwindow will appear. Choose between downloading the current offline project to the controller or uploading the onlineproject and saving it as the offline project.3.When you are online (‘Connected’) with the controller, note where the Connected text is displayed and where the buttonto Disconnect (i.e., to go back offline) is.10.BACK
Password Protecting Future Controller AccessOnce online (“Connected”), the controller can be password protected, if desired. This prevents unauthorized users from accessingthe configuration and programming in the Micro800 controller unless they first enter the password, which consists of 8 to 32characters in length. Valid characters are uppercase and lowercase letters, numbers, spaces, and symbols found on the keyboard.This password does not protect the offline file from edits or viewing. For this, you must separately apply passwords to individualprograms and/or UDFBs.1.While online with the controller, click Secure and select Set Password.2.Enter Password, reenter the password in Confirmation and click OK.11.BACK
Online Monitoring of Programs and TagsThe Connected Components Workbench software term for Online is Connected.1.Once online with the controller, double-click the program name icon under Project Organizer of the program that youwant to monitor. Blue is the rung color that is used to indicate that the rung logic is false and red is the rung color that isused to indicate that the rung logic is true.2.To monitor the tag values in list format, double-click any tag name to bring up the Variable Monitoring window. Programtags are listed under the Local Variables tab and user-created controller tags are listed under the User Global Variablestab.12.BACK
3.To open a separate screen of all local program tags, double-click the Local Variables icon under the program name in theProject Organizer.4.To open a separate screen of all global controller tags, double-click the Global Variables icon under the program namein the Project Organizer.13.BACK
Forcing I/OThe Connected Components Workbench software term for Force is Lock.1.While monitoring the I/O tags under Global Variables, click the Lock checkbox for each I/O tag that you want to forceon or off. For outputs, check the Physical Value checkbox to force the output on and uncheck the Physical Valuecheckbox to force the output off. The output LEDs for forced outputs on the Micro800 controller will correspond tothe forced value. For inputs, check the Logical Value checkbox to force the input on and uncheck the Logical Valuecheckbox to force the input off. The input LEDs for forced inputs on the Micro800 controller will correspond to the actualinput value, not the forced value.The FORCE LED on the Micro800 is on whenever there is at least on I/O point being forced. All forces are cleared afterpower cycle.14.BACK
Making Online EditsThe Connected Components Workbench software term for Online Editing is Run Mode Change (RMC).1.While monitoring the ladder program, click the Run Mode Change icon. The ladder program will change to appear as ifit is offline, even though the software is still online (‘Connected’).2.Make your desired changes to the logic and/or tags, then test edits by clicking the Test Changes icon to the immediateright of Run Mode Change.15.BACK
3.To assemble the online edits to make the change permanent, click the Accept Changes icon to the right of theTest Changes icon.z4.To cancel the online edits to undo the changes, click the Discard Changes icon to the far right of Run Mode Change.16.BACK
Going Offline from a Controller1.Double-click the Micro800 controller icon under Project Organizer to bring up the Micro800 window. Click theDisconnect button on the upper right-hand corner of the screen to go offline.17.BACK
Saving an Offline ProjectA Connected Components Workbench software CCWARC archive file is equivalent to a Logix ACD file in that the one fileencapsulates the entire Connected Components Workbench software project. However, you must export the project to save it inthis file format.1.Select File- Export Project , browse to the desired directory and enter a file name (which will be given a .ccwarcextension) to save (‘archive’) the project to.18.BACK
Generating a Project Printout1.Select Device- Document Generator (print). The only options are what is shown on this screen.19.BACK
Changing the Offline File Controller Catalog Number and/or VersionYou can upgrade the controller project version for the existing controller catalog number to match the installed version ofConnected Components Workbench software. Alternatively, you can change to another controller catalog number at the samecontroller project version as the installed version of Connected
While online with the controller, click Secure and select Set Password. 2. Enter Password, reenter the password in Confirmation and click OK. 12. BACK Online Monitoring of Programs and Tags The Connected Components Workbench software term for Online is Connected. 1. Once online with the controller, double-click the program name icon under Project Organizer of the program that you want