Transcription
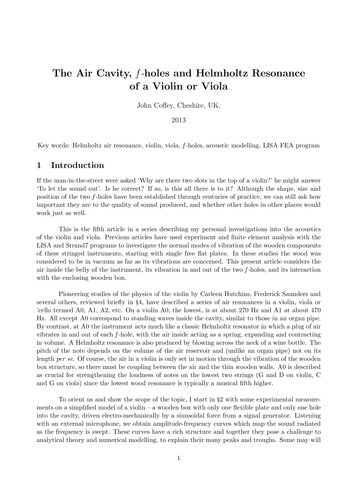
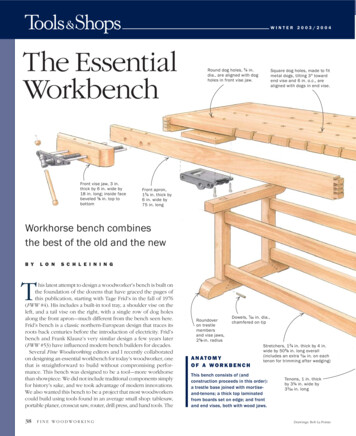
STWINTER 2003/2004The EssentialWorkbenchFront vise jaw, 3 in.thick by 6 in. wide by18 in. long; inside facebeveled 1 8 in. top tobottomRound dog holes, 3 4 in.dia., are aligned with dogholes in front vise jaw.Square dog holes, made to fitmetal dogs, tilting 3 towardend vise and 6 in. o.c., arealigned with dogs in end vise.Front apron,1 3 4 in. thick by6 in. wide by75 in. longWorkhorse bench combinesthe best of the old and the newB YL O NS C H L E I N I N GThis latest attempt to design a woodworker’s bench is built onthe foundation of the dozens that have graced the pages ofthis publication, starting with Tage Frid’s in the fall of 1976(FWW #4). His includes a built-in tool tray, a shoulder vise on theleft, and a tail vise on the right, with a single row of dog holesalong the front apron—much different from the bench seen here.Frid’s bench is a classic northern-European design that traces itsroots back centuries before the introduction of electricity. Frid’sbench and Frank Klausz’s very similar design a few years later(FWW #53) have influenced modern bench builders for decades.Several Fine Woodworking editors and I recently collaboratedon designing an essential workbench for today’s woodworker, onethat is straightforward to build without compromising performance. This bench was designed to be a tool—more workhorsethan showpiece. We did not include traditional components simplyfor history’s sake, and we took advantage of modern innovations.We also wanted this bench to be a project that most woodworkerscould build using tools found in an average small shop: tablesaw,portable planer, crosscut saw, router, drill press, and hand tools. The38FINE WOODWORKINGRoundoveron trestlemembersand vise jaws,2 1 8-in. radiusDowels, 7 16 in. dia.,chamfered on tipANATOMYOF A WORKBENCHStretchers, 1 3 4 in. thick by 4 in.wide by 50 5 8 in. long overall(includes an extra 1 16 in. on eachtenon for trimming after wedging)This bench consists of (andconstruction proceeds in this order):a trestle base joined with mortiseand-tenons; a thick top laminatedfrom boards set on edge; and frontand end vises, both with wood jaws.Tenons, 1 in. thickby 3 1 4 in. wide by3 1 16 in. longDrawings: Bob La Pointe
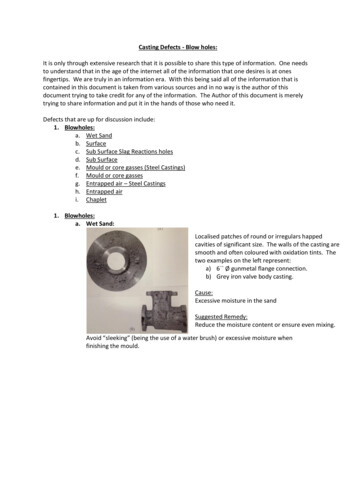
78 1 2 in.27 3 4 in.2 1 2 in.34 1 2 in.32 in.1Top slab, 2 2 in.thick by 26 in.wide by 73 3 8 in.long overall51 in.Tongue, 3 4 in. thickby 11 16 in. long28 in.SlotEnd caps, 1 3 4 in. thick by6 in. wide by 27 3 4 in. long,are glued to the top at thefront and barrel-bolted atthe center and rear.Wedges, 5 1 2 in.Top dovetail iscentered on slot.Trestle top member,3 in. thick by 3 in.wide by 25 3 4 in. longUpper tenons, 1 1 2 in. thick by2 1 4 in. wide by 3 1 16 in. long(includes an extra 1 16 in. fortrimming after wedging)End vise jaw, 3 in.thick by 6 5 8 in. wideby 27 3 4 in. long, arebeveled 1 8 in. top tobottom on the insideface.SOURCES OF SUPPLYPREMADE BENCHTOP SLABSGrizzly Industrial800-523-4777; www.grizzly.comTrestle legs, 3 in. thickby 3 in. wide by 31 1 16 in.long, including tenonsLee Valley Tools800-871-8158; www.leevalley.comWoodcraft800-225-1153; www.woodcraft.comQUICK-RELEASE FRONT VISEWoodcraftLower tenons, 1 1 2 in.thick by 2 1 4 in. wideby 2 1 2 in. longVERITAS TWIN-SCREW VISELee Valley ToolsSTEEL BENCHDOGS (SQUARE)Highland Hardware800-241-6748; www.tools-for-woodworking.comTrestle feet, 3 1 2 in. thick by3 1 2 in. wide by 28 in. longROUND BENCHDOGSLee Valley ToolsTOOLS & SHOPS 200439
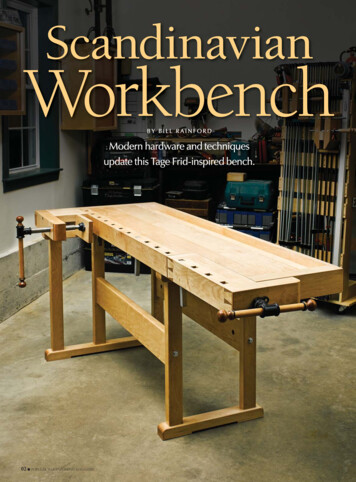
BASEA S S E M B LYBLIND MORTISE-AND-TENONS ARE PINNED FOR STRENGTHThe deep mortiseand-tenon joints areeither draw-pinnedor wedged to ensuredecades of rigidity.First, assemble thetrestles, then addthe long stretchersto complete thebase.The feet are pinned to the legs. Start by drilling the dowel holes in the feet, dry-fitting the joints, and transferring (left)the dowel-hole locations to the tenons. Then use a center punch (center) to offset those locations slightly on the tenons,creating the draw effect. Last, apply glue to all surfaces, assemble the joint, and drive home the dowels (right).only heavy-duty tool I used was a 3-hp tablesaw. Ripping lots of 8/4maple puts a strain on even a large saw, so use a clean, sharp blade.A durable workbench requires beefy partsAvid woodworkers themselves, FWW editors regularly visit shopsacross the country, and they see a wide array of workbench configurations. Like all woodworkers, they know what they like anddon’t like. In the end we all compromised a bit, but we reached asolid consensus. My own involvement arose from having spent thelast year researching and writing a book on workbenches (look forit in the fall of 2004 from The Taunton Press). I was commissionedto finalize this design, write the article, and build the bench.A thick, solid top—We decided on an overall size of 28 in. wideby 6 ft. long. Add a few inches for vise jaws, and it’s a nice, big top.The editors thought 2 in. in top thickness would be plenty, with extra thickness at the edges, but I made this top 21 2 in. thick becauseit wasn’t much more difficult to mill and laminate thicker pieces.However, if you start with a premade bench slab, the standard13 4-in. thickness offers plenty of mass and solidity for serious handtool use, especially after adding the thicker apron and end caps.Gluing up the slab allowed me to machine the square dog holesbefore the pieces were assembled. Round dog holes might be abetter option for a premade slab because square ones are best cutwhile the top slab is in pieces.Heavy, rigid base—I wanted the benchtop and base to be nicelyproportioned. Many benches I’ve seen look like top-heavy slabson spindly legs. Also, it was important that the bench not rack orskid across the floor under heavy handplaning. A thick trestle base,A jig makeseasy workof mortisesThere are 16 mortises(and tenons) in the basebut only two differentsizes. Make two mortising jigs to speed up layout and guide the chisels.The jig is made from threeblocks glued and screwedtogether, with a fenceattached on each side tohug the workpiece.40Locate and lay out the mortises.With the jig, this job should go quickly.FINE WOODWORKINGDrill out most of the waste. Thelayout lines will guide you. For theblind mortises, set the drillpress’s depth stop.Chop out the rest with chisels. Remove most of the material with a 1 2-in.chisel before switching to a wider one.The jig will guide the chisels precisely.
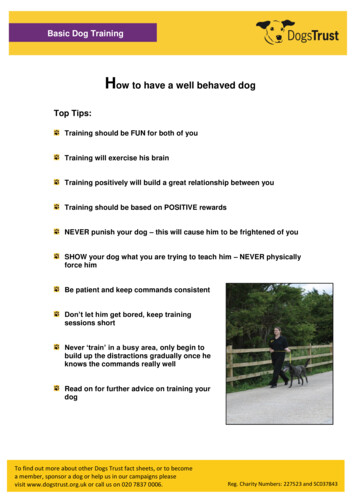
THROUGH-TENONS ARE WEDGEDWedge the top members and stretchers. The slots in the tenons areangled 5 to match the wedge angle. A hole is drilled at the base ofeach slot to prevent splitting. Apply glue to all surfaces, including thewedges and slots; assemble the joint; and drive home the wedges(above), using a block of wood to protect them from direct blows. Last,connect the two trestles with the upper and lower stretchers (below),wedging their tenons in place.Photos: Asa Christianajoined with pinned or wedged mortise-and-tenons, guarantees stability. I laminated 8/4 lumber to make these thick members (andthe top slab) because 8/4 is readily available in most regions.Splitting the stretchers, two high and two low, leaves a perfectopening for a future cabinet with drawers. The traditional single,wide stretcher would have saved some time, but it also wouldhave blocked this natural storage area.Innovative vises—Hundreds of woodworkers probably wouldsay they could not get through a day without a conventional tailvise, which is designed primarily for clamping things flat on thebenchtop between dogs. Others would say the same for a shoulder vise, which offers the capability of clamping workpieces between its jaws without interference from guide bars or screws. TheVeritas Twin-Screw Vise incorporates some of the capabilities ofboth types, allowing long boards or large panels to be clampedwith benchdogs as well as clamping an upright board up to 15 in.wide for operations such as dovetailing. The two screws are connected with a chain, preventing the jaws from racking no matterwhere a workpiece is located or which row of dog holes is used.I’ve always loved the look and performance of thick wooden jawson a front vise but found it tedious to crank the long screw in andout constantly. I was tempted to install a cast-iron, quick-actionRecord-style vise, until I found a German-made quick-action visescrew and guide bars at Woodcraft. That allowed me to design awooden front jaw to match the one I made for the Veritas end viseTOOLS & SHOPS 200441
BENCHTOPGLUE-UPMAKE UP THE TOP SLAB IN SECTIONSThe benchtop ismade of 8/4 maple,set on edge. Makethe top in sectionsnarrow enough to fitthrough thethickness planer.Joint and plane the pieces.Run them through the planeron edge to ensure uniformity.Milling benchdog holesSquarebenchdogCut the holes for thesquare benchdogswith a dado bladebefore glue-up. Thenotches for the dogfaces can be routedor chopped out with achisel.Glue up the top. The base makes a level Use cauls to keep the slab flat. Wrapglue-up platform, but protect it fromthem with clear tape for easy cleanup. Snugdrips. Use a notched card to spread glue. them down first, then clamp across the width.Notch fordog faceDog hole is angled3 toward the end vise.Dado the dogholes. Use acrosscut sledwith a wedgeagainst the fenceto cut the slots ata 3 angle. Asquare pin setsthe distance between dog slots.and still have quick action. However, a cast-iron vise also wouldhave been fine (see FWW #158, pp. 56-59, for proper installation),and a patternmaker’s vise is an interesting option.Both square and round benchdogs—The debates over round vs.square and wood vs. metal will go on as long as folks work wood.All dogs have advantages, but I prefer square, steel ones. However, lots of accessories are designed to fit into 3 4-in. round holes,so I incorporated both types into the bench. For the end vise, Imilled square dog holes to fit specific steel dogs. But I can makewood ones if I choose, fitting them to the holes for the metal dogs.I ran two rows of 3 4-in. round dog holes for the front vise. Thisgives me the option of using round dogs as well as hold-downsand holdfasts, which use 3 4-in. holes. The round dog holes also provide the option of locating and securing jigs with 3 4-in. dowel pins.No tool tray—I like tool trays, but many woodworkers think theyare only good for collecting debris. Although this design lacks one,a tool tray could be attached easily to the back of the benchtop.Keep in mind that the large space between the stretchers willhouse a small chest of drawers for protected storage close at hand.Build the base firstWedge between fence andworkpiece is angled 3 .WorkpieceSquarepinTablesawsledTOP VIEW OF SLED42FINE WOODWORKINGIt’s more glamorous to build the top than the base. But if you buildthe base first, you can use it for gluing up the top slab. Then, whenthe top is ready, you can set it on the base to finish installing thevises. Wedged mortise-and-tenons join the legs and stretchers, creating strong resistance to racking; pegged mortise-and-tenons joinlegs to feet. Laminating two layers of 8/4 material (each 13 4 in. thickafter surfacing) creates the right thickness for the base members.Mill the legs and top crossmembers down to 3 in. square but leavethe feet at 31 2 in. square.Leave the stretchers the full 13 4 in. in thickness and rip them 3 8 in.oversize in width to allow them to move. When a wide plank isripped into narrower pieces, tension in it is released, resulting inboards that bow one way or the other. Let the stretcher stock sit fortwo days, straighten and rip it to rough width, then run it through a
Flatten the slab. A five-board section of the top slab is narrow enoughto fit through a benchtop planer.Now glue three sections into one big slab. Place a try square acrossthe dog holes and use a long bar clamp diagonally to correct any misalignment. Again, use lots of clamps and cauls to keep the sections level.portable planer on edge to clean each edge and bring the pieces tofinal width. If there’s any fitting to be done, it’s easier to do it on thetenons, so cut the mortises first, using a four-sided guide block tohelp with the chisel work. Then cut the tenons on the tablesaw,using a dado set.the stretchers in place. Put glue in the mortises and on the tenons aswell as on the wedges and in the wedge slots. At every step of theway, measure diagonally to make sure everything stays square,and sight across the trestle tops to be sure the assembly doesn’ttwist as you clamp it. Your eye will pick up minute variations.Cutting the thumbnail profile—For the next task, cutting alarge thumbnail profile on the feet, it will be worth your time to install a sharp new blade on the bandsaw. Before cutting the curve,I used a tablesaw and a crosscut sled to cut the small step at the topof the profile. After the bandsaw cut, the smoothing went quicklyusing a rasp and some files, followed by sandpaper.Build the topAssembling the base—Start with the two trestle assemblies; it’scritical that they be flat and square. After the dowels have been driven home and the glue has set, dry-fit and then glue and wedgeThe boards for the top are plainsawn 8/4 stock set on edge andlaminated face to face. The top’s finished thickness is 21 2 in., butyou should expect some bowing when you rip the boards fromwider stock, so rip the boards for the slab just under 3 in. wide. Oncethe strips have stabilized for a day or two, joint them straight onone edge, rip them on the tablesaw to about 23 4 in., and then planethem on edge to about 25 8 in. This leaves the pieces 1 8 in. oversizeto allow for finish planing after each section is glued up. Cut theslots for the square dogs now, while the pieces are separate.TRIM THE ENDS OF THE TOP IN T WO STEPSUse the simple two-fence jig shown. Rout deep slots in bothsides of the slab, then use a jigsaw to cut off the waste, leavingsquare shoulders and a tongue that will fit into the end caps.TOOLS & SHOPS 200443
I N S TA L LTHE VISES,APRON,AND ENDCAPSBecause of the halfb
this publication, starting with Tage Frid’s in the fall of 1976 (FWW #4). His includes a built-in tool tray, a shoulder vise on the left, and a tail vise on the right, with a single row of dog holes along the front apron—much different from the bench seen here. Frid’s bench is