Transcription
Kentico CMS 7.0 Windows AzureDeployment Guide
2Kentico CMS 7.0 Windows Azure Deployment GuideTable of ContentsIntroduction4.4Aboutthis guideInstallation and deployment6. 6Overview. 6Architecture.9Prerequisites& .15Applicationstructure and configuration.24Deploymentto the cloud.26Databasesetup.34Deployingan existing website to Windows Azure.40Convertinga web site project to an Azure application.45Runningmultiple instances in one web role.46Configuringexternal services.47ConfiguringAzure CDN. 50TroubleshootingStoring files on Windows Azure54.54AzureStorage overview.56Hybridstorage scenariosApplication settings60 2014 Kentico Software
PartIIntroduction
4Kentico CMS 7.0 Windows Azure Deployment Guide1Introduction1.1About this guideThe main purpose of this guide is to describe the steps that need to be taken to successfully deploy aKentico CMS website to the Windows Azure cloud computing platform. It also provides information aboutthe differences between an application deployed on Windows Azure and one that is installed and set upfor on-premise hosting. You can also learn about the additional configuration options available in KenticoCMS that are related to Windows Azure and its various services and components.To follow the instructions in this guide, you will need to have general knowledge of the Windows Azureplatform and a basic overview of the development principles that apply to Azure applications. Anotherrequirement is access to an active Windows Azure subscription. If you are new to Windows Azure andneed to create a subscription or are looking for information, please visit http://www.microsoft.com/windowsazure/.If you are not familiar with Kentico CMS, we recommend that you get to know the system and itsfeatures before attempting to deploy a website to Windows Azure. First-time users can go through theKentico CMS Tutorial, which describes the standard installation in a local environment and the basics ofits administration interface. If you need additional information about any parts of the system, please referto the Kentico CMS Developer's Guide. 2014 Kentico Software
PartIIInstallation and deployment
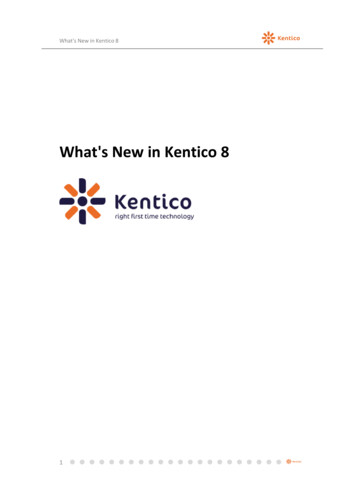
6Kentico CMS 7.0 Windows Azure Deployment Guide2Installation and deployment2.1OverviewThe installation process for Kentico CMS and the deployment of a website to Windows Azure consistsof the following steps:Setup (kenticocms.exe) - installs the basic files required to create Kentico CMS web projects andthe documentation. This setup is intended for your development machines, since it allows you to runthe web installer.Web Installer - can be used to create new Kentico CMS projects specifically designed fordeployment to the Windows Azure platform.Application structure and configuration - once you have an Azure project installed, you can configureit as necessary and start developing your website. At this stage, you can run the application locallyon the Windows Azure emulator.Deployment to the cloud - there are several ways to deploy a website to Windows Azure. The guidedescribes the simplest approach, which is to create a deployment package directly in Visual Studio,and then upload it through the Windows Azure Management Portal.Database setup - when the website is opened in a browser for the first time, it starts the databaseinstaller, which creates the required system tables and other data on a specified database. Thetarget database server can either be hosted on-premise or on SQL Azure.If you wish to move an existing Kentico CMS website to Windows Azure, please follow the instructionsgiven in the Deploying an existing website to Windows Azure topic.Before you start the installation and deployment, please see the Prerequisites & Limitations topic andmake any necessary preparations. It is recommended to read through the limitations and confirm thatyour website requirements are compatible with the environment.If you wish to learn the details about Kentico CMS operation in the cloud, refer to the Architecture topic.2.2ArchitectureThis chapter describes how Kentico CMS works within the Windows Azure environment, which featuresof the service are utilized and how the application stores and manages its data in the cloud environment.The following diagram illustrates the relations between the individual elements that together form KenticoCMS in the cloud environment. The different components depicted in the diagram are described in thetext that follows. 2014 Kentico Software
Installation and deployment7ApplicationIf you choose to install Kentico CMS to Windows Azure, all files will be grouped into a solution based onVisual Studio's Windows Azure template. The solution contains several projects. One of them is a webapplication, which encompasses almost all the functions of Kentico CMS and is designed to run as aWindows Azure ASP.NET Web role. The Smart search worker, is separated from the web applicationin another project because it cannot run together with the application as the Web role. In order to indexcontent of websites correctly and effectively, the Smart search worker runs as a Windows AzureWorker role.Because the application is divided into these two entities (called services in the Azure terminology), youwill also need to configure them separately. More information on how to configure the application can befound in Application structure and configuration.DatabaseKentico CMS on Windows Azure uses the SQL Azure relational database. This database engine isalmost identical to the standard SQL Server engine, with only a few limitations. These limitations aretaken into account in Kentico CMS, hence no additional configuration or customization is required. Ifyou're interested in which SQL Server features are not available in SQL Azure, refer to the followingMSDN article.File storageWindows Azure doesn't offer a persistent file system similar to the file systems in Windows that you'reused to. Data stored within Azure can't be hierarchically organized into folders. However, Kentico CMSprovides an abstract layer called CMS.IO, which enables the system to operate on different types of filestorages. 2014 Kentico Software
8Kentico CMS 7.0 Windows Azure Deployment GuideThe CMS.IO namespace acts as an intermediary between the Kentico CMS business layer and variousfile storages, including Azure's blob storage. On a standard non-Azure installation, CMS.IO onlyoverrides the System.IO namespace. On Windows Azure, the namespace uses a provider which workswith the blob storage, creating an imitation of the regular Windows file system.The CMS.IO namespace can be extended to support any other type of storage, e.g. the Amazon clouddrive.Additionally, you can make use of the Azure storage provider and store files in the cloud even if you'rerunning a non-Azure installation. You can find more information about this approach in the Hybridstorage scenarios topic.The file storage is shared across multiple instances, therefore no file synchronization is needed.Important!Contrary to Windows file systems, the blob storage is case-sensitive. As a result,names of all files processed by Kentico CMS are converted to lower case beforesaving.This won't normally affect functioning of the system, although there are a few scenarioswhen you will have to take additional actions to prevent unexpected behavior.Running on multiple instancesThe fact that Kentico CMS can run in multiple instances on Windows Azure creates the need forsynchronization of data between the instances. The CMS handles this by considering each instance aweb farm server. Unlike the traditional web farm comprising multiple physical servers, you don't have toconfigure the web farm servers manually in the multiple-instance Azure environment. The onlyconfiguration that needs to be done is setting the number of instances in the service configuration file.Data is synchronized via web farm tasks, which are created and executed automatically. 2014 Kentico Software
Installation and deployment9Storing session stateEvery complex web application needs to store information about its state, especially user session data.Since the Azure environment is dynamic and the application doesn't reside constantly in one place, itsstate has to be stored separately.Kentico CMS is pre-configured to use the Windows Azure AppFabric caching service to take care ofsession information. This way, all instances of the application have access to their data, which keepsthem synchronized.Please noteUsing the AppFabric cache is recommended, however, you can choose any othermeans of storing session state information.2.3Prerequisites & LimitationsIf you wish to run Kentico CMS in Windows Azure, ensure that the requirements listed in this topic arefulfilled.Development toolsThe following software must be installed on the machines where you plan to develop and deploy yourWindows Azure application:Microsoft Visual Studio 2010/2012 (including Microsoft Visual Studio 2010/2012 Express Edition)Microsoft .NET Framework 4.0Windows Azure SDK 1.7 or 1.8Windows Azure Tools for Microsoft Visual StudioWindows Azure AppFabric SDKMicrosoft Internet Information Services (IIS) 7.0 or newer - required if you wish to run the applicationlocally on the Windows Azure Compute Emulator.The Windows Azure SDKs and Tools for Visual Studio may be downloaded from http://www.microsoft.com/windowsazure/sdk/. 2014 Kentico Software
10Kentico CMS 7.0 Windows Azure Deployment GuideWindows Azure requirementsThe exact hosting requirements depend on the resource consumption and traffic load of your site and itscomponents. For live production deployments of Kentico CMS websites, it is highly recommended touse at least the Small Compute Instance Size.In addition, you will need to prepare the following services for your Windows Azure subscription:Azure Storage accountAppFabric Caching service (128 MB or more) - required if you wish to run the application onmultiple instances.SQL Azure server and database - required if you wish to host your application's database onWindows Azure. The smallest available database (1GB) is more than sufficient for the default KenticoCMS installation.LicensingIf you wish to run Kentico CMS in multiple Windows Azure instances, you will need a licence whichallows the corresponding number of web farm servers, regardless of the number of actual physicalservers involved. For more information, refer to our website.LimitationsThere are some issues and limitations related to the Windows Azure environment, that affect thefunctionality of Kentico CMS websites:If the application's database is hosted on SQL Azure, it is important to keep in mind that certainstatements and expressions are restricted when writing queries (e.g., in custom code, web partproperties or for reporting objects). For a comprehensive list of all SQL Azure features and requirements,please see the Guidelines and Limitations (SQL Azure Database) articles on MSDN.A shortcoming of any application running on Windows Azure is the need to redeploy (or at least updateyour deployment) before any changes made to the project structure or code are reflected. This maymake it more difficult and time consuming to perform website maintenance, customization and somedevelopment tasks.In addition, the following features of Kentico CMS are currently limited:Full site import - importing sites is possible, but files stored in the web project, such as customuser controls, ASPX page templates or design files, will not be included in the import process. Towork around this limitation, you can copy such files into the target Azure project and include them inthe solution before you deploy the application to Windows Azure.CSS Theme tabs - management of files contained in stylesheet Theme folders directly through theKentico CMS administration interface is not available when running on Windows Azure. 2014 Kentico Software
Installation and deployment2.411Setup (KenticoCMS.exe)If you do not have Kentico CMS installed yet, it is necessary to do so before you can continue. Theinitial setup is the same for both standard installations and Azure deployment scenarios:1. Run KenticoCMS version .exe. You will see the welcome screen. Click Next.2. Read the license agreement, accept it and click Next if you want to continue. 2014 Kentico Software
12Kentico CMS 7.0 Windows Azure Deployment Guide3. Choose the location where the Kentico CMS web installer, documentation and other related files willbe deployed. Click Next and then Install.Please note: this is not the folder where your website will be placed, it's only a location for Kentico CMSprogram and help files.4. After the installation is finished, check the Launch Kentico CMS Web Installer option and clickFinish. Then continue with the Web installer. 2014 Kentico Software
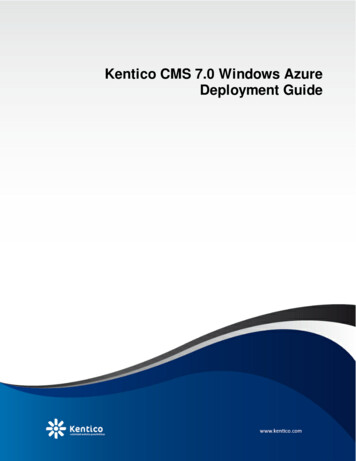
Installation and deployment2.513Web installerTo create a new Azure web project, run the Kentico CMS Web Installer. You can either do that directlyafter completing the initial setup wizard or by running WebInstaller.exe from the Bin folder of yourinstallation directory.1. Once the installer opens, choose Custom installation as the Installation mode.2. In Step 1 of the installer, choose the Windows Azure project option, which will create a webapplication suitable for deployment to the Windows Azure platform. You are allowed to choose .NETFramework 4.0 or 4.5 for the installation of Windows Azure project. 2014 Kentico Software
14Kentico CMS 7.0 Windows Azure Deployment GuideClick Next.3. You can then select from the following two installation types:I want to use built-in web server in Visual Studio - creates a new clean installation of theKentico CMS Azure project.I want to modify an existing Kentico CMS installation - you can use this option to change anexisting Azure project installation on the local machine (i.e. add or remove its components).4. Next, you will need to enter a target location for the project on your local disk.5. In Step 4, you can choose whether you want to perform a Full installation including all optionalcomponents or a Custom installation where you can select which components should be installed.6. The installer will then copy the project files to the specified folder. Once this is complete, open thesolution in Visual Studio using the displayed link.Continue on to Application structure and configuration, where the Kentico CMS Azure solution isdescribed. 2014 Kentico Software
Installation and deployment2.615Application structure and configurationAfter you finish the installation of the Kentico CMS web application as an Azure project, open thesolution in Visual Studio. You can either follow the link displayed in the final step of the Web Installer, oruse the CMSAzure.sln file created in the project directory at any time.The structure of the solution is slightly different than that of a standard Kentico CMS installation andsome additional projects are included:The first project (CMSApp) is Kentico CMS in the web application format. The second (CMSAzure)uses the Windows Azure Project template and is necessary to ensure that the application can bedeployed as a hosted service on Windows Azure. It contains the service definition and serviceconfiguration files and has the other projects defined as roles. The CMSApp project is added as a Webrole and the SmartSearchWorker, used to carry out tasks required by the Smart search module, is setup as a Worker role.If you are certain that you will not need the Smart search module, you can remove theSmartSearchWorker project (and role) from the solution. This reduces the number of roles that need tobe hosted, so the costs of running your application on Windows Azure will be lower. In this case, youcan ignore any further instructions related to this project and role. 2014 Kentico Software
16Kentico CMS 7.0 Windows Azure Deployment GuideRunning the project on the local emulatorThe application can be started on the local compute and storage emulator provided by the Azure SDK.This can be used to test the website during its development without actually hosting it in the cloud.To run the website on the emulator you will need to have the appropriate service configuration file set upin a specific way. The following settings must be present in the ConfigurationSettings section of bothroles: Setting name "CMSUrlPort" value "81" / Setting name "CMSAzureAccountName" value "devstoreaccount1"/ Setting name "CMSAzureSharedKey"value q2UVErCz4I6tq/K1SZFPTOtr/KBHBeksoGMGw "/ Setting name "CMSAzureQueueEndPoint" value "http://127.0.0.1:10001/devstoreaccount1"/ Setting name "CMSAzureTableEndPoint" value "http://127.0.0.1:10002/devstoreaccount1"/ Setting name "CMSAzureBlobEndPoint" value "http://127.0.0.1:10000/devstoreaccount1"/ If you wish to use the Windows Azure diagnostics module and have it transfer data to the localdevelopment storage, you also need to use the following settings:CMSApp role: Setting name "DiagnosticsConnectionString" value "UseDevelopmentStorage true" / SmartSearchWorker role: Setting name tionString"value "UseDevelopmentStorage true" / These settings are configured by default in the ServiceConfiguration.Local.cscfg file after a cleaninstallation of the Azure project. The Local service configuration is used when running on the emulator. Ifnecessary, you can specify a different configuration file by right clicking the CMSAzure project,selecting Properties and switching to the Development tab of the displayed dialog.You can start the emulator from Visual Studio by selecting Debug - Start Debugging (F5) or bypressing CTRL F5 to run the application on the emulator without debugging. Once the project issuccessfully built and everything starts up, the website will be opened in your browser and you can startworking with it as usual. The first step that the website will require is to perform the database installation(unless you entered a connection string manually). Please see the Database setup topic to learn moreabout the database installer and connection strings in a Windows Azure environment. 2014 Kentico Software
Installation and deployment17If you wish to debug the application on the emulator, it is first necessary to make a small modification inthe web.config file of the CMSApp project. Find the compilation element under the system.web section and change the value of its debug attribute to true. system.web . compilation debug "true" numRecompilesBeforeAppRestart "100"targetFramework "4.0" . /compilation . /system.web Remember to set the debug attribute back to false when you are done debugging to make sure that it isdisabled on your production deployments (for security and performance reasons).Please note that you will have to restart the emulator deployment every time you make any changes tothe configuration or perform customizations of the application's code. This ensures that the changes arereflected on the website.Emulator performance and requirementsYou may experience relatively slow loading times when running Kentico CMS on thelocal emulator. This is caused by the limited resources of the emulated environment.The performance of the website will be significantly better when it is actually deployedto Windows Azure.Additionally, you may encounter memory-related errors during the emulator startupwhen running on a low-end machine. This is caused by the relatively high requirementsof the emulator, not by a problem with Kentico CMS. 2014 Kentico Software
18Kentico CMS 7.0 Windows Azure Deployment GuideConfiguration for cloud deploymentIf you want to move the application to the Azure cloud, you will first have to ensure that your Azuresubscription contains the necessary accounts and services. The application must then be configuredaccording to the specific details of your subscription. You can set up your subscription and also find therequired information on the Windows Azure Management Portal, which you can access at https://manage.windowsazure.com/. Use your Windows Live ID credentials to sign in.The following steps are required:1. You will need an active Azure Blob Storage account to serve as the file system of your cloud-basedapplication. To create a new storage account, select Storage in the management portal, then click Newand continue according to the instructions in the portal.Once you have an existing storage account, click it in the list of accounts and click Manage keys.Copy your Storage account name and Primary access key, and enter them as the values of theCMSAzureAccountName and CMSAzureSharedKey settings in the ConfigurationSettings sectionof both the CMSApp and SmartSearchWorker roles in your application's service configuration file. Youcan use the default ServiceConfiguration.Cloud.cscfg file for this purpose, so you do not have tooverwrite the local configuration for the emulator. 2014 Kentico Software
Installation and deployment19 Setting name "CMSAzureAccountName" value "AccountName"/ Setting name "CMSAzureSharedKey" value "PrimaryAccessKey"/ Additionally, if you wish to use the Windows Azure diagnostics module and log its output on the storageaccount, you must set the diagnostics connection string of both roles to use https and enter the nameand access key of the given account: Setting name "DiagnosticsConnectionString" value "DefaultEndpointsProtocol https;AccountName AccountName;AccountKey PrimaryAccessKey" / 2. If you want the storage account connection to use the default endpoints for its services (blob, table orqueue), leave empty values for the CMSAzureQueueEndPoint, CMSAzureTableEndPoint,CMSAzureBlobEndPoint settings for both roles in the service configuration file. Otherwise, if you use aspecific endpoint for any of the services (e.g. if you have registered a custom domain name for the blobservice or wish to access a specific container), enter the given endpoint as the value of the appropriatesetting.3. Another thing that can be set up in the service configuration file is the number of instances used forthe CMSApp role, which represents the Kentico CMS application. This determines how many virtualmachines will be dedicated to the website, so its performance and load handling capacity will increasewith each instance. Simply enter the required number of instances as the value of the count attribute ofthe role's Instances element. Role name "CMSApp" Instances count "4" / ConfigurationSettings . /ConfigurationSettings /Role Each instance will be represented by a separate web farm server within the Kentico CMS system. Thecreation and management of the servers is handled automatically, and it is not necessary to perform anyfurther configuration.Instance licensingIn order for the website to run, the Kentico CMS license used for your domain mustallow at least as many servers as the amount of instances set for the role.Do not increase the number of instances for the SmartSearchWorker role. Due to the way smartsearch indexes are processed, the required tasks must be performed by a single instance.4. If you wish to use more than one instance for the application, you will also need a Windows AzureAppFabric Cache service namespace as part of your subscription. It is used to share the session state 2014 Kentico Software
20Kentico CMS 7.0 Windows Azure Deployment Guidebetween multiple instances.The Windows Azure portal does not support managing AppFabric services. It is possible only in the oldversion of the management portal. To switch to the old version, click your account name in the top rightcorner of the portal and click Previous portal.In the old portal, you can manage AppFabric services for your Azure subscription in Service Bus,Access Control & Caching - AppFabric - Cache. Select your cache namespace and view itsproperties on the right.Scroll down to the Authentication Token property, view it and copy it to your clipboard. Next, open theweb.config file of the CMSApp project and locate its dataCacheClients section. Here, enter theService URL of your AppFabric cache namespace into the name attribute of the host elements andcopy your authentication token into the messageSecurity authorizationInfo attributes. !-- Azure AppFabric cache BEGIN -- dataCacheClients dataCacheClient name "default" hosts host name "CacheNamespaceName.cache.windows.net" cachePort "22233" / /hosts securityProperties mode "Message" messageSecurity authorizationInfo "AuthenticationToken" /messageSecurity /securityProperties /dataCacheClient 2014 Kentico Software
Installation and deployment21 dataCacheClient name "SslEndpoint" hosts host name "CacheNamespaceName.cache.windows.net" cachePort "22243" / /hosts securityProperties mode "Message" sslEnabled "true" messageSecurity authorizationInfo "AuthenticationToken" /messageSecurity /securityProperties /dataCacheClient /dataCacheClients !-- Azure AppFabric cache END -- Next, find the sessionState element under the system.web section, delete (or comment out) thedefault line of code and replace it with the version that uses the AppFabric cache that is included as acomment. system.web . !-- Azure AppFabric cache BEGIN -- sessionState mode "Custom" customProvider "AppFabricCacheSessionStoreProvider" providers add name "AppFabricCacheSessionStoreProvider"type ache"cacheName "default"useBlobMode "true"dataCacheClientName "default" / /providers /sessionState !-- Azure AppFabric cache END -- . /system.web Then, right click the CMSApp project, select Add reference, switch to the Browse tab and navigate tothe dlls in the AppFabric SDK installation directory (typically in Program Files\Windows AzureAppFabric SDK\V1.0\Assemblies\NET4.0\Cache). 2014 Kentico Software
22Kentico CMS 7.0 Windows Azure Deployment GuideChoose the Microsoft.ApplicationServer.Caching.Client.dll, Microsoft.ApplicationServer.Caching.Core.dlland Microsoft.Web.DistributedCache.dll files and click OK. 2014 Kentico Software
Installation and deployment23Other types of session state providersAlternatively, you can set up a Blob/table or SQL Azure provider to maintain thesession state if you do not wish to use AppFabric cache.Please see the article about Session State on Windows Azure published on our DevNetportal for more information.5. Set the value of the CMSURLPort setting in the service configuration file to 80. Setting name "CMSUrlPort" value "80" / The value of this setting should always match the port attribute of the InputEndpoint element underthe CMSApp role in your service definition file (ServiceDefinition.csdef). If you need to use a differentport for some reason, adjust the values in both the service definition and configuration.6. At this point, you can also choose if you wish to run the application in Full IIS mode or under HostedWeb Core (legacy mode). Full IIS mode is set by default and recommended, since it allows you to usethe full range of IIS features, such as Windows Authentication. If you wish to use Hosted Web Core, youcan do so by deleting or commenting out the Sites section of the CMSApp role in the servicedefinition file. Also, edit the AzureInit.cs file in the Old App code/CM
Microsoft Visual Studio 2010/2012 (including Microsoft Visual Studio 2010/2012 Express Edition) Microsoft .NET Framework 4.0 Windows Azure SDK 1.7 or 1.8 Windows Azure Tools for Microsoft Visual Studio Windows Azure AppFabric SDK Microsoft Internet Information Services (IIS) 7.0 or newer - required if you wish to run the application