Transcription
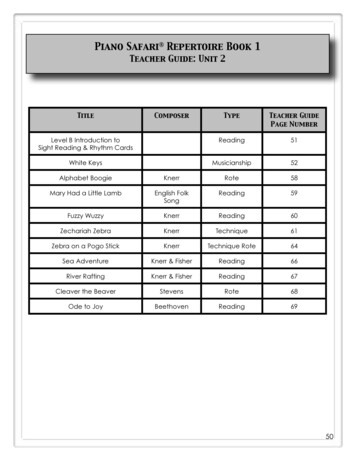
Piano Safari Repertoire Book 1Teacher Guide: Unit 2TitleComposerTypeTeacher GuidePage NumberLevel B Introduction toSight Reading & Rhythm CardsReading51White KeysMusicianship52Alphabet BoogieKnerrRote58Mary Had a Little LambEnglish FolkSongReading59Fuzzy WuzzyKnerrReading60Zechariah ZebraKnerrTechnique61Zebra on a Pogo StickKnerrTechnique Rote64Sea AdventureKnerr & FisherReading66River RaftingKnerr & FisherReading67Cleaver the BeaverStevensRote68Ode to JoyBeethovenReading6950
Unit 2: Pre-Staff White Keys with Fingers 1 2 3 4 5Sight Reading & Rhythm Cards for Book 1Level B Cards: Pre-Staff White Keyswith Fingers 1 2 3 4 5Objectives: Read finger numbers on white keys,beginning on various finger numbers Use all five fingers Learn the names of the white keys Track from left to right on the page whenreading Tap and count rhythmic notation Refine piano hand shape and work onstrong fingertipsSample Level B CardDuring Unit 2, assign Level B of Piano Safari Sight Reading & Rhythm Cards for Book 1.See pianosafari.com for the Teacher Guide to Sight Reading & Rhythm Cards for Book 1.51
White Keys!!!!!!!!!!!!!Step 1: Learning the names of the white keys cantake several weeks or months, dependingon the age of the student. Teach notenames at each lesson using the followingActivities until the child can quickly nameany note you play. We suggest startingthe process of learning the white keys atthe first lesson.!!!!!!!!Unit 2MusicianshipObjective: Learn the names of the white keyson the pianoStep 2: Follow the directions on the page. Students can complete this page as homework, in a groupclass, or in the lesson.Activity 1: Note CardsThis Activity is best for students who are ages 4-6.Step 1: Make two or more sets of cards with one letter on each card, A through G.Step 2: Direct the child to put the cards in order on the music rack or floor. Tell the student that thereis no H. In music, we just go to G and then start over on A.Step 3: Point to each card and chant with the student, “A B C D E F G A B C D E F G” in the rhythmof the “Alphabet Boogie” Rote Piece in this unit.Step 4: The student closes his eyes while the teacher scrambles the cards.Step 5: The student opens his eyes and puts the cards in order.Step 6: Repeat Steps 3-5.52
Activity 2: Decorating the PianoThis is a great activity for a student’s very first piano lesson. This activity can be done at eachlesson or class until the student is ready to move on to other White Key Activities.This Activity is best for students who are ages 4-10.Step 1: Make small foam or cardboard letters that fit on the keys for each of the white keys of thepiano. Color code them so that: 8 A’s are red8 B’s orange8 C’s yellow7 D’s green7 E’s blue7 F’s purple7 G’s pinkBuy 7 bouncy balls and 7 plastic toy worms.Step 2: Have the student put bouncy balls on the groups of two black keys, and worms on groups ofthree black keys.Step 3: Hand the student all the D foam letters. Tell him the D’s are right in the middle of the groups oftwo black keys. He puts the D foam letters on all the D’s of the piano.53
Step 4: Ask the student what comes in the alphabet before D. Say, “A B ” He will say, “C.” Say, “Yes.C comes right before D,” and put a C foam letter on the piano to the left of D. Hand thestudent all the C foam letters. He puts them on all the C’s of the piano.Step 5: Ask the student what comes in the alphabet after C. Say, “A B C D ” He will say, “E.” Handthe student all the E foam letters to put on the E’s of the piano.Step 6: Continue saying the alphabet and figuring out what comes next. “A B C D E ” “F.” Tell thestudent that the F goes to the left of the group of 3 black keys. Hand the student all the Ffoam letters. He puts them on all the F’s of the piano. Repeat with G, A, B.54
Step 7: Celebrate how great the piano looks now that it is decorated!Step 8: In future lessons, have the student: Put on the balls and worms Play the CDE groups up the piano Play the FGAB groups up the piano Hand the student a CDE or FGAB group of foam letters. At subsequent lessons, hand the student small groups of foam letters in random order.Help the student find the right keys by using the CDE and FGAB groups rather thancounting up from A for every letter.55
Activity 3: Note Name RacesThis Activity is best for students who are ages 4-8.Step 1: If you have two pianos, assign the student one piano and the parent the other piano. If youhave one piano, assign the parent one half of the keyboard and student the other half.Step 2: Call out a letter. “D! Ready, set, go!”Step 3: The student and parent race to play all the D’s in their jurisdiction. Cheer for whomever wins.If the student is slow, hopefully the parent will let him win sometimes, but as the student getsfaster, he should be able to win on his own.Step 4: Repeat Steps 2 and 3 with other notes.Note: If you do not have an available parent, you can race the student with the handicap of youhaving your eyes closed while he has his eyes open.Activity 4: Suction Cup Letter CardsThis Activity is best for students who are ages 4-10 and can be used in both private lesson and groupclass settings.Step 1: Attach the note cards you used in Activity 1: Note Cards to a mirror or window.Step 2: The student throws your suction cup ball at the mirror/window. (Suction cup balls can befound in the party section of Target or similar stores.) You take down the card closest to wherethe ball stuck.Step 3: The student plays all the keys of that letter. For example, if the ball stuck closest to the C card,he plays all the C’s. Encourage the student to play as fast as he can.Step 4: Repeat Steps 2 and 3 with the other cards until all cards are used.Step 5: Have him put the note cards in order, and then play “Alphabet Boogie” once he has learnedit.56
Activity 5: Fuzzy LettersThis Activity is best for students who are ages 4-8 and can be used in both private lesson and groupclass settings.Step 1: Hand the student a Fuzzy and ask him to put it on a G. A Fuzzy is a pom pom with eyes andfoam feet glued on. If you do not want to make Fuzzies, you can use flat marbles or othersmall objects.Step 2: Hand the student another Fuzzy and ask him to put it on a C.Step 3: Keep handing the student Fuzzies and having him put them on various white keys until yourun out of Fuzzies.Step 4: Once the student becomes fast at putting Fuzzies on the proper notes, you chant or sing inrhythm:!!!“Put a Fuzzy on a C (clap, clap, clap, clap). Put a Fuzzy on an E (clap, clap, clap, clap).” etc.""""The student must work quickly to put the Fuzzy on during the four beats you are clapping tokeep the game going. Repeat until you run out of Fuzzies.Activity 6: Tenuto AppStep 1: Have the student practice finding the names of the white key at home by using an app suchas Tenuto on a tablet or smartphone.57
Alphabet Boogie!Knerr and C. Fisher!!!!!!!!!Unit 2!!Rote Piece8Tell the parent that there is a Reminder Video at pianosafari.com for reference at home.Step 1: Have the student listen to this piece on hisListening CD several times beforeintroducing it.Step 2: Beginning on the very lowest note of thepiano, play and sing, “A B C D E F GA B C D E F G” in rhythm using RH Finger 2for all the notes. Student imitates.Step 3: When he is confident, add the teacheraccompaniment.Step 4: Have the student to play “AlphabetBoogie” with LH.Objectives: Review the music alphabet byplaying a piece Increase concentration by playingfrom the very bottom to the top ofthe pianoDoes your student have? Free forearm motion Good tone Rhythmic playing Concentration through the wholepieceStep 5: Congratulate the student on his goodconcentration if he is able to play all theway up the piano without making amistake or stopping. If his concentration is lacking, encourage him to concentrate all theway from the bottom to the top of the piano.Step 6: This piece works well in a first lesson, since it is easy to play, and in combination withActivity 2: Decorating the Piano, explained earlier in this unit.Praise the student for good effort and concentration more often than for “being smart.” Thiswill reinforce the behavior most necessary for progressing in piano study: working hard. For aninteresting book on this subject, read Nurture Shock by Po Bronson, available at amazon.com.58
Mary Had a Little Lamb!!English Folk Song, Arr. Knerr!!!!!!!Unit 2Reading PieceStep 1: Play and sing the piece for the student.Step 2: The student circles the keyboard picturered to remind him that the piece is playedwith the RH.Step 3: The student finds his hand position basedon the keyboard picture.Step 4: Have the student preview and play eachline. Point to the notes on the page andsay the finger numbers to keep the studenttracking with his eyes and playing withcorrect rhythm.Objectives: Read pre-staff notation using fingernumbers 2 3 4 on white keys Transpose to various keysDoes your student have? Non legato articulation Good piano hand shape, with firmfingertips, tall bridge, thumb oncornerStep 5: When the student can play the piece well alone, add the teacher accompaniment.Step 6: Show the student how he can start on different notes and play the same piece (transpose).Help him put his Finger 4 on A and play the piece. Repeat starting with Finger 4 on B and ona group of 3 black keys.Step 7: By this point the student probably will not have to look at the finger numbers but will have thepiece memorized or be playing it by ear. He can then play the piece with the LH by ear andHT in parallel motion.Step 8: As the student masters each transposition, put a sticker in the box next to that transposition.Step 9: Play the teacher accompaniment with him as he masters each transposition. TheseAccompaniment Transpositions are found at the end of the book or can be downloaded atwww.pianosafari.com.59
Fuzzy Wuzzy! !Knerr! !!!!!!!!!!!!!!Unit 2Reading PieceStep 1: Play and sing the piece for the student.Step 2: The student circles the keyboard picturesfor RH red and LH blue.Step 3: Ask the student how many groups of notesthere are. “4.” Circle the lowest group bluefor LH and play it for the student in thelowest octave that the student can easilyreach, saying, “E C.” Student imitates.Step 4: You play RH while student plays LH. This isto allow him to play the LH in rhythm at theappropriate time.Objectives: Read pre-staff notation using fingernumbers 2 3 4 on white keys Move to different octaves on thepiano in rhythmDoes your student have? Non legato articulation Good piano hand shape, with firmfingertips, tall bridge, thumb oncorner Rhythmic shift from octave to octaveStep 5: Ask the student which two groups are thesame (1, 2). Have him circle these twogroups red for RH. Since group 3 is played by the RH but is different from the other RH groups,have him circle it red and draw some fuzz next to it to denote that it is different.Step 6: Play m. 1-2 while the student points to the notes and says the finger numbers.Step 7: Student plays m. 1-2 and then m. 3-4 an octave higher.Step 8: Play m. 5-6 while the student points to the notes and says the finger numbers.Step 9: Student plays m. 5-6.Step 10: Student plays the entire piece.Step 11: When the student can play the piece well alone, add the teacher accompaniment.Step 12: Play the piece on groups of three black keys with transposed teacher accompaniment,available the end of the book or for download at www.pianosafari.com. Put a sticker in thethe box as the student completes each transposition.60
Zechariah Zebra!Knerr! !!!!!!! !!!Unit 2Technical Exercise9Tell the parent that there is a Reminder Video at pianosafari.com for reference at home.In my dissertation research with excellent pre-college teachers, three of the four teachers inmy original study used this exercise under different guises: Marvin Blickenstaff called it “Ebenezer Sneezer.”Carolyn Shaak called it “Colorado Mountain.”Mary Craig Powell called it “Mississippi Hop Frog.”Mary Craig Powell explained to me the benefits of this exercise in developing the following: Firm fingertips, which are easier to develop when playing repeated fingers rather thanconsecutive fingersLoose arm, because if students can play this exercise at a fast tempo, they have to beloose. It is not possible to play this exercise well with a stiff armConfidence in playing fast repeated notes.This exercise may take a month or more to master. At first, the piano hand shape may not lookvery good, especially with Fingers 4 and 5. Keep working to shape the hand until the studentdevelops control to play this exercise with firm fingertips and a good piano hand shape.Fingers should absolutely not be glued to the keys. The whole forearm bounces on the eighthnotes, with a higher bounce for the quarter notes. The arm aligns behind the playing finger.Finger 1 plays on its corner, not flat on its side. It is slightly curved (rather than turned out withcollapsed joints):61
Fingers 2 and 3 are the easiest fingers. They should play with firm fingertips and a raised (notcollapsed) hand knuckle bridge:""""""""""""""""""Finger nail joints should not collapse like this!Finger 4 will need to stand taller than fingers 2 and 3 in order to play with a firm fingertip andgood piano hand shape, as it tends to want to play flat and pull the hand down.Finger 5 plays on its outer corner tip, not straight on its tip, as this would make it stand too talland cause a hand position in which the fingers are too curved. However, Finger 5 should notplay flat either.62
Step 1: Have the student listen to this exercise onhis Listening CD several times beforeintroducing it.Step 2: Play m. 1 for the student. Then hold hishand and thumb and play the measureusing his thumb. You are doing all the workwhile he has a relaxed arm. Be sure thethumb plays up on its corner, not flat on itsside. Proper thumb position will preventmany technical problems in the future. Thearm bounces as a unit from the elbow.Tempo should be aboutObjectives: Develop the ability to play repeatednotes fast with a loose arm Develop firm fingertipsDoes your student have? Firm fingertips Good piano hand shape aftergradually working on this exercise Bouncy arm, with bigger bounce oneighth notes 120.Step 3: Let him play m. 1 by himself. Check for relaxed shoulders. If the shoulders are not relaxed,touch them to relax them.Step 4: Check for good piano hand shape in preparation for Finger 2 on D (m. 3). Play using hishand. Then let him play it himself.Step 5: Check for a good piano hand shape in preparation for Finger 3 on E (m. 5). Play it with hisfinger before letting him play it himself. Be sure the arm is aligned behind Finger 3.Step 6: Check for a good piano hand shape in preparation for Finger 4 on F (m. 7). Say, “TallFinger 4.” Play it with his finger before letting him play it himself. Be sure the arm is alignedbehind Finger 4.Step 7: Check for a good piano hand shape in preparation for Finger 5 on G (m. 9), saying, “TallFinger 5.” Play it with his finger before letting him play it himself. Be sure the arm is alignedbehind Finger 5.Step 8: Keep setting the student’s hand for each finger as you repeat the exercise with the LH.Step 9: As the student progresses and is able to maintain a good piano hand shape for each fingeron his own, add the teacher accompaniment in one hand and play the student partdisplaced by an octave with the student. Stop to fix a poor hand shape during the whole restbefore allowing him to play the next note. Also, address any problems while the student isplaying a specific finger. For example, if non-playing fingers are flying up very high, ask thestudent to relax those fingers. As the student gains strength and control, this will becomeeasier. You can also make your hand look bad (fingers sticking up in the air, flat thumb, etc.)and ask him what is wrong with your hand and have him fix it.Step 10: After the student demonstrates the ability to have a good piano hand shape throughoutthe whole exercise, play the teacher accompaniment and coach him verbally for eachfinger during the whole rest before he plays that finger:In summary, the progression of working on the Zechariah Zebra Technique is: You play a finger using the student’s hand. Student plays that finger himself.Student plays each finger. Stop before each finger to check hand shape.Student plays while you play teacher accompaniment and verbally coach him for eachfinger. Stop as needed between fingers to fix hand shape.Student plays alone with teacher accompaniment.63
Zebra on a Pogo Stick! !!!!Unit 2Knerr! !!!!Rote Piece!!!!10I usually teach student Steps 1-5 at one lesson, Steps 6-9 at the next lesson, and Steps 10-11 atthe following lesson.Tell the parent that there is a Reminder Video at pianosafari.com for reference at home.This piece is a definite challenge for students in terms of coordination. Keep working on it, andbe sure the student plays at a moderate tempo that he can maintain throughout the piece.Step 1: Have the student listen to this piece on hisListening CD several times beforeintroducing it.Step 2: Play and sing the piece for the student.Step 3: Have the student play the RH of m. 1-6while the teacher plays LH. Coach himabout which finger to play next. He canrefer to the score to see the fingernumbers.Objective: Play a piece by rote that uses theZechariah Zebra TechniqueDoes your student have? Good piano hand shape in RHZechariah Zebra parts Steady tempo Free bouncy motions in LH m. 6Step 4: For m. 7-8, tell him that Finger 4 does notplay. Play RH while singing, “ZechariahZebra 3 2 1.” Student imitates.Step 5: Student plays RH and teacher plays LH for the entire piece.Step 6: Play LH m. 2 with two different fingerings, 1 1 1 1 2 2 3, or 1 1 1 1 3 3 4. Have the student tryboth and decide which he likes better. I have students who have chosen each fingering asmore comfortable. Write in the fingering he chooses. This passage can be difficult forstudents. For older students who you know can technically play it well, this is a time to let thestudent work hard until he masters this. After teaching this piece to many students, I havediscovered that some students can play the LH part easily, while other students struggletechnically. For those students who need a version with a simplified LH, you can use: This is also a great practice step for eventually playing the original version:64
This is the most simplified version:Step 7: For the original version in m. 4, use the same fingering as m. 2 in reverse. Student imitates.Step 8: Play LH m. 6. Student imitates. Make sure he has an extra bouncy arm, like a zebra bouncingon his pogo stick.Step 9: Teacher plays RH while student plays LH.Step 10: Student plays HT.Step 11: When the student can play the piece well alone, add the teacher accompaniment.65
Sea Adventure! !Knerr & Fisher!!!!!!!!!!!!!!Unit 2Reading Piece“Fuzzy Wuzzy” and “Mary Had a Little Lamb” focused on the white keys surrounding the groupsof two black keys (C D E group). The next two pieces, “Sea Adventure” and “River Rafting”highlight the white keys around the groups of three black keys (F G A B group).Step 1: Play the piece for the student and sing thewords. Be sure you are playing with a nonlegato articulation with an arm bounce oneach note. Talk about the animals thatare in the ocean.Step 2: Play the piece for the student while hepoints to the notes and says the letternames. Show the student how the noteson the page and keyboard go up anddown, just like the waves of the ocean.Draw lines on the page to show thepattern, as shown below:Objectives: Read pre-staff notation with letternames for the F G A B group of whitekeys (the letters that surrounds thegroup of three black keys).Does your student have? Non legato articulation Understanding of the white keygroup F G A B Correct rhythmStep 3: Have the student circle the LH keyboard picture with blue to show that the piece is playedwith the LH.Step 4: Student plays while you point to the notes on the page and say the letter names.Step 5: When the student can play the piece well alone, with steady rhythm, firm fingertips in hispiano hand shape, and an arm bounce on each note with a non legato articulation, addthe teacher accompaniment.66
River Rafting! !Knerr & Fisher!!!!!!!!!Unit 2!!!!Reading PieceStep 1: Play and sing the piece for the studentwhile he points to the notes and says thefinger numbers. Play non legato. Be sureyou have a well-paced ritardando at theend, and define this term for the student.Step 2: The student previews and plays each line.Step 3: At the end, coach the ritardando bysinging, playing, and conducting as thestudent plays.Step 4: Student plays the entire piece.Objectives: Read pre-staff notation with letternames for the F G A B group of whitekeys. Learn the term ritardandoDoes your student have? Non legato articulation Good piano hand shape Understanding of the white keygroup F G A B Well-paced ritardandoStep 5: When the student can play the piece wellalone, add the teacher accompaniment.67
Cleaver the Beaver!!!!!!Unit 2Stevens!!!!!!Rote Piece!!!11I usually teach Steps 1-7 at one lesson and Steps 8-11 at the next lesson.Tell the parent that there is a Reminder Video at pianosafari.com for reference at home.Stems up RH. Stems down LHStep 1: Have the student listen to this piece on hisListening CD several times beforeintroducing it.Step 2: Play the piece for the student and sing thewords while playing the teacheraccompaniment. This allows the student tohear the waltz.Step 3: Play m. 1-2 and sing “C D E C D E.” Studentimitates. Make sure the student plays nonlegato with an arm bounce on each noteand with firm fingertips.Objectives: Play a rote piece that moves overthe entire piano Practice moving between handpositions that begin on C and G.Does your student have? Non legato articulation Coordinated movements betweenC and G. Continuous rhythmStep 4: Play m. 3-4 and sing “G A B Together.” Student imitates.Step 5: Student plays m. 1-4 until secure. Count “1 2 3 4 5 6 7 8 9 10” and use Playing Insurance if thestudent has a tendency to stop on the bar lines.Step 6: Move the student’s hands to the next position. Student plays m. 5-8 (repeat of m. 1-4 anoctave higher).Step 7: Student plays m. 1-8.Step 8: Play m. 9-12, and alert the student, “This part is different. C D E together. G A B together.”Student imitates.Step 9: For m. 13-16, say, “Now for the special ending.” Ask the student to tell you which note you donot play. Play m. 13-15. Student says, “F.” Student imitates. End with low C.Step 10: Put the entire piece together.Step 11: When the student can play the piece well alone, add the teacher accompaniment.68
Ode to Joy!!!Beethoven, Arr. Knerr!!!!!Unit 2!!!!!Reading PieceCelebrate the fact that the student is playing a tune written by the famous composer,Beethoven. Talk a bit about Beethoven’s life. Did you know his favorite dinner, according tohis administrative assistant and early biographer Anton Schindler, was macaroni and cheese?Have the student listen to some music by Beethoven. A good resource for composerbiographies that appeal to children is the “Getting to Know the World’s Greatest Composers”series by Mike Venezia, available on amazon.com. I have a library of these books and lendthem to students with the correlating listening CDs I created.Step 1: Play the piece for the student using nonlegato articulation even on the eighthnotes.Step 2: Have the student color the RH keyboardpicture red and the LH keyboard pictureblue.Step 3: Tell the student there is only one LH note(m. 12 stem down). Circle this note withblue.Step 4: Play m. 1-4 for the student so he can hearthe rhythm for m. 4. Student plays.Explanation of therhythm is notnecessary. This rhythm should be taught byrote at this stage, as the student is usuallytoo young to understand the fractionsnecessary to explain the dotted rhythmmathematically.Objectives: Read pre-staff notation using fingernumbers with all fingers on whitekeys. Play a familiar tune by a famouscomposer Read eighth notes in pre-staffnotation in a piece Hear the dotted quarter eighthrhythm, which is formally introducedin Piano Safari Repertoire Book 2.Does your student have? Non legato articulation on all notes Good piano hand shape, with firmfingertips, tall bridge, thumb oncorner Correct rhythmStep 5: Student previews and plays m. 5-8, after discovering that it is the same as m. 1-4 except forthe last measure.Step 6: Play m. 9-12 for the student so he can hear the rhythm. Student imitates. Make sure he playsthe entire piece, including the eighth notes, non legato to preserve a good piano handshape. This will also keep him from smearing or rushing the eighth notes.Step 7: Student plays m. 13-16 and then plays the entire piece.Step 8: When the student can play the piece well alone, add the teacher accompaniment.Step 9: Instruct the student to transpose the piece to C Major by starting with RH 3 on E. The LH notewill be G. The teacher accompaniment in C is at the end of the book, or download it atwww.pianosafari.com.69
on the piano Step 1: Learning the names of the white keys can take several weeks or months, depending on the age of the student. Teach note names at each lesson using the following Activities until the child can quickly name any note you play. We suggest starting the process of learnin
