Transcription
EASY TRAINER GPSSPEED DISTANCEWATCHW293 USER GUIDE - REVISED 1.30.14USERGUIDE
TABLE OF CONTENTSIntroducing Your Watch.3Features.3Charging the Watch.3Basic Operation.3Icon Descriptions.4Getting Started .4Setting the Time.4Setting Display Units.4Setting Up the User Profile.5Turning on the GPS.5Using Run Mode.5Starting, Stopping, and Saving a Workout.5Taking Splits.6Using Chrono Mode.6Starting, Stopping, and Saving a Chrono Workout.6Using Interval Timer Mode.7Setting Up the Interval Timer.7Starting, Stopping and Resetting the Interval Timer.7Reviewing Workouts.8Choosing a Workout to View.8Viewing Workout Data.8Deleting Workouts.8Setting Alarms.9Choosing an Alarm.9Setting the Alarm Time.9Turning an Alarm On or Off.9Configuring Settings.9Setting Up Automatic Laps.9Setting the Time Manually.10Turning on Night-Mode Feature. 10Adjusting Contrast.10Turning Button Beep On and Off.10Resetting the Watch.10Troubleshooting. 11Problems with the GPS. 11Problems with the Battery. 11Safety. 11Water Resistance. 11Cleaning and Storage. 11Warranty and Service.13Declaration of Conformity.14
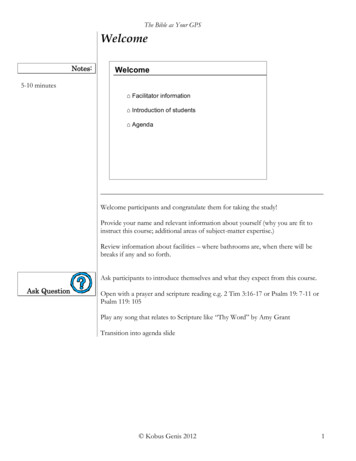
INTRODUCING YOUR WATCHCongratulations on your purchase of the Timex Ironman Easy Trainer GPS watch. As a serious roadrunner, you’ll appreciate the accurate speed, pace, and other data the watch provides you. The watch’s GPStechnology finds satellites from almost anywhere in the world so you have the information you need to trainefficiently.FEATURES GPS – Obtain fixes on satellites to provide workout data. Your speed, distance, and pace are determinedbased on how your position changes relative to the satellites. Set the time zone using the GPS. Run mode – Track data during workouts. View your workout data while a workout is in progress, and savedata for later review. Freely switch between Run, Chrono, and Interval Timer modes while the workout isrunning. Chrono mode – Take splits during workouts, and save lap data for later review. Interval Timer mode – Program the timer to go through up to 5 timed segments and track up to 99 repetitions of the sequence. Workout review – Save to memory for review when the workout is reset. Store more than 20 hours ofworkout data. View all data tracked for the entire workout, as well as data for individual laps. Hands-free auto-lap – Automatically take a split when you reach one of 6 selectable distances. Alarm – Set up to 5 alarms that will sound at your specified time each day. Indiglo night-light with Night-Mode feature – Press a button to light the watch face for 10 seconds.CHARGING THE WATCHBefore you use the watch for the first time, charge the battery for at least 4 hours.Plug the large end of the USB cable into a powered USB port on your computer, and attach the charging clip tothe watch so that the 2 pins on the clip touch the 2 outermost metal contacts on the back of the watch.BASIC OPERATIONINDIGLO BUTTONSTART/SPLIT/ GPS ON/OFFVIEW/OKMODESTOP/SAVE/-3
INDIGLO NIGHT-LIGHT BUTTONPress to turn on the night-light for 10 seconds.GPS ON/OFFPress and hold to turn on the GPS or turn off the GPS.MODEPress to cycle through each mode. In settings screens, press to move to the next item.START/SPLIT/ In Time mode, press to go to Run mode. In Run, Chrono, and Interval Timer modes with the workout stopped,press to start. In Run and Chrono modes with the workout running, press to take a split. In settings screens,press to increase values or move to the previous item in a list.VIEW/OKIn Run or Chrono modes, press to change the display view. In settings screens, press to confirm the flashingoption. In Time mode, press to view the second time zone, or hold to make the secondary time zone primary.STOP/SAVE/When workout is running, press to stop. When the workout is stopped, hold to reset and save the workout. Insettings screens, press to decrease values or choose the next item in a list.ICON DESCRIPTIONSThese icons indicate the watch status.qGPS Search& ConnectionStrengthSolid: GPS has a satellite fix.Flashing: GPS is seeking a satellite fix.More bars indicate a stronger satellite fix.Button BeepIndicates button sounds are on.AlarmAn alarm is set and will sound at the specified time.BatteryIndicates the remaining battery power. More dark segments indicate a higher charge.GETTING STARTEDSETTING THE TIMEYou can set time for two time zones. The time is set by the GPS, but you choose the time zone (GMT offset),daylight saving (ON or OFF), time format (12- or 24-hour), and date format (month-day or day-month).NOTE: The GMT offset is the number of hours difference between your time zone and Greenwich Mean Time.Each GMT offset is listed with the abbreviated name of a major city in that time zone (for example, London isdisplayed as LON). If you do not know your GMT offset, find your city or a nearby one in Time Zones.1. Press MODE until SET displays.2. Press - or to select TIME, then press OK.3. Press or - to select the time zone to set (TIME 1 or TIME 2), then press OK.4. Press or - to select AUTO (to allow the GPS to set the time), then press OK.5. Press or - to select your time zone, then press OK.6. Repeat step 5 for DST (daylight saving), time format, and date format.7. Press MODE to exit.NOTE: You can also set the time manually, preventing the GPS from setting the time. See Setting the TimeManually for more information.SETTING DISPLAY UNITSYou can display units in English (miles, feet, inches, pounds) or metric (kilometers, meters, centimeters,kilograms) measurements.1. Press MODE until SET displays.2. Press - or to select UNIT, then press OK.3. Press or - to select MI for English, or KM for metric, then press OK.4. Press MODE to exit.4
SETTING UP THE USER PROFILEEnter your gender, age, weight, and height to ensure accurate calorie calculations.1. Press MODE until SET displays.2. Press or - to select USER, then press OK.3. Press or - to select gender, then press OK.4. Repeat step 3 for age, weight, and height.5. Press MODE to exit.TURNING ON THE GPSBefore you can use the watch to collect speed, pace, and distance data, you must turn on the GPS and acquire a satellite fix.1. Take the watch outside and away from buildings and tall trees.2. Make sure the watch is facing the sky; do not block the GPS antenna in the bottom part of the watch face.3. Stand still.4. Press and hold ON/OFF. Theicon flashes when the GPS is searching for satellites. It turns solid when the fix is achieved,and more “bars” in theicon indicate a stronger fix.NOTE: Heavy cloud cover or rain may make it difficult to acquire a satellite fix.USING RUN MODEUse Run mode when you need to be able to view speed, distance, pace, or calorie data while a workout isin progress. You might want to view this data to help you build endurance at a specific speed, or to focus oncompleting a 5k race within a particular goal time. You cannot view data for your current lap from Run mode.Run mode and Chrono mode share the timer, so you can switch freely between the two modes while theworkout is running by pressing MODE. Switch to Chrono mode if you want to view lap data.NOTE: You can take splits in Run mode, but you can view individual lap data only in Chrono mode.When the workout is running, several types of information about the workout are displayed: Workout time Speed Distance Calories burned Pace Current timeNOTE: For the most accurate speed, distance, and pace calculations, use the watch in clear weather.STARTING, STOPPING, AND SAVING A WORKOUTSTARTING A WORKOUT1. Press MODE until RUN displays.2. Press or - to select GPS (to use the GPS to record workout data) or INDOOR (to record time data only),then press OK.A battery life message appears. Press OK to acknowledge it. If the battery life is too low, charge the watchas described in Charging the Watch.A memory remaining message appears. Press OK to acknowledge it. If there is not enough estimatedmemory remaining to record your intended workout, delete some workouts to free memory space asdescribed in Deleting Workouts.3. Press START.CHANGING THE DISPLAY VIEWWhile a workout is in progress, you can cycle through several view screens that each display different dataabout your workout.There are four displays in Run mode. All of the displays show the elapsed time and the total distance traveled,but data in the third line of the display is different for each. The first shows current pace, the second showscurrent speed, the third shows calories burned, and the fourth shows the primary time zone.Use the displays to know how to change your workout to achieve your goals. For example, if your pace is toofast, you may get tired before your run is complete. Slow down to make your time goal and still finish the run. Press VIEW to cycle through the display views.5
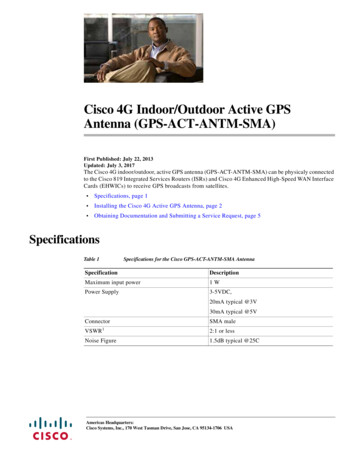
STOPPING A WORKOUT1. While the workout is running, press STOP to pause.2. If the workout is paused, but has not been reset, press START to resume.SAVING AND RESETTING A WORKOUTWhen you reset a workout, the workout data is saved in memory so you can review it later.1. While the workout is paused, hold SAVE to save the workout and reset.All collected data is saved. See Reviewing Workouts for instructions on viewing saved data.TAKING SPLITSWHAT ARE LAP AND SPLIT TIMES?Lap time is the length of an individual segment of your workout. Split time is the time elapsed from thebeginning of your workout through the current segment.When you “take a split”, you have completed timing one segment (such as one lap) and are now timing thenext segment.The graph below represents the lap and split times for a workout in which 4 laps were taken.LAP 17:11 MIN7:11 MINSPLIT 1LAP 27:50 MINLAP 37:08 MINLAP 47:30 MIN15:01 MINSPLIT 222:09 MINSPLIT 329:39 MINSPLIT 4TAKING A SPLIT While the timer is running, press SPLIT to take a split.The lap and split time for the lap you completed is displayed, and the watch begins timing the new lap.Individual lap data is saved when you save and reset the workout. See Viewing Workout Data for instructionson viewing saved lap data.You can press VIEW while in Chrono mode to view data for a lap in progress. See Changing the Display Viewfor instructions on changing Chrono mode display screens.USING CHRONO MODEUse Chrono mode when you need to be able to view time and distance data only for the lap in progress. Forexample, you might use this data to measure consistency of times among 1-mile legs of the same run.All data tracked in Run mode is still tracked when you are in Chrono mode, but the data you can view inChrono mode is more limited; you can only view data about the current lap in Chrono mode.Chrono mode and Run mode share the elapsed time clock, and you can press MODE to switch between thetwo modes. Switch to Run mode if you want to view speed, distance, pace, or calorie data for the entireworkout.NOTE: For the most accurate speed, distance, and pace calculations, use the watch in clear weather.STARTING, STOPPING, AND SAVING A CHRONO WORKOUTSTARTING A WORKOUT1. Press MODE until CHRO displays.2. Press or - to select GPS (to use the GPS to record workout data) or INDOOR (to record time data only),then press OK.A battery life message appears. Press OK to acknowledge it. If the battery life is too low, charge the watchas described in Charging the Watch.A memory remaining message appears. Press OK to acknowledge it. If there is not enough estimatedmemory remaining to record your intended workout, delete some workouts to free memory space asdescribed in Deleting Workouts.3. Press START.6
CHANGING THE DISPLAY VIEWWhile a lap is in progress, you can switch between two view screens that each display different data about thelap.Both displays show the lap and split times, but one display shows the lap number while the other shows thedistance traveled during the lap. Press VIEW to switch the display views.TAKING SPLITS, STOPPING, AND SAVING A CHRONO WORKOUTTake splits, stop the timer, and save and reset the workout as described in Using Run Mode.USING INTERVAL TIMER MODEUse Interval Timer mode when you need to be able to vary the intensity of your workout for pre-determinedamounts of time. For example, you can run for one period of time and walk for another in order to recover before starting to run again. This will allow you to repeat the sequence and complete a certain distance without having to run the entire way or walk for an extended time.SETTING UP THE INTERVAL TIMERThe Interval Timer allows you to set the duration of up to 5 segments that can be repeated in sequence.1. Press MODE until SET displays.2. Press or – to select TIMER, then press OK.3. Press or – to select the “flashing” segment number (1 of 5), then press OK.4. Press or – to change the Hours duration of that segment, then press OK.5. Press or – to change the Minutes duration of that segment, then press OK.6. Press or – to change the Seconds duration of that segment, then press OK.7. Change the other segment times by repeating Steps 3-6.8. Press OK to go through the settings to allow you to change any of the previous settings.9. When done, press MODE to exit TIMER SET mode, and press MODE again to exit SET mode.NOTE: To review the settings, press MODE until INT TIMER displays. Press STOP repeatedly to see each segment and its times.STARTING, STOPPING AND RESETTING THE INTERVAL TIMERSTARTING AN INTERVAL TIMER SESSIONWhen you run the Interval Timer, it automatically goes through each segment’s time and counts the number oftimes that the sequence repeats.1. Press MODE until INT TIMER displays.NOTE: If the display does not show SEG-1 and its full time, hold STOP to reset the Interval Timer to its originalsettings.NOTE: To review the settings, press STOP repeatedly to see each segment and its times.2. Press START to begin the Interval Timer session. The first segment (SEG-1)begins counting down, as displayed on the watch.3. As each segment time runs out, the watch beeps and the next segment begins counting down.4. When SEG-1 is reached again, the repetition (R) counter increments by 1 and continues until the IntervalTimer is stopped.NOTE: If you want to capture Distance, Pace, Speed and/or Elapsed Time data during an Interval Timer workout, you will need to see the section on Using Run Mode. Start the Run mode just before the IntervalTimer workout begins, and stop and save Run mode just after the Interval Timer workout ends.STOPPING AN INTERVAL TIMER SESSION1. While the workout is running, press STOP to pause.2. If the workout is paused, but has not been reset, press START to resume.RESETTING THE INTERVAL TIMER1. While the workout is paused, hold STOP to reset the Interval Timer to its original settings.7
REVIEWING WORKOUTSEvery time you reset the timer in Run or Chrono modes, the workout is saved. You can view it from the Reviewscreens. Compare these saved workouts against one another to track your progress and decide how to trainnext time.You can view the following from the Review screens:DataDescriptionDataDescriptionSTstart timeAV SPEEDaverage miles per hour over entire workoutENDend timeCALcalories burned during the workoutDISTtotal distance travelledLap timeelapsed time for this lap onlyCHRONOtotal timeLap distancedistance traveled during this lapAV PACEaverage minutes per mile over entire workoutCHOOSING A WORKOUT TO VIEWBefore you can view the details of a workout, select the workout you want to view. Information in the list ofsaved workouts helps you select a workout.1. Press MODE until REVIEW displays.The most recent entry in the list of workouts displays. This diagram describes the features of a saved entry:File numberWorkout dateG: GPS workoutWorkout number by dayH: Indoor workout2. Press or - to scroll through the list of workouts.3. Press VIEW.The first page of data for that workout displays.VIEWING WORKOUT DATA Press VIEW to cycle through each screen to view detailed data for that workout.The workout data screens display in this order: Workout start and end times, and distance Elapsed time, distance, and average pace Average speed and total calories burned Elapsed time and distance of each lapDELETING WORKOUTSTo free up memory on the watch, you can delete one or more workouts.DELETING ONE WORKOUT1. Press MODE until REVIEW displays.2. Press or - to select a workout to delete, then press VIEW.3. Press VIEW until VIEW/dEL/ALL displays.4. Press or - to select dEL, then press OK.The workout is removed from memory.NOTE: There is no confirmation when deleting a workout; the workout is deleted immediately when youpress OK.8
DELETING ALL WORKOUTS1. Press MODE until REVIEW displays.2. Press or - to select any workout, then press VIEW.3. Press VIEW until VIEW/dEL/ALL displays.4. Press or - to select ALL, then press OK.The workouts are removed from memory.NOTE: There is no confirmation; all workouts are deleted immediately when you press OK.SETTING ALARMSYou can set up to 5 alarms on the watch. Each of these alarms can be set to sound at a different time.When you set the alarm, you choose on which of the time zones (T1 or T2) the alarm will be timed; the alarmwill sound at the specified time in that time zone each day.All alarms will sound regardless of which time zone is primary, but will sound at the time specified accordingto the time zone you selected.CHOOSING AN ALARM1. Press MODE until SET displays.2. Press or - to select ALARM, then press OK.3. Press or - to select the alarm to set, then press OK.SETTING THE ALARM TIME1. From the alarm setting screen, press or - to change hours, then press OK.2. Press or - to change minutes, then press OK.3. Press or - to select the time zone on which to time the alarm (T1 or T2), then press OK.4. Press or - to turn the alarm ON, then press OK.5. Press or - to turn the KEY TONE (button beep) ON or OFF, then press OK.NOTE: Even if you set KEY TONE to OFF, the alarm will still sound at the specified time; this setting affectsonly whether the watch beeps when you press a button.6. Press MODE to exit.TURNING AN ALARM ON OR OFFYou can turn an alarm on or off from ALARM mode.1. Press MODE until ALARM displays.2. Press - to select the alarm to turn on or off.3. Press to switch between ON and OFF.4. Press MODE to exit.When any alarm is ON, the q icon appears in the lower right of the display.CONFIGURING SETTINGSThe settings changes described in this section are not required, but you can use these settings to get themost out of the watch.SETTING UP AUTOMATIC LAPSYou can set the watch to take a split automatically during workouts. Automatic laps work in both Run andChrono modes when the timer is running. You choose one of the preset distances, and the watch takes a splitfor you so you don’t have to break stride or take your eyes off the road.1. Press MODE until SET displays.2. Press or - to select AUTO LAP, then press OK.3. Press or - to select the distance at which the watch will take a split, then press OK.You only select the number of units at which you want to take a split. The watch applies the units ofmeasurement you selected when you set up the watch in the Getting Started section.For example, if you chose MI when you set up the watch, and chose 1 in step 2 of this procedure, thewatch takes a split every mile you travel.4. Press or - to set ALERT to ON (the watch will beep when a split is taken) or OFF (the watch will not beep),then press OK.5. Press MODE to exit.9
SETTING THE TIME MANUALLYWhile it is easiest to allow the GPS to set the time for you based on selected time zones, you can set eithertime zone manually.1. Press MODE until SET displays.2. Press - or to select TIME, then press OK.3. Press or - to select the time zone (TIME 1 or TIME 2) to set, then press OK.4. Press or - to select MANUAL, then press OK.5. Press or - to change hours, then press OK to move to the next field.6. Repeat step 5 for minutes, seconds, year, month, day, time format, and date format.7. Press MODE to exit.SELECTING THE TIME DISPLAYYou can set two time zones on the watch to keep time in different time zones. By default, TIME 1 is the primary time zone that displays in Time mode, but you can view TIME 2 or make it the primary time zone. In Time mode, press VIEW to see the time in your secondary time zone. In Time mode, hold VIEW to make the secondary time zone primary.TURNING ON NIGHT-MODE FEATURENormally, you must press INDIGLO button to turn on the night-light. When the Night Mode feature is active,any button press between the hours of 6 p.m. and 7 a.m. in the primary time zone turns on the night-light.1. Press MODE until SET displays.2. Press or - to select NIGHT, then press OK.3. Press or - to select ON, then press OK.4. Press MODE to exit.ADJUSTING CONTRASTContrast settings determine how dark the text on the watch screen appears. Raise the contrast setting fordarker text, and lower the setting for lighter text.1. Press MODE until SET displays.2. Press or - to select CONTRAST, then press OK.3. Press or - to select the contrast value, the press OK.4. Press MODE to exit.TURNING BUTTON BEEP ON AND OFFSelect whether or not the watch emits a beep when any button is pressed.1. Press MODE until SET displays.2. Press or - to select TONE, then press OK.3. Press or - to select ON or OFF, the press OK.4. Press MODE to exit.When TONE is ON, theicon displays in the lower right of the display.You can also set the button beep when setting the alarm. See Setting the Alarm Time for more information.RESETTING THE WATCHYou can return all settings to their factory defaults. Your user profile and workout data are preserved. Press INDIGLO , MODE, START/SPLIT/ and STOP/SAVE/- simultaneously and hold.10
TROUBLESHOOTINGFollow these steps to solve problems that may arise when using the watch.PROBLEMS WITH THE GPSHOW DO I TURN OFF THE GPS?If the timer is not running for 15 minutes, the GPS will turn off automatically.To conserve battery life, you may turn of the GPS manually. Hold GPS ON/OFF to turn off the GPS.WHY CAN’T I GET A SATELLITE FIX?To obtain a good satellite fix, the GPS needs a clear line-of-sight to the satellites. Go outside and move away from buildings or tall trees. Remain stationary. Point the bottom of the watch face toward the sky.PROBLEMS WITH THE BATTERYTHE BATTERY INDICATOR DOES NOT MATCH THE ACTUAL CHARGEIf the display appears too light or the GPS shuts off unexpectedly, but the battery indicator appears full:1. Allow the battery to run down completely so that the watch shuts off automatically.2. Fully charge the watch without interruption.NOTE: Even when the watch is not in use, fully charge the watch every 1 or 2 months to preserve battery life.SAFETYCAUTION: Do not wear this watch while swimming. Prolonged submersion in water can cause electricalshorting which may cause skin irritation and minor burns.WATER RESISTANCEThe watch is water resistant to 50 meters.Water-Resistance Depthp.s.i.a. *Water Pressure Below Surface50m /160ft86*pounds per square inch absoluteIf the watch is submerged, before using or charging, wipe the watch dry and allow to air dry completely.CLEANING AND STORAGEYou can clean the watch with a damp cloth and a mild detergent. Wipe dry completely before using orcharging.NOTE: Do not use any chemical cleaners or solvents that may damage plastic components.To avoid permanent damage to the watch, do not store the watch in extreme high or low temperatureenvironments for extended periods.11
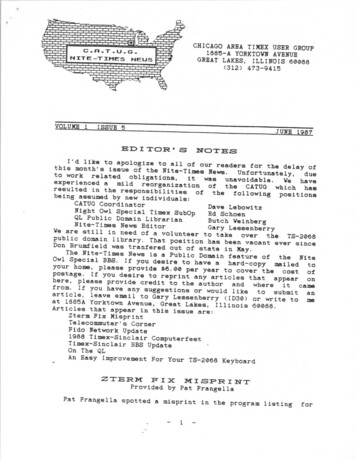
TIME ZONESConsult this chart for guidance in setting your time zones. If your city is not listed, and you do not know yourGMT offset, select the city that is nearest to fsetCityCodeCityPPGPago San FranciscoABJAbidjanLAXLos AngelesPARParisLASLas VegasMILSEASeattleROMUS-PPacific Standard TimeDENELPUS-MMountain Standard BColomboRGNYangonBKKBangkokJKTJakartaPNHPhnom PenhMilanHANHanoiRomeSINSingaporeBERBerlinHKGHong KongDenverMADMadridKULKuala LumpurEl o OUHoustonSTOStockholmSHAShanghaiDFWDallas/Fort WorthHAMHamburgSELSeoulMSYNew delaideUS-CCentral Standard CNew pe TownWLGWellingtonPTYPanama s AbabaWASWashingtonNBONairobiUS-EEastern Standard TimeTHRTehranCCSCaracasSYZShirazLPBLa PazDXBDubaiSCLSantiagoAUHAbu DhabiRIORio de JaneiroMCTMuscatGRUSao PauloKBLKabulBUEBuenos elhi0 1 2 3 3.5 4 4.5 5 5.512 5.5 6 6.5 7 8 9 9.5 10 11 12
WARRANTY AND SERVICETimex International Warranty (U.S. Limited Warranty)Your Timex GPS watch is warranted against manufacturing defects by Timex for a period of ONE YEAR fromthe original purchase date. Timex Group USA, Inc. and its worldwide affiliates will honor this InternationalWarranty.Please note that Timex may, at its option, repair your Timex product by installing new or thoroughlyreconditioned and inspected components or replace it with an identical or similar model.IMPORTANT: PLEASE NOTE THAT THIS WARRANTY DOES NOT COVER DEFECTS OR DAMAGES TO YOURPRODUCT:1. after the warranty peri
w293_user guide - revised 1.30.14 easy trainer user guide gps speed distance watch