Transcription
Educator’s Guide to a Hand Held GPSOverviewThis lesson is designed to introduce students to a hand-help GPS receiver, its features, and the basicconcept behind its function and use.Grades and Subject Areas Recommended for students 5th grade and above.Subject is relevant to geography, science, math, and physical education.Objectives Students will have a basic understanding of the global position system.Students will be able to determine the latitude/longitude of an object and record the position. Students will be able to navigate and use the basic features of a hand-help GPS receiver, suchas using the paging through screens, finding the map source, measuring distances betweengeographical objects, use the trip odometer, mark and find waypoints, and reset defaults.I Can Statements I can accurately describe the global position system to a friend.I can calculate my position in relation to distance objects on the map.I can set a waypoint, find a waypoint, and reset data on a GPS.I can use the trip computer to calculate speed, average speed, and direction.Curriculum ConnectionsAlaska Content StandardsTechnologyA.A student should be able to operate technology-based tools.1) Use technological tools for learning, communications, and productivity.2) Manage and maintain technology tools.David Brannan – January, 2011
C. A student should be able to use technology to explore ideas, solve problems, and derivemeaning.1) Use technologies to observe, analyze, interpret, and draw conclusions.2) Solve problems both individually and with othersE.A student should be able to use technology to express ideas and exchange information.5) Examine the role of technology in the workplace and explore careers that require the useof technology;7) Integrate the use of technology into daily living.ISTE Student Standards (2007)5. Digital CitizenshipStudents understand human, cultural, and societal issues related to technology andpractice legal and ethical behavior. Students:b. Exhibit a positive attitude toward using technology that supports collaboration,learning, and productivity.ISTE Teacher Standards (2008)1. Facilitate and Inspire Student Learning and CreativityTeachers use their knowledge of subject matter, teaching and learning, and technology tofacilitate experiences that advance student learning, creativity, and innovation in bothface-to-face and virtual environments. Teachers:b. Engage students in exploring real-world issues and solving authentic problemsusing digital tools and resources.3. Model Digital-Age Work and LearningTeachers exhibit knowledge, skills, and work processes representative of an innovativeprofessional in a global and digital society. Teachers:a. Demonstrate fluency in technology systems and the transfer of current knowledgeto new technologies and situations.Technology IntegrationHardware and Software Needs1. Document camera2. LCD projector3. GPS receiver (no more than 3 students per receiver if possible)Tips and tricks1. Explain to students to hold still for 30 seconds to 1 minute before reading the handheldGPS to get an accurate reading. Often times students will spin, turn, or walk while readingbefore the GPS calculates fully.David Brannan – January, 2011
2. Check that the units are using the proper units of degrees, minutes, and seconds. Thereare several different units these GPS units can use for longitude and latitude, so forconsistency make sure they are all using the same units.3. If you mark points on the GPS then later check those points on Google Earth, they may notalign exactly due to the handheld GPS and/or Google Earth maps.ResourcesHandouts or Downloads1. Introductory GPS Lesson Outline2. Introductory GPS Lesson Plan3. Introductory GPS ActivityWeb resources1. l/gps.htmDavid Brannan – January, 2011
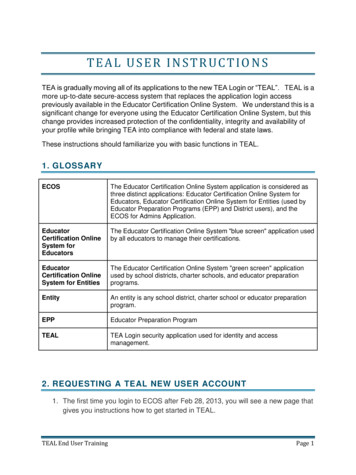
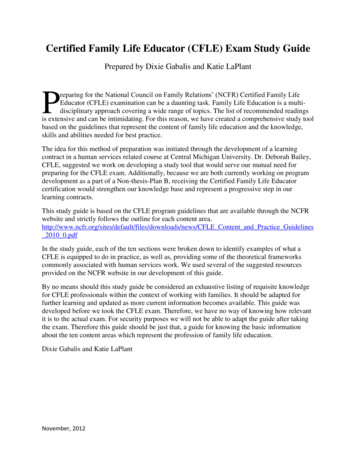
Introduction to Global Positioning Systems (GPS)Lesson PlanPrep Time30 - 45 minutesPrior to LessonContact your Instructional Technology Teacher (ITT) to assist with the lesson. ITTs haveaccess to GPS kits and are willing to assist with this lesson on request.On arrival, check each GPS unit legacy data (reset if necessary) and charge batteries.Time Needed for Lesson90 minutesStep 1Gather students as you usually do (meeting place, desk, etc.) for instruction on latitudeand longitude referencing images below (see source) and grid lines in Google Earth.Image source: eog101/study/LongLat.htmDavid Brannan – January, 2011
Your Global AddressEvery location on earth has a global address. Because the address is in numbers, peoplecan communicate about location no matter what language they might speak. A globaladdress is given as two numbers called coordinates. The two numbers are a location'slatitude number and its longitude number.Latitude (shown as a horizontal line) is the angular distance, in degrees, minutes, andseconds of a point north or south of the Equator. Lines of latitude are often referred toas parallels.Teaching tip: It is easier to remember latitude as horizontal because yourmouth has to go wide like a smile when you pronounce the word.Longitude (shown as a vertical line) is the angular distance, in degrees, minutes, andseconds, of a point east or west of the Prime (Greenwich) Meridian. Lines of longitudeare often referred to as meridians.Teaching tip: It is easier to remember longitude as vertical because your mothhas to go long-wise up & down to pronounce the word.Distance between Lines If you divide the circumference of the earth (approximately25,000 miles) by 360 degrees, the distance on the earth's surface for each one degreeof latitude or longitude is just over 69 miles, or 111 km.How Latitude and Longitude Work TogetherUsing latitude and longitude is different from using a street address. Instead of having aspecific street address, latitude and longitude work with a numbered grid system, likewhat you see when you look at graph paper. It has horizontal lines and vertical lines thatintersect. A location can be mapped or found on a grid system simply by giving twonumbers which are the location's horizontal and vertical coordinates; or, to say itanother way, the "intersection" where the place is located).To precisely locate points on the earth's surface, degrees longitude and latitude havebeen divided into minutes (') and seconds ("). There are 60 minutes in each degree. Eachminute is divided into 60 seconds. Seconds can be further divided into tenths,hundredths, or even thousandths.Source of information: mlStep 2Global Positioning SystemsThe Global Positioning System (GPS) is a worldwide radio-navigation system formedfrom a constellation of 24 active satellites and their ground stations.David Brannan – January, 2011
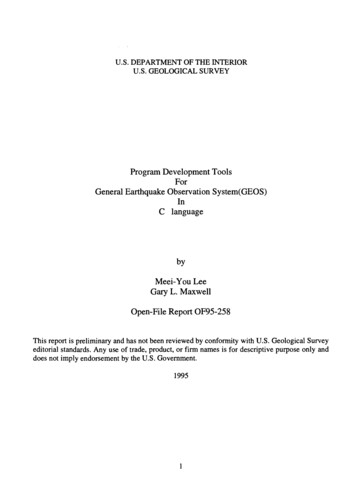
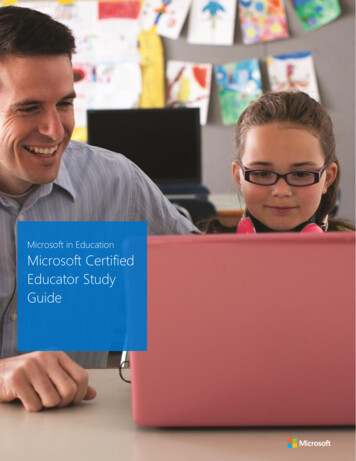
GPS uses these "man-made stars" as reference points to calculate positions accurate to amatter of meters. In fact, with advanced forms of GPS you can make measurements tobetter than a centimeter.Note of interest:The U.S. Department of Defense developed the GPS system for 12billion dollars in order to precision guide missiles.How GPS WorksEach of these 3,000- to 4,000-pound solar-powered satellites circles the globe at about12,000 miles (19,300 km), making two complete rotations every day. The orbits arearranged so that at any time, anywhere on Earth, there are at least four satellites"visible" in the sky.Demo:Watch an animated GIF on Wikipedia that shows how satellites are tellationGPS.gifA GPS receiver's job is to locate four or more of these satellites, figure out the distanceto each, and use this information to deduce its own location. This operation is based ona simple mathematical principle called trilateration. Trilateration in three-dimensionalspace can be a little tricky, so we'll start with an explanation of simple two-dimensionaltrilateration.Source of Information: l/gps.htmStep 3If you have not already done so, pass out hand held GPS units to students.Using a document camera, direct students to watch you demonstrate how to use the GPSunits to meet the learning targets.Hand-held GPS OverviewUsing a document camera and LCD projector project this image and/or your own GPSunit on a screen for the class to view and follow along. Review the various componentson their own GPS unit, mainly on/off, page, up, down, enter and joysticks buttons.Owner’s manual: http://static.garmincdn.com/pumac/eTrexH OwnersManual.pdfDavid Brannan – January, 2011
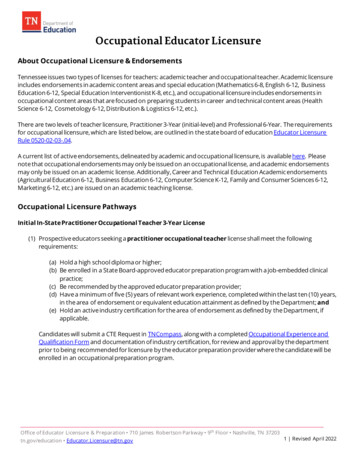
Turn on the GPS and review the homescreen GPS units may have difficulty locking ontosatellites inside a building. However, point outthe position accuracy, the constellation of thesatellites, the satellites’ signal, and currentposition (coordinates).With the page button navigate to the map screen You can view the current elevation, time of theday, and a default map with the currentlocation. Using the joystick you can determine distancesto other locations by pushing the white arrowon the map. Demonstrate how to zoom in/out the map andchange the scale.David Brannan – January, 2011
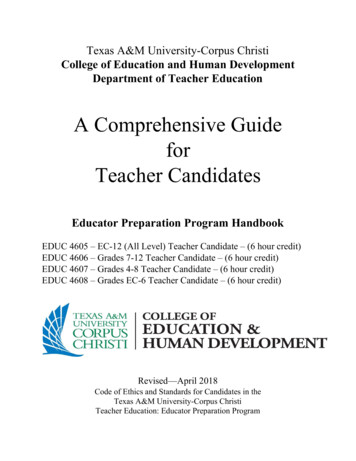
With the page button go to the navigation screen View the current speed, distance to thenext turn, current time of the day, anddistance from route. You can demonstrate the compass ringwith the bearing to the next turn.With the page button navigate to the trip computer You can use the enter button to reset the stats. With the trip computer you can view distance traveled, maximum speed, theamount of time you’ve been moving, average speed (total time), and view youraccumulated distance traveled (odometer).With the page button navigation to the main menu The main menu leads to all main functions of the GPS. You can navigate to satellites status information, trip computer settings,waypoints, travelled paths (tracks), manage routes, system setup, calendar,calculator, stopwatch, and games (not recommend showing).Source of GPS screen shots: http://static.garmincdn.com/pumac/eTrexH OwnersManual.pdfStep 4 Distribute GPS Skills Exercise Handout and lead students outside to the footballfield, track, or large grassy area. Have students complete as many questions on the exercise sheet as possibleworking in groups of 2 students.David Brannan – January, 2011
NameDate / /GPS Skills Exercise1. What does GPS stand for? .2. Turn on the GPS unit with the lower right button. (TOP has the words ETREX at top)What screen shows up? (What is the GPS doing?) .3. Scroll through the pages with the upper right button. What screens do you have?.4. Using the map page: What is the scale at the lower left (what is the length of the bar)?5. What direction is up on all maps? Hint, it starts with an N .6. Zoom onto the map (upper left button) to see the biggest map source scale. How manymiles to the ¼ inch is it? . This is all the detail there is but youcan over zoom.7. Put the white pointer on the school. What are the elevation, latitude and longitude ofthe school? .8. How far is it to the closest river by the shortest distance? (Move the white arrow to thatpoint and read the distance in the upper right corner). .9. Use the toggle to move the curser down to the big river to see the next town. What is it?10. How far is that town from us? (Scroll through with the upperright menu button to get back to the black arrow, when you are done).11. Can you find Hawaii the same way? How far away is it? .Odometer page12. Scroll to the odometer page (all the numbers). What information does the odometernumbers page give you? .13. Clear the odometer. (Push the options button on the lower left side and reset, apply,and ok.)14. Change the screen to big numbers or small numbers. (Lower left button). Whatinformation does the page give now? .Now Get Up and Move15. What is your normal walking speed how fast can you run?(Big numbers odometer page works well for this).16. Using the compass page, what direction you are walking? .David Brannan – January, 2011
To Make a TrackNote: The GPS automatically makes a track.1. Zoom into the map page to see yourself walk. (You are at the black arrow and it ispointing the direction you are going. The line is you walking)2. Make a red track trail. (Go to main menu and select Tracks. Then select Setup andchange the color. Now walk around and make a track.To Mark a Way Point1. Mark a Waypoint at your location. (Go to main menu and select Mark. Scroll to the topand select the waypoint number to re-name it). What did you name it?To Find a Point1. Walk away from your waypoint or trade GPS’s with a classmate.2. Go to Find on main menu and select “find” then “way points” and use the compass pageto find your way back. What location did you find? .3. Move the white pointer to the location of your house. Mark the point. Use the findfunction to make a line to it. Looking at the map and compass page –How far and inwhat direction is your house? .4. If you start walking, what is your ETA (estimated time of arrival) to your house?5. How far is it to Anchorage? (Select find from main menu,select cities or all points of interest. Push lower right button to type in Anchorage).To Save Your Track1. Select “Track from main Menu. Save, rename by selecting numbers on top of page,select ok to quit typing and OK again at bottom of page to save.To Clear Data1. Clear tracks and waypoints; from the odometer numbers page - push the lower leftbutton and select clear, apply and ok.2. Clear the navigation lines; from the map page push the lower left button and select StopNavigation3. Turn off GPS by holding lower right button for three seconds.David Brannan – January, 2011
GPS uses these "man-made stars" as reference points to calculate positions accurate to a matter of meters. In fact, with advanced forms of GPS you can make measurements to better than a centimeter. Note of interest: The U.S. Department of Defense developed the GPS system for 12 billion dollars in order to precision guide missiles. How GPS Works