Transcription
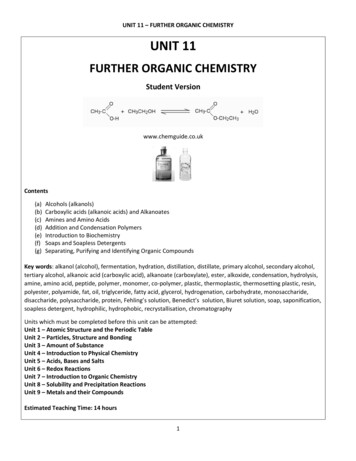
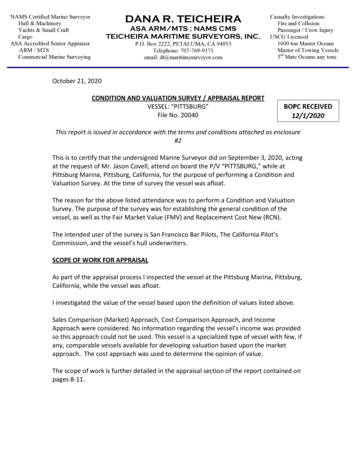
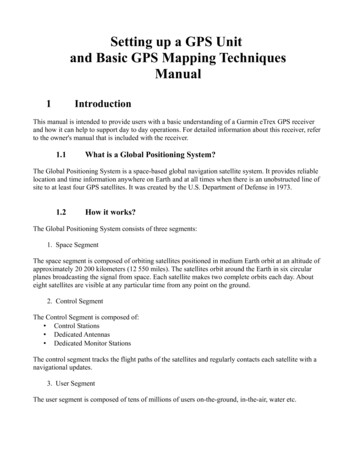
Setting up a GPS Unitand Basic GPS Mapping TechniquesManual1IntroductionThis manual is intended to provide users with a basic understanding of a Garmin eTrex GPS receiverand how it can help to support day to day operations. For detailed information about this receiver, referto the owner's manual that is included with the receiver.1.1What is a Global Positioning System?The Global Positioning System is a space-based global navigation satellite system. It provides reliablelocation and time information anywhere on Earth and at all times when there is an unobstructed line ofsite to at least four GPS satellites. It was created by the U.S. Department of Defense in 1973.1.2How it works?The Global Positioning System consists of three segments:1. Space SegmentThe space segment is composed of orbiting satellites positioned in medium Earth orbit at an altitude ofapproximately 20 200 kilometers (12 550 miles). The satellites orbit around the Earth in six circularplanes broadcasting the signal from space. Each satellite makes two complete orbits each day. Abouteight satellites are visible at any particular time from any point on the ground.2. Control SegmentThe Control Segment is composed of: Control Stations Dedicated Antennas Dedicated Monitor StationsThe control segment tracks the flight paths of the satellites and regularly contacts each satellite with anavigational updates.3. User SegmentThe user segment is composed of tens of millions of users on-the-ground, in-the-air, water etc.
GPS Segments2Setting up a Garmin e-Trex GPS unitThese are the basic steps on how to set up a Garmin eTrex GPS unit. These steps are specificallyaddressed for achieving best results when collecting track logs and waypoints for OpenStreetMap.For a full description of the settings please consult the Owners Manual or check the site:2.1Getting Started2.1.1Installing batteries and a microSD cardThe eTrex operates on two AA batteries which are not included.To install the batteries: Remove the battery compartment cover from the back of the unit Insert the batteries, observing the proper polarityThe SD card should be included in the Garmin eTrex folder bundle. It should be installed in the slot onthe left side of the batteries.To install a microSD card: Remove the battery compartment cover from the back of the unit Locate the card slot at the upper-left edge of the battery tray, and slide the card into the slot2.1.2Transferring data to and from the GPS unitTo transfer data to and from the device:
Lift the weather cover from the USB unit on the back of the unit Connect the USB cable to the USB port on your computer and the USB port on the back of theunit Transfer the dataInstalling the batteries and a microSD card2.1.3Key FunctionsKey Functions
2.1.4Initializing the GPS ReceiverWhen the satellite is turned on for the first time, the receiver must collect satellite data and establish itslocation. To receive the satellite signals you must: Be outdoors and have a clear view of the skyGPS is now searching for the satellite signalsThe Locating Satellites is replaced by Acquiring Satellites messageOnce the connection is established the Location and Coordinates appear in the AcquiringSatellites WindowAcquiring Satellites Window2.2Loading a MapOpenStreetMap data is free to use however you like. Important! The changes need to be released underthe OSM license. OSM data can be transformed into map files compatible with Garmin GPS devices.CloudMade (http://cloudmade.com) is one of the companies that produces free Garmin maps for a largenumber of countries.Download a map: To find maps of the area, load http://downloads.cloudmade.com and browse the maps. TheGarmin maps are in .img format. Once the area of interest is found, download the appropriate file to the computer. Unzip the file, this will extract the file called gmapsupp.imgLoad the map onto the Garmin device by putting the device into USB Mass Storage mode, and copyingover the file: Press Menu twice or Page key until arriving to Main Menu Select the Setup icon, press Enter, then select the Interface icon, and press Enter Connect the GPS to the Computer via USB cable, highlight the USB Mass Storage button andpress Enter, the device shows up on a system as a drive If it doesn't exist create a folder called Garmin on the device Copy the downloaded gmapsupp.img file to the Garmin folder; if the file already exists youmight want to archive the existing file Disconnect the GPS or press the Power button to restart the unit - the map should be available
2.3Map SetupMap SetupSet up a map on the Map Page: Press Quit/Page key until arriving at the Map Page Press Menu/Find key, select Setup Map and press Enter/Rocker keyUse the Rocker key and move it left and right between different Map setups. Setup:General Setup Use the Rocker key (left and right) to move from icon to icon on the top menu and select theGeneral Setup Move the Rocker key down to highlight Orientation, press Enter, select North Up and pressEnter again Then highlight Lock On Road, press Enter, select Off and press Enter again.Turning Lock On Road ON would automatically align the tracklog with the nearest road present onthe map loaded into the GPS unit. By turning the Lock On Road OFF will record new data even in thepresence of existing roads.Tracks Setup Use the Rocker to move back to the Icon Menu on topSelect Track SetupMove the Rocker down to highlight Track Points and press EnterUse the Numeric Keypad to enter 10000 and press Enter10000 is the maximum number of track points that can be recorded in the GPS units internal memory.The limit of the track points recorded to the microSD card is only limited by the size of the card.
2.4Track Log SetupThese steps make sure that the Garmin eTrex is recording track logs with a sample rate once per secondand recording the track logs to the data card. Setting the frequency of the track log recording to thehighest possible (one second) will ensure the most complete track recording.Track Log SetupFirst make sure the Track Log is being recorded: Press Menu twice or Page key until arriving to Main Menu Select Tracks icon and press Enter If Track Log is set to Off, move the Rocker to highlight On, and press EnterNext, configure the Track Log recording:Highlight the Setup button, and press Enter to open the Tracklog Setup PageHighlight Wrap When Full, and press Enter so that it is CheckedHighlight Record Method, press Enter, select Time, and press EnterHighlight Interval, use the Numeric Keypad to set interval to 00 hrs 00 min 01 sec, andselect OK Highlight Color, press Enter, select your choice, and press Enter Finally. Configure the Data Card: Highlight the Data Card Setup button, and press Enter to enter the Data Card Setup Page Highlight Log Track To Data Card, and press Enter so that it is Checked
2.5System setupSystem Setup Press Menu twice or Page key until you arrive to the Main MenuSelect the Setup icon, and press Enter, then select the System icon, and press EnterHighlight GPS, press Enter, select Normal, and press Enter againHighlight WASS/EGNOS, press Enter, select Enabled, and press Enter againHighlight Battery Type, press Enter, select depending on your battery type (most rechargeablebatteries are usually NiMH, while the normal ones are Alkaline)2.6Units SetupUnits SetupTo set up Measuring Units: Press Menu twice or Page key until you arrive to the Main MenuSelect Setup icon, press Enter, then select the Units icon, and press EnterHighlight Position Format, press Enter, select hddd.ddddd , and press EnterSelect Map Datum, press Enter, select WGS 84, and press EnterSelect Distance/Speed, press Enter, select Metric, and press EnterSelect Elevation, press Enter, select Meters (m/min), and press EnterSelect Depth, press Enter, select Meters, and press EnterSelect Temperature, press Enter, select Celsius, and press Enter
2.7Time SetupTime SetupPress Menu twice or Page key until you arrive to the Main MenuSelect Setup icon, press Enter, then select the Time icon, and press EnterHighlight Time Format, press Enter, and select 24 HourHighlight Time Zone, press Enter, and select a city in your time zone. If no obvious choice islisted, select Other, and press Enter Highlight UTC Offset, press enter, and use the Numeric Keypad to manually set yourtimezones offset. When finished, select OK. 2.8Welcome screen setupWelcome Setup Press Menu twice or Page key until you arrive to the Main Menu Select Setup icon, and press Enter, then select Welcome icon, and press Enter Use the Alphanumeric Keypad to enter a message
3Basic GPS mapping techniquesThe basic mapping techniques described are specifically addressed for achieving the best results whencollecting points of interest, ways and areas, using a hand-held GPS units, such as the Garmin eTrexdevice.3.1Collect satellite data and establish locationThe steps to initialize the GPS receiver are already described above (Initializing the GSP receiver).Before you set out to map, you need to initialize the GPS receiver, meaning, the receiver must collectsatellite data and establish its location. To receive the satellite signals: Be outdoors and have a clear view of the sky!Turn the GPS device on by pressing the Power buttonGPS is now searching for the satellite signalsThe Locating Satellites is replaced by Acquiring Satellites messageOnce the connection is established the Location and Coordinates appear in the AcquiringSatellites WindowYou are ready to map!Collecting satellite data and establishing location3.2Collecting Points of InterestPoints of Interest (POI) are points/locations which are of special interest and usually the reason forconducting a mapping exercise. They are either physical points or events, placed somewhere in spaceand time. Some examples of Points of Interest are hospitals, schools, water points, toilets, shops,religious institutions, and even events, such as, demonstrations, clashes, rallies, etc. By mapping wedetermine the exact location of Points of Interest in space and time.
There are many different ways to collect Points of Interest. This step explains how to collect thesepoints , also known as waypoints, using a hand-held GPS unit.To collect a point: Stand in front of an object you wish to collect Press Enter key and hold it for one second until you arrive to Mark Waypoint screen Write down on a piece of paper (or into Waypoint Log Sheet) the number and the name of thepoint you are collecting (You can move up to the waypoint number field by using the Rockerkey, and press Enter. Alphanumeric and Numeric Keypads appear. You can use these keypadsto type in the name of the location you are mapping but for the sake of saving time it is betterto use a sheet of paper and a pencil) OK should be highlighted, press Enter to save the locationCollecting Points of InterestExample of a GPS Waypoint Log Sheet:Waypoint Log Sheet
3.3Collecting WaysWays are lines connecting different locations. Ways can be highways, roads, paths, railway lines, buslines, ship lines, bicycle routs, hiking trails etc.Before you start collecting ways, you need to set the Track Log as described above in the Track LogSetup. Once the device is set to record track, all you need to do is walk along the way you wish to map,and the device does the rest. For maximum efficiency try walking in the middle of the way you arecollecting, but DO NOT PUT YOURSELF IN DANGER!Collecting ways3.4Collecting AreasAn area is an enclosed space usually of the same attribute/land use. Areas can be forests, lakes, seas,parks, fields, buildings, parking lots, squares, playgrounds, etc.There is a couple of ways to collect an area with a GPS unit but the fastest and the easiest are:Collect a point in the middle: Collect a point in the middle of an area you want to map, estimate the dimensions and draw anapproximate sketch of an area on a piece of paperThis method is good for smaller areas like playgrounds but it's not very precise.Collect points on the perimeter of the area: Walk around the perimeter of an area and collect points at the edges of an area Write the waypoints of the edges of an area on a piece of paper
Collecting a point in the middle of an area and sketching out an area:Collecting a point in the middle and sketching out an areaCollecting points on the perimeter of the area:Walking the perimeter of an area and collecting points at the edges
2 Setting up a Garmin e-Trex GPS unit These are the basic steps on how to set up a Garmin eTrex GPS unit. These steps are specifically addressed for achieving best results when collecting track logs and waypoints for OpenStreetMap. For a full description of the settings please consult