Transcription
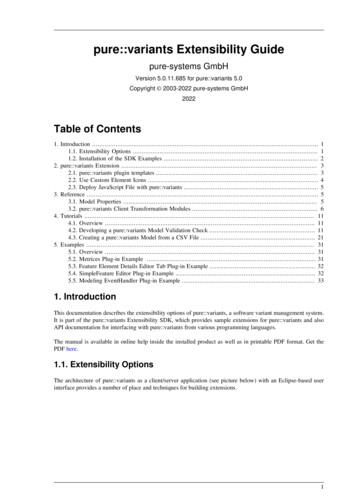
pure::variants Extensibility Guidepure-systems GmbHVersion 5.0.11.685 for pure::variants 5.0Copyright 2003-2022 pure-systems GmbH2022Table of Contents1. Introduction . 11.1. Extensibility Options . 11.2. Installation of the SDK Examples . 22. pure::variants Extension . 32.1. pure::variants plugin templates . 32.2. Use Custom Element Icons . 42.3. Deploy JavaScript File with pure::variants . 53. Reference . 53.1. Model Properties . 53.2. pure::variants Client Transformation Modules . 64. Tutorials . 114.1. Overview . 114.2. Developing a pure::variants Model Validation Check . 114.3. Creating a pure::variants Model from a CSV File . 215. Examples . 315.1. Overview . 315.2. Metrices Plug-in Example . 315.3. Feature Element Details Editor Tab Plug-in Example . 325.4. SimpleFeature Editor Plug-in Example . 325.5. Modeling EventHandler Plug-in Example . 331. IntroductionThis documentation describes the extensibility options of pure::variants, a software variant management system.It is part of the pure::variants Extensibility SDK, which provides sample extensions for pure::variants and alsoAPI documentation for interfacing with pure::variants from various programming languages.The manual is available in online help inside the installed product as well as in printable PDF format. Get thePDF here.1.1. Extensibility OptionsThe architecture of pure::variants as a client/server application (see picture below) with an Eclipse-based userinterface provides a number of place and techniques for building extensions.1
pure::variants Extensibility GuideFigure 1. Client Server ArchitectureThe user interface can be extended using the standard mechanisms provided by the Eclipse platform, called extension points. Beside the already in a standard Eclipse existing extension points (for adding menu items, providingtoolbar buttons, etc.) pure::variants provides also new extension points which provide an easy way to add newfunctionality to pure::variants e.g. for model import/export, element type specific wizards and editors, new editorviews.A second layer for extensibility is the core Java API which provides most non-user interface related functionality.This API can be used to interface with pure::variants from other Java-based applications, which are not built ontop of the Eclipse platform.It is also possible (but not advisable) to directly connect to the server using the SOAP protocol interface. In mostcases one should rely on the Java API for handling the communication.The core functionality itself is realized in a separate application which provides a similar platform independentextension interface as it is available in Eclipse but supports also platform specific extensibility mechanisms suchas shared libraries and COM/OLE interfaces.All afore mentioned extensibility options are (depending on the concrete configuration) available for allpure::variants Editions. The Integration Edition also provides the option to integrate the pure::variants core components in own binary applications.1.2. Installation of the SDK ExamplesAs in the introduction mentioned the SDK feature is provided with an API documentation and correspondingsample extensions. For each part of this documentation a reference to a sample extension is given if there is one.Installing such a sample is very easy:Choose in the eclipse workbench File - New - Example. - Variant Management SDK. Below this categorytwo example wizards can be chosen:The "Extensibility Example Plugins" - wizard and the "Extensibility Example Projects" - wizard. To install aproject (plugin) select the desired wizard and press next. A list of all example projects (plugins) is shown. Checkthe projects you wish to install and press finish.2
pure::variants Extensibility GuideTo run the examples start an eclipse runtime workbench. See chapter PDE Guide- Getting Started- Basic Plugin Tutorial- Running a plug-in in the Eclipse help.2. pure::variants Extension2.1. pure::variants plugin templatesThe pure::variants SDK provides some plugin templates. With these template you can compose your ownpure::variants importer, synchronizer and transformation. All templates are available as plugin in templates in theEclipse New Plug-In Project wizard.To use the template create a new Eclipse plugin project. Right-click in the Eclipse Projects View and choose New- Project - Plug-in Project from the context menu (see Figure 2, “New Plug-in Project Wizard”).Figure 2. New Plug-in Project WizardFigure 3, “Plug-in Project Settings” shows the settings required for the plugin. Please note that the plugin has towork with an eclipse version and must not work with OSGI framework.Figure 3. Plug-in Project SettingsAfter pressing Next the Plug-in Content page is opened. Please apply the settings as shown in Figure 4, “Plugin Content Settings”.3
pure::variants Extensibility GuideFigure 4. Plug-in Content SettingsThe next Page shows available Plug-In templates. Choose pure::variants Plug-in(Figure 5, “Plug-in TemplateSelection”). On the next page you can choose which parts of the template you need. It is possible to use allthe template parts alone. Or to use all parts together. The later enables you to implement a complete round tripwith importing data, synchronize the external data and transform the data. It also contains model manipulationif necessary.Figure 5. Plug-in Template SelectionTo run the examples start an eclipse runtime workbench. See chapter PDE Guide- Getting Started- Basic Plugin Tutorial- Running a plug-in in the Eclipse help.2.2. Use Custom Element IconsTo use custom element icons for elements in pure::variants custom icons can be placed in one of the followinglocations:4
pure::variants Extensibility Guide Eclipse Installation Directory /configuration/com.ps.consul.eclipse.ui/images Eclipse Configuration Directory /com.ps.consul.eclipse.ui/images In a plugin which defines an image directory with the com.ps.consul.eclipse.ui.ImageDirectory extension point.The icons have to placed in the define image directory.Both pathes can be found in the Installation Details in the Eclipse About Dialog. In tab "Configuration".eclipse.home.location is showing the Eclipse installation path and osgi.configuration.area is showing the configuration directory.The icon has to be of type gif and the name of the icon file has to follow a specific scheme: element typeelement class-MODELTYPEICON.gifAll elements in pure::variants have an element type and an element klass. Both usually have a namespace anda name. For example ps:feature is the generic feature type. The namespace is ps and the name is feature. Theicon file name is composed of type namespace type name - class namespace class name - MODELTYPE ICON.gif. MODELTYPE is either XFM or CCFM.For a generic feature the file name is ps feature-ps feaure-XFMICON.gif.2.3. Deploy JavaScript File with pure::variantsTo use custom JavaScript files in pure::variants those files can be deployed with pure::variants. The files can beplaced in on of the following locations: Eclipse Installation Directory s Eclipse Configuration Directory /com.ps.consul.eclipse.ui/javascripts In a plugin which defines a JavaScript ScriptEntry with the ryextension point.Both pathes can be found in the Installation Details in the Eclipse About Dialog. In tab "Configuration".eclipse.home.location is showing the Eclipse installation path and osgi.configuration.area is showing the configuration directory.3. Reference3.1. Model Propertiesps:evaluation:propertiesSettings for property handling during evaluation. This can be used to skip or pass through properties in prolog.The value is a XML structure: properties skip class "element class" type "element type" name "property name"/ pass class "element class" type "element type" name "property name"/ /properties ps:evaluation:relation:mappingMapping of user relation types to p::v base relation types. The value is a XML structure. It can contain multiple map tags. relationtypemap map from "user relation type" to "p::v base relation type"/ /relationtypemap 5
pure::variants Extensibility Guideps:diff:rebuildersProperty with IDs of IDiffRebuildTask to perform model dependen difference rebuilds. Rebuilders needs to register at ldTaskextension point.ps:admin:properties:disabledSet to "true" to disable creation and update of admin properties on model elements.3.2. pure::variants Client Transformation ModulesAutosar Feature Model Exchange Format (ARXML) TransformationExport variants to AUTOSAR Feature Model files.Transformer LabelAutosar Feature Model Exchange Format (ARXML)TransformationTransformer NameAUTOSAR FMEF mef.transform.moduleAUTOSAR Transformation ModuleCreates variants of AUTOSAR projects.Transformer NameAUTOSAR Transformation .clienttransformation.moduleCaliberRM ModuleTriggers the export of a variant description model to CaliberRM.Transformer NameCaliberRM xternal Capella TransformationStarts Capella and triggers transformation.Transformer NameExternal Capella .capella.moduleSimulink Configuration PropagatorPropagate a variation point configuration to running Simulink instance.Transformer LabelSimulink Configuration PropagatorTransformer NameSimulink Configuration Propagation6
pure::variants Extensibility .server.propagationSimulink Configuration m-File WriterWrite a variation point configuration to a MATLAB/Simulink initialisation file (*.m).Transformer LabelSimulink Configuration m-File WriterTransformer NameSimulink Configuration r.server.savingCreo Variation ModuleTriggers the transformation of the example Java code.Transformer NameCreo Variation duleIBM Rational DOORS ModuleTriggers the export of a variant description model to DOORS.Transformer NameIBM Rational DOORS ModuleIDcom.ps.consul.ui.doors.transform.moduleIBM Rational DOORS Configuration ExporterTriggers the export of a variant description model to DOORS.Transformer NameIBM Rational DOORS Configuration .column.moduleIBM Rational DOORS NG ModuleTriggers the transformation of the Doors NG Module.Transformer NameIBM Rational DOORS NG MF Feature Mapping ModuleCreate Variants of Mapped Ecore Models during the pure::variants transformation.Transformer NameEMF Feature Mapping enttransformation.moduleHTML Transformation ModuleCreates HTML output of Models. Models can be input or transformed models of a VDM.Transformer NameHTML Transformation m.module7
pure::variants Extensibility GuideReuse TransformationReuse another transformation configuration as part of the current transformation.Transformer NameReuse .sub.moduleAnt Build ModuleRuns an Ant build file as part of the transformation.Transformer NameAnt Build External Program RunnerRun an external program.Transformer LabelExternal Program RunnerTransformer moduleMakefile GeneratorGenerate a Makefile compatible to gmake, nmake, or ccmake.Transformer LabelMakefile GeneratorTransformer akefile.moduleAction List Generatorpure::variants standard transformation which generatesTransformer LabelAction List GeneratorTransformer Namestandard .actionlist.generator.moduleAction List RunnerExecute pure::variants standard transformation actionTransformer LabelAction List RunnerTransformer .actionlist.runner.moduleJava Script Transformation ModuleTriggers the transformation of Javascript code.Transformer Name8Java Script Transformation Module
pure::variants Extensibility pt.modulElement Cluster ReportGenerates a selection cluster report of the transformed variants in a CSV file.Transformer NameElement Cluster luster.report.moduleHP Quality Center Test Set creation moduleTriggers the transformation of HP QC Test Plans which creates Test Instances forTransformer NameHP Quality Center Test Set creation dule.testsetHP Quality Center Test Folder creation moduleTriggers the transformation of HP QC Test Plans which creates Test Folders andTransformer NameHP Quality Center Test Folder creation dule.testfolderPTC Integrity ModuleTriggers the transformation of a PTC Integrity document.Transformer NamePTC Integrity uleJAMA Connect Transformation ModuleTriggers the transformation of the JAMA project.Transformer NameJAMA Connect Transformation duleMagicDraw Transformation ModuleTriggers the transformation of Magic Draw Projects.Transformer LabelMagicDraw Transformation ModuleTransformer NameMagic Draw Transformation aw.moduleMicrosoft Word ModuleTriggers the transformation of Microsoft Word Documents.Transformer NameMicrosoft Word ModuleIDcom.ps.consul.ui.transform.office.module9
pure::variants Extensibility GuideMicrosoft Excel ModuleTriggers the transformation of Microsoft Excel Workbooks.Transformer NameMicrosoft Excel dulePolarion Configuration ExporterTriggers the transformation of the Polarion Module.Transformer NamePolarion Configuration orm.modulePolarion Variants ModuleTriggers the transformation of Polarion LiveDocs inside Polarion.Transformer NamePolarion Variants .clientModuleIBM Rational Rhapsody ModuleTriggers the transformation of IBM Rational Rhapsody file and server projects.Transformer LabelIBM Rational Rhapsody ModuleTransformer NameRhapsody IBM Rational Quality Manager ModuleTriggers the transformation of the RQM Test Plans.Transformer NameIBM Rational Quality Manager uleSoftware Configuration Management WrapperRuns the Software Configuration Management wrapper for ps:scmfile source elements.Transformer LabelSoftware Configuration Management WrapperTransformer eEnterprise Architect ModuleTriggers the transformation of a Sparx System Enterprise Architect Project.Transformer NameEnterprise Architect 10
pure::variants Extensibility GuideMicrosoft TFS ModuleTransformer NameMicrosoft TFS uleVEL Configuration WriterWrite a VEL configuration to XML file.Transformer LabelVEL Configuration WriterTransformer NameVEL Transformation n.moduleZuken Variation ModuleCreates Zuken variation resource files with destinations.Transformer NameZuken Variation odule4. Tutorials4.1. OverviewMost tutorials consist of two eclipse projects. One can be used to build an eclipse plugin which has to be installedin the Eclipse plugins folder (these projects have the suffix .plugin) and example pure::variants projects (theseprojects have the suffix .pvproject). These projects can only be used when the respective Eclipse plugin is installed.To ease the installation process, installed SDK provides two example packages installable from "New"- "Examples"- "Variant Management SDK". The Extensibility Example Plugins package contains all eclipse pluginprojects and installs them into the workspace when selected. The Extensibility Example Projects package containsall example projects.4.2. Developing a pure::variants Model Validation CheckOverviewThe reader must have basic knowledge of pure::variants and the Java Plugin Development under Eclipse. Formore information about the Eclipse Plugin concept see chapter Plattform Plug-in Developer Guide in the EclipseHelp.This tutorial explains how to develop a new check and corresponding quick fix for the pure::variants Model Validation Framework. Model Validation checks are applied in order to examine the correctness of a pure::variantsmodel. If a check detects problems in a model, the provided quick fix can be used to solve this problem automatically.A check is a Java class that is registered as Model Validation Framework extension in the Eclipse plugin containingthe check. The quick fix also is a Java class that does not need to be registered. In the following it is shown how tosetup a new Eclipse plugin, implement and register the check, and provide a quick fix for the check. The presentedexample check examines all unique names of the elements of a feature model. The names must begin with thestring feature, otherwise a problem is announced.The tutorial is structured as follows. Chapter 2 describes how a new Eclipse plugin is created. Chapter 3 shows theimplementation and registration of the check class. Chapter 4 shows how the new check is activated and applied toa model. Chapter 5 explains how the quick fix for the check is implemented and connected to the check. Chapter11
pure::variants Extensibility Guide6 shows how the quick fix for the check is used. The last chapter provides information about how to install thenew plugin in an Eclipse installation.Before reading this tutorial it is recommended to read section Model Check Framework (Tasks/Validation Models/Model Check Framework) from the pure:: variants User's Guide.The plugin described in this tutorial is part of the pure::variants SDK. It can be installed by choosing New - Example from the Eclipse File menu, and then Examples - Variant Management SDK - Extensibility ExamplePlugins - ing up the Plugin ProjectAs first a new Eclipse plugin project has to be created. Right-click in the Eclipse Projects View and choose New- Project - Plug-in Project from the context menu (see Figure 6, “New Plug-in Project Wizard”).Figure 6. New Plug-in Project WizardThe name of the new project shall be com.ps.pvesdk.examples.modelvalidation. Figure 7, “Plug-in Project Settings” shows further settings required for the plugin. Please note that the plugin has to work with an eclipse versionand must not work with OSGI framework.Figure 7. Plug-in Project Settings12
pure::variants Extensibility GuideAfter pressing Next the Plug-in Content page is opened. Please apply the settings as shown in Figure 8, “Plugin Content Settings”.Figure 8. Plug-in Content SettingsAfter pressing the Finish button a new plugin project is created. The new project contains an empty src-directoryfor the Java code and a plugin.xml file.Next the dependencies should be added for the plug-in. For this double-click on the plugin.xml file to open it inthe Plug-in Manifest Editor. Switch to the Dependencies page and press the Add button to add the plugin-inslisted in Figure 9, “Dependencies”.Figure 9. DependenciesThis is all to setup the project. The next step is to write the check class.Writing the Check ImplementationThis chapter shows how to implement the Java class for the new Model Validation check.First the new Java package com.ps.pvesdk.examples.modelvalidation.plugin has to be created inthe src-directory of the plug-in. Then create a new Java class within the package and name itCheckElementUniqueNameExample.java. This class has to be derived from class Check and has to implementthe IElementCheck interface.Each check class implements the check() methods from the interfaces it implements (IElementCheck in this case).These methods are called by the Model Validation Framework for each model item to check (model elements13
pure::variants Extensibility Guidein this case), and implement the check functionality. The return value of a check() method is an object of typeICheckResult. This object contains the problems found by this check (of type CheckProblem).In the presented example a problem is provided for all features with a unique name that does not start with thestring feature. The problem object contains:1) The problem-class. The problem-class has to match the name of the check as given at the extension point ofthe plugin.2) The problem-type, here ELEMENTCHECK TYPE. The type corresponds to the interfaces implemented by thecheck.3) The problem-code to identify the problem. This code has no special format but shall be unique.4) The problem-severity, here ERROR SEVERITY. A problem can also have the severtities warning and info.Furthermore the problem object contains information about the model item that was checked, i.e. the element idin this case, and a textual problem description.This is the implementation of the check() method of the example check./*** This method implements the check. It is called by the model validation* framework for every element of the checked model. It gets the element to* check and an abort listener that is used to find out whether the user has* aborted the current model validation run. In this case the check also* should be aborted. This is only useful for long running checks.** The result of the check is an object of type CheckResult (or any other type* implementing the ICheckResult interface). This result object contains the* problems that were found during the check, i.e. that the unique name of the* checked element does not start with 'feature'.** @param element*The element to check.* @param listener*The abort listener.* @return ICheckResult with a vector of problems if the check fails.*/public ICheckResult check(IPVElement element, ICheckAbortListener listener) {/** Create an empty CheckResult object. If no problem is added to the result* object, then this is interpreted as success by the model validation* framework, i.e. the element's unique name starts with 'feature' as* claimed by the check.*/CheckResult result new CheckResult();/** Ensure that the element is valid and has a non-empty unique name. Family* model elements do not need to have a unique name. Since this check is* also applicable for family models, simply ignore elements that have no* unique name.*/if (element ! null && element.getName().length() 0) {/** Get the unique name of the element. This is name that is to be checked* in the next step.*/String name element.getName();if (name.startsWith("feature") false) { // NON-NLS-1 /** The unique name of the element does not start with 'feature'. This* means that the check is failed. To let the user know that the check* failed and what exactly is wrong, a problem description is created* represented by a CheckProblem object.** The first argument of the constructor of class CheckProblem is the* name of the check, followed by the check type (an element check),14
pure::variants Extensibility Guide* followed by a unique problem code for this problem, followed by the* severity of the problem.*/CheckProblem problem new CheckProblem(element.getModelContainer(), getName(),CheckConstants.ELEMENTCHECK TYPE, OR SEVERITY);/** To let the model validation framework know on which element to place* the problem marker for this problem, the unique ID of the checked* element has to be set in the problem );/** This message is shown to the user for instance as the label of a* corresponding problem marker in the Problems sages.CheckElementUniqueNameExample 3,name));result.addProblem(problem);}}return result;}.In the next step the new check must be registered as an Extension for the Model Validation Framework. For thispurpose open the file plugin.xml with the Plug-in Manifest Editor again and switch to the Extensions page. Clickthe Add button to select com.ps.consul.eclipse.ui.checks.Checks extension. After press Finish button the newcheck extension is added to the extensions list. The Check-Extension is shown in Figure 10, “Check-Extension”.Figure 10. Check-ExtensionSince each check has a specific category (like whole model or single element check) the example check also needsan extension for the category of the check. Select com.ps.consul.eclipse.ui.checks.CheckCategory extensionfrom the extensions list. The CheckCategory-Extension is shown in Figure 11, “CheckCategory-Extension”.Figure 11. CheckCategory-ExtensionNow a new Category and a new Check can be added to the Extensions. Right-click on the check extension andchoose New - ElementCheck from the context menu. In the description field add a description for the new check.Fill in the other fields as shown in Figure 12, “New ElementCheck”. class is the path the check class, modeltypesis used to specify for which model types the check is applicable, and category specifies the check category thecheck belongs to.15
pure::variants Extensibility GuideFigure 12. New ElementCheckRight-click on the category extension and choose New - Category from the context menu. Add a description andfill in the other fields as shown in Figure 13, “New Category”.Figure 13. New CategoryTesting the new CheckFor testing the new check CheckElementUniqueNameExample the plugin has to be installed. Therefor two differentpossibilities exist. Either the plugin is exported as Deployable Plugin and installed into pure::variants. Or an EclipseRuntime is started using the Check Example plugin. This approach is described in the Eclipse help in chapter PDEGuide- Getting Started- Basic Plug-in Tutorial- Running a plug-in. How to export and install the plugin as aDeployable Plugin is described in the PDE Guide- Getting Started- Basic Plug-in Tutorial- Exporting a Plugin.After the Runtime is started or the Deployable Plugin is installed open the Preferences by choosing Window- Preferences from the Eclipse menu. Change to page VariantManagement - Model Validation where theregistered checks can be configured and activated (see Figure 14, “New Check Configuration”).Figure 14. New Check ConfigurationAfter closing the preferences open for instance a feature model. Then click on button Validate Model in the Eclipsetoolbar. Figure 15, “Validated Model” shows a sample feature model where the check has found three problems.On the left side of the model editor markers are shown for each problem in the model, placed on the correspondingelements. The whole list of problems also is shown in the Problems View.16
pure::variants Extensibility GuideFigure 15. Validated ModelAfter the check is tested, the next step is to write a quick fix for the problems found by the check (if possibleand/or needed).Writing the Quick Fix ImplementationAfter a model is validated and problems were found in the model, the user can apply automatic quick fixes forthese problems if available. This chapter explains how a quick fix can be provided for problems found by a check,and how the quick fix can be connected to the check class.In the package com.ps.pvesdk.examples.modelvalidation.plugin create a new Java class with nameCheckElementUniqueNameExampleQuickFix.java. This class has to be derived from the class CheckQuickFix. Each quick fix class has a getLabel()-Mathod, getImage()-Mathod and a getDescription()-Method, wherethe functionality of the check is explained. See the following code.public class C
Creo Variation Module Triggers the transformation of the example Java code. Transformer Name Creo Variation Module ID com.ps.consul.eclipse.ui.creo.transform.module IBM Rational DOORS Module Triggers the export of a variant description model to DOORS. Transformer Name IBM Rational DOORS Module ID com.ps.consul.ui.doors.transform.module