Transcription
ReceiverSETUPINSTRUCTIONS
If you are not seeing the screens listed in this guide, try changing your TV’s input by pressingthe “Source/Input” button on your TV. When you reach the activation stage of this guide, you will need either your account numberor your previous receiver’s ID number. Account number: Located along the upper-right corner of your DISH bill or in the MyAccount Summary section of your mydish.com account. Receiver ID: Located on a label on the back of your previous receiver. It begins with“R.” In step 7, your replacement receiver will test your Internet and phone connection. If the resultsdisplay as “not available,” ensure the cords are connected to the appropriate ports on theback of your receiver and to your phone/modem. To find your closest UPS dropoff location or to schedule a pickup at your cost, call1-800-742-5877 or visit ups.com/dropoff.Do you have questions?Take a look at the back cover of this guide to contact DISH!2
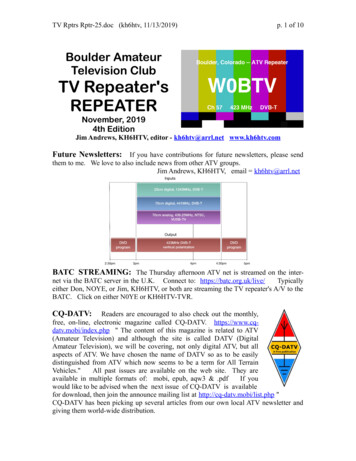
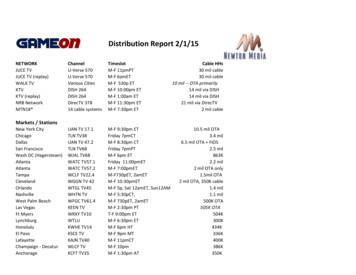
Disconnect Your Cables and RemoteAntennaLocate the power cable for thereceiver that you are replacing,and unplug it from the wall.Locate the antenna connectedto the “Remote Antenna” port.Then unscrew the antenna fromthe receiver.Locate the cables connected tothe “Satellite In” ports and the“Home Distribution” port, and thenunscrew them from the receiver.Do not unscrew the cables fromthe wall.If applicable, unscrew the over-the-air (OTA) Module; set itaside. (You may not have this accessory.)3
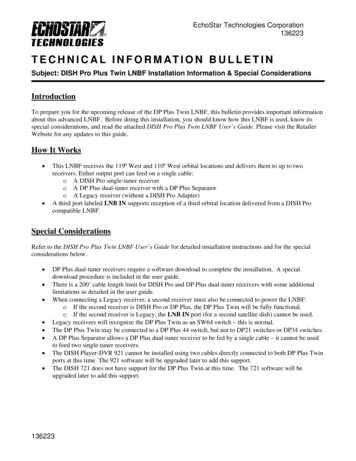
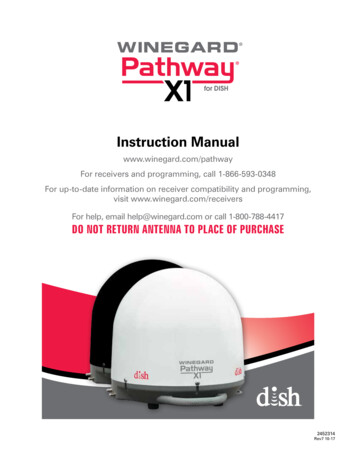
Disconnect Your Cables and RemoteAntennaDetermine the cable you areusing to receive audio/visualsignal. Then unplug it from thereceiver, but not from your TV.HDMI 1ORVIDEOLAUDIOREthernetEthernetHDMI CABLELocate the cable connected to the “Ethernet” port. Then,unplug the cable from the receiver. Do not unplug it fromthe wall. (You may not have this cable.)PHONE4RCA CABLESGLocate the cable connected tothe “Phone” port. Then unplug thecable from the receiver. Do notunplug it from the wall. (You maynot have this cable.)
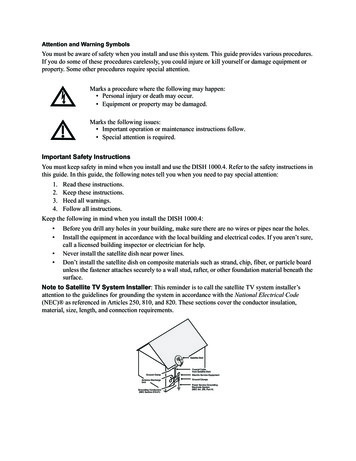
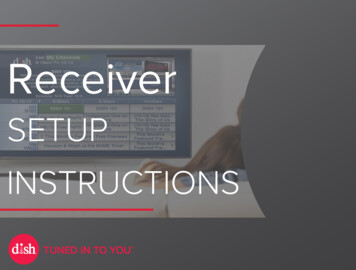
Connect Your Cables and RemoteAntennaConnect the Satellite In cables to the “Satellite In”ports and the Home Distribution cable to the “HomeDistribution” port on your replacement receiver.Connect the remote antenna to the “RemoteAntenna” port on your replacementreceiver.If applicable, unscrew the cover on the back-left sideof your replacement receiver. Slide in the OTA module,and then secure it by reattaching the screws. (You maynot have this accessory.)5
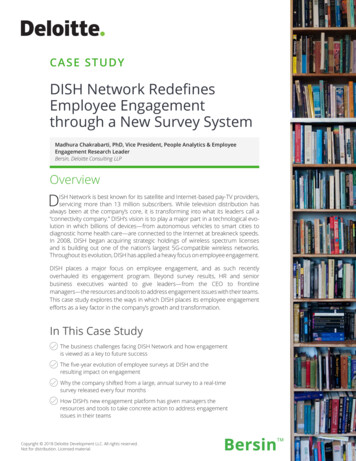
Connect Your Cables and RemoteAntennaHDMI 1Connect either the RCA cablesor the HDMI cable to thecorresponding port(s) on yourreplacement receiver.VIDEOORRHDMI CABLEEthernetEthernetRCA CABLESConnect the Ethernet cable to the “Ethernet” porton your replacement receiver. (You may not havethis cable.)PHONE6LAUDIOConnect the Phone cableto the “Phone” port on yourreplacement receiver. (You maynot have this cable.)
03Power Your EquipmentPlug the power cord from yourreceiver into a power outlet,and ensure that your TV is stillplugged in. Turn on your TV. Itcould take up to 30 seconds foryou to see any images.Make sure that the SmartCard issecured firmly in the slot on thefront of your receiver.7
Program Your RemoteYour screen should now display the ProgramTV1 Remote to Receiver screen. Follow theonscreen instructions to program your remotethat has a green number 1 identifier at thebottom to the replacement receiver. Once yourremote is programmed, use the arrow buttonson your remote to highlight “Continue,” and thenpress Select.8If you are using a second TV with thisreceiver, repeat to program the remotethat has the blue number 2 identifierat the bottom. Once complete, use thearrow buttons on your remote to highlight“Continue,” and then press Select.
Download Receiver SoftwareYour receiver will start downloadingsoftware automatically.Once the software download iscomplete, your receiver will updateautomatically.9
Set Your TV ConfigurationIf you have a second TV, see what channel itis currently tuned to by using the TV’s remoteor the buttons on the TV itself to channelup and then channel back down. Select theappropriate channel onscreen according towhat channel your TV is tuned to, and thenselect “Continue.”Follow the onscreen instructions toset your TV’s video resolution sothe picture will display properly.Once your TV resolution is set, usethe arrow buttons on your remoteto select “Save,” and then pressSelect.10
Test Your Internet & PhoneConnectionYour receiver will automaticallytest your Internet and phoneconnection.Once complete, your receiver willdisplay your connection status. Usethe arrow buttons on your remoteto highlight “Continue,” and thenpress Select.11
Activate Your ReceiverIf your receiver is connected tothe Internet, enter your previousreceiver’s ID number. Or enter youraccount number and ZIP Code.Select “Continue.”If your receiver is not connected tothe Internet, please call1-800-333-DISH (3474) to activateit. Note that you will need toprovide the receiver and SmartCardnumbers onscreen to the DISHagent.Your receiver will go through theactivation process, which can takeup to 15 minutes.12
Acquire Satellite SignalUse the arrow buttons on yourremote to highlight “Live TV,” andthen press Select.Your receiver will automaticallyacquire satellite signal.13
Download Program GuideYour receiver will automaticallydownload the program guide.14Once complete, your screen willdisplay live TV.
Recycle Your Original ReceiverOpen the front panel on your original receiver andtake out the SmartCard. Then cut the SmartCardlengthwise through the main chip.SmartCardSmartCardSmartCardE-WASTE RECYCLINGFACILITYVisit mydish.com/recycle to findan e-waste recycling facility nearyou. Take your receiver to thatfacility.15
Have questions?Let us help!Get product support information at mydish.com/support.Find helpful instructional videos at youtube.com/user/dish.Chat with a human being by visiting us at mydish.com/chat.- OR Call us at 1-800-333-DISH (3474).We want to hear from youso that we can keep delivering whatyou need to enjoy your TV service.Share your thoughts at mydish.com/tunedintoyou.DN010662
Account number: Located along the upper-right corner of your DISH bill or in the My Account Summary section of your mydish.com account. Receiver ID: Located on a label on the back of your previous receiver. It begins with "R." In step 7, your replacement receiver will test your Internet and phone connection. If the results