Transcription
EchoStar Technologies Corporation136223T E C H N I C A L I N F O R M AT I O N B U L L E T I NSubject: DISH Pro Plus Twin LNBF Installation Information & Special ConsiderationsIntroductionTo prepare you for the upcoming release of the DP Plus Twin LNBF, this bulletin provides important informationabout this advanced LNBF. Before doing this installation, you should know how this LNBF is used, know itsspecial considerations, and read the attached DISH Pro Plus Twin LNBF User’s Guide. Please visit the RetailerWebsite for any updates to this guide.How It Works This LNBF receives the 119º West and 110º West orbital locations and delivers them to up to tworeceivers. Either output port can feed on a single cable:o A DISH Pro single-tuner receivero A DP Plus dual-tuner receiver with a DP Plus Separatoro A Legacy receiver (without a DISH Pro Adapter)A third port labeled LNB IN supports reception of a third orbital location delivered from a DISH Procompatible LNBF.Special ConsiderationsRefer to the DISH Pro Plus Twin LNBF User’s Guide for detailed installation instructions and for the specialconsiderations below. DP Plus dual-tuner receivers require a software download to complete the installation. A specialdownload procedure is included in the user guide.There is a 200’ cable length limit for DISH Pro and DP Plus dual-tuner receivers with some additionallimitations as detailed in the user guide.When connecting a Legacy receiver, a second receiver must also be connected to power the LNBF:o If the second receiver is DISH Pro or DP Plus, the DP Plus Twin will be fully functional.o If the second receiver is Legacy, the LNB IN port (for a second satellite dish) cannot be used.Legacy receivers will recognize the DP Plus Twin as an SW64 switch – this is normal.The DP Plus Twin may be connected to a DP Plus 44 switch, but not to DP21 switches or DP34 switches.A DP Plus Separator allows a DP Plus dual-tuner receiver to be fed by a single cable – it cannot be usedto feed two single-tuner receivers.The DISH Player-DVR 921 cannot be installed using two cables directly connected to both DP Plus Twinports at this time. The 921 software will be upgraded later to add this support.The DISH 721 does not have support for the DP Plus Twin at this time. The 721 software will beupgraded later to add this support.136223
DISH Pro Plus Twin LNBFInstallation Instructions
Attention and Warning SymbolsYou must be aware of safety when you install and use this system. This guide provides various procedures.If you do some of these procedures carelessly, you could injure or kill yourself or damage equipment orproperty. Some other procedures require special attention.Marks a procedure where the following may happen: Personal injury or death may occur. Equipment or property may be damaged.Marks the following issues: Important operation or maintenance instructions follow. Special attention is required.Important Safety InstructionsYou must keep safety in mind when you install and use the DISH Pro Plus Twin LNBF. Refer to the safetyinstructions in the installation instructions that came with your system. In this guide, the following notestell you when you need to pay special attention:1.2.3.4.Read these instructions.Keep these instructions.Heed all warnings.Follow all instructions.Keep the following in mind when you install the DISH Pro Plus Twin LNBF: Before you drill any holes in your building, make sure there are no wires or pipes near the holes.Install the equipment in accordance with the local building and electrical codes. If you aren’t sure, calla licensed building inspector or electrician for help.Never install the satellite dish near power lines.Don’t install the satellite dish on composite materials such as strand, chip, fiber, or particle boardunless the fastener attaches securely to a wall stud, rafter, or other foundation material beneath thesurface.
ContentsIntroduction.2Installing with Single-Tuner Receivers andSoftware-Upgraded Dual-Tuner Receivers.3Installing with any Dual-Tuner Receiver .8Installing a Second Receiver .12Connecting a Second Satellite Dish .12Connecting to a Switch .15Wiring Diagrams .16Troubleshooting Tables .18Radio Interference .20Page 1
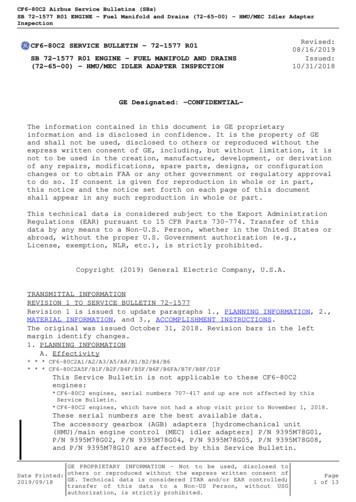
IntroductionThe DISH Pro Plus Twin LNBF features DISH Pro Plus Technology and provides reception from the 110and 119 orbital locations. The device includes two receiver outputs and one input from an additional DISHPro Single, DISH Pro Dual, or a DISH Network bandstacked FSS LNBF supporting a third orbitallocation.This LNBF supports connection of up to two satellite receivers in any of the following combinations: Single-cable connection to DISH Pro Plus (dual-tuner) receivers, when each input is used with a DISHPro Plus Separator.Single-cable connection to DISH Pro receivers.Single-cable connection to one Legacy (no DISH Pro or DISH Pro Plus label) receiver, without a DISHPro Adapter. However, an additional satellite receiver must also be installed as follows:- For 110W/119W reception only, a second operating satellite receiver must be connected to providepower to the LNBF.- For 110W/119W reception plus satellite reception from an additional compatible LNBF, a DISH Proor DISH Pro Plus receiver must also be installed to provide power to the LNBF.Figure 1 shows the three ports provided on the DISH Pro Plus Twin LNBF. The ports marked 1 and 2 areused to connect two satellite receivers. The port marked LNB IN is used to connect to a DISH Pro Single,DISH Pro Dual, or a DISH Network bandstacked FSS LNBF.Figure 1. DISH Pro Plus Twin LNBFThis guide contains instructions for professional installation of the DISH Pro Plus Twin LNBF directly tosatellite receivers and to compatible DISH Pro Plus switches.Page 2
Installing with Single-Tuner Receivers and Software-UpgradedDual-Tuner ReceiversThe following instructions describe how to install the DISH Pro Plus Twin LNBF on a DISH 500 antennawith DISH Pro and Legacy single-tuner receivers and with DISH Pro Plus dual-tuner receivers that haveupgraded software, as shown in Table 1. For dual-tuner receivers that do not have upgraded software, youmust instead use the instructions in Installing with any Dual-Tuner Receiver starting on page 8.Table 1. Software Required for Dual-Tuner Receiver InstallationReceiverSoftware VersionDISH 322L054 or later or current downloadDISH Player-DVR 522L059 or later or current downloadDISH 721Supported with a future version ofsoftwareDISH Player-DVR 921L052 or later or current downloadFuture DISH Pro Plus Dual-Tuner ReceiversAllInstallation InstructionsUse the steps below while referring to Figure 6 on page 7 for this installation.Locate and install the DISH 500 antenna using the instructions that came with the dish orsatellite receiver.Run RG-6 coaxial cables from the receiver location(s) to the DISH 500 antenna using Table 2and the notes that follow:Table 2. Receiver Installation OptionsReceiver to InstallDISH Pro PlusDual-TunerReceiversDISH ProSingle-TunerReceiversComponent RequirementsLegacySingle-TunerReceiversDISH Pro PlusSeparatorCables to DISHPro Plus TwinSupports 119W/110WSupports additionalCompatible a11a. Install a DISH Pro single-tuner or DISH Pro Plus dual-tuner receiver first.Page 3
b. Connect and power both receivers before running Check Switch.Cable Limitations Only RG-6 coaxial cables rated for 950 to 2150 MHz can be used in this installation. Do not useexisting cables such as RG-59. These other cables may cause signal loss. Also, be sure that anyoutdoor connections are made using waterproof F-connectors.Refer to Figure 13 on page 16 and the following for cable length limitations:- The length of the RG-6 cable must be 200 feet or less between any receiver and the farthestLNBF in the system including both cabling to the DISH Pro Plus Twin LNBF plus any cablingconnecting an additional DISH Pro LNBF.- If you are connecting a Legacy receiver (no DISH Pro or DISH Pro Plus label), RG-6 cablelength must be 150 feet or less to the DISH Pro Plus Twin LNBF.- Cable length between the DISH Pro Plus Twin LNBF and a connected compatible LNBF mustbe 80 feet or less.Tighten all indoor coaxial cable connections to the receiver only by hand. If you use awrench, you may over-tighten the connections and damage your equipment. Tightenall outdoor cable connections up to 30 inch/pounds maximum to ensure seal againstmoisture. Damage caused by over-tightening is not covered by the limited warranty.Thread the RG-6 coaxial cables at the DISH 500 through the mast, support arm, and Y-bracketas shown in Figure 2. Connect at least one cable to Port 1, which will be used for dish peakingon 119W later in this procedure. If you have a second satellite receiver, connect its cable toPORT 2. Assemble the LNBF to the DISH 500 Y-bracket, and secure with screws as shown inFigure 3.Figure 2. Connecting DISH Pro Plus Twin to DISH 500 Y-Bracket and CablingPage 4
Figure 3. Attaching DISH Pro Plus Twin with ScrewsInstall the satellite receiver(s) using the user's guide that came with your receiver(s).Direct connect the RG-6 coaxial cable from the LNBF’s PORT 1 to a peaking meter.Peak the dish for the strongest possible signal on the 119W satellite signal.Connect the cable from LNBF PORT 1 to the satellite receiver’s SATELLITE IN connection(s)referring to Table 2 on page 3.a. If you are installing a single cable installation with a DISH Pro Plus Separator to aDISH Pro Plus dual-tuner receiver, install a DISH Pro Plus Separator as follows (seeFigure 14 on page 17):1) Connect a cable from the DISH Pro Plus Twin LNBF output (Port 1 or Port 2) tothe DISH Pro Plus Separator Input.2) Connect cables between the receiver SATELLITE IN 1 and SATELLITE IN 2 to PORTS1 and 2 respectively on the DISH Pro Plus Separator.You must use a DISH Pro Plus Separator in this installation. A splitter or otherdevices will not work in this configuration.b. If you are installing a Legacy receiver in this step, you must have a second satellitereceiver powered on and connected to PORT 2 of the LNBF to complete thisinstallation.Plug in and turn on the satellite receiver and TV. The Point Dish/Signal screen should bedisplayed - if not, you can open this screen on most receivers by pressing MENU on theremote and selecting System Setup, Installation, then Point Dish/Signal (refer to yourreceivers user’s guide).Select Check Switch or Switch and then select either Check or Test to run Check Switch.When the Check Switch procedure finishes, you should see an Installation Summary screensimilar to one of those shown in Figures 4 and 5 on the next page. The summary screen shown in Figure 4 is similar to what should be shown for DISH Proand DISH Pro Plus receivers connected to the DISH Pro Plus Twin LNBF. Make sure thesummary screen shows reception from both 110W and 119W satellites on all availablesatellite tuners. If not, consult your receiver user's guide to re-peak your DISH 500 asneeded. Also confirm the LNBF is correctly identified as a DPP Twin (some early factorysoftware on some models may identify this LNBF as a DP Twin. This identification isOK).Page 5
Figure 4. DISH Pro Plus Installation Summary The summary screen below is similar to what should be shown for a Legacyreceiver connected to the DISH Pro Plus Twin LNBF. Make sure the summaryscreen shows reception from both 110W and 119W satellites on all availablesatellite tuners. If not, consult your receiver user's guide to re-peak your DISH500 as needed. Note that the DP Plus Twin will be identified as SW64. This is OKand does not indicate a problem.Figure 5. Legacy Installation SummarySelect OK or Done to exit the Installation Summary screen. The Point Dish/Signal screenshould be displayed. Make sure the signal strength bar is green and locked for the 119W and110W satellites.Note: If the signal strength bar is not green and locked, toggle the transponder number up oneand then back down one.Exit the Point Dish screen and follow your receiver user's guide instructions for taking areceiver software upgrade. If exiting the Point Dish screen does not start the upgrade processas described in the receiver user's guide, then turn off the receiver for at least 20 minutes toallow the receiver to take a software upgrade.Run Check Switch again and re-confirm reception for 119W/110W satellites.Page 6
Figure 6. Installing the DISH Pro Plus Twin LNBF with Upgraded SoftwarePage 7
Installing with any Dual-Tuner ReceiverThese instructions describe how to install the DISH Pro Plus Twin LNBF on a DISH 500 antennawith any dual-tuner DISH Network satellite receiver such as DISH 322, DISH Player-DVR 522,DISH 721 (supported with a future version of software), and DISH Player-DVR 921. Use theseinstructions if you do not have the upgraded software on the dual-tuner receivers listed on page 3.Refer to Figure 8 on page 11 while completing these instructions.Installation InstructionsNote: You will need a DISH Pro compliant splitter to complete this installation. The splitter is used onlytemporarily during receiver software upgrade and must not be left installed in the system.Locate and install the DISH 500 antenna using the instructions that came with the dish orsatellite receiver.Run RG-6 coaxial cables from the receiver location(s) to the DISH 500 antenna using thefollowing table and notes:Table 3. Receiver Installation OptionsReceiver to InstallDISH Pro PlusDual-TunerReceiversDISH ProSingle-TunerReceiversComponent RequirementsLegacySingle-TunerReceiversDISH Pro PlusSeparatorCables to DISH ProPlus TwinSupports 119W/110WSupports additionalCompatible YesYes111a1a. Install a DISH Pro Plus dual-tuner receiver first.Cable Limitations Only RG-6 coaxial cables rated for 950 to 2150 MHz can be used in this installation. Do not useexisting cables such as RG-59. These other cables may cause signal loss. Also, be sure that anyoutdoor connections are made using waterproof F-connectors.If the RG-6 to be used in this installation includes copper-clad steel center conductor, one of thefollowing may be needed to complete the receiver software upgrade. After the software upgrade iscompleted, the following measures are no longer needed for future receiver operation.- Cable length must be shortened to 100 feet maximum.- Temporarily install RG-6 cabling with solid copper center conductor up to 200 feet betweenthe receiver to the DP Plus Twin.- Download the receiver software using an LNBF other than the DP Plus Twin, or prior tocoming to the installation site.Refer to Figure 13 on page 16 and the following for cable length limitations:- The length of the RG-6 cable must be 200 feet or less between any receiver and the farthestLNBF in the system including both cabling to the DISH Pro Plus Twin LNBF plus any cablingconnecting an additional DISH Pro LNBF.Page 8
-If you are connecting a Legacy receiver (no DISH Pro or DISH Pro Plus label), RG-6 cablelength must be 150 feet or less to the DISH Pro Plus Twin LNBF.Cable length between the DISH Pro Plus Twin LNBF and a connected compatible LNBF mustbe 80 feet or less.Tighten all indoor coaxial cable connections to the receiver only by hand. If you use awrench, you may over-tighten the connections and damage your equipment. Tightenall outdoor cable connections up to 30 inch/pounds maximum to ensure seal againstmoisture. Damage caused by over-tightening is not covered by the limited warranty.Thread the RG-6 coaxial cables at the DISH 500 through the mast, support arm, and Y-bracketwhile referring to Figure 2 on page 4. Connect at least one cable to PORT 1, which will be usedfor dish peaking on 119W later in this procedure. If you have a second satellite receiver,connect its cable to PORT 2. Assemble the LNBFs to the DISH 500 Y-bracket, and secure withscrews as shown in Figure 3 on page 4.Install the satellite receiver(s) using the user's guide that came with your receiver(s).Direct connect the RG-6 coaxial cable from the LNBF’s PORT 1 to a peaking meter.Peak the dish for the strongest possible signal on the 119W satellite signal.Connect a single cable from the DISH Pro Plus Twin LNBF PORT 1 to the LNB port on aDISH Pro compliant splitter (not a DISH Pro Plus Separator). Then connect two cables fromthe receiver ports on the DISH Pro compliant splitter to SATELLITE IN 1 and 2 ports on thereceiver.This DISH Pro splitter in this installation is used only temporarily for upgradingreceiver software. This splitter must be removed and replaced with a DISH Pro PlusSeparator following software upgrade or else the system will not work properly.Plug in and turn on the satellite receiver and TV. The Point Dish/Signal screen should bedisplayed. Make sure the signal strength bar is green and locked for the 119W and 110Wsatellites on an odd transponder greater than 10 (for example, 11, 13, 15, etc.).Note: If the signal strength bar is not green and locked, toggle the transponder number up oneand then back down one.Do not run Check Switch at this time. If you do run Check Switch by mistake, thissituation can be corrected by completing the following:a. Disconnect all SATELLITE IN cables.b. Run Check Switch (from Point Dish/Signal screen, select Check Switch orSwitch then Check or Test.c. When Check Switch finishes, exit the Installation Summary screen back to thePoint Dish screen.d. Reconnect all SATELLITE IN cables.Page 9
Exit the Point Dish/Signal screen and follow your receiver user's guide instructions for takinga receiver software upgrade.If exiting the Point Dish/Signal screen does not start the upgrade process as described in thereceiver user's guide, then, turn off the receiver for at least 20 minutes to allow the receiver totake a software upgrade.After the receiver has completed taking the software upgrade, go to the Point Dish/Signalscreen. With most receivers, you can do this by pressing MENU on the remote and selectingSystem Setup, Installation, then Point Dish/Signal (refer to your receiver user’s guide).Make sure the signal strength bar is green and locked.Remove the DISH Pro compliant splitter. Either connect both receiver SATELLITE INconnections to LNBF PORT 1 and 2 or install a DISH Pro Plus Separator (Figure 14 onpage 17) as follows:a. Connect a cable from the DISH Pro Plus Twin LNBF output (PORT 1 or PORT 2) tothe DISH Pro Plus Separator INPUT.b. Connect cables between the receiver SATELLITE IN 1 and SATELLITE IN 2 to PORTS 1and 2 respectively on the DISH Pro Plus Separator.Select Check Switch or Switch and then select either Check or Test to run Check Switch.When the Check Switch procedure finishes, you should see an Installation Summary screensimilar to Figure 7 below. Make sure the summary screen shows reception from both 110Wand 119W satellites on both satellite tuners. If not, consult your receiver user's guide to repeak your DISH 500 as needed. Also confirm the LNBF is correctly identified as a DPP Twin.Figure 7. DISH Pro Plus Installation SummaryPage 10
Figure 8. Installing the DISH Pro Plus Twin LNBF on any DISH Network ReceiverPage 11
Installing a Second ReceiverInstall another receiver to the DISH Pro Plus Twin LNBF completing one of the following: For single-tuner receivers and software-upgraded dual-tuner receivers, refer to the instructions thatstart on page 3. Skip the steps to install and peak the DISH 500.For any dual-tuner receiver, refer to the instructions that start on page 8. Skip the steps to install andpeak the DISH 500.Connecting a Second Satellite DishAfter completing the previous section(s) to install the DISH Pro Plus Twin LNBF, following theinstructions below to add a third satellite location from another compatible LNBF to the DISH Pro PlusTwin LNBF. The added LNBF from the second dish must be a DISH Pro Single, DISH Pro Dual, or aDISH Network bandstacked FSS LNBF.Note: You cannot do this installation if both receivers connected to the DISH Pro Plus Twin LNBF areLegacy receivers (that is, receivers not marked with DISH Pro or DISH Pro Plus logos).Installation InstructionsRefer to Figure 11 on page 14 while completing these instructions.Install and peak the second dish antenna using a peaking meter and the instructions that camewith the dish antenna. Skip any steps regarding taking a receiver software upgrade since thiswas done in the previous section.Run cable from the second dish antenna location to the DISH 500 with the installed DISH ProPlus Twin LNBF. Cabling must meet Cable Limitations identified below.Cable Limitations Only RG-6 coaxial cables rated for 950 to 2150 MHz can be used in this installation. Do not useexisting cables such as RG-59. These other cables may cause signal loss. Also, be sure that anyoutdoor connections are made using waterproof F-connectors.Refer to Figure 13 on page 16 and the following for cable length limitations:- The length of the RG-6 cable must be 200 feet or less between any receiver and the farthestLNBF in the system including both cabling to the DISH Pro Plus Twin LNBF plus anycabling connecting an additional DISH Pro LNBF.- If you are connecting a Legacy receiver (no DISH Pro or DISH Pro Plus label), RG-6 cablelength must be 150 feet or less to the DISH Pro Plus Twin LNBF.- Cable length between the DISH Pro Plus Twin LNBF and a connected compatible LNBFmust be 80 feet or less.Tighten all indoor coaxial cable connections to the receiver only by hand. If you use a wrench,you may over-tighten the connections and damage your equipment. Tighten all outdoor cableconnections up to 30 inch/pounds maximum to ensure seal against moisture. Damage caused byover-tightening is not covered by the limited warranty.Connect the coaxial cable between the LNBF on the second dish and the LNB IN port on theDISH Pro Plus Twin LNBF. Refer to Figures 1 on page 2 and 15 on page 17.Go to the Point Dish/Signal screen. With most receivers, you can do this by pressing MENUon the remote and selecting System Setup, Installation, then Point Dish/Signal (refer toyour receiver user’s guide).Page 12
Select Check Switch or Switch and then select either Check or Test to run Check Switch.When the Check Switch procedure finishes, you should see a summary screen similar to oneof those shown in Figures 9 and 10. The summary screen in Figure 9 is similar to what should be shown for DISH Proand DISH Pro Plus receivers connected to the DISH Pro Plus Twin LNBF. Makesure the summary screen shows reception from 110W and 119W satellites and thethird satellite location on all available satellite tuners. If not, consult your receiveruser's guide to re-peak your dish antenna as needed. Also confirm the LNBF iscorrectly identified as a DP Plus Twin.Figure 9. DISH Pro Plus Installation Summary The summary screen in Figure 10 is similar to what should be shown for a Legacyreceivers connected to the DISH Pro Plus Twin LNBF. Make sure the summaryscreen shows reception from 110W and 119W satellites and the third satellitelocation on all available satellite tuners. If not, consult your receiver user's guideto re-peak the dish antenna as needed. Note that the DP Plus Twin will beidentified as SW64. This is OK and does not indicate a problem.Note: Legacy receiver models 1000, 2000, 3000, 4000, 5000, 7100, 7200 andJVC DVHS (HMDSR100U) cannot receive signals and will not detect from DISHNetwork bandstacked FSS LNBFs.Figure 10. Legacy Installation SummaryPage 13
Figure 11. Connecting a Second Satellite DishPage 14
Connecting to a SwitchThe DISH Pro Plus Twin LNBF can be connected to a DISH Pro Plus 44 switch to provide 119W and110W satellite signals to the switch. When used this way, LNBF PORT 1 will default to the 119W positionand LNBF PORT 2 will default to the 110W position. The LNBF port marked LNB IN is not used and willnot provide any signal to the switch. To complete this installation, install the DP Plus Twin LNBF firstusing these instructions, then install the DP Plus 44 Switch using instructions which come with the switch.Figure 12 shows an installation example.Note: The DISH Pro Plus Twin LNBF is NOT compatible with the DISH Pro 34 switch in any installation.Do not install these devices together in any system, including trunked switch installations which containDISH Pro 34 switches.Figure 12. Connecting to a DISH Pro Plus 44 SwitchPage 15
Wiring DiagramsExample: If you have a Legacy receiver attached 150 feet from a DISH Pro Plus Twin and a SingleLNBF 50 feet from the DPP Twin, then the DP or DP Plus receiver must be within 150 feet of theDPP Twin. The cable length between the DPP Twin and the Single LNBF is limited to 50 feetbecause the maximum distance between the Legacy receiver and the Single LNBF is 200 feet.If the cable length between the Legacy receiver and the DPP Twin was only 120 feet, then theSingle LNBF could be extended to the 80 feet max from the DPP Twin LNBF. The DP/DPPreceiver to the DPP Twin separation would be limited to a max of 120 feet as well.Figure 13. Cable Length LimitationsPage 16
Figure 14. DISH Pro Plus Twin LNBF, DISH Pro Plus Separator, and a DISH Pro Plus ReceiverFigure 15. DISH Pro Plus Twin LNBF, DISH Pro LNBF,One DISH Pro Plus Separator, One DISH Pro Plus Receiver, and One DISH Pro ReceiverPage 17
Troubleshooting TablesWhen you run Check Switch, you do not see “DPP Twin” identified as a device or LNBF on a DISH ProPlus or DISH Pro receiver. Instead, all you see are Xs.Possible ReasonWhat to Do The DISH Pro Plus Twin LNBF may not be properlyconnected. Check all the connections in your system and run CheckSwitch again. The cables between the receiver and the farthest LNBFmay be longer than 200’ for DISH Pro or DISH Pro Plusreceivers or 150’ for Legacy receivers. Make sure the cabling meets Cable Limitations on page 8. The cables may not be rated for 2150 MHz. Make sure all cables in the installation are rated for 2150MHz. Run Check Switch. You may have a DISH Pro Adapter installed on a DISHPro receiver. Remove the DISH Pro Adapter. Run Check Switch. You may have a switch in the system. Remove any switches and run Check Switch. You may have a DISH Pro splitter installed. Replace with a DISH Pro Plus Separator. Your receiver may need a software upgrade. Refer to the user’s guide that came with your receiver forinformation on taking a software upgrade. You have only one operating Legacy receiver connected tothe system. You must have another satellite receiver connected to theDISH Pro Plus Twin. See page 2 for details.When you run Check Switch, you see “Satellite reception verified” but you see “Feed” instead of “DPPTwin” identified as the device or LNBF.Possible ReasonWhat to Do The DISH Pro Plus Twin is connected but something inthe system may be blocking the switch commands.Check the cable path between the DISH Pro Plus Twinand the receiver and remove any devices that are not ratedfor 2150 MHz and two-way, 22 KHz signals. Run CheckSwitch.When you run Check Switch, you see “DPP Twin” identified as the LNBF and Satellite shows “Conn,” butyou do not see “Satellite reception verified.”Possible ReasonWhat to Do The DISH Pro Plus Twin LNBF is connected but nosatellite signal is present. Check the Point Dish/Signal menu to confirm that youhave satellite signal. If not, check your dish antenna tomake sure the DISH Pro Plus Twin is installed properly,the dish is pointed for maximum signal strength, and thatthere is nothing blocking the signal. Run Check Switch. The cables might not be rated for 2150 MHz. Make sure all of the cables in the installation are rated for2150 MHz.Page 18
When you run Check Switch, you see “DPP Twin” identified as the device or LNBF but you have signalconfirmed from only one satellite.Possible ReasonWhat to Do If the Check Switch Summary Screen shows “119W” onDish Input 2, you need to point your dish 9 degrees to theeast and repoint it for the strongest possible signal. If the Check Switch Summary Screen shows “110W” onDish Input 1, you need to point the dish 9 degrees to thewest and repoint it for the strongest possible signal. Make sure the skew setting is correct for a DISH 500installation at your Zip Code. Run Check Switch.The DISH Pro Plus Twin LNBF is connected but the dishmay not be pointed to receive signal from both 110W and119W satellites.When you run Check Switch, 119W/110W satellites are detected but the third satellite from the connectedsecond dish is not detected.Possible ReasonWhat to Do Cable to the second dish is disconnected. Check all the connections in your system and run CheckSwitch again. The third satellite is from a DISH Network bandstackedFSS LNBF. Some older Legacy receivers cannot receiveprogramming from DISH Network bandstacked FSSLNBF orbital locations. A newer receiver model is required. Two Legacy receivers are connected to the DISH Pro PlusTwin LNBF and the LNBF cannot support the thirdsatellite. These receivers do not provide enough power tosupport the LNB IN port on the LNBF. Replace one Legacy receiver with a DISH Pro or DISHPro Plus receiver.When you run Check Switch, you do not see “DPP Twin” identified as a device or LNBF but oddtransponders are detected only on one satellite.Possible ReasonWhat to Do Your receiver ma
The DISH Pro Plus Twin LNBF features DISH Pro Plus Technology and provides reception from the 110 and 119 orbital locations. The device includes two receiv er outputs and one input from an additional DISH Pro Single, DISH Pro Dual, or a DISH Network