Transcription
United StatesDepartment ofAgricultureForest ortFPL–GTR–201Installation, Care, andMaintenance of WoodShake and Shingle RoofsTony BonuraJack DwyerArnie NebelsickBrent StuartR. Sam WilliamsChristopher G. Hunt
AbstractThis article gives general guidelines for selection,installation, finishing, and maintenance of wood shakeand shingle roofs. The authors have gathered informationfrom a variety of sources: research publications on woodfinishing, technical data sheets from paint manufacturers,installation instructions for shake and shingle roofs, andinterviews with experts having decades of experience inconstructing and inspecting shake and shingle roofs. Wherepossible, recommendations are based on research results;however, some information is determined from practicalexperience installing shake and shingle roofs. More detailedinformation is available from shake and shingle suppliersand the Cedar Shake and Shingle Bureau (CSSB). Note:Installation instructions contained herein are not intended tosupercede local building codes.Keywords: Shakes, shingles, ultraviolet radiation, UVdegradation, water-repellent preservatives, semitransparentstains, solid-color stains, paintsSafety PrecautionsIt is best to apply cleaners on a cloudy day. This slows theevaporation and allows the cleaner to work more effectively.Wear eye protection, rubber gloves, an apron, boots, andother protective gear when using and preparing cleaningOctober 2011Bonura, Tony; Dwyer, Jack; Nebelsick, Arnie; Stuart, Brent; Williams, R.Sam; Hunt, Christopher G.; 2011. Installation, Care, and Maintenance ofWood Shake and Shingle Roofs. General Technical Report FPL-GTR-201.Madison, WI: U.S. Department of Agriculture, Forest Service, Forest Products Laboratory.11 p.A limited number of free copies of this publication are available to thepublic from the Forest Products Laboratory, One Gifford Pinchot Drive,Madison, WI 53726–2398. This publication is also available online atwww.fpl.fs.fed.us. Laboratory publications are sent to hundreds of librariesin the United States and elsewhere.The Forest Products Laboratory is maintained in cooperation with theUniversity of Wisconsin.The use of trade or firm names in this publication is for reader informationand does not imply endorsement by the United States Department ofAgriculture (USDA) of any product or service.The USDA prohibits discrimination in all its programs and activities on thebasis of race, color, national origin, age, disability, and where applicable,sex, marital status, familial status, parental status, religion, sexual orientation, genetic information, political beliefs, reprisal, or because all or a partof an individual’s income is derived from any public assistance program.(Not all prohibited bases apply to all programs.) Persons with disabilitieswho require alternative means for communication of program information (Braille, large print, audiotape, etc.) should contact USDA’s TARGETCenter at (202) 720–2600 (voice and TDD). To file a complaint of discrimination, write to USDA, Director, Office of Civil Rights, 1400 IndependenceAvenue, S.W., Washington, D.C. 20250–9410, or call (800) 795–3272(voice) or (202) 720–6382 (TDD). USDA is an equal opportunity providerand employer.Authors are members of the Joint Coatings Forest Product Committee. TheAmerican Coatings Association and the Forest Products Laboratory cosponsor the committee and it is comprised of representatives from the woodand coatings industries. The committee functions through task groups organized to write articles on wood/paint interaction. Tony Bonura chaired thetask group and he is the author to contact for more information. (Mr. TonyBonura, District Manager/Northeast, Cedar Shake and Shingle Bureau,1019 Fort Salonga Rd., Suite 10-#203, Northport, NY 11768-2209, Phone/FAX 631-643-7839, tony@cedarbureau.com, www.cedarbureau.org).solutions. Avoid getting cleaning solutions on yourself,other parts of the structure, and vegetation. If the cleaningsolution comes in contact with you or these other areas,rinse promptly and thoroughly with water. Follow alladditional instruction on labels and technical data sheetssupplied by manufactures of cleaning products and finishes.AcknowledgmentsWe thank Martin Obando for reviewing the manuscript andgiving us suggestion on general practices used in the fieldfor installing shakes and shingles.ContentsIntroduction.1Product Selection.1Shakes.1Shingles.2Installation.4Spaced Sheathing.4Solid Deck Sheating.6Rain-Screen.6Horizontal Nailing Strips.7Direct Application.7Fasteners.8Zinc or Copper Strips.8Finish Selection and Application.8Water-Repellent Preservatives.8Semitransparent Stains.9Factory Finishing.9On-Site Finishing.9Maintenance.9Cleaning. 10Refinishing. 10Other Sources of Information. 10The Cedar Shake and Shingle Bureau (CSSB) is anonprofit organization that oversees the inspectionof western redcedar (Thuja plicata), Alaska yellowcedar (Chamaecyparis nootkatensis) and redwood(Sequoia sempervirens) shakes and shingles. TheCSSB publishes quality standards (grade rules) andensures that the member mills producing shakes andshingles meet these standards through periodic thirdparty inspection. Shakes and shingles having their“Certigrade ,” “Certi-Split ,” or “Certi-Sawn ”designations have been inspected to meet gradestandards. A grade stamp/label (with color codefor the grade) is placed on each bundle or cartonof shakes or shingles and clearly shows the grade.The label contains other information such as woodspecies, certifying agency, building code standards,and manufacturer (Fig. 1). This “Certi” label assuresthe consumer that the shake and shingle manufactureris adhering to grading rules as prescribed by buildingcodes.
Installation, Care, and Maintenanceof Wood Shake and Shingle RoofsTony Bonura, Cedar Shake & Shingle Bureau, Northport, New YorkJack Dwyer, State of Vermont, retiredArnie Nebelsick, Edmund Allen Lumber Company, Momence, IllinoisBrent Stuart, Russin Lumber Corporation, Vancouver, British Columbia, CanadaR. Sam Williams, Forest Products Laboratory, Madison, Wisconsin, retiredChristopher G. Hunt, Forest Products Laboratory, Madison, WisconsinIntroductionWestern redcedar (Thuja plicata), Alaska yellow-cedar(Chamaecyparis nootkatensis, also called yellow cedar), andredwood (Sequoia sempervirens) are the wood species mostcommonly specified by architects and are included in building codes for the USA and Canada. To meet these buildingcode requirements, shakes/shingles must meet wood qualitystandards, which are verified through third party inspections (Table 1). Other species have historically been used forshakes/shingles: northern white-cedar, also known as eastern white cedar (Thuja occidentalis) (Table 2), white oak(Quercus alba), and Southern Pine (also called southern yellow pine (Pinus spp.)). The quality of northern white-cedar,white oak, and Southern Pine shakes/shingles is not assuredthrough CSSB inspection. Therefore, check local buildingcodes for compliance before using these species on residential or commercial roofs. The exception to this code requirement may be use of these species for historical restoration.Wood shakes and shingles have been used for centuries asa roofing material. Asphalt, steel, and polymeric materialsare newcomers. If properly installed and maintained, woodshakes and shingles should last more than 30 years (Fig. 2).Product SelectionThe first requirement for long service life is the selectionof the shake or shingle. These products are available ina range of grades and are described in Table 1 (listed inorder of decreasing quality). This is where “money talks!”The higher the grade (and price), the longer the roof canbe expected to last. Shakes and shingles that contain onlyheartwood are more resistant to decay than are shingles thatcontain sapwood. Vertical-grain (or edge-grain) shakes andshingles will perform better than flat-grain grades; verticalgrain wood is more dimensionally stable and therefore lesslikely to warp and split. Narrow shakes and shingles are lesslikely to warp than wide ones. Thicker shakes and shinglesare less likely to warp than are thinner ones. Also, checkwith your local building code official because some localities often have additional requirements (for example,fire-retardant or preservative treatment).Table 1—Grade and description of shakes and shinglesfrom western redcedar, Alaska yellow-cedar, andredwoodGradeaDescriptionShakesbPremium Handsplit, tapersawn, tapersplit, or straight-split shakesfrom 100% clear vertical-grained heartwood. Tapersplitshakes have a natural taper that is similar to the taper ofa shingle. Straight-split shakes are of the samethickness throughout the length of the shake.No. 1Handsplit and tapersawn shakes of clear heartwoodwith no more than 20% flat-grained pieces in eachbundle.ShinglescNo. 1The top grade of shingles. This grade of shingle can beused for sidewalls and roofs. This grade of shingle mustbe 100% clear, 100% heartwood, and 100% verticalgrain. These shingles are available in three lengths(16, 18, and 24 in.).dNo. 2No. 2 grade can be used in various applications. Thisgrade of shingle must have at least 10 in. of clear wood(butt end) on a 16-in. shingle, 11 in. on an 18-in.shingle, and 16 in. on a 24-in. shingle. This gradeallows no limitation on flat grain. Limited sapwood isalso allowed in this grade.No. 3No. 3 grade is a utility grade intended to be used oneconomy applications as well as on secondarybuildings. This grade must have at least 6 in. of clearwood (butt end) on 16-in. and 18-in. shingles and 10 in.on a 24-in. shingle.No. 4 grade is to be used for the under course ofNo. 4double-coursed sidewalls only. This shingle is never tobe used for roof application or as a starter course onroofs.aRefer to CSSB 97 for more information on grade rules for cedars andredwood.bGraded on the split side.cSawn on both sides and graded on one face.d1 in. 25.4 mm.ShakesSplit shakes differ from sawn shakes and shingles in thatthe side to the weather is a split surface, and therefore thewood cells are aligned with the surface of the shake. Thisgives a lateral surface with minimal cut wood cells and thusdecreases water penetration into this surface. Shingles andtapersawn shakes are sawn to give a uniform surface, but inthe process, the surface fibers are cut, increasing the chance
General Technical Report FPL–GTR–201aTable 2—Grade and description of shingles from northern white-cedarGradebExtraClearsSecond clearsClear wallsUtilitycDescriptionNo defects are allowed in this grade.No limitations on flat grain. Knots are allowed no closer than 7 in.from the butt end.d Holes of 1 in. in diameter allowed, not closerthan 8 in. from the butt. Rot is not allowed. Sapwood can be 3/4 in.wide, not closer than 10 in. from the butt end. Wane can be 3/4 in.wide, not closer than 10 in. from the butt end.No limitations on flat grain. Knots must be sound with norestriction. Coarse or black knots may be a maximum of 1 in. indiameter, not closer than 6 in. from the butt end. Holes of 1 in. indiameter allowed, not closer than 6 1/2 in. from the butt end. Rotstreaks not closer than 6 in. from the butt end. Sapwood can be1 1/2 in. wide, not closer than 6 in. from the butt end. Wane can be3/4 in. wide, not closer than 6 1/2 in. from the butt end.No limitations on flat grain. Knots must be sound with norestriction. Course or black knots may be a maximum of one-thirdthe width of the shingle, but not closer than 6 in. from the butt end.Holes of 1 in. in diameter allowed, not closer than 6 in. from the buttend. Rot streaks not closer than 6 in. from the butt end. Sapwood, norestriction. Wane is allowed not closer than 6 in. from the butt end.No limitations on flat grain. All defects found in wood shall bepermitted provided that the extent of the defects, singular or incombination, do not impair the use of the shingle.aThuja occidentalis.Refer to Quebec Lumber Manufacturer’s Association (QLMA) for complete information ongrades of eastern white-cedar.cAll eastern white-cedar grades contain flat grain.d1 in. 25.4 mm.bfor water penetration. Shakes come in a variety of sizes,shapes, and surfaces. Shakes are most commonly availablein 18-in. (457-mm)1 and 24-in. (610-mm) lengths, but longer lengths can be special-ordered. Shakes can be split onthe face and have sawn backs (handsplit), split on both sides(straight-split and tapersplit), or sawn on both sides (tapersawn). Tapersawn shakes are commonly available havingbutt-end thickness of 5/8, 3/4, and 7/8 in.(16, 19, and22 mm) and may be special ordered up to 2 in. (51 mm)butt-end thickness. All shakes are available in two grades(Premium and No. 1) and are graded to one face according to the grain angle, flaws, and amount of heartwood/sapwood. A brief description of each grade is containedin Table 1 and Figure 3a. Additional information on gradeis readily available on the Cedar Shake & Shingle Bureauwebsite (www.cedarbureau.org). Click the Products, Codesand Testing tab and then click Shakes. Click the appropriateshake or shingle and then click Grading Rules. There arethree rules for three different types of shakes and three rulesfor three different shingles. You will see the drop-down forthe CSSB-97 Grade Rules.ShinglesShingles are similar in appearance to tapersawn shakes except that they are thinner. Whereas the minimum butt-end1 Thevariability in manufacturing results in large variance in measuredvalues of shakes and shingles, which are not necessarily reflected inthe precision of the reported conversions to SI units.2thickness for tapersawn shakes is at least 5/8 in. (16 mm),shingles have a butt-end thickness of about 3/8 to 1/2 in.(10–13 mm). Western redcedar, yellow cedar, and redwoodshingles are graded according to the grain angle, flaws, andthe amount of heartwood/sapwood and are available in fourgrades: No. 1, No. 2, No. 3, and No. 4 (Fig. 3b, Table 1).No. 1 grade shingles must be 100% clear, 100% heartwood,and 100% vertical grain. Lower grades may contain sapwood, flat grain, and knots. Lengths may be 16, 18, or 24 in.(406, 457, or 610 mm). Thickness of shingles is describedas the number of shingles per the total of butt-end thickness of that number of shingles. For example, a 24-in. by4/2-in. (610-mm by 4/51-mm) “Royal” shingle measuresapproximately 1/2 in. at the butt end. That is, the total buttend thickness of 4 shingles must be at least 2 in. (51 mm).An 18-in. by 5/2¼-in. (457-mm by 5/57-mm) “Perfection”measures approximately 7/16 in. at the butt. That is, the totalbutt-end thickness of 5 shingles must be at least 2¼ in. (57mm). A 16-in. (406-mm) shingle is referred to as a “5X”because they are installed with a maximum 5-in. exposure.They are a 5/2-in. shingle; butt-end thickness of 5 shinglesmust be at least 2 in. (51 mm). Shingles are available inspecified widths or random widths (Fig. 4).Local code jurisdictions may have requirements for thegrade of shake or shingle permitted for roof application inyour area and special requirements, such as fire-retardanttreatments. Only Premium and No. 1 grades of shakes andNo. 1 grades of shingles are pressure-impregnated with
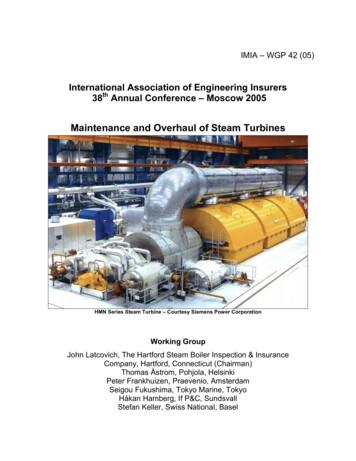
Installation, Care, and Maintenance of Wood Shake and Shingle RoofsFigure 1. Information on a Certi-Label : 1) “Certi” brand name; 2) Product grade;3) Product type; 4) Independent third party quality control agency; 5. Compliancewith total quality processes; 6) Manufacturer; 7) Industry product description;8) Product dimensions; 9) Cedar Bureau label number; 10) Building code compliance numbers; 11) Product performance tests passed; 12) Label identificationnumber; 13) UPC code; 14) Coverage showing the number of bundles/100 squarefeet and recommended exposure; 15) Application instruction on reverse side.Used with permission from Cedar Shake & Shingle Bureau, New Roof Construction Manual.Figure 2. Example of shingle roof after decades of service.fire retardants to meet Class A, B, and C fire requirements.Other grades are not. Spray-on fire-retardant treatments arealso available, but their effectiveness is not guaranteed byany inspection agency because the treatment may wash outby rain. There may also be requirements for preservativetreatments. Only Premium and No. 1 grades of shakes andNo. 1 grades of shingles may be pressure-impregnated withpreservative treatments. Factory impregnation of shakesand shingles with preservatives such as chromated copperarsenate (CCA) can dramatically extend the life of shakesand shingles, especially in areas where warm temperaturesand humid conditions are present for substantial parts of theyear. Non-pressure treatments such as copper-8-quinolateand copper napthenate are also available, but these are notas leach resistant as pressure-applied preservatives.3
General Technical Report FPL–GTR–201Figure 3a. Certi-Label western redcedar shakes. Usedwith permission from Cedar Shake & Shingle Bureau,New Roof Construction Manual.InstallationShakes and shingles can be installed on roofs over spacedsheathing or solid deck sheathing. Various installation methods are described below. Spaced sheathing or rain-screensystems are common in geographic regions that experiencehigh humidity. Direct application of shakes and shingles tosolid sheathing is common in dry/arid regions. However,shakes require a solid plywood deck in geographical regionsthat experience wind-driven snow. In addition, check withlocal building codes for deck type requirements in highwind- or hurricane-prone areas. For all these methods, thespacing between shakes/shingles depends on the grain angle,the width of the shake/shingle, and the moisture content atthe time of installation. Flat-grained shakes/shingles shrinkand swell almost twice as much as vertical-grained ones andrequire more space between them to avoid buckling(Fig. 5). Wide shingles require more space than narrowshingles. If the moisture content is low (5–6%), leave alittle extra space; if it is high (above 20%), decrease thespacing slightly. As a general rule for shingles equilibratedto ambient conditions (about 12% moisture content), shin4Figure 3b. Certigrade western redcedar shingles. Usedwith permission from Cedar Shake & Shingle Bureau, NewRoof Construction Manual.gles should be installed about ¼ to 3/8 in. (6–10 mm) apart,whereas shakes should be spaced at least 3/8 in.(10 mm) apart and not more than 5/8 in. (16 mm) apart.Adjacent courses should be offset at least 1 1/2 in.(38 mm). Shakes and shingles may be attached to roofsin a variety of ways.Spaced SheathingSpaced sheathing is the traditional roof system used forshakes and shingles. Shakes or shingles are attached to 1 by4 in. (19 by 89 mm) or 1 by 6 in. (19 by 140 mm) boardsplaced horizontally across the rafters (Fig. 6). Note that1 by 4 and 1 by 6 are nominal sizes and hereafter will bereferred to as 1 by 4 or 1 by 6 boards. The boards are spacedon centers equal to the recommended exposed surface of theshake or shingle. A well-ventilated attic allows the back sideof the shakes/shingles to dry, which generally improves theirperformance.NOTE: The installation of shakes (split shakes, andtapersawn shakes) and shingles is different. Shakes (splitand tapersawn) can be installed in two- or three-ply applications. For two-ply application, shakes (split and tapersawn)
Installation, Care, and Maintenance of Wood Shake and Shingle Roofsmust be interlaid with Number 30 felt (See text box) to decrease the infiltration of windblown rain and snow (Fig. 6).For three-ply application, split shakes require felt interlay;however, tapersawn shakes do not. A layer of felt is installedwith each course of shake. The bottom of the felt should beplaced above the butt-end of the shake at a distance equal todouble the weather exposure. For example, if the exposureof an 18-in. shake is 7 ½ in. (190 mm), the bottom of the feltshould be 15 in. (381 mm) from the bottom of the shake.This means only the top 3 in. (76 mm) of the shake shouldbe covered by the felt. Flashing must be installed just aswith any roof system. Refer to page 20 of the Roof Manualfound in the CSSB website under “installation and maintenance” for additional information onrequirements for two- and three-ply shake installation.Figure 4. Thirteen-year-old shingle roof with random-widthshingles.Shingles must be installed in a three-ply application and arenot interlaid with felt as this impedes drying of the shingle,thus decreasing the service life (Fig. 7). Interlaying shingleswith felt will cause them to rot (“rot-felting”). The smoothsurface of the shingle or three-ply application of tapersawnshakes makes a tight seal with the felt between each courseof shingle, which does not permit the shingles to dry ifwater gets beneath them.NOTE: The amount of asphalt in building felt(and hence its water repellency) is described by theweight per square (10 ft by 10 ft (about 3 by3 m)). Traditionally, this coverage of felt weighed30 pounds, hence the name 30-lb felt. This is nolonger the case. The general category is now referredto as Number 30 felt. Within Number 30 felt arevarious “types” as specified by ASTM Standards D226 and D 4869. Section R905.9.2 of the InternationalResidential Code specifies Number 30 felt for woodroofing material.Figure 5. Buckling of shingles installed with insufficientspace between adjacent shakes/shingles to accommodateswelling.Figure 6. Two-ply shake roof over spaced sheathing showing interlaidNumber 30 felt. Used with permission from Cedar Shake & Shingle Bureau,New Roof Construction Manual.5
General Technical Report FPL–GTR–201Figure 7. Shingle roof over spaced sheathing. Used with permission from CedarShake & Shingle Bureau, New Roof Construction Manual.Solid Deck SheathingRain-ScreenRain screen, horizontal-nailing strips, and direct applicationare three common methods for installing shakes and shingles over solid sheathing. In modern construction, plywoodis placed over the rafters to give solid deck sheathing. Werecommend at least ¾ in. (19 mm) thick plywood to ensureproper nail holding. Local building codes for plywood thickness may allow a lesser thickness, but this is counter to bestpractices as specified by the CSSB. Solid deck application isrecommended for shake application in areas that experiencehigh winds or wind-driven snow and may be a local coderequirement in these areas. Where solid deck sheathing isrequired, we recommend using the rain-screen techniqueor horizontal nailing strips. This ventilation between theshakes/shingles and the plywood sheathing improves performance. When shakes or shingles are installed directly onthe sheathing in geographical regions having high humidity,they need to be preservative treated.The rain-screen technique simulates traditional roof systemsby allowing the back side of shakes or shingles to dry(Fig. 8). The rain screen gives an air space between the backside of the siding and the plywood sheathing and possiblya secondary barrier to water. Sheathing is placed over therafters. Although the shakes/shingles are not being naileddirectly to the roof sheathing in a rain-screen application,local codes usually still require plywood or solid lumbersheathing. “Vertical” spacers (usually 2 by 4s) are placeddirectly over each rafter and are fastened securely throughthe sheathing to the rafters. Horizontal boards (nailingstrips) 1 by 4 or 1 by 6 are placed across the 2 by 4 spacersto give an open space between the back side of the shakes orshingles and the solid roof deck. Use stainless steel or hotdipped galvanized screws of sufficient length to penetratewell into the underlying rafter to attach the “vertical” 2 by 4spacers. Attach the horizontal nailing strips securely to the“vertical” strips with screws. The space can be vented at theroof peak and at the fascia and must be screened to keep outinsects. When using this solid deck technique for roof slopesless than 4:12 for shakes and 3:12 for shingles, a “hot mop”or similar code-approved membrane is required over thesheathing.NOTE: There are two reasons for using plywoodsheathing instead of oriented strandboard (OSB)for shake and shingle roofs. Plywood gives betternail holding than OSB and also has better moisturetransmission properties. If plywood gets wet, thewater is distributed over a larger area than with OSB.Plywood has a higher permeability to water vaporand thus dries more quickly than OSB.6As with spaced sheathing described above, two-ply or threeply handsplit shake and two-ply tapersawn shake installations require interlaid felt (Fig. 8). However, do not interlayshingles with felt as this impedes drying and decreasesservice life (Fig. 9).
Installation, Care, and Maintenance of Wood Shake and Shingle RoofsFigure 8. Rain screen installation of shakes over solid sheathing. Used with permission from Cedar Shake & Shingle Bureau, New Roof Construction Manual.Figure 9. Rain screen installation of shingles over solid sheathing. Used with permission from Cedar Shake & Shingle Bureau, New Roof Construction Manual.Horizontal Nailing StripsApply 1 by 4 or 1 by 6 nailing strips horizontally directlyto plywood sheathing. A decay-resistant species should beused for the nailing strip. The nailing strips are spaced at adistance equal to the exposed surface of the shake or shingle. Although this system does not have as much venting asthe rain screen, the space between the shakes or shingles andthe sheathing helps the roof stay dry.Direct ApplicationShakes and shingles may be attached directly to roof sheathing. Whereas shingles must be three-ply application, shakesmay be a two- or three-ply application. Handsplit, straightsplit, and tapersplit shakes must be installed with an 18-in.wide Number 30 felt interlay to improve protection againstwind driven snow and rain (Fig. 10). However, do notinterlay felt with shingles or a 3-ply application of Premiumand No. 1 grades of tapersawn shakes unless required bya local building code. Two-ply application of tapersawnshakes must have felt interlay.CCA-treated shakes and shingles are required for directshingle application to solid decks. CCA-treated sheathing isnot required. This method does not have a secondary waterbarrier; therefore, when the roof begins to leak at the end ofits service life, the sheathing is likely to decay. We do notconsider direct application of shingles and tapersawn shakesto sheathing as robust as other roof systems.NOTE: Always check with the manufacturer of theproduct as well as with your local code official forapproved application methods in your local area.7
General Technical Report FPL–GTR–201Figure 10. Installation of shakes directly on solid sheathing with interlaidNumber 30 felt. Used with permission from Cedar Shake & Shingle Bureau,New Roof Construction Manual.FastenersFinish Selection and ApplicationFasten shakes and shingles using corrosion-resistant ringshank nails having blunt tips. Consult with fastener manufacturers for the best fastener. Fasteners manufactured forasphalt shingles are not appropriate for wood shakes orshingles. Fasteners must be hot-dipped galvanized as perASTM A 153/D or stainless steel (Type 304 or 316). Placenails 3/4 in. (19 mm) (from each edge and 1-½ in. (38 mm)above the exposure line. The head of the fastener should beflush with the surface of the shake or shingle. Do not overor underdrive the fasteners. Overdriving causes spalling, inwhich wood on the back side of the shingle detaches fromthe rest of the shingle. Corrosion-resistant nails are neededto avoid irons stains caused by extractives in the wood andcorrosion by acid rain, salt air, etc. Certain preservativeand fire-retardant treatments may be corrosive. Contact thepreservative or fire-retardant manufacturer for additionalrequirements for corrosion resistance of fasteners for usewith their products.Because western redcedar, Alaska yellow-cedar, and redwood are naturally durable, applying a finish is not mandatory. Sometimes wood roofs are finished to preserve the color of shakes or shingles on the roof. This section providesinformation on various types of finishes and the applicationof those finishes. Always consult the particular finish manufacturer for information regarding the specific applicationcriteria for their product and if their product is suitable forwood roof application.Zinc or Copper StripsInterlaying a zinc or copper strip at the ridge cap/vent canbe effective for controlling the surface growth of algae,mold, and moss for a short distance down the surface of theroof. Some literature specifies 12 feet (4 m) between zincor copper strips, however, this spacing may be inadequate;excessive spacing giv
wood (butt end) on 16-in. and 18-in. shingles and 10 in. on a 24-in. shingle. No. 4 No. 4 grade is to be used for the under course of double-coursed sidewalls only. This shingle is never to be used for roof application or as a starter course on roofs.