Transcription
ImageJ Activity BookletWritten by Kurtis Williams (Texas A&M University - Commerce), Kyle Fricke (Universityof California, Berkeley), David Auslender (University of Texas at Austin)ImageJ Activity Booklet - Page 1
Table of ContentsIntroduction . 3Downloading and Installing ImageJ and Astronomy Plugins . 4Lesson 1: Digital Picture Basics . 8Lesson 2: Opening an Astronomical Image . 15Lesson 3: Making Color Pictures . 19Lesson 4: Measuring Star Brightnesses . 26Answer Key . 33Appendix . 34ImageJ Activity Booklet - Page 2
IntroductionAs scientists, astronomers do not only take pretty pictures, but also mustproduce quantitative (mathematical) analyses of these pictures. There aremany different methods for analyzing astronomical images, and thereforemany different software tools for doing this analysis.This guide provides instructions using a program called ImageJ. Theadvantages of this program are that it is Java-based (so it can run on anycomputer), it is free, and it is relatively user-friendly.You’ll begin with a set of instructions for downloading ImageJ plus someadditional astronomy-related plugins, followed by directions on how toinstall everything correctly (for both mac and pc). After you have everythinginstalled, there are 4 lessons that will help you get oriented with some ofthe most basic image processing skills needed for analyzing astronomicalimages and making color pictures. There are questions throughout thelessons to help guide your thinking (the answers are provided at the end).Many of the lessons require some supplementary materials. They’re foundat: ls/tabid/305/Default.aspxMany of these files are pretty large. It is recommended to access them witha high-speed internet connection.Finally, some technical notes: Both ImageJ and the Astronomy pluginsmentioned in this guide are frequently updated. The functionality andappearance of the programs may be different now compared to when theseinstructions were last updated (Summer 2012, using ImageJ version 1.45s,and Astronomy Plugins version 2011-12-23). However, the basic ideasand processes should remain basically the same. Also, the screenshots inthis booklet were all taken on a MacBook. If you are using a PC, things willlook slightly different. The most significant difference is that the menus willappear in the ImageJ windows instead of at the top of the screen. Also, it ishighly recommended to use Mozilla Firefox (http://www.mozilla.org/) fordownloading the software and FITS images (Internet Explorer is especiallydiscouraged).ImageJ Activity Booklet - Page 3
Downloading and Installing ImageJ andthe Astronomy PluginsGoals: In this section, you will download and install ImageJ and theastronomy plugin tools.ImageJ is a free image processing and analysis program that shouldwork on any modern PC or Mac (with Java). It is published by theNational Institutes of Health, and was originally designed for medicalprofessionals that work with electronic imaging. It also worksextremely well with astronomical images, especially if you install theastronomy plugins provided below. The plugins were created by Dr.Frederic Hessman at the University of Göttingen in Germany for useby classrooms and teachers for images taken with the MONETtelescopes, and will work with almost any electronic image.1. To download ImageJ, go to this website:http://rsb.info.nih.gov/ij/download.html2. Install ImageJ to your computer.a) Make sure you know what operating system you are using on yourcomputer.b) Simply follow the installation instructions after you click on thehyperlink to download the program.c) Run ImageJ just to make sure it is working on your computer, andclose it after you verify that it works.Note: it is recommended to download the most recent version of ImageJ. However, ifyou run into problems try downloading version 1.45s instead - this was the last versionverified to work well.Next, you’ll need to install all of the astronomy-specific tools 3. Go to this next web page: [DO NOT POST THIS LINK ON ANY OTHERWEBSITE] www.astro.physik.uni-goettingen.de/ hesman/ImageJ/Astronomy/4. Download the zip file entitled ‘Astronomy.zip’ to your desktop. (Again,please download the most recent version. However, the last verifiedversion is 2011-12-23)ImageJ Activity Booklet - Page 4
Now it’s time to install everything in the correct places 5. Unzip (extract) the ‘Astronomy.zip’ file onto your desktop.6. Double click on the ‘Hard Drive’ icon if you are using a mac, or go to‘My Computer’ if you are using a PC in order to open an "explorer window”(or “finder window”) so that you can move files around.7. Double click on the ‘Hard Drive’/’My Computer’ icon again to open aSECOND “explorer window”. -In one window (the first) you want to be ableto look through the astronomy folder that you just unzipped, and in theother window (the second) you want to be able to look at ImageJ and itsassociated files.8. In the first window navigate to the ‘Astronomy’ folder from the desktop.-You should see two folders, ‘plugins’ and ‘macros’.9. Double click into the ‘plugins’ folder. -You should see four items (2subfolders and 2 .jar files).10. In your second window double click on ‘Applications’ folder (Mac), orthe ‘Program Files’ folder (PC) [or ‘Program Files (x86)’].11. Navigate to and double click on the ‘ImageJ’ folder. -You should belooking at all of the folders and files within ‘ImageJ’ (about 11 total)including one folder in particular labeled ‘plugins’.12. Look BACK at your first window (the ‘Astronomy’ folder that you justunzipped). Highlight all four items within the unzipped ‘Astronomy’ folder.(another Astronomy folder, CCD folder, astroj.jar, Astronomy.jar)13. Drag those four items into the ‘plugins’ folder of ImageJ in the secondwindow.14. Within that first window were originally two folders. Go back and clickinto the other folder now - the ‘macros’ folder. -You should see a subfolderlabeled ‘toolsets’.15. Double click into ‘toolsets’. -You should see one file labeled‘astronomytools.txt’.ImageJ Activity Booklet - Page 5
16. In your second window (looking at ImageJ files), double click on thefolder labeled ‘macros’. -You should be looking at a long list of .txt filesand 2 subfolders, one of which is labeled ‘toolsets’.17. In your first window highlight ‘astronomytools.txt’, then drag it over tothe other explorer window and place into the ‘toolsets’ folder.18. Close the first window (it’s now basically just empty folders). Leave thesecond one open.19. If ImageJ is running, restart it. Or if it was not running, start it up bydouble clicking on its icon.Now to get those tools up to the tool bar (ImageJ should be running)20. Click the icon on the far right side of the ImageJ toolbar.21. In the pulldown menu that appears, click on ‘Astronomy Tools’ -Severalof the toolbar icons will change, now appearing something like so:Almost done! You just have one last item to download and install 22. Close ImageJ.23. Go to jar in yourbrowser. This link will prompt you to download a file named “Jama1.0.2.jar” .24. Save/download that file. It will most likely download to your desktop, butwherever it downloads make sure you know where it is.ImageJ Activity Booklet - Page 6
25. Now go back to the already-opened window from the previous steps(which should currently be looking at the ImageJ - macros folder).26. Click back one step so that you’re once again looking at the files andsubfolders inside the ImageJ folder (about 11 total).27. Double click on the ‘plugins’ folder.28. Now, click and drag the Jama-1.0.2.jar file into the folder labeled‘Input-Output’.29. Close all windows.Pat yourself on the back. You’re finished installing all of the tools!ImageJ Activity Booklet - Page 7
Lesson 1: Digital Picture BasicsGoals: In this lesson you will learn some basic vocabulary about digitalpictures. You will also open a picture with ImageJ and relate thisvocabulary to the picture.Materials: You need a computer with ImageJ and the Astronomy pluginsinstalled, and the digital picture kermit.jpg (found rials/tabid/305/Default.aspx) ora digital picture of yourself or someone you know well.Here is some basic vocabulary that will re-appear throughout our workwith astronomical images: Pixel — A “pixel” (short for “picture element”) is the smallestunit of a digital picture. These are little squares arranged in agrid to create a full picture, like a mosaic. RGB/Grayscale — “RGB” stands for “Red, Green and Blue.”Monitors display colors using red, green and blue light;combinations of these three colors create all other colors.Color digital pictures are usually stored in RGB format.“Grayscale” is the same as what most people would call “blackand white.” Another common color scheme is “cmyk” (cyan,magenta, yellow and black); cmyk is used by color printers. Pixel Value — The pixel value indicates how bright each coloris in a pixel. Most grayscale images use a value between 0(pure black) and 255 (pure white). For RGB images, each coloris assigned a value between 0 and 255. A pixel with R 255,G 0, and B 0 will be a bright red pixel. A pixel with R 255,G 0, and B 255 will be purple (bright red plus bright blue). Look-up Table (LUT) — A look-up table, or LUT, relates thepixel value to what is displayed on the screen. If you changethe brightness or contrast of an image, you are altering thisrelation, but not the image itself. Think of it like changing thebrightness or the tint on your television set. Twiddling withthose settings changes the picture that you see, but the signalcoming from the TV station is not changed.ImageJ Activity Booklet - Page 8
Activity: Explore these terms in relation to a real image1. Find a color digital image to work with. For the activities below,we’ll be exploring how images change as we mess with colors,brightness and contrast. Find a picture of someone you know verywell, so you can readily see how these changes affect the picture.If you don’t have a picture, use the picture of Kermit the Frog.2. Make a copy of this image. We don’t want to mess up your onlycopy of a perfectly good image, so make a copy of the image file,and put the copy where you can find it.3. Open the image with ImageJ. Start ImageJ by double-clicking on the microscopeicon in the ImageJ folder. Click on“File”, then“Open”, andthen locatethe copy youmade in thelast step.ImageJ Activity Booklet - Page 9
The picture should popopen.4. Move the mouse around over the image. As you do this, look atthe ImageJ tool bar. You should see numbers like “x 106, y 214,Value 77,80,25.” These are the x and y coordinates of the pixelyour mouse is over, and the pixel value(s) for that pixel. The threevalues tell us that this is an RGB image, and the individualnumbers say that the pixel has a moderate amount of red, amoderate amount of green, and little blue (remember that thesevalues range from 0 to 255). In reality, the pixel is olive green.As you move the mouse, the x and y coordinates and the pixelvalues will change. Move the mouse over areas of different colors. Do thechanges in the pixel values make sense, depending on thecolor you are seeing? In which direction do the x coordinates increase? The ycoordinates? Look at the pixel values for a nearly-white pixel. Do thesevalues agree with the convention that the maximum pixelvalues are 255?5. Zoom in many times. There are three ways to zoom in. You caneither use the menus for “Image” “Zoom” “In”, or you canclick on the magnifying glass in the toolbar and then click on theimage, or you can use the and – keys. Keep zooming in untilyou reach the maximum zoom. Can you see the individual pixels? Move the mouse around inside an individual pixel. Note howthe x coordinate, y coordinate, and pixel values do notImageJ Activity Booklet - Page 10
change. This is because a pixel is the smallest unit of adigital image. You can zoom back out bypressing the – key, or withthe magnifying glass tool byholding the ‘Alt’ key andclicking on the image.6. Convert the image to grayscale (black and white). Becauseastronomy images are in grayscale, and because grayscale is alittle easier to understand, let’s convert your color image tograyscale. In the ImageJ menus, go to “Image” “Type” “8-bit.”Voila! Your image is in grayscale. Save the image with a different name: “File” “Save As” “Jpeg ”ImageJ Activity Booklet - Page 11
7. Move the mouse over the grayscale image. Note that the pixelcoordinates are unchanged, but the Value is now a single number. What pixel values correspond to dark areas? What values tolight areas?8. Change the brightness and contrast. “Brightness” and “contrast”are controls that allow you to change the look-up table, but not thepixel value. Open the Brightness & Contrast dialog box. Use the menus“Image” “Adjust” “Brightness/Contrast” Slide the bars controlling brightness and contrast around.What is the difference between adjusting the brightness andadjusting the contrast? Click “Reset” to go back to the default settings. Zoom in as far as you can on part of the image. Find a singlepixel to follow. What is its x and y coordinate? What is itspixel value? Move the brightness and contrast bars drastically. Move the mouse back to the same pixel. Use the x and ycoordinates to make sure you have the right pixel. What isthe pixel value? Move the brightness and contrast bars again. Relocate yourpixel. What is the pixel value? Brightness and contrast change how the image looks on thescreen, but do not affect the pixel value. However, if youImageJ Activity Booklet - Page 12
save the adjusted image, many computer programs willchange the pixel values so that the picture looks the samethe next time you open it.9. Set some specific value ranges. The brightness and contrastdialog box also allows you to set specific value ranges to display.Values higher than the maximum appear as pure white; valuesless than the minimum appear as pure black. Zoom back out so you van view the entire image. In the brightness and contrast dialog box, click on the buttonlabeled “Reset”. Your picture should go back to the normalgrayscale. In the brightness and contrast dialog box, click the button“Set.” Another dialog box will appear. Set the minimum value to 50, and the maximum to 100.Click “OK”. What happens? Move your mouse over pure white and pure black areas.Look at the pixel values. Are they outside your minimum andmaximum range (they should be)? Now, click on the “Set” button again. Set the minimum valueto –100, and the maximum value to 350. Click “OK”. Whathappens?ImageJ Activity Booklet - Page 13
Click on the “Reset” button; your picture should be back tonormal. Zoom in as far as you can and look at a single pixel; note thepixel value. Play around with the minimum and maximum and thebrightness and contrast buttons. Convince yourself that thepixel value does not change no matter what you do with thebrightness, contrast, minimum and maximum. You arechanging how the image is displayed, not the image itself.Points to take away: Digital images are made of individual pixels. A pixel is the smallestpart of a digital image. Each pixel has an assigned coordinate and a pixel value. Color pictures need three values for each pixel. These valuesdescribe how much red, green, and blue light are present in eachpixel. Grayscale pictures need only one value for each pixel, describinghow bright each pixel is. Changing the brightness and contrast does not change the pixelvalue.Some questions to think about: Brightness and contrast change the mapping of pixel values to thedisplayed shade of gray, but those values are unchanged. Why doastronomers like this property? Most astronomical cameras create images with pixel values that arevery large - some as high as 65,535, some even larger. ImageJ willmap these counts to look-up tables that run from 0 to 255. If youhave faint stars with pixel values of only 300 out of 65,535 you won’tbe able to see them in ImageJ’s display. How can you use ImageJ tosee these stars?ImageJ Activity Booklet - Page 14
Lesson 2: Opening an Astronomical ImageGoals: In this lesson, you will open an astronomical image, adjust itsbrightness and contrast, and learn how to invert an image and why.Materials: You need a computer with ImageJ and the Astronomy pluginsinstalled, and the image file quintet.fits, downloadable erials/tabid/305/Default.aspxNote: Be sure to option-click (Mac) or right-click (PC) and ‘Save Link As ’1. Look at the file name. The “.fits” means that the image is a “FITS” file.“FITS” stands for “Flexible Image Transport System.” FITS files are oneof the standard image types for astronomical research images.2. Opening the image file. ImageJ opens FITS files the same way as otherimage types: “File” “Open”. Browse for the file, find it and click it!This picture is of Stephan’s Quintet, a group of four related (and oneunrelated) galaxies. Can you see five galaxies in the image? We can’t.3. Run your mouse over the image and look at pixel values. Rememberhow the grayscale image from Lesson 1 had pixel values between 0 and255? Some FITS images can have seemingly arbitrary pixel values, andmight include decimal points. This allows astronomical cameras to countImageJ Activity Booklet - Page 15
individual photons; many astronomical cameras go up to 65,535, andsome can even approach 4.3 billion. When you open a FITS file withImageJ, it displays the highest pixel value as pure white and the faintestpixel value as pure black. This means that the faintest objects aredisplayed as only slightly less-black pixels, which your eyes have troubleseeing. So, the galaxies are there, but they and other faint objects arehard to see.What can you do to make fainter pixels easier to see?4. Adjust the Brightness and Contrast. Remember, to do this click“Image” “Adjust” “Brightness/Contrast”. The Brightness andContrast window will pop up.There are three ways to choose the brightness andcontrast: The first and easiest way to adjust thebrightness/contrast of the image is to click onthe ‘Auto’ button. This button will automaticallyadjust the image to ImageJ’s best guess atoptimal values. It’s usually okay, but not great. The second way to adjust the brightness andcontrast is to slide the minimum, maximum,brightness and contrast bars until you can seefaint objects. This is easy to do, but hard to dialin, and probably the most frustrating and leastproductive method. The final and best way is to manually set the minimum andmaximum values. Press the Set button, and a dialogue box willopen allowing you to set the minimum and maximum displayedpixel values.o Minimum Displayed Value: In a majority of astronomicalpictures, most of the pixels will be blank sky. Close the ‘Set’window, move your pointer around the picture, especially in theparts that are likely to be blank sky with no gas or dust. Look forthe lowest typical pixel value (in the case of quintet.fits, I wouldguess it is around 350. Do you agree?). Press ‘Set’ again andinput 350 to be the minimum.o Maximum Displayed Value: The maximum value is a littleharder to choose. It takes some experimentation and dependson what details you want to bring out. Typically you’ll want toImageJ Activity Booklet - Page 16
set it low enough to see faint objects, but high enough that thesky doesn’t look washed out, mottled, or speckled. A goodstarting guess for the maximum for many images is to add 500to the minimum value (850 here). Click OK. Can you see thefive galaxies now?Remember from Lesson 1: changing the brightness and contrastdoes not change the pixel value; it only helps you to see the imagebetter. So feel free to adjust the brightness and contrast howeveryou want. Remember, the goal is to see faint objects – the brightones will always be visible as pure white pixels!5. Invert the image. Your eye is very good at picking out slightly off-whitecolors on a white background, while not so good at picking out slightlyless-black colors on a black background. (This is why if you spill coffeeon white shirt you rush to change it, but you don’t need to change if youspill coffee on a black shirt.) The same is true for picking out faint starsor galaxies in an astronomy image. If you could make the sky white andthe stars black, you could pick out fainter objects.Although the Universe doesn’t provide us this convenience, ImageJdoes. To make your life easier, you can invert (“flip”) the image so thatyou are seeing black stars on a white background. To do this click:Image Lookup Tables Invert LUT.ImageJ Activity Booklet - Page 17
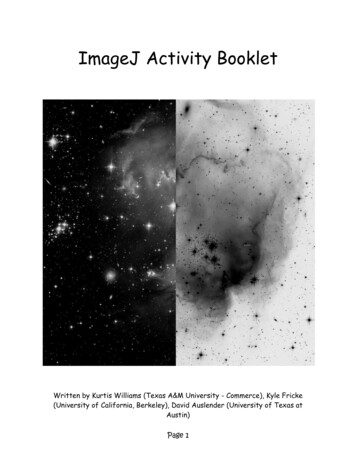
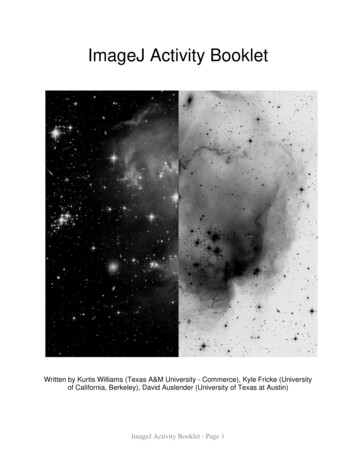
Important! Do not use Edit Invert, because this changes the pixelvalues!!Another example of an inverted image is shown on the cover of thisbooklet. Half the image is normal, and half is inverted. Note how muchmore detail you can see in the faint nebula in the inverted half!6. Play with the brightness and contrast some more to bring out faintfeatures. To get the best results from the inverting process, you willprobably need to adjust the brightness and contrast some more.Personally, we like a light-gray background; we obtained best results byusing the SET button and setting the minimum to 300, and the maximumto 475. Play around and see what different values do! Can you see thefaint arms extending far beyond the galaxies?Conclusion: By now, you should be familiar with the process of opening anastronomical image with ImageJ. You should be able to use the brightnessand contrast in order to make faint objects more noticeable. Finally, youshould be familiar with the process required to invert an image.ImageJ Activity Booklet - Page 18
Lesson 3: Making Pretty Color PicturesGoals: In this lesson, you will learn to use ImageJ to create a color imagefrom individual images of an object taken through different filters.Materials: You will need your computer with ImageJ software andastronomical tools installed. You will also need the image files M16B.fits,M16V.fits, and M16R.fits erials/tabid/305/Default.aspxBefore beginning this worksheet, read the NASA/Hubble Space Telescopewebsite http://hubblesite.org/gallery/behind the pictures/meaning of color/ .The important points to keep in mind from this site are: CCD cameras take black and white images. Color images are produced by combining the black and white imagestaken through different color filters. Most images of nebulae and galaxies are color-enhanced, meaningthat subtle shades of color are brought out to produce anaesthetically pleasing picture. Your eye would see just a milky whitecolor, even if you were really close to the object.In other words, in producing a color image, we are leaving the realm ofscience and entering the realm of art. For that reason, the instructionsbelow are generally not quantitative. You should feel free to play aroundwith images until you think the result is pretty.Many people feel uncomfortable with this; they tend to want pictures thatreplicate what the human eye would see. If you feel this way, pleasereconsider. No camera ever built reproduces exactly what the human eyesees. Some are closer than others. But we can and do learn a lot frompictures that are not “exact,” like black-and-white pictures, sepia-tonedpictures, and old color pictures where some colors have faded.The color astronomical picture you will produce in this lesson is like that. Inaddition to aesthetic qualities, the colors are telling us something scientific,that conditions in one area are not identical to conditions in another area.What do the different colors mean? Answering that question leads one fromart back into science.So, how can we make color pictures? Let’s return to our friend, ImageJ.ImageJ Activity Booklet - Page 19
To begin, you’ll want to open several images of the same object withImageJ. You will need three images, one through a bluer filter, one througha redder filter, and one through an intermediate filter. These are typicallylabeled “B” (blue), “V” (green), and “R” (red).For this exercise, we’ve provided images taken with a 0.8-metertelescope of Messier 16 (a.k.a. the Eagle Nebula, famous for the “Pillarsof Creation” from Hubble), taken through the B, V, and R filters. UseImageJ to open each image (M16B.fits, M16V.fits, M16R.fits) so youhave three open images.1. Convert each image to a logarithmic stretch. CCDs take linear images,such that each incoming photon is turned into a set number of image“counts.” However, a logarithmic stretch is generally preferred, becausethis brings out faint objects while still allowing your eye to discernbrightness differences in bright parts of the image. In fact, your eye usesImageJ Activity Booklet - Page 20
logarithmic stretch, as does photographic film. Digital cameras convertmost pictures to a logarithmic stretch before displaying them.To get a logarithmic stretch in ImageJ, click on the “B”-band image andselect Process Math Log. Repeat the process on the “V” and “R”image.Don’t worry if the images suddenly become dark or washed out, you’ll fixthat in the next step.Note: converting to a logarithmic stretch also essentially corrects forexposure time and sensitivity differences.2. Adjust the Brightness/Contrast in each image. Do this in the same wayyou learned in Lesson 2, Step 4.ImageJ Activity Booklet - Page 21
(“Image” “Adjust” “Brightness/Contrast”)Note: since we took the logarithm of the images, the pixel value rangesare much smaller. A good starting point is to run the cursor around eachimage and look at typical values in the dark background sky, and set thisto your min value. Then add 2 or 3 for the max value.3. Open the RGB Composer. This is a plugin that provides some usefultools for creating a color image. In the menus, select “Plugins” ”Color” “RGB Composer”.The RGB Composer window will open as well as a new color image.4. Select the appropriate image for each color. In the RGB Composerpopup window, select which image you want to use for the red, green,and blue portions of your image. (R red, B blue, V green [think ‘verde’in Spanish]). Select each image from the pull-down menu at the top ofeach column, then click ‘Update’ for each one.5. Fine-tune the brightness and contrast of each color. The RGBComposer contains controls the brightness, contrast, upper, and lowerlimits for each color. Play around with these controls and watch whathappens to the color image. The goal is to bring out as much of the faintImageJ Activity Booklet - Page 22
structure as possible, while making sure that the sky is black andstructures are not washed out.Don’t hesitate to zoom in on your object, and go for what looks pretty!Here are my final values and the resulting image:ImageJ Activity Booklet - Page 23
Some tips: If the sky, which should be black, has a tint to it, go to that color andclick on the increase the Lower “ ” button until the sky is devoid ofthat color. Some images may not have a black sky background ifthere is a lot of gas and dust scattered throughout. If the picture looks like it has too much of one color (like all the starsare red or green), go to that color and increase the Upper value byclicking on the “ ” button until things look right. If the picture seems to be lacking a color (say the picture looksyellowish, meaning it is lacking blue):o If bright things are yellowish but faint things are okay, trydecreasing the Upper blue value with the “ ” buttono If faint things look yellowish but brighter things are okay,decrease the Lower blue value by clicking on the “ ” button In pictures of galaxies or nebulae, most background stars should bewhite in color, though some may be reddish or blue. In pictures of star clusters, you may want to try very narrow colorranges in order to bring out the differences in star colors. At some places in your color image, you may see individual pixels,round spots, or even small lines of just one color (pure red, puregreen, or pure blue). These are likely cosmic rays, where chargedparticles hit the CCD in random spots during one image. There areclever but complex ways to get rid of these, and they affect a smallpercentage of pixels, so we left them in your images. Oftentimes, astronomical images will need to be aligned, meaningthat all the stars should appear on the same pixels in the color image.We’ve aligned the 0.8-meter images for you, but images from the webor your own telescope may not be aligned.o In unaligned images, if you zoom inon a star, you will see each star asthree points; a red, green, and bluedot. If they overlap somewhat, youmay see a white star with colors onthe fringe:o Use the “up”, “down”, “left” and“right” buttons in the RGBcomposer to align the star imagethe best you can. For star clusters, the colors can be enhanced by de-focusing theimage. This spreads the light from a star over more pixels, giving yourImageJ Activity Booklet - Page 24
eye more pixels from which to get the color. In ImageJ, try theGaussian blur filter (Process Filters Gaussian Blur) with aradius of 3 pixels. You’ll have to re-adjust the brightness and contrast,and you’ll lose the faintest stars. Before running the RGB Composer, compare the pictures in theindividual filters. Do you notice obvio
hyperlink to download the program. c) Run ImageJ just to make sure it is working on your computer, and close it after you verify that it works. Note: it is recommended to download the most recent version of ImageJ. However, if you run into problems try downloading version 1.45s instead - this was the last version verified to work well.