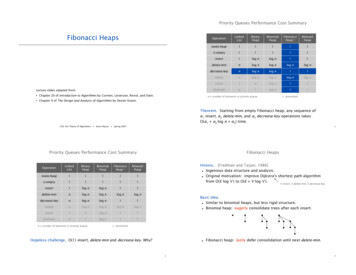
Transcription
C H A P T E R10Trace Collection and Log Central in RTMTThe trace and log central feature in the Cisco Unified Presence Server real-time monitoring tool (RTMT)allows you to configure on-demand trace collection for a specific date range or an absolute time. Youcan collect trace files that contain search criteria that you specify and save the trace collection criteriafor later use, schedule one recurring trace collection and download the trace files to an SFTP server onyour network, or collect a crash dump file. After you collect the files, you can view them in theappropriate viewer within the real-time monitoring tool.NoteFrom RTMT, you can also edit the trace setting for the traces on the node that you have specified.Enabling trace settings decreases system performance; therefore, enable Trace only for troubleshootingpurposes.NoteTo use the trace and log central feature in the RTMT, make sure that RTMT can access all of the nodesin the cluster directly without Network Access Translation (NAT). If you have set up a NAT to accessdevices, configure the Cisco Unified Presence Server with a hostname instead of an IP address and makesure that the host names and their routable IP address are in the DNS server or host file.NoteFor devices that support encryption, the SRTP keying material does not display in the trace file.This chapter contains information on the following topics: Importing Certificates, page 10-2 Displaying Trace & Log Central Options in RTMT, page 10-2 Collecting Traces, page 10-3 Using the Query Wizard, page 10-5 Scheduling Trace Collection, page 10-9 Viewing Trace Collection Status and Deleting Scheduled Collections, page 10-12 Collecting a Crash Dump, page 10-12 Using Local Browse, page 10-14 Using Remote Browse, page 10-15 Using Q931 Translator, page 10-17 Displaying QRT Report Information, page 10-18Cisco Unified Presence Server Serviceability Administration GuideOL-11383-0110-1
Chapter 10Trace Collection and Log Central in RTMTImporting Certificates Using Real Time Trace, page 10-19 Updating the Trace Configuration Setting for RTMT, page 10-22Importing CertificatesYou can import the server authentication certificate that the certificate authority provides for each server inthe cluster. Cisco recommends that you import the certificates before using the trace and log centraloption. If you do not import the certificates, the trace and log central option displays a security certificatefor each node in the cluster each time that you log into RTMT and access the trace and log central option.You cannot change any data that displays for the certificate.To import the certificate, choose Tools Trace Import Certificate.A messages displays that states that the system completed the importing of server certificates. Click OK.Displaying Trace & Log Central Options in RTMTBefore you begin, make sure that you have imported the security certificates as described in the“Importing Certificates” section on page 10-2.To display the Trace & Log Central tree hierarchy, perform one of the following tasks:Tip In the Quick Launch Channel, click the Tools tab; then, click Trace and the Trace & Log Centralicon. Choose Tools Trace Open Trace & Log Central.From any option that displays in the tree hierarchy, you can specify the services/applications for whichyou want traces, specify the logs and servers that you want to use, schedule a collection time and date,configure the ability to download the files, configure zip files, and delete collected trace files.After you display the Trace & Log Central options in the real-time monitoring tool, perform one of thefollowing tasks: Collect traces for services, applications, and system logs on one or more servers in the cluster. See“Collecting Traces” section on page 10-3 Collect and download trace files that contain search criteria that you specify as well as save tracecollection criteria for later use. See “Using the Query Wizard” section on page 10-5 Schedule a recurring trace collection and download the trace files to an SFTP server on yournetwork. See “Scheduling Trace Collection” section on page 10-9 Collect a crash dump file for one or more servers on your network. See “Collecting a Crash Dump”section on page 10-12. View the trace files that you have collected. See the “Using Local Browse” section on page 10-14. View all of the trace files on the server. See the “Using Remote Browse” section on page 10-15. View the current trace file that is being written on the server for each application. You can performa specified action when a search string appears in the trace file. See “Using Real Time Trace” sectionon page 10-19.Cisco Unified Presence Server Serviceability Administration Guide10-2OL-11383-01
Chapter 10Trace Collection and Log Central in RTMTCollecting TracesCollecting TracesUse the Collect Traces option of the trace and log central feature to collect traces for services,applications, and system logs on one or more servers in the cluster. You specify date/time range forwhich you want to collect traces, the directory in which to download the trace files, whether to deletethe collected files from the server, and so on. The following procedure describes how to collect tracesby using the trace and log central feature.NoteThe services that you have not activated also display, so you can collect traces for those services.If you want to collect trace files that contain search criteria that you specify or you want to use tracecollection criteria that you saved for later use, see the “Using the Query Wizard” section on page 10-5.Before You BeginPerform one or more of the following tasks: Configure the information that you want to include in the trace files for the various services fromthe Trace Configuration window. For more information, see the “Trace Configuration” section onpage 5-1. If you want alarms to be sent to a trace file, choose an SDI trace file as the alarm destination in theAlarm Configuration window. For more information, see the “Alarm Configuration” section onpage 3-1.ProcedureStep 1Display the Trace & Log Central options, as described in the “Displaying Trace & Log Central Optionsin RTMT” section on page 10-2.Step 2In the tree hierarchy, double-click Collect Files.The Select Presence Server Services/Applications tab displays.NoteStep 3If any server in the cluster is not available, a dialog box displays with a message that indicateswhich server is not available. The unavailable server will not display in the Trace & Log Centralwindows.Perform one of the following tasks: To collect traces for all services and applications for all servers in the cluster, check the Select AllServices on All Servers check box. To collect traces for all services and applications on a particular server, check the check box next tothe IP address of the server. To collect traces for particular services or applications on particular servers, check the check boxesthat apply. To continue the trace collection wizard without collecting traces for services or applications, go toStep 4.NoteThe services that you have not activated also display, so you can collect traces for those services.Cisco Unified Presence Server Serviceability Administration GuideOL-11383-0110-3
Chapter 10Trace Collection and Log Central in RTMTCollecting TracesNoteStep 4You can install some of the listed services/applications only on a particular node in the cluster.To collect traces for those services/applications, make sure that you collect traces from the serveron which you have activated the service/application.Click Next.The Select System Logs tab displays.Step 5Perform one of the following tasks: To collect all system logs for all servers in the cluster, check the Select All Logs on all Serverscheck box. To collect traces for all system logs on a particular server, check the check box next to the IP addressof the server. To collect traces for particular system logs on particular servers, check the check boxes that apply.For example, to collect CSA logs, check the Cisco Security Agent check box in the Select SystemLogs tab. To access user logs that provide information about users that are logging in and out, checkthe Security Logs check box in the Select System Logs tab. To continue the trace collection wizard without collecting traces for system logs, go to Step 6.Step 6Click Next.Step 7In the Collection Time group box, specify the time range for which you want to collect traces. Chooseone of the following options: Absolute Range—Specify the server time zone and the time range (start and end date and time) forwhich you want to collect traces.The time zone of the client machine provides the default setting for the Select Reference ServerTime Zone field. All the standard time zones, along with a separate set of entries for all time zonesthat have Daylight Saving settings, display in the Select Time Zone drop-down list box.The trace files that get modified in the date range (between the From date and the To date), getcollected if the chosen time zone matches the time zone settings of the server (for example Server1). If another server exists in the same Cisco Unified Presence Server cluster (Server 2), but thatserver resides in a different time zone, then the trace files that get modified in the corresponding daterange in Server 2 will get collected from Server 2.To set the date range for which you want to collect traces, choose the drop-down list box in the FromDate/Time and To Date/Time fields. Step 8Relative Range—Specify the time (in minutes, hours, days, weeks, or months) prior to the currenttime for which you want to collect traces.From the Select Partition drop-down list box, choose the partition that contains the logs for which youwant to collect traces.Cisco Unified Presence Server Serviceability stores logs for up to two Linux-based versions ofCisco Unified Presence Server. Cisco Unified Presence Server Serviceability stores the logs for theversion of Cisco Unified Presence Server that you are logged in to in the active partition and stores thelogs for the other version of Cisco Unified Presence Server (if installed) in the inactive directory.So, when you upgrade from one version of Cisco Unified Presence Server that is running on the Linuxplatform to another and log in to the new version of Cisco Unified Presence Server that is running on theLinux platform, Cisco Unified Presence Server Serviceability moves the logs from the previous versionto the inactive partition and stores logs for the newer version in the active partition. If you log in to theCisco Unified Presence Server Serviceability Administration Guide10-4OL-11383-01
Chapter 10Trace Collection and Log Central in RTMTUsing the Query Wizardolder version of Cisco Unified Presence Server, Cisco Unified Presence Server Serviceability moves thelogs for the newer version of Cisco Unified Presence Server to the inactive partition and stores the logsfor the older version in the active directory.NoteCisco Unified Presence Server Serviceability does not retain logs from Cisco Unified PresenceServer versions that ran on the Windows platform.Step 9To specify the directory in which you want to download the trace files, click the Browse button next tothe Download File Directory field, navigate to the directory, and click Open. The default specifiesC:\Program Files\Cisco\Presence Server Serviceability\jrtmt\ server IP address \ download time .Step 10To create a zip file of the trace files that you collect, choose the Zip File radio button. To download thetrace files without zipping the files, choose the Do Not Zip Files radio button.Step 11To delete collected log files from the server, check the Delete Collected Log Files from the servercheck box.Step 12Click Finish.The window shows the progress of the trace collection. If you want to stop the trace collection, clickCancel.When the trace collection process is complete, the message “Completed downloading for node IPaddress ” displays at the bottom of the window.Step 13To view the trace files that you collected, you can use the Local Browse option of the trace collectionfeature. For more information, see the “Using Local Browse” section on page 10-14.Additional InformationSee the Related Topics, page 10-22.Using the Query WizardThe Trace Collection Query Wizard allows you to collect and download trace files that contain searchcriteria that you specify as well as to save trace collection criteria for later use. To use the TraceCollection Query Wizard, perform the following procedure.Before You BeginPerform one or more of the following tasks: From the Trace Configuration window, configure the information that you want to include in thetrace files for the various services. For more information, see the “Trace Configuration” section onpage 5-1. If you want alarms to be sent to a trace file, choose an SDI trace file as the alarm destination in theAlarm Configuration window. For more information, see the “Alarm Configuration” section onpage 3-1.Cisco Unified Presence Server Serviceability Administration GuideOL-11383-0110-5
Chapter 10Trace Collection and Log Central in RTMTUsing the Query WizardProcedureStep 1Display the Trace & Log Central options, as described in the “Displaying Trace & Log Central Optionsin RTMT” section on page 10-2.Step 2In the tree hierarchy, double-click Query Wizard.NoteStep 3If any server in the cluster is not available, a dialog box displays with a message that indicateswhich server is not available. The unavailable server will not display in the Trace & Log Centralwindows.In the window that opens, click one of the following radio buttons: Saved QueryClick the Browse button to navigate to the query that you want to use. Choose the query and clickOpen.If you chose a single node generic query, the node to which RTMT is connected displays with acheckmark next to the Browse button. You can run the query on additional nodes by placing acheckmark next to those servers.If you chose an all node generic query, all nodes display with a checkmark next to the Browse button.You can uncheck any server for which you do not want to run the query.If you chose a regular query, all of the nodes that you selected when you saved the query displaywith a checkmark. You can check or uncheck any of the servers in the list. If you choose new servers,you must use the wizard to choose the services for that node.To run the query without any modifications, click Run Query and go to Step 17. To modify thequery, go to Step 4. Step 4Create QueryClick Next.The Select Cisco Presence Server Services/Applications tab displays.Step 5If you clicked the Saved Query radio button and chose a query, the criteria that you specified for querydisplay. If necessary, modify the list of services/applications for which you want to collect traces. If youclicked the Create Query radio button, you must choose all services/applications for which you want tocollect traces.TipTo collect traces for all services and applications for all servers in the cluster, check the SelectAll Services on All Servers check box. To collect traces for all services and applications on aparticular server, check the check box next to the IP address of the server.NoteThe services that you have not activated also display, so you can collect traces for those services.NoteYou can install some listed services/applications only on a particular node in the cluster. Tocollect traces for those services/applications, make sure that you collect traces from the serveron which you have activated the service/application.Cisco Unified Presence Server Serviceability Administration Guide10-6OL-11383-01
Chapter 10Trace Collection and Log Central in RTMTUsing the Query WizardStep 6Click Next.Step 7In the Select System Logs tab, check all check boxes that apply.TipTo collect traces for all system logs for all servers in the cluster, check the Select All Logs onAll Servers check box. To collect traces for all services and applications on a particular server,check the check box next to the IP address of the server.Step 8Click Next.Step 9In the Collection Time group box, specify the time range for which you want to collect traces. Chooseone of the following options: All Available Traces—Choose this option to collect all the traces on the server for the service(s)that you chose. Absolute Range—Specify the server time zone and the time range (start and end date and time) forwhich you want to collect traces.The time zone of the client machine provides the default setting for the Select Reference ServerTime Zone field. All the standard time zones, along with a separate set of entries for all time zonesthat have Daylight Saving settings, display in the Select Time Zone drop-down list box.The trace files that get modified in the date range (between the From date and the To date), getcollected if the chosen time zone matches the time zone settings of the server (for example Server1). If another server exists in the same Cisco Unified Presence Server cluster (Server 2), but thatserver is in a different time zone, then the trace files that get modified in the corresponding daterange in Server 2 will get collected from Server 2.To set the date range for which you want to collect traces, choose the drop-down list box in the FromDate/Time and To Date/Time fields. Relative Range—Specify the time (in minutes, hours, days, weeks, or months) prior to the currenttime for which you want to collect traces.Step 10To search by phrases or words that exist in the trace file, enter the word or phrase in the Search Stringfield. The tool searches for an exact match to the word or phrase that you enter.Step 11From the Select Impact Level drop-down list box, specify the level of impact you want the string searchactivity to have on call processing. Available options include Low, Medium, and High. Low impactcauses the least impact on call processing but yields slower results. High impact causes the most impacton call processing but yields faster results.Step 12Choose one of the following options: To execute the query, click Run Query.The Query Results folder displays. When the query completes, a dialog box that indicates that thequery execution completed displays. Click OK and continue with Step 17. To save the query, click the Save Query button and continue with Step 13.Cisco Unified Presence Server Serviceability Administration GuideOL-11383-0110-7
Chapter 10Trace Collection and Log Central in RTMTUsing the Query WizardStep 13Check the check box next to the type of query that you want to create. Generic Query—Choose this option if you want to create a query that you can run on nodes otherthan the one on which it was created. You can only create a generic query if the services that youchose exist on a single node. If you chose services on more than one node, a message displays. Youcan either save the query as a regular query or choose services on a single node.Then, choose either the Single Node Query or All Node Query option. If you choose the Single NodeQuery, the trace collection tool by default chooses the server on which you created the query whenyou execute the query. If you choose the All Node Query option, the trace collection tool by defaultchooses all of the servers in the cluster when you execute the query.Note You can choose servers other than the default before running the query.Regular Query—Choose this option if you only want to run the query on that node or cluster onwhich you created the query.Step 14Click Finish.Step 15Browse to the location to store the query, enter a name for the query in the File Name field, and clickSave.Step 16Do one of the following tasks:Step 17 To run the query that you have just saved, click Run Query and continue with Step 17. To exit the query wizard without running the query that you created, click Cancel.After the query execution completes, perform one or more of the following tasks: To view a file that you collected, navigate to the file by double-clicking Query Results,double-clicking the node folder, where node equals the IP address or host name for the serverthat you specified in the wizard, and double-clicking the folder that contains the file that you wantto view. After you have located the file, double-click that file. The file displays in the viewer that isdesignated for that file type. Download the trace files and the result file that contains a list of the trace files that your querycollected by choosing the files that you want to download, clicking Download, specifying thecriteria for the download, and clicking Finish.– To specify the directory in which you want to download the trace files and the results file, clickthe Browse button next to the Download all files field, navigate to the directory, and click Open.The default specifies C:\Program Files\Cisco\Presence Server Serviceability\jrtmt\ server IPaddress \ download time .– To create a zip file of the trace files that you collect, check the Zip File check box.– To delete collected log files from the server, check the Delete Collected Log Files from Servercheck box.Tip After you have downloaded the trace files, you can view them by using the Local Browse optionof the trace and log central feature. For more information, see the “Using Local Browse” sectionon page 10-14.To save the query, click Save Query and complete Step 13 through Step 15.Cisco Unified Presence Server Serviceability Administration Guide10-8OL-11383-01
Chapter 10Trace Collection and Log Central in RTMTScheduling Trace CollectionAdditional InformationSee the Related Topics, page 10-22.Scheduling Trace CollectionYou can use the Schedule Collection option of the trace and log central feature to schedule recurring upto 6 concurrent trace collections and to download the trace files to an SFTP server on your network, runanother saved query, or generate a syslog file. To change a scheduled collection after you have enteredit in the system, you must delete the scheduled collection and add a new collection event. To scheduletrace collection, perform the following procedure.NoteYou can schedule up 10 trace collection jobs, but only 6 trace collection can be concurrent. That is, only6 jobs can be in a running state at the same time.Before You BeginPerform one or more of the following tasks: Configure the information that you want to include in the trace files for the various services fromthe Trace Configuration window. For more information, see the “Trace Configuration” section onpage 5-1. If you want alarms to be sent to a trace file, choose an SDI trace file as the alarm destination in theAlarm Configuration window. For more information, see the “Alarm Configuration” section onpage 3-1.ProcedureStep 1Display the Trace & Log Central options, as described in the “Displaying Trace & Log Central Optionsin RTMT” section on page 10-2.Step 2In the tree hierarchy, double-click Schedule Collection.The Select Presence Server Services/Applications tab displays.NoteStep 3If any server in the cluster is not available, a dialog box displays with a message that indicateswhich server is not available. The unavailable server will not display in the Trace & Log Centralwindows.Perform one of the following tasks: To collect traces for all services and applications for all servers in the cluster, check the Select AllServices on All Servers check box. To collect traces for all services and applications on a particular server, check the check box next tothe IP address of the server. To collect traces for particular services or applications on particular servers, check the check boxesthat apply. To continue the trace collection wizard without collecting traces for services or applications, go toStep 4.Cisco Unified Presence Server Serviceability Administration GuideOL-11383-0110-9
Chapter 10Trace Collection and Log Central in RTMTScheduling Trace CollectionStep 4NoteThe services that you have not activated also display, so you can collect traces for those services.NoteYou can install some of the listed services/applications only on a particular node in the cluster.To collect traces for those services/applications, make sure that you collect traces from the serveron which you have activated the service/application.Click Next.The System Logs tab displays.Step 5To collect traces on system logs, perform one of the following tasks: To collect all system logs for all servers in the cluster, check the Select All Logs on all Serverscheck box. To collect traces for all system logs on a particular server, check the check box next to the IP addressof the server. To collect traces for particular system logs on particular servers, check the check boxes that apply. To continue the trace collection wizard without collecting traces for system logs, go to Step 6.Step 6Click Next.Step 7Specify the server time zone and the time range for which you want to collect traces.The time zone of the client machine provides the default setting for the Select Reference Server TimeZone field. All the standard time zones, along with a separate set of entries for all time zones that haveDaylight Saving settings, display in the Select Time Zone drop-down list box.Step 8To specify the date and time that you want to start the trace collection, click the down arrow button nextto the Schedule Start Date/Time field. From the Date tab, choose the appropriate date. From the Timetab, choose the appropriate time.Step 9To specify the date and time that you want to end the trace collection, click the down arrow button nextto the Schedule End Date/Time field. From the Date tab, choose the appropriate date. From the Time tab,choose the appropriate time.NoteThe trace collection completes, even if the collection goes beyond the configured end time;however, the trace and log central feature deletes this collection from the schedule.Step 10From the Scheduler Frequency drop-down list box, choose how often you want to run the configuredtrace collection.Step 11From the Collect Files generated in the last drop-down list boxes, specify the time (in minutes, hours,days, weeks, or months) prior to the current time for which you want to collect traces.Step 12To search by phrases or words that exist in the trace file, enter the word or phrase in the Search Stringfield. The tool searches for an exact match to the word or phrase that you enter and only collects thosefiles that match the search criteria.Step 13To create a zip file of the trace files that you collect, check the Zip File check box.Cisco Unified Presence Server Serviceability Administration Guide10-10OL-11383-01
Chapter 10Trace Collection and Log Central in RTMTScheduling Trace CollectionStep 14To delete collected log files from the server, check the Delete Collected Log Files from the Servercheck box.Step 15Choose one or more of the following actions:Step 16Step 17 Download Files Run Another Query Generate SyslogDo one of the following: If you chose Download Files or Run Another Query, continue with Step 17. If you chose Generate Syslog, go to Step 19.In the SFTP Server Parameters group box, enter the server credentials for the server where the trace andlog central feature downloads the results and click Test Connection. After the trace and log centralfeature verifies the connection to the SFTP server, click OK.NoteStep 18The Download Directory Path field specifies the directory in which the trace and log centralfeature stores collected files. By default, the trace collection stores the files in the home directoryof the user whose user ID you specify in the SFTP parameters fields: /home/ user /Trace.If you chose the Run Another Query Option, click the Browse button to locate the query that you wantto run and click OK.NoteStep 19The trace and log central feature only executes the specified query if the first query generatesresults.Click Finish.A message indicates that the system added the scheduled trace successfully.NoteIf the real-time monitoring tool cannot access the SFTP server, a message displays. Verify thatyou entered the correct IP address, user name, and passwordStep 20Click OK.Step 21To view a list of scheduled collections, click the Job Status icon in the Quick Launch Channel.TipTo delete a scheduled collection, choose the collection event and click Delete. A confirmationmessage displays. Click OK.Additional InformationSee the Related Topics, page 10-22.Cisco Unified Presence Server Serviceability Administration GuideOL-11383-0110-11
Chapter 10Trace Collection and Log Central in RTMTViewing Trace Collection Status and Deleting Scheduled CollectionsViewing Trace Collection Status and Deleting ScheduledCollectionsTo view trace collection event status and to delete scheduled trace collections, use the followingprocedure:ProcedureStep 1Display the Trace & Log Central options, as described in the “Displaying Trace & Log Central Optionsin RTMT” section on page 10-2.Step 2In the Quick Launch Channel, click the Job Status icon.Step 3From the Select a Node drop-down list box, choose the server for which you want to view or delete tracecollection events.This list of scheduled trace collections displays.Possible job types include Scheduled Job, OnDemand, RealTimeFileMon, and RealTimeFileSearch.Possible statuses include Pending, Terminated, Running, Cancel, and Terminated.Step 4To delete a scheduled collection, choose the event that you want to delete and click Delete.NoteYou can only delete jobs with a status of “Pending” or “Running” and a job type of“ScheduleTask.”Additional InformationSee the Related Topics, page 10-22.Collecting a Crash DumpPerform the following procedure to collect a core dump of trace files:ProcedureStep 1Display the Trace & Log Central tree hierarchy, as described in “Displaying Trace & Log CentralOptions in RTMT” section on page 10-2.Step 2Double-click Collect Crash Dump.NoteIf any server in the cluster is not available, a dialog box displays with a message that indicateswhich server is no
the Trace Configuration window. For more information, see the "Trace Configuration" section on page 5-1. † If you want alarms to be sent to a trace file, choose an SDI tr ace file as the alarm destination in the Alarm Configuration window. For more information, see the "Alarm Configuration" section on page 3-1. Procedure