Transcription
AC427-3: Excel-ing with AutoCAD : NoProgramming RequiredDonnie Gladfelter – CADD Microsystems, Inc.AC2807Learn to combine the power of Microsoft Excel with the power of AutoCAD software.This class will explore several ways you can use AutoCAD and Microsoft Excel in tandem withoutprogramming. You'll be able to apply everything learned in this class using an out-of-the-box installationof AutoCAD and Microsoft Excel. Conventional concepts will include working with Data Links to display,update, and manage Excel data from AutoCAD. Lesser-known concepts will include updating UpdateBlock Attributes from Excel tables, combining Data Extraction tables with Excel (Data Link) tables, andwriting AutoCAD script files using Excel.About the Speaker:Donnie Gladfelter (Richmond, VA) is a highly visible, and respected thought leader in the designcommunity. He has authored multiple books including the book and Autodesk Official Training GuideAutoCAD 2013 and AutoCAD LT 2013: No Experience Required. Other publications include articles inthe popular AUGIWorld magazine, and The CAD Geek blog (www.TheCADGeek.com) which welcomesmore than 14,000 visitors each month.A speaker at Autodesk University since 2007, Donnie is a proven communicator with experiencespeaking to audiences in excess of 60,000 people. Through a long-standing peripatetic existence hisportfolio of presentations includes serving as the host of Autodesk University Virtual 2010, local usergroup presentations, and countless industry events.Driven by a personal mantra to empower design professionals, he applies more than a decade ofindustry experience as a Business Development Manager at CADD Microsystems, an AutodeskPlatinum Partner, as he helps professionals throughout the Mid-Atlantic leverage technology through hissolutions-focused insights and expertise.E-mail: Donnie.Gladfelter@TheCA DGeek.comtwitter: @thecadgeekBlog: www.TheCADGeek.com
AC427-3: Excel-ing with AutoCAD : No Programming Required2
AC427-3: Excel-ing with AutoCAD : No Programming RequiredIntroductionA long-time standard among both architects and engineers, Microsoft Excel has proven itself as anincredibly versatile tool for both creating and analyzing data. Over the years many third-partyapplications and homebrewed solutions have been created to bridge the gap between AutodeskAutoCAD and Microsoft Excel. Unfortunately, the programming knowledge required to create manyof those solutions proved too great a hurdle for a large number of AutoCAD users.Fortunately modern releases of AutoCAD have begun to bridge this gap with an ever growingcollection of tools that can connect to Excel. In this class you will learn to maximize the potential ofthese tools without writing a single line of code. So sit back, relax, and get ready to Excel withAutoCAD: No Programming Required.Objectives Create data links to display, manage, and update Excel tables from AutoCADUpdate AutoCAD block attributes using data from an Excel spreadsheetCombine data from a data extraction table with data from an Excel spreadsheetAutomate tasks with AutoCAD script files that are created with Excel3
AC427-3: Excel-ing with AutoCAD : No Programming RequiredContentsIntroduction .3Objectives .3Cont ents .4Linking Excel Tables with AutoCAD .5New Excel Data Link .5Process: Creating an Excel Data Link .8Updating Linked Excel Tables . 13Process: Updating using Contextual Table Cell Ribbon . 13Process: Updating using Status Bar . 14Quickly Link an Excel Table with AutoCA D . 15Process: Quickly Linking an Excel Table. 15Process: Editing Existing Data Links . 17Build Dynamic Tables from Drawing Attributes . 18Process: Creating Dynamic Data Extraction Tables . 18Dynamically Link Excel Tables wit h Data Extraction Tables . 23Process: Combine Excel Data Links with Data Extraction Tables . 23Generat e Quantity-Based Cost Estimates . 31Process: Edit Excel Data Link . 31Process: Create a Data Extraction Formula . 33Author Script Files Using Excel . 36Process: Authoring Script Files with Excel . 36Populate Block Attributes with Excel Data . 38Guidelines for Importing and Exporting Attributes . 38Understanding the Disconnect . 39Process: Exporting Attributes . 40Process: Importing Attribut es into Excel. 41Process: Modifying Attribute Data with Excel . 42Process: Exporting Excel Attribute Table to AutoCA D. 43Process: Importing Excel Block Attribute Table int o AutoCA D . 444
AC427-3: Excel-ing with AutoCAD : No Programming RequiredLinking Excel Tables with AutoCADExternal References allow us to link drawings, images, and several other files into our drawings, butwhat about tables? Although it has been possible to establish a link between AutoCAD and Excelusing OLE (Object Linking and Embedding) objects for some time, it’s only been since AutoCAD2008 that a native AutoCAD solution has existed. Using Data Links, it’s now possible to link anAutoCAD table with an .xls, .xlsx, or .csv file.New Excel Data LinkSeveral options are available to you when linking an Excel spreadsheet into an AutoCAD drawing.The way you configure these options will largely depend on variables such as the complexity of yourExcel spreadsheet, and how you prefer to display it within your drawing. This section will walk youthrough each of the options available to you from the Excel Data Link dialog.5
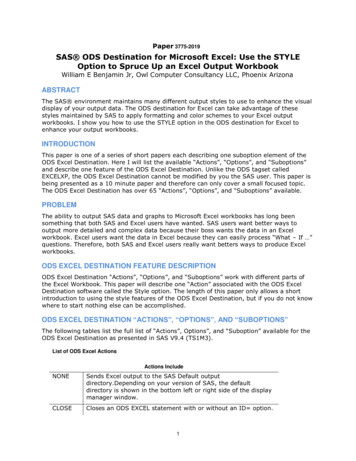
AC427-3: Excel-ing with AutoCAD : No Programming RequiredFile Choose an Excel File: Click thebutton to browse to and specify the location of an ExcelXLS, XLSX, or CSV file on your computer or network. Path Type: Use the drop-down list to choose one of three options; Full Path; Relative Path;or No Path.oFull Path: Uses the complete path of the selected data link. This will include thedrive letter/server name, root directory, and all subdirectories.oRelative Path: Typically the preferred option for keeping project data links functionalafter a project has been archived, and the drive letter/UNC path has changed. Thismethod will only include the portion of the path AutoCAD needs to locate the datalink; generally no higher than the project directory. You drawing must be saved forthis method to work.oNo Path: Requires both the Excel document and AutoCAD DWG to live in the samedirectory, and will only save the filename of the referenced Excel document.Link Options Select Excel Sheet to Link to: Dropdown list displays each worksheet saved within theselected XLS or XLSX file. A data link can only connect to a single sheet, thus multiple datalinks would be required to display multiple worksheets from a single XLS or XLSX file. Link Area: Choose which portion of the worksheet displays in the AutoCAD DWG.oLink Entire Sheet: Creates a table including the whole worksheet (to include allrows and columns of the selected worksheet).oLink to a Named Range: Creates a table using a pre-named collection of cells fromthe selected Excel file.oLink to Range: A range of cells may be defined within the AutoCAD data link itself.Valid range definitions include; rectangular regions, A1:D10; entire columns, A:A; orsets of columns, A:D.The essential link options such as the Excel file and Link Area are found in the standard Excel DataLink dialog. Additional parameters may be customized by clicking the More Options buttonfoundin the lower-right corner of the dialog. The expanded Excel Data Link dialog includes the followingparameters:6
AC427-3: Excel-ing with AutoCAD : No Programming RequiredCell ContentsControls how data is imported into your drawing, more specifically how formulas are handled. Keep Data Formats and Formulas: Imports Excel worksheet with formulas and dataformats attached. Keep Data Formats, Solve Formulas in Excel: Preserves data formats (number, text, etc),but relies on Excel (not AutoCAD) to solve formulas. This is a good option for worksheetswhose formulas and other components do not correctly solve within AutoCAD. Convert Data Formats to Text, Solve Formulas in Excel: Like the Keep Data Formats,Solve Formulas in Excel option, formulas will be solved within Excel (not AutoCAD), howeverall data will be formatted as text (stripping away data formatting such as number, date, etc). Allow Writing to Source File: When enabled changes made to a table inside AutoCADmay be written back to the source Excel table using the DATALINKUPDATE command.Cell Formatting Use Excel Formatting: Use to control whether AutoCAD uses formatting of AutoCAD TableStyle (disabled/un-checked), or the Excel file (enabled/checked). When enabled you’ll havethe ability to further refine how AutoCAD uses the formatting stored within your Excel file.These settings include:oKeep Table Updated to Excel Formatting: When selected, AutoCAD will keep theAutoCAD Table formatting in sync with the Excel table formatting when theDATALINKUPDATE command is used.oStart With Excel Formatting, Do Not Update: Performs a one-time-import offormatting specified in the original Excel file. Subsequent formatting changes are notincluded when the DATALINKUPDATE command is used.Note: Cell Formatting options has no effect on how AutoCAD manages changes to data within a link edExcel document. These settings only control how AutoCAD manages a cells format changing from Bold toItalic.7
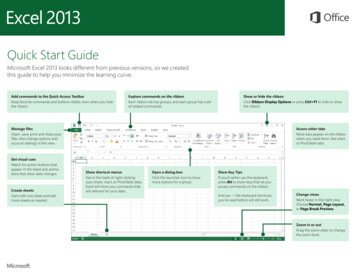
AC427-3: Excel-ing with AutoCAD : No Programming RequiredProcess: Creating an Excel Data LinkThe following steps will show you how to create data links between an AutoCAD drawing and anExcel workbook, displaying a table linked from Excel within your AutoCAD drawing.Step Action1. Start the TABLE command; On the Ribbon,choose Home tab Annotation panel Table.ResultThe Insert Table dialog opens.2. From the Insert Table dialog; click From A Data The From a Data Link drop-down list isLink [1] within the Insert Options area of theenabled, and displays No Data Links Found.dialog.3. With From A Data Link selected, click the Data The Select A Data Link dialog opens.Link Manager button [2] to the right of the DataLink drop-down list.8
AC427-3: Excel-ing with AutoCAD : No Programming RequiredStep ActionResult4. From the Select A Data Link dialog; clickCreate A New Excel Data Link from the Linkstree.The Enter Data Link Name dialog opens.5. Enter a unique name for the Data Link withinthe Enter Data Link Name dialog; click OK.The New Excel Data Link dialog opens.9
AC427-3: Excel-ing with AutoCAD : No Programming RequiredStep Action6. Click thebutton to browse to an Excel file(.xls or .xlsx). After selecting an Excelworkbook, the New Excel Data Link dialogdisplays additional information about how thelink will be created.ResultThe Save As dialog box opens, allowing you tobrowse for an Excel (.xls or .xlsx) file.7. Browse to and select an Excel file (.xls or .xlsx) The Save As dialog closes and the New Excelfrom the Save As dialog box; click Open.Data Link dialog updates to display informationabout the selected Excel file.10
AC427-3: Excel-ing with AutoCAD : No Programming RequiredStep Action8. Using thebutton, expand the New ExcelData Link dialog to configure the data link.ResultThe New Excel Data Link dialog expands todisplay a complete list of data link configurationoptions.9. Using the instructions within the New Data Link The New Excel Data Link dialog closes, andsection (above) as a guide, make the desiredthe Select a Data Link dialog reopens tochanges the Excel Data Link; click OK.display the newly created Excel Data Link.10. Choose the newly created Excel Data Link(AU EXCEL in this example) within the Selecta Data Link dialog; click OK.The Select a Data Link dialog closes, and theInsert Table dialog reopens to display theselected Excel Data Link (AU EXCEL in thisexample) under the From a Data Link option.11
AC427-3: Excel-ing with AutoCAD : No Programming RequiredStep Action11. Confirm each of the configuration choiceswithin the Insert Table dialog, and click OK.ResultChoose an insertion point for your table.12
AC427-3: Excel-ing with AutoCAD : No Programming RequiredUpdating Linked Excel TablesWhen flipping between AutoCAD and Microsoft Excel, it may be necessary to manually update oneor more Data Extraction tables. Like most things in AutoCAD, this can be done in several differentways.Process: Updating using Contextual Table Cell RibbonThe AutoCAD Contextual Ribbon Tabs expand the reach of the AutoCAD Ribbon by providing quickaccess to tools related to, or in the context of, a given object. This functionality extends to Tables,and more specifically Table Cells. Selecting any cell within an AutoCAD table will open theContextual Table Cell Ribbon tab. From this Contextual Ribbon tab several common tasks, includingupdating Data Links, can be performed.To update Data Links using Contextual Ribbon tabs:Step ActionResult1. Select any cell of a linked AutoCAD table.The contextual Table Cell Ribbon tab opens.2. On the contextual Table Cell Ribbon tab Data panel; click Download From Source.The Excel Data Link updates to reflect changesmade to the linked Excel file.13
AC427-3: Excel-ing with AutoCAD : No Programming RequiredProcess: Updating using Status BarThe AutoCAD status bar provides access to several application settings. An additional Data Link iconwill display in the status bar whenever data links are present in a drawing. With this icon it ispossible to update all data links in a given drawing at once.Step Action1. Right-click the Data Link iconwithin thestatus bar; click Update All Data Links.ResultAll data linked tables within the current drawingupdate to reflect the latest revisions to thesource Excel files.14
AC427-3: Excel-ing with AutoCAD : No Programming RequiredQuickly Link an Excel Table with AutoCADManually creating Data Links as outlined earlier in this document will undoubtedly give you the mostcontrol over the way the link between Excel and AutoCAD is created. While this control is absolutelyneeded in many applications, a collection of “off-the-shelf” settings is oftentimes more thanadequate. Assuming these default settings are adequate for your application, the quickest andeasiest way to link Excel with AutoCAD is using the Windows Copy and Paste commands.The following procedure outlines how to quickly link Excel with AutoCAD using these commands:Process: Quickly Linking an Excel TableStep ActionResult1. From Microsoft Excel, select the cells to link toan AutoCAD drawing.The selected cells highlight within Excel.2. Still within Microsoft Excel; click Copy from theRibbon, or contextual right-click menu.The selected cells are copied to the MicrosoftWindows clipboard.15
AC427-3: Excel-ing with AutoCAD : No Programming RequiredStep ActionResult3. Switch to AutoCAD and open the drawing you The AutoCAD Application Window is now thewish to link to the Excel table you copied to the active application.Windows Clipboard.4. On the Home tab of the Ribbon Clipboardpanel; expand the Paste tool by clicking thedown arrow beneath it. With the Past toolexpanded, click Paste Special.The Paste Special dialog opens.16
AC427-3: Excel-ing with AutoCAD : No Programming RequiredStep Action5. From the Paste Special dialog, click the PasteLink radio button, and then select AutoCADEntities. Click OK.ResultChoose an insertion point for your table.The Excel table is linked into your drawing.Process: Editing Existing Data LinksAutoCAD automatically creates a Data Link in thebackground when using the Paste Special command toquickly link Excel with AutoCAD. These data links are givenan arbitrary “Excel Data Link #” name where the # is asequential number; 1, 2, 3, and so on. Since this arbitrarynaming convention has little context with the table, manyprefer renaming these automatically created Data Links tosomething more descriptive. This can be done after thePaste Special command is used to link a table by using the Data Link tool on the Insert Ribbon tab Linking & Extraction panel.The Data Link command will open the DataLink Manager, where you can both create newand modify existing Data Links in the currentdrawing. To rename an existing Data Link,highlight its name in the Links tree, right-click,and choose Rename.Enter a new name for your Data Link, andpress Enter. You can also modify theindividual parameters of an existing Data Linkby double-clicking its name. This will open adialog similar to the New Excel Data Linkdialog discussed earlier in this handout, where you can tweak a Data Link to your liking.17
AC427-3: Excel-ing with AutoCAD : No Programming RequiredBuild Dynamic Tables from Drawing AttributesAttributes are most commonly thought of in the context of user-defined block attributes, howeverthese are just one of several different attributes any AutoCAD object may have. Other attributes mayinclude the length of a line, drawing coordinates, layer, scale, even dynamic block parameters. Usingthe Extract Data (DATAEXTRACTION or EATTEXT) command it’s possible to quickly compile anycombination of these attributes into a table. This table could help facilitate quantity takeoffs, or evenas a way to create a dynamic schedule within your drawing.Process: Creating Dynamic Data Extraction TablesStep Action1. On the Ribbon, Insert tab Linking &Extraction panel; click Extract Data.ResultThe Data Extraction wizard opens.2. On Page 1 of the Data Extraction wizard;The Save Data Extraction As dialog opens.choose the Create a New Data Extraction radiobutton. Click Next.18
AC427-3: Excel-ing with AutoCAD : No Programming RequiredStep ActionResult3. From the Save Data Extraction As dialog, enter Page 2 of the Data Extraction wizard opens.a name for your Data Extraction; click Save.4. Page 2 of the Data Extraction wizard promptsfor the data source to be defined. By defaultthis is the current drawing, however anynumber of drawings may be added to the list,and the data included within them extractedinto a single table.Page 3 of the Data Extraction wizard opens.Specify the drawing to extract data from; clickNext.19
AC427-3: Excel-ing with AutoCAD : No Programming RequiredStep Action5. Page 3 of the Data Extraction wizard promptsyou to select the objects whose attributes youwould like to extract. This example will extracta single object; the Door – Imperial dynamicblock.ResultPage 4 of the Data Extraction Wizard opens.Click Next after selecting objects to extract.Tip: Uncheck theobjects you want toextract, right-click ,and select InvertSelection to quick lychoose the objectsto extract.6. Page 4 of the Data Extraction wizard promptsyou to select the properties or attributes youwish to extract.Page 5 of the Data Extraction wizard opens.Choose the properties you wish to extract, clickNext.Tip: Customize column header names bymodifying the Display Name cell of anextraction property.20
AC427-3: Excel-ing with AutoCAD : No Programming RequiredStep Action7. Page 5 of the Data Extraction Wizard allowsyou Refine Data, or otherwise customize theoverall organization of data within your table.ResultPage 6 of the Data Extraction wizard opens.In this example, identical rows are combined, aCount column is included (for quantities), andthe Name column is omitted, and data hasbeen sorted based on the Wall Thicknesscolumn. When finished click Next.8. Choose where to place the Data Extractiontable from the Choose Output (Page 6) dialog.Page 7 of the Data Extraction wizard opens.This example will insert a table into the current.dwg. Click Next to continue the wizard.21
AC427-3: Excel-ing with AutoCAD : No Programming RequiredStep ActionResult9. Page 7 of the Data Extraction wizard providesPage 8 of the Data Extraction wizard opens.several options to customize how a DataExtraction Table displays in a drawing. Thisincludes options to adjust the Table Style, andassign individual styles to elements such as thetable Title, Header, and Data.Verify settings using the preview on the rightsiade of the dialog and click Next.10. Completing the Data Extraction wizard, Page 8 AutoCAD prompts for an insertion point.allows for the Data Etraction table configured inthe preceeding steps to be inserted into thecurrent drawing. Click Finish to insert the table.22
AC427-3: Excel-ing with AutoCAD : No Programming RequiredStep Action11. Click a location in the curent drawing to placethe Data Extraction table.ResultThe Data Extraction table is placed into thecurrent drawing.Dynamically Link Excel Tables with Data ExtractionTablesData Extraction tables provide an incredibly powerful way to summarize data from the attributes ofobjects stored inside one or more AutoCAD drawings. While it’s certainly possible to add any amountof metadata to an object inside AutoCAD using tools such as Block Attributes, inputting this data canbe a time consuming endeavor. For this reason, detailed metadata is oftentimes contained outsidethe AutoCAD .dwg file, and instead stored in something like an Excel table.Process: Combine Excel Data Links with Data Extraction TablesIn this example a single dynamic window block represents both the A and B window types; the Atype being 8’ in length, and the B type being 4’ in length. Additional information including themanufacturer and model is stored in an Excel spreadsheet, whereas the .dwg only contains thewindow type (A or B).Step Action1. On the Ribbon, Insert tab Linking &Extraction panel; click Extract Data.ResultThe Data Extraction wizard opens.23
AC427-3: Excel-ing with AutoCAD : No Programming RequiredStep ActionResult2. On Page 1 of the Data Extraction wizard;The Save Data Extraction As dialog opens.choose the Create a New Data Extraction radiobutton. Click Next.3. From the Save Data Extraction As dialog, enter Page 2 of the Data Extraction wizard opens.a name for your Data Extraction; click Save.4. Specify the drawing to extract data from; clickNext.Page 3 of the Data Extraction wizard opens.24
AC427-3: Excel-ing with AutoCAD : No Programming RequiredStep Action5. Select the object or objects whose data shouldbe extracted.ResultPage 4 of the Data Extraction Wizard opens.This example will use a single object; theWindow (A-GLAZ) block.6. Choose the properties you wish to extract. Besure to include one unique property that’sincluded in both the AutoCAD drawing and theExcel spreadsheet. In this example, thatproperty is the Window Type block attribute.Page 5 of the Data Extraction wizard opens.7. Choose how drawing data should beThe preview inside the Refine Data Page 5summarized. In this example, identical rowsupdates to reflect summary options.are combined, a Count column is included, andthe Name column is omitted, and data hasbeen sorted based on the Type column.25
AC427-3: Excel-ing with AutoCAD : No Programming RequiredStep ActionResult8. Still on the Refine Data (Page 5) dialog, clickLink External Data.The Link External Data dialog opens.9. From the Link External Data dialog, click theThe Data Link Manager dialog opens.Launch Data Link Managerbutton.26
AC427-3: Excel-ing with AutoCAD : No Programming RequiredStep Action10. Click Create A New Excel Data Link from theLinks tree, and then enter a unique name forthe new Data Link. Click OK.ResultThe New Excel Data Link Windows dialogopens.11. From the New Excel Data Link dialog, click the The Save As dialog opens.button.12. From the Save As dialog, browse to and select The New Excel Data Link dialog expands toan Excel document. Click Open.display information related to the selectedExcel document.27
AC427-3: Excel-ing with AutoCAD : No Programming RequiredStep ActionResult13. Configure the Excel Data Link using theoptions within the New Excel Data Link dialog.See the New Excel Data Link section of thishandout for more information. Click OKThe Excel Data Link is created and listed insidethe Data Link Manager dialog.14. Select the newly created Data Link from theData Link Manager dialog; click OK.Information related to the selected Data Linkdisplays inside the Ink External Data dialog.15. Use the drop-down lists within the DataMatching group of the Link External Datadialog to match the Data Extraction and Exceltables.The matching data columns are reflected in theDrawing Data Column and External DataColumn drop-down lists.In this example Type represents the DataExtraction column containing the A or Bwindow type designation, and Key is thematching column in the Excel document.16. Verify the specified data columns are valid byclicking the Check Match button.The Valid Key dialog opens to confirm asuccessful key pairing.28
AC427-3: Excel-ing with AutoCAD : No Programming RequiredStep ActionResult17. Use the Additional Columns For Data Tablegroup to configure which columns from theExcel document are included in the DataExtraction table. Click OK.Information from the Excel spreadsheet isappended to the Data Extraction table preview.18. Preview the combined Data Extraction andData Link table; click Next.Page 6 of the Data Extraction wizard opens.19. Choose where to place the Data Extractiontable from the Choose Output (Page 6) dialog.Click Next.Page 7 of the Data Extraction wizard opens.Linked columns are designated with aicon.29
AC427-3: Excel-ing with AutoCAD : No Programming RequiredStep ActionResult20. Specify the desired Table Style, table Title, and Page 8 of the Data Extraction wizard opens.cell styles from the Table Style (Page 7) dialog.21. Completing the Data Extraction wizard, Page 8 AutoCAD prompts for an insertion point.allows for the Data Etraction table configured inthe preceeding steps to be inserted into thecurrent drawing. Click Finish to insert the table.22. Click a location in the curent drawing to placethe Data Extraction table.The Data Extraction table is placed into thecurrent drawing.30
AC427-3: Excel-ing with AutoCAD : No Programming RequiredGenerate Quantity-Based Cost EstimatesData Extraction tables are commonly used to as a way to quantify pieces of equipment, generallyrepresented as block insertions, for the purposes of cost estimating. The net cost for a given lineitem is typically expressed as Block Count Unit Cost Net Cost. This type of calculation can beaccomplished within the Data Extraction function of AutoCAD by inserting a Formula Column. AFormula Column will allow you to do several things. First you will be able to calculate net item costsbased on any column within your Data Extraction table; this could be block/drawing attributeinformation, or data linked from an Excel table.Process: Edit Excel Data LinkFormula Columns within a Data Extraction Table will only solve formulas between numerical values.Although this requirement may seem obvious, Excel Data Links are oftentimes configured to convertdata formats to text as a way of maintaining visual fidelity of a table between AutoCAD and MicrosoftExcel. As a result of this setting, cells that appear to have numerical values, may in fact be treated asnon-numerical text in the eyes of AutoCAD. To ensure your table is composed of numerical values:Step Action1. On the Ribbon, Insert tab Linking &Extraction panel; click Data Link.ResultThe Data Link Manager dialog opens.2. Double-click the Excel Link (Windows) from the The Modify Excel Link dialog opens.Data Link Manager dialog.31
AC427-3: Excel-ing with AutoCAD : No Programming RequiredStep ActionResult3. Click the More Options disclosure triangle inthe lower-right corner of the Modify Excel Linkdialog.The Modify Excel Link dialog expands todisplay the Cell Con
XLS, XLSX, or CSV file on your computer or network. Path Type: Use the dropdown l- ist to choose one of three options; Full Path; Relative Path; or No Path. o Full Path: Uses the complete path of the selected data link. This will include the drive letter/server name, root directory, and all subdirectories. o Relative Path: