Transcription
NuWaveBrio Healthy Digital10Q Air Fryer Owner’s Manual
NuWave Brio Air FryerNuWaveElectric SkilletNuWaveOven Pro PlusSuper-heated air cooksyour food to crispy,tender perfection.The digital touch screengives you precise temperature control.Coated with Duralon Healthy Ceramic NonStick for easy cleanup.Includes a premiumtempered glass lid.Cook healthier mealsfaster and more efficiently with Triple Combo Cooking Power.More about our innovative products, visit:2Owner's Manual
NuWave PIC(Precision Induction Cooktop)Cook faster, safer andmore efficiently than youever could on your gasor electric stovetop.NuWave Nutri-Pot 10-in-1 Digital6 Qt. Pressure CookerEasily cook rice, poultry, vegetables, and moreall with the press of a button! The Nutri-Pot’ssafety release valve and hinged lid make forconvenient and safe operation.www.NuWaveNow.com1-877-689-2838Owner's Manual3
NuWave Flavor-Lockers with Vacuum-Seal TechnologyKeep food fresh for 21 days! Removethe oxygen with a few easy pumps.Slow the growth of mold by removingtrapped oxygen.NuWave Nutri-Master Slow JuicerThe Nutri-Master with a low 48RPM is incredibly quiet and powerfulenough to extract juice from nut andhard vegetables.More about our innovative products, visit:4Recipes
NuWave Healthy Ceramic Non-Stick Cookwarewith Duralon CoatingCoated with Duralon Healthy Ceramic Non-Stick for easycleanup, this versatile cookware is perfect for use in the ovenas well as on gas, electric, and even induction cooktops.www.NuWaveNow.com1-877-689-2838Recipes5
GUIDEThe following guide indicates the amount of time, temperature, and weight for thevarious food types that are listed below.Shake/FlipTime(min)Temp( F)SuggestedAmountFrozen French ToastSticksFlip8-103808 ozFrozen Hash BrownPattiesFlip18-253601-4 patties10-123501-5 rollsFood TypeCinnamon RollsAdditional NotesCover w/foil ½ wayThin Frozen FriesShake8-1440028 ozThick Frozen FriesShake14-1740024 ozMedium-thick cutHomemade FriesShake20-2536012-16 ozSoak in water - 30minutesHomemade PotatoWedgesShake20-2536012-16 ozSoak in water - 30minutesHomemade PotatoCubesShake15-2036012-16 ozSoak in water - 30minutesFlip12-183601-4 (8 oz each)Pork Chops (with bone)Flip15-203751-3 (8-12 ozeach)Frozen HamburgersFlip16-203601-2 (5 oz each)Fresh HamburgersFlip12-163601-4 (8 oz each)Italian SausageFlip13-154003-7 (4 oz each)Chicken WingsShake20-2539024 ozPoultryFlip11-143601-2 (8 oz each)Chicken BreastSpiral Ham9-10min/lb300Up to 5 lbsCover with foilBoneless Ham11-13min/lb300Up to 7 lbsCover with foilFlip10-12min/lb375Up to 6 lbsCover with foilSteak (½" ribeye)Whole ChickenFrozen Tater TotsShake6-836016-20 ozSpring RollsShake6-836016 ozChicken NuggetsShake8-1239012 ozFishShake6-1040012 ozStuffed PoppersShake8-1036012 ozOnion RingsShake12-1636016 ozBreaded MushroomsShake8-1039012 ozMozz. Sticks/ZucchiniShake5-736016 ozFrozen Fish SticksNote: Actual cooking times may vary depending on the size and shape of the ingredientsused. Listed cooking times should be used as a guide. Adjust the settings as necessary tosuit your needs. According to the FDA, the safe internal temperature is 165 F for poultry and160 F for pork.6Owner's Manual
TABLE OF CONTENTSGuide . 6Grilled Ham and Cheese . 38Save These Instructions . 9Salmon with Orange Curry Sauce . 40Operating Instructions . 11-19Apple Glazed Pork Tednderloin . 42Important Safeguards . 8Parts Description . 10Tortilla Crusted Tilapia . 39Turkey Sliders . 41Care & Maintenance . 19Citrus Green Beans . 43Warranty . 22Bacon Wrapped Onion Rings . 45Troubleshooting Guide .20-21RecipesPrime Rib . 23Crispy Tofu . 44Party Meatballs . 46Pasta Bake . 47Twice Baked Potato . 24Philly Cheese Steak Braid . 48Home Fries . 26Santa Fe Bell Pepper . 50Roasted Brussel Sprouts . 25Cheesy Rice Stuffed Meatloaf . 49Air Baked Eggs . 27Kale Chips . 51Classic Bacon Cheeseburger . 29Roasted Root Vegetables . 53Spinach Stuffed Chicken . 31Banana and Nutella Wontons. 55Grilled Chicken Tenders . 33Apple Pie Egg Rolls . 57Butter-Infused Chicken . 35Easy Blueberry Muffins . 59Chimichurri Skirt Steak . 37Garlic Roasted Game Hens . 61Air Fried Tortilla Chips . 28Roasted Tomatoes . 52Buffalo Wings . 30Apple Pie . 54Chicken Satay . 32Pineapple Crescents . 56Parmesan Chicken Tenders . 34Berry Cheesecake Egg Rolls . 58Cajun Shrimp . 36Indian Eggplant, Bell Pepper and Za'atar 60Peppered Sirloin Brochette . 62Bacon-Wrapped Pork Tenderloin . 63www.NuWaveNow.comOwner's Manual7
IMPORTANT SAFEGUARDSREAD ALL INSTRUCTIONSWhen using electrical units, basic safety precautions should always befollowed including the following:1. Do not touch hot surfaces.2. To protect against electrical shock, do not immerse cord, plugs, or the unitin water or other liquid.3. Close supervision is necessary when any unit is used by or near children.4. Unplug from outlet when not in use and before cleaning. Allow to coolbefore putting on or taking off parts.5. The use of other accessories that are not intended to be use with this unit isnot recommended. Doing so may damage the unit and can cause accidents.6. NOT INTENDED FOR OUTDOOR USE.7. Do not let cord hang over edge of table or counter, or touch hot surface.8. Do not place on or near a hot gas, electric burner and or in a heated oven.9. Extreme caution must be used when moving unit containing hot oil or otherhot liquids.10. To disconnect, turn any control “OFF”, then remove plug from the wall outlet.11. Never put the appliance against the wall or other appliances. There shouldbe at least 3 inches of free space for the back side. Left/right sides and theupper side of the appliance. Do not place anything on top of appliance.12. During air frying, hot steam is released from the air outlet opening. Keepyour hands and face distance from the steam and from the air outletopening. Also, be careful of hot steam and air when you remove the Fry PanBasket from the appliance.WARNINGPlease immediately cut off circuit and send unit to ourCustomer Service Department in case of other problems.1-877-689-2838 help@nuwavenow.comDO NOT USE THE UNIT FOR OTHER THAN INTENDED USE.Note: Put the appliance on a surface that is horizontal, even and stable.This appliance is intended for normal, household use. It is not intended to be usedin environments such as staff kitchens, shops. Offices or other work environments.8Owner's Manual
SAVE THESE INSTRUCTIONS1. Do not place the unit close to flammable materials heating units or wetenvironments.2. Height of ingredients placed in the Fry Pan Basket should comply with thedirections listed under “Operation Instructions”.3. Do not replace with other parts that are not designed specifically for theNuWave Digital Brio 10Q Digital Air Fryer.4. Do not put any other cooking pans in the Fry Pan Basket. Do not replace anyparts with other containers.5. If a lot of smoke is escaping from the air vent during operation, unplug theunit immediately and contact customer service.*6. Do not move the unit while in operation. Only after the NuWave Digital Brio10Q Digital Air Fryer has completely cooled down should you attempt tomove it. Always wait for the NuWave Brio Healthy Digital 10Q Air Fryer tocool down prior to handling it.7. Never use a towel to block the vent.8. If any troubles arise during operation, any necessary service must be doneby NuWave, LLC or authorized by the manufacturer for repairs.9. Do not disassemble the unit on your own or replace any parts.10. Do not use metal utensils with the coated Fry Pan Basket as this candamage the surface.11. If the power cord is damaged, do not attempt to operate the unit.*12. Keep the unit out of reach of children when the unit is operating orcooling down.13. Keep hands and face away from the venting outlet or where heat or steamis being released.14. Make sure NuWave Brio Healthy Digital 10Q. Air Fryer is always clean prior tocooking.15. It is normal for some smoke to escape the unit when heating for the first time.*Customer Service Department at 1-877-689-2838 help@nuwavenow.comCAUTION Always put the ingredients to be fried in the Fry Pan Basket toprevent direct contact with the heating components. Do not cover the air inlet and outlet opening while the applianceis operating. Do not pour oil into the Base Tray, this may create a fire hazard. Never touch the inside of the appliance while it is operating.Owner's Manual9
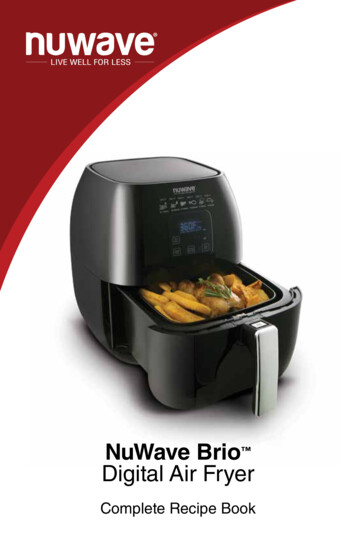
PARTS DESCRIPTION1012111321. Air Fryer power basePart #: 372572. Base TrayPart #: 37251453. Rotisserie ForkPart #: 372524. SkewerPart #: 372535. Reversible Wire RackPart #: 37254766. Fry Pan Basket NetPart #: 372557. Non-Stick Inner BasketPart #: 372568. Lid Unlock Button99. Lid Handle10. Vents11. Control Panel1312. Vent13. Heater14. Shaft Support Hole10 Owner's Manual148
AIR FRYER PREPARATIONBefore Use:1. Remove all the packaging materials.2. Remove the glue and labels on the appliance.3. Clean the Base Tray, Rotisserie Fork, Skewer, Reversible Wire Rack, FryPan Basket Net, and Non-Stick Inner Basket thoroughly with hot water, anonabrasive sponge and a mild dish detergent, or in the dishwasher, toprack only.4. Wipe the inside and outside of the appliance with a wet cloth. Do notimmerse the appliance in water.Note: This appliance cooks using hot air. DO NOT fill the unit with oil.Operation Preparation:1. Place the appliance on a level, even, and stable heat-resistant surface.2. Place the Base Tray and Fry Pan Basket in the NuWave Brio HealthyDigital 10Q Air Fryer.3. Plug the appliance into a standard wall socket. The power plug is included inthe package.Note: Do not cover or block the vent located on the top of the NuWave BrioHealthy Digital 10Q Air Fryer. Doing so can prevent proper ventilation and willadversely affect the cooking results.How to lock/unlock Air Fryer1. To open the Top Cover, hold the Lid Handlewith one hand and make sure you hear "click"sound to make sure secure the Top Coverstay on the position.2. Place the Base Tray into the Brio 10Q byholding the handles and make sure thebottom of the Base Tray is dry and clean.3. To close the Top Cover, hold the Lid Handlewth one hand and use the other hand pull upthe Lid Unlock Button and slowly lower the Liddown until it fully closes.Owner's Manual11
CONTROL PANEL OPERATIONVent Switch Adjust the vent to the “close” position to help keep moisture within the unit. Adjust the vent to the “open” position to have the NuWave Brio Digital AirFryer function as a true air fryer.Operation Functions - On/Off Function:Press “On/Off” once to turn the unit on. The control panel shoulddisplay “0” indicating that no cooking time or temperature hasbeen selected and the unit is powered on. Press “On/Off” againto turn the unit off.Start: Press “Start” once to begin cooking, ":15" will be displayed as wellas a fan icon, and the NuWave Brio Healthy Digital 10Qt. Air Fryerwill start to countdown. The default is 360 F for 15 minutes.Pause/Clear: To interrupt the cooking process, press “Pause/Clear” once. To cancel the cooking process or program, press “Pause/Clear”again. Adjusting Temperature:1. Default cooking temperature is 360ºF "360" on the display.2. Press "Cook Temp" and “TEMP” will appear on display.3. To adjust the cooking temperature by pressing " " and "-".Note: After setting the cooking temperature, if you want to changethe cooking temperature before you can start cooking, you canadjust by " " and "-".12 Owner's Manual
CONTROL PANEL OPERATION (Continued) During cooking, Remaining time will countdown (“:” isflashing), you can press "Cook Temp" to see the current cookingtemperature, the display will go back to the original cook timecountdown after 3 seconds.Adjusting Time:Default cooking time is 15 minutes.1. Press "Cook Time", “00:15” and “TIME” will flash on display.2. Adjust the cooking time by pressing the " " and "-".Sear Function:Default cooking time is 8 minutes and default cookingtemperature is 400 F.1. Press “Sear”.2. “00:08” and “TIME” will appear on the display.3. Press "Start".4. Proceed with setting the cooking temperature and cookingtime.Note: Sear will always be the first cooking function executed by theNuWave Brio Digital Air Fryer. You cannot adjust the time or temperature of the SearFunction.“Preheat” Function:The “Preheat” function ensures that the NuWave Brio HealthyDigital 10Q. Air Fryer reaches the desired temperature beforeyou begin cooking your food. Press the “Preheat” button. Thecontrol panel will display “0” and “Pre-Heat”.Manually adjust the cooking temperature and time, then press“Start/Pause”. Once you press “Start”, the desired temperaturewill be flashing and "Pre-Heat" will be displayed.Once the NuWave Brio Healthy Digital 10Qt. Air Fryer reachesthe set temperature, the control panel will display “Ready” and theNuWave Brio Healthy Digital 10Qt. Air Fryer will beep once. TheNuWave Brio Healthy Digital 10Qt. Air Fryer will start a countdownof 5 minutes and the number “5” will start flashing. It will remain atthis temperature for up to 5 minutes, or until you open and closethe lid, whichever comes first.Once the food has been added to the Fry Pan Basket, close thelid. This will start the countdown on the set cooking time.Owner's Manual13
CONTROL PANEL OPERATION (Continued)Note: If you open the lid at any point during the preheating stage,the NuWave Brio Healthy Digital 10Qt. Air Fryer will automaticallypause, start a countdown of 5 minutes until you close the lid. If you cook another batch of food shortly after cooking in theNuWave Brio Healthy Digital 10Qt. Air Fryer, you do not need touse the “Preheat” Function as the NuWave Brio Healthy Digital10Qt. Air Fryer will already be hot. If you wish to cook your foodlonger, continue cooking in 2-3 minute increments until desiredconsistency has been reached.Warm Function:Default cooking time is 2 hours and default cooking temperatureis 155ºF.1. Press “Warm”.2. “155F” and “WARM” will appear on the display.3. To change the time, press “Cook Time” and “2:00” will appearon the display. Press “ “ and “-” to increase or decrease the time.4. Proceed with setting the cooking temperature and cookingtimes.Note: You can set the NuWave Brio Digital Air Fryer to Warm from 1minute up to 24 hours. Warm will always be the last cooking function executed by theNuWave Brio Digital Air Fryer.Delay Function:1. Press “Delay”.2. “00:00” and “TIME” will appear on the display.3. Press “ “ and “-” to increase or decrease the time.4. Proceed with setting the cooking temperature and cookingtime.Note: You can set the NuWave Brio Digital Air Fryer to Delay from 1minute up to 4 hours. Delay will always be the first function executed by theNuWave Brio Digital Air Fryer.Program Function:The Program button represents Memory Entry and MemoryRecall.1. Enter cooking recipe first - Press "Program" - " " and "-"to choose number to save - press "Program".Press "Stage", then using the " " and "-", achieve yourappropriate temperatures, times and additional stages14 Owner's Manual
CONTROL PANEL OPERATION (Continued)if necessary for your recipes. Once complete, press"Program". "Program" will be flashing on the display, thenusing the " " and "-", confirm the program number you wishto save to. Press "Program" again to store it, then press"Start" or press "Pause/Clear" so you can Recall at a latertime. Up to 10 cooking functions may be stored with eachmemory entry (cooking time, temperature).2. Press "Program"- " " & "-" to choose number to save - press "Program" - Enter cooking recipe - Start.Press "Program" (Program is flashing) and use " " and"-" to choose the number to save your program to. Press"Program" again to confirm the number to save to. Press"Stage", then use " " and "-" to achieve your appropriatetemperatures, times and additional stages if necessary foryour recipes. Then press "Start" or press "Pause/Clear" soyou can Recall at a later time.3. When the cooking process is done, you can also save them.When the cooking process is done, Press "Program"(Program is flashing) and use " " and "-" to choose thenumber to save your program. Press "Program" again toconfirm the number to save to. Now you can recall the samerecipe you just cooked.NOTE: You may store up to 100 different entries (1-100)Memory Recall —Press "Program". “000” will display. Then, use" " and "-" to select the appropriate numeral buttons to start thedesired program.Stage Function:1. Press "Stage" then “1 STAGE” and “0” will be on display.You can enter desired cooking temp/time by pressing "CookTemp" or "Cook Time".2. Press "Stage" again, then you can set desired cooking for thesecond stage. “2 STAGE” will be on display.3. You can enter up-to 10 stages (Stage 10 will show as “0”)4. Press "Start" when you are done entering all the stages.Owner's Manual15
Rotisserie Function:1. Press "Rotisserie", "325F" and "temp" will be displayed andLED dot above rotisserie will be flashing. Time is defaultedto 1 hour. To change the temperature press "Cook Temp"to adjust. To get out of rotisserie, press rotisserie againuntil LED dot above rotisserie is no longer flashing, or press"Pause/Clear".2. Once Start is pressed and cook time has started, the dotabove rotisserie will be solid indicating that the rotisserie isrotating.3. To change time, after you press rotisserie, press cook time,1:00 and time will be displayed and use the " " and "-" toachieve your desired time.To use Rotisserie with stages:1. Press "Stage", during that stage you can press rotisserie. 325 F andtemp will be displayed and dot above rotisserie will be flashing. Timeis defaulted to 1 hour. To change the temperature, press cook temp toadjust. To get out of rotisserie, press "Rotisserie" again until dot aboverotisserie is no longer flashing.2. To change time, after you press "Rotisserie", press cook time, 1:00 andtime will be displayed and use the up and down arrow to achieve yourdesired time.3. Dot will be flashing until you press start or press stage to move onto thenext stage.4. Once Start is pressed and cook time has started, the dot above rotisseriewill be solid during the stage you chose indicating that the rotisserie isrotating during that stage.Example set Rotisserie with Stages:Rotisserie for 1 hour for 350 F at Stage 21. Press "Stage", then set the cook time and temperature for 10 minutes at400ºF.2. Press "Stage", then Press "Rotisserie", press "Cook Time", use arrow tillyou see 1 hour, press "Start". Dot above rotisserie is solid when you get tostage 2.16 Owner's Manual
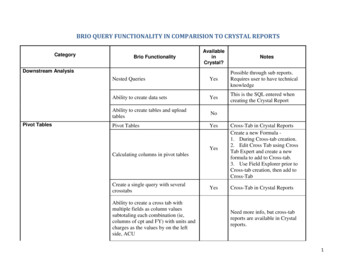
ROTISSERIE ASSEMBLYTo assemble the chicken with Rotisserie kit, please follow the illustrationbelow:11. Screw one Rotisserie Fork onto one endof the Skewer as shown in Step 1.2. Push the Skewer through the center ofthe chicken or meat you wish to cook(see Step 2) until the Rotisserie Forkpierces the food.3. Place the second Rotisserie Fork ontothe other end of the Skewer and pushit along the rod until it pierces the otherend of the chicken and then tighten thescrew in place as shown in Step 3.24. Place the assembled Rotisserie Forkinto the Base Tray making sure thatthe longer squared section at the endof the Skewer engages with the Shaftassembly hole on the main body ofthe Cooker. Place the shorter squaredsection on the Shaft Bracket (see Steps4 and 5).3CAUTION: Always check that there issufficient space above and below for food torotate freely without causing an obstruction.4Owner's Manual17
CARE & MAINTENANCERemove the Base Tray beforecleaning:To remove the Fry Pan Basket fromthe Base Tray.1. Lift the top cover and makesure you hear "click" soundto make sure secure the TopCover stay on the position.2. Lift the Fry Pan Basket out ofthe Base Tray. Unplug the appliance and makesure it cools completely.Cleaning:Clean the appliance after every use or in between a large amount of batches.The Fry Pan Basket and the Base Tray have a non-stick coating with a stainlesssteel Basket Net. Do not use metal utensils or harsh abrasives when cleaning asthis can damage the coating.Note: Remove the Base Tray and Fry Pan Basket, place on a heat resistantsurface to help cool the appliance quicker.1. Once cooled completely, clean the Fry Pan Basket and Base Tray witha soft cleaning brush to remove any lingering food.2. Use a damp cloth to wipe the outside of the appliance.3. Clean the Fry Pan Basket, and inside components with a nonabrasivesponge, hot water and mild detergent or place in the dishwasher.Note: If using the dishwasher for the Base Tray, and Fry PanBasket it is recommended to use top rack only.Tip: If there is residual food in the Base Tray, and Fry Pan Basket,add some hot water and let it soak separately for about 10 minutes foreasier cleaning. Storage: Unplug the appliance and let it cool down completely. Make sure that all the parts are cleaned and dry.Once cooled completely, clean the Fry Pan Basket and Base Traywith a soft cleaning brush to remove any lingering food.IMPORTANT - Do not immerse unit in water or attempt to cycle throughdishwasher. The outer surface may be cleaned by wiping carefully with adamp dishcloth or sponge. Make sure unit has cooled completely priorto cleaning.18 Owner's Manual
TROUBLESHOOTING GUIDEPROBLEMThe NuWave BrioHealthy Digital 10Qt. Air Fryer doesnot work.POSSIBLE CAUSE(S)The appliance is notplugged in. Did notpress On/OFF button.Fry Pan Basket is notin the NuWave BrioHealthy Digital 10Q.Air Fryer.RESOLUTION(S)Insert the plug into anappropriate grounded powersocket. Press ON/OFF buttonafter settings are selected.Place the Fry Pan Basket inthe NuWave Brio HealthyDigital 10Q Air Fryer.The ingredientsfried in the Fry PanBasket are notcompletely cooked.Too many ingredientswere used. The cookingtemperature is too low.The cooking time is tooshort.Remove some ingredientsfrom the Fry Pan Basket.Smaller batches are friedmore evenly. Fry at ahigher temperature. Set theNuWave Brio Healthy Digital10Q Air Fryer to fry for alonger time.The food is friedunevenly.Certain types ofingredients need to beshaken halfway throughthe preparation time.Ingredients that are onthe top need to be shakenhalfway through thepreparation time.Fried snacks arenot crispy whenthey come out of theNuWave Brio HealthyDigital 10Q Air Fryer.You used a type ofsnack meant to beprepared in a traditionaldeep fryer.Use snacks designed to bebaked in a traditional oven,or lightly brush some oliveoil onto the snacks for acrispier result.I cannot slide the Fry The Fry Pan Basket isPan Basket into the overfilled. The Fry Panappliance properly.Basket is not placed inthe Base Tray correctly.Do not fill the Fry PanBasket more than 4/5. Pushthe Fry Pan Basket downinto the Base Tray until youhear a click.White smoke iscoming out of theproduct.When you are preparinggreasy ingredients in theNuWave Brio Healthy Digital10Q Air Fryer, large amountsof oil can smoke and infiltrateinto the pan. The oil willproduce white smoke andthe frying pan might becomehotter than usual. This will notaffect the final cooking effect.White smoke is caused bygreasy heating up in the pan.Make sure you clean the fryingpan properly after each use.You are frying greasyfoods. The pan containsgreasy residue fromprevious uses.Owner's Manual19
TROUBLESHOOTING GUIDEPROBLEMFrench fries arefried unevenly inthe NuWave BrioHealthy Digital 10QAir Fryer.POSSIBLE CAUSE(S)You did not soak thepotato sticks properlybefore you fried them.You did not use theright potato type.RESOLUTION(S)Soak potato sticks in a bowlof water for at lea st 30minutes, take them out anddry them with paper towel.Use fresh potatoes andmake sure they stay firmduring frying.French fries are notcrispy when theycome out of theNuWave Brio HealthyDigital 10Q Air Fryer.The crispiness of thefries depends on theamount of oil and waterin the fries.Make sure you dry the potatosticks properly before you addthe oil. Cut the potato stickssmaller for a crispier result.Add slightly more oil for acrispier result.If the unit needs to be replaced or returned to the manufacturer,please contact our Customer Service Department at: 1-877-689-2838help@nuwavenow.comContact costumer service if any of these errors occurCodeErrorE2Sensor openended20 Owner's ManualE1Sensor shortcircuitE3Over heat
WARRANTYThe NuWave Brio Healthy Digital 10Q Air FryerTHE MANUFACTURER WARRANTSThe NuWave Brio Healthy Digital 10Qt. Air Fryer, including the Base Tray, and Fry PanBasket, are to be free from manufacturer defects.All electrical components are warranted for 1 year from the date of purchase, undernormal household use, and when operated in accordance with the Manufacturer’swritten instructions. The Manufacturer will provide the necessary parts and labor to repairany part of the NuWave Brio Healthy Digital 10Qt. Air Fryer at NuWave, LLC ServiceDepartment. After the expiration of the warranty, the cost of the labor and parts will be theresponsibility of the owner.THE WARRANTY DOES NOT COVERThe Limited Warranty is voided if repairs are made by an unauthorized dealer or theserial number data plate is removed or defaced. Normal deterioration of finish due touse or exposure is not covered by this Warranty. This Limited Warranty does not coverfailure, damages or inadequate performance due to accident, acts of God (such aslightning), fluctuations in electric power, alterations, abuse, misuse, misapplications,corrosive type atmospheres, improper installation, failure to operate in accordance withthe Manufacturer’s written instructions, abnormal use or commercial use. NuWave, LLCreserves the right to void the Limited Warranty, where allowable by law, for productspurchased from an unauthorized dealer.TO OBTAIN SERVICEThe owner shall have the obligation and responsibility to: Pay for all services and partsnot covered by the warranty; Prepay the freight to and from Service Department forany part or system returned under this warranty; Carefully package the product usingadequate padding material to prevent damage in transit. The original container is idealfor this purpose. Include in the package the owner’s name, address, day time telephonenumber, a detailed description of the problem, and your “RGA number.” (Call 1-877689-2838) or e-mail help@nuwavenow.com to obtain the RGA number (Return GoodsAuthorization number). Provide the cooking system model & serial number and proof ofdate of purchase (a copy of the receipt) when making claims under this warranty.MANUFACTURER’S OBLIGATIONThe Manufacturer’s obligation under this Limited Warranty is limited, to the extentallowable by law, to repairing or replacing any part covered by this Limited Warrantywhich upon examination is found to be defective under normal use. The LimitedWarranty is applicable only within the continental United States and only to the originalpurchaser of the manufacturer’s authorized channels of distribution. THE LIMITEDWARRANTY MAY NOT BE ALTERED, VARIED OR EXTENDED EXCEPT BY AWRITTEN INSTRUMENT EXECUTED BY THE MANUFACTURER. THE REMEDY OFREPAIR OR REPLACEMENT AS PROVIDED UNDER THIS LIMITED WARRANTYIS EXCLUSIVE. IN NO EVENT SHALL THE MANUFACTURER BE LIABLE FOR ANYCONSEQUENTIAL OR INCIDENTAL DAMAGES TO ANY PERSON, WHETHER ORNOT OCCASIONED BY NEGLIGENCE OF THE MANUFACTURER, INCLUDINGWITHOUT LIMITATION, DAMAGES FOR LOSS OF USE, COSTS OF SUBSTITUTION,PROPERTY DAMAGE, OR OTHER MONEY LOSS.Some states do not allow the exclusion or limitation of incidental or consequentialdamages, so the above limitation exclusions may not apply. This Limited Warranty givesspecific legal rights, and there may also be other rights which vary from state to state.EXCEPT AS OTHERWISE EXPRESSLY PROVIDED ABOVE, THE MANUFACTURERMAKES NO WARRANTIES EXPRESSED OR IMPLIED ARISING BY LAW OROTHERWISE, INCLUDING WITHOUT LIMITATION, THE IMPLIED WARRANTIES OFMERCHANTABILITY AND FITNESS FOR A PARTICULAR PURPOSE TO ANY OTHERPERSON. READ YOUR OWNER’S MANUAL. IF YOU STILL HAVE ANY QUESTIONSABOUT OPERATION OR WARRANTY OF THE PRODUCT, PLEASE CONTACTNUWAVE, LLC.READ YOUR OWNER’S MANUAL: If you still have any questions about operation orwarranty of the product, please contact NuWave, LLC at:1-877-689-2838 or e-mail help@nuwavenow.com.Owner's Manual21
22 RecipesRECIPES
Prime Rib(Serves 4)Time and Temp:Prep Time: 10 minutesCook Time: 23-25 minutesTemp: 350 FIngredients:3-4 pound rib roast2 tablespoons extra-virgin olive oilSea salt and fresh cracked blackpepper to tasteDirections:1.2.3.4.Press “Pre-heat”, set temperature at 350F and set cooking time for 23-25 minutes apound. Press Start.Season rib roast with oil, salt and pepper.Once ready, place roast directly in Brio basket and coo
NuWave Digital Brio 10Q Digital Air Fryer. 4. Do not put any other cooking pans in the Fry Pan Basket. Do not replace any parts with other containers. 5. If a lot of smoke is escaping from the air vent during operation, unplug the unit immediately and contact customer service.* 6. Do not move the unit while in operation. Only after the NuWave .