Transcription
OWNER’S MANUAL& COMPLETERECIPE BOOKDigital Air Fryer6Qwith Temperature Probenuwavenow.com
ERTSIREG!WNOAs a special thank-you for registering your NuWave unit,you’ll automatically receive an additional 6 months added to your limited manufacturer’s warranty!*All you have to do is follow these simple steps.1234Using your smartphone orsmart device, scan the QR codelocated on the unit label on theback of the unit.You will be directed to NuWave’sproduct registration page withyour unit’s unique serial numberautomatically entered in theappropriate field.NOTE: If you do not have aweb-enabled smart device,simply visit nuwavenow.com/QRand manually enter in your unit’sserial number.Fill out the remaining informationand complete the optional survey.Once you submit yourinformation, you will receivea confirmation email containingyour extended warranty details.*Register your product within 1 year of date of purchase for a free6-month extension of your limited warranty.22
6monthswarranty!for an additionalDOWNLOAD THE QR CODEAPP TO YOUR MOBILE DEVICE123Open your mobile app store(App Store, Google Play).Search for "QR code readers."QR code readersSimply download the QR code reader to your phone,open it, scan the code and you are ready to go.NOTE: You may need to open your downloaded QRcode reader each time you want to scan a QR code.nuwavenow.com33
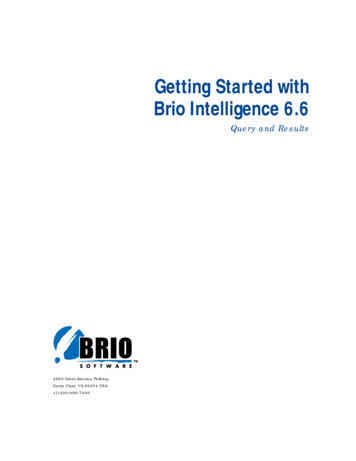
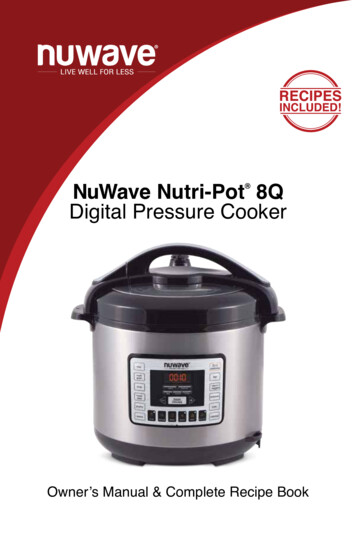
OUR PRODUCTSPrimo Combo Grill OvenModel #: 20701Brio 3Q Air FryerModel #: 36011Brio 4.5Q Air FryerModel #: 36102Brio 6Q Air FryerModel #: 37005 Brio 14Q Brio 10Q Air FryerModel #: 37101The Ultimate Air Fryer OvenModel #: 38001Bravo XL Smart OvenModel #: 20801Bravo Toaster OvenModel #: 20831 4our products
Nutri-PotDuet Pressure Cooker& Air Fryer ComboModel #: 33801Nutri-Pot6Q Digital Pressure CookerModel #: 33101 8Q Digital Pressure CookerModel #: 33201Mosaic Olio Rice & Multi-CookerModel #: 33701 Precision Induction WokModel #: 30801Jubilee Smokeless GrillModel #: 35001Medley Digital SkilletModel #: 31825PIC Gold (Induction Cooktop)Model #: 30242 nuwavenow.com5
OUR PRODUCTSPIC Flex (Induction Cooktop)Model #: 30532PIC Pro Chef (Induction Cooktop)Model #: 30701PIC Double (Induction Cooktop)Model #: 30602BruHub 3-in-1 Coffee MakerModel #: 45011Moxie VacuumHigh-PerformanceBlenderModel #: 28101Moxie ProHigh-PerformanceBlenderModel #: 2820212-Piece10-PieceDuralon Non-Stick CookwareModel #: 31424Duralon Non-Stick CookwareModel #: 31422 6our products
7-Piece10.5-inchDuralon Non-Stick CookwareModel #: 31420Duralon Non-Stick EverydayModel #: 3143411-inch9.5-inch Duralon Non-Stick Fry PanModel #: 32708Duralon Non-Stick Fry PanModel #: 327078-inch3-Quart Duralon Non-Stick Fry PanModel #: 32706 Duralon Non-Stick Grill PanModel #: 31438 OxyPure Air PurifierModel #: 47001 nuwavenow.com7
TABLE OF CONTENTSOWNER’S MANUALImportant Safeguards.10-13Parts & Accessories.14-15Assembly Guide.16-17Instructions.18-32RecipesAir-Fried Spinach Ravioli with Pesto Sauce.34Air-Fried Shrimp with Cocktail Sauce.35Bacon-Wrapped Scallops.36BBQ Chicharrons.37BBQ Wings with Pink Peppercorns.38Blue Bacon-Stuffed Mushrooms.39Cajun Roasted Potatoes.40Cajun Salmon with Mustard Greens.41Char Siu.42Chicago-Style Hot Dogs.43Chicken Cordon Bleu.44Chicken Fajita Egg Rolls.45Chicken Parmesan with Marinara.46Chili-Coffee-Rubbed NY Strip Steak.47Crab Rangoon.48Crispy Beef.49Crispy Pork Chops with Roasted Broccoli Crowns.50Croque Monsieur.51Devils on Horseback.52Filet Mignon.53Fish and Chips with Homemade Tartar Sauce.548table of contents
ENGLISHFive-Spice Duck Breast.55Fried Pickles.56Homemade Chicken Tenders with Honey Mustard.57Honey-Butter Pork Tenderloin.58Italian Sausage with Rigatoni Pasta.59Jumbo Lump Crab Cakes.60Korean Wings.61Mongolian Beef.62Mozzarella Sticks.63Polish Kielbasa with Peppers and Onions.64Reuben Sandwich.65Scotch Eggs.66Sesame Beef.67Southern Fried Chicken Thighs.68Spiced Avocado Fries with Creole Sauce.69Spicy Rumaki.70Stuffed Peppers.71Sweet and Sour Chicken.72Yakitori.73Cleaning & Maintenance.74Troubleshoot Guide.75-77Limited Warranty.78-79Spanish.80-113100 Presets & Notes.114-123nuwavenow.com9
IMPORTANT SAFEGUARDSHOUSEHOLD USE ONLY READ ALL INSTRUCTIONS BEFORE USEWARNING: When using the Brio, basic safetyprecautions should always be followed:1. Do not touch hot surfaces. Use handles or knobs.2. To protect against electrical shock, do not immerse cord,plugs, or the Brio in water or other liquids.3. Do not operate the Brio with a damaged cord or plug orafter the appliance malfunctions or has been damaged inany manner. Return appliance to the nearest authorizedservice facility for examination, repair, or adjustment.4. Close supervision is necessary when any applianceis used near children. This appliance is not intendedfor use by persons (including children) with reducedphysical, sensory or mental capabilities, or lack ofexperience and knowledge, unless they have beengiven supervision or instruction concerning use of theappliance by a person responsible for their safety.5. The use of other accessories that are not intended to beused with the Brio is not recommended. Doing so maydamage the Brio and can cause accidents.6. NOT INTENDED FOR OUTDOOR USE. FOR HOUSEHOLD USE ONLY.7. Do not let cord hang over edge of table or counter ortouch hot surfaces.8. Do not place the Brio on or near a hot gas, electricburner, or in a heated oven.9. Extreme caution must be used when moving the Briocontaining hot oil or other hot liquids.10. To disconnect, turn the Brio “OFF”, then remove plugfrom the wall outlet.11. During air-frying, hot steam is released from the airoutlet vent. Keep hands and face at a distance fromthe steam and from the air outlet vent. Also, be carefulof hot steam and air when removing Trays, Racks, orRotisserie Cage and Skewer.12. Never put the Brio against the wall or other appliances.There should be at least 3 inches of free space for theback side, left/right sides, and the upper side of the Brio.13. Do not place anything on top of the Brio.10important safeguards
ENGLISH14. Unplug the Brio from outlet when not in use and beforecleaning. Allow the Brio to cool before cleaning, puttingon or taking off parts.15. Keep manual handy for future reference.ADDITIONAL SAFEGUARDSSEE INSTRUCTIONS BEFORE USEElectrical InformationA short power-supply cord (or detachable powersupply cord) is provided to reduce the risk resultingfrom becoming entangled in or tripping over alonger cord. Longer detachable power-supply cordsor extension cords are available and may be used ifcare is exercised in their use. If a longer detachablepower-supply cord or extension cord is used:1. The marked electrical rating of the extension cordshould be at least as great as the electrical rating ofthe appliance.2.The longer cord should be arranged so that it willnot drape over the countertop or tabletop where itcould be pulled on or tripped over unintentionally.The Brio should be operated on a separateelectrical outlet from other operating appliances dueto wattage limitations. The appliance has a polarizedplug (one blade is wider than the other). To reducethe risk of electric shock, this plug is intended to fitinto a polarized outlet only one way. If the plug doesnot fit fully into the outlet, reverse the plug. If it stilldoes not fit, contact a qualified electrician. Do notattempt to modify the plug in any way.3.If the appliance is of the grounded type, the cord set orextension cord should be a grounding-type 3-wire cord.nuwavenow.com11
IMPORTANT SAFEGUARDSHOUSEHOLD USE ONLY READ ALL INSTRUCTIONS BEFORE USESAVE THESE INSTRUCTIONSRead and understand the entire manual before usingthe Brio.DO NOT USE THE UNIT FOR OTHER THANINTENDED USE.Note: Put the Brio on a surface that is horizontal, even, andstable. This appliance is intended for normal household use.It is not intended to be used in environments such as kitchenstaffs of shops, offices, farms, or other work environments.Nor is it intended to be used by clients in hotels, motels, bedand breakfasts, and non-residential environments.NOTICE: THE FAILURE TO FOLLOW ANY OF THEIMPORTANT SAFEGUARDS, ADDITIONAL SAFEGUARDS,OR THE INSTRUCTIONS FOR SAFE USE IS A MISUSEOF YOUR BRIO THAT CAN VOID YOUR WARRANTY ANDCREATE THE RISK OF SERIOUS INJURY.WARNINGIn case of other problems,immediately unplug and contactCustomer Service Department.1-877-689-2838 help@nuwavenow.com1. Do not place the Brio close to flammable materials,heating units, or wet environments.2. Height of ingredients placed in the Fry Pan Basket shouldcomply with the directions listed under “Instructions.”3. Do not put any other cooking pans in the Fry PanBasket. Do not replace any parts with other containers.4. It is normal for some smoke to escape the Brio whenheating for the first time.5. If a lot of smoke is escaping from the air vent duringoperation, unplug the Brio immediately and contactCustomer Service.*6. Extreme caution must be exercised when operating theBrio or any other appliance.12important safeguards
ENGLISH7. Do not move the Brio while in operation. Only after theBrio has completely cooled should moving be attempted.Always wait for the Air Fryer to cool down prior tohandling it.8. Children should be supervised to ensure that they do notplay with the appliance.9. Never use a towel or other material or object to block theair vents.10. If any trouble arises during operation, any serviceMUST be done by NuWave LLC or authorized by themanufacturer for repairs.11. The Brio is not intended to be operated by means of anexternal timer or separate remote-control system.12. Do not disassemble the Brio or replace any parts withoutprior written consent from the manufacturer.13. Do not use metal utensils with the coated Fry Pan Basketor Fry Pan Basket Net as this can damage the surface.14. Make sure the Brio is always clean prior to cooking.*Customer Service Department:1-877-689-2838 help@nuwavenow.comCAUTION Always put the ingredients to be fried in the FryPan Basket to prevent direct contact with theheating components. Do not cover the air inlet and outlet openingswhile the appliance is operating. Do not pour oil into the Base Tray or Fry PanBasket, as this may create a fire hazard. Never touch the insides of the appliance whileit is operating.nuwavenow.com13
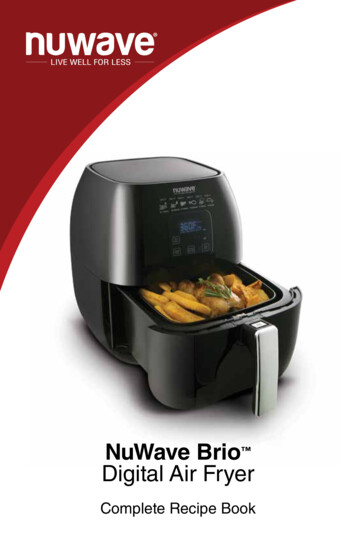
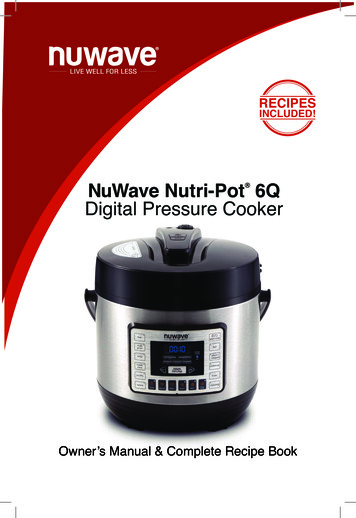
PARTS & ACCESSORIES11. Bacon (4 oz)2. Bake (8 oz) Use Baking Pan3. Baked Eggs (2 oz)4. Baked Potato (32 oz)5. Chicken Breast (8 oz)6. Chicken Thighs (8 oz)7. Dehydrate (8 oz)8. Dessert (8 oz)9. Fish (6 oz)10. Fries, Fresh (16 oz) Shake Halfway11.12.13.14.15.16.17.18.19.20.Fries, Frozen (16 oz) Shake HalfwayFrozen Food (16 oz)Pork (16 oz)Reheat (8 oz)Roast (32 oz)Shrimp (8 oz)Steak (8 oz)Sweet Potato (32 oz)Toast / Bagel (4 slices / 4 oz)Vegetables (8 oz)sear 1 2 temp time prog open900warm15001800pre ready probe delay TARTPAUSEall text and lines - pantone metallic 877CLED Display - BLUE234adatenamedoc#01-18-196Q Control Panel204bSilicone Tabs514parts & accessories6
ENGLISH1Air Fryer Power BasePart #: 372102Fry Pan BasketPart #: 372023Fry Pan Basket NetPart #: 372044aFry Pan DividerPart #: 372054b4 Silicone TabsPart #: 372075Base TrayPart #: 372016ProbePart #: 36261nuwavenow.com15
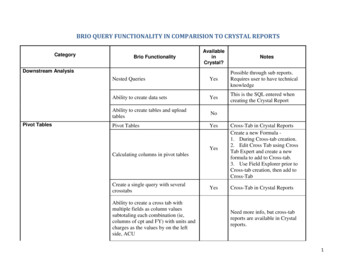
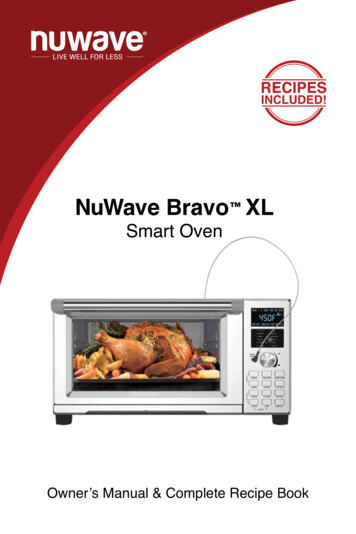
ASSEMBLY GUIDEAssembling the BrioCAUTION: DO NOT use the Brio without the Base Trayand Fry Pan Basket with Net. DO NOT touch the insides ofthe Base Tray, Fry Pan Basket, and Net immediately aftercooking. Parts will be hot. ONLY hold the Base Tray and FryPan Basket by the handle.Removing Base Tray with Fry Pan Basket1. Using the handle, pull and slide out the Base Tray andFry Pan Basket with Net. (See Fig. 1.)2.To remove Fry Pan Basket from Base Tray, while holdingthe handle, push demounting button forward and liftup Fry Pan Basket from Base Tray. (See Fig. 2.) Whencooking, this will reduce extra weight from Base Trayand make it easier to pour or shake smaller foods.21Basket NetFry PanBasketFry PanBasketDemountingButtonBase TrayBase TrayRemoving the Fry Pan Basket Net:1. After removing Fry Pan Basket from Base Tray, turn FryPan Basket upside down.2. Using oven mitts, press the underneath of the Fry PanBasket Net down until it is released from Fry Pan Basket.Net and its tab will be released from Fry Pan Basket.Assembling the Fry PanBasket Net1. Place Tab of Fry PanBasket Net into slot of FryPan Basket. (See Fig. 3.)2. Press other end of Fry PanBasket Net down until Netsnaps into place and is flatinside Fry Pan Basket.16assembly guide3BasketNetTab
XShaking FoodSome foods require shakinghalfway through cooking. Toproperly shake the food, holdthe handle, remove the BaseTray with Fry Pan Basket fromthe appliance, and shake.Once the food has beenadequately shaken, slidethe Base Tray with Fry PanBasket back into the Brio.ENGLISHFor Best ResultsNote: For best results, whencooking, do not fill more than4 full.5DO NOT PUSH THEDEMOUNTINGBUTTON FORWARDWHILE SHAKING.Silicone Tabs12Using the Fry Pan Divider:Fig.1.Make sure all 4 Silicone Tabsare placed on the divider tabs.Fig. 2.Looking down at the Fry PanBasket, slide the Divider downthe center of the Basket.Make sure the Divider isbetween both the groves andscrews of the Basket.To remove Divider, simplyslide the Divider straight up.(Caution: Divider will be hotfrom cooking. Use oven mitts.)Silicone Tabs can beremoved from the Dividerbefore cleaning. (Caution:Silicone Tabs may be hot.)nuwavenow.com17
INSTRUCTIONSFunction ButtonsON/OFF: The ON/OFF button turns the unit on and off andstops all cooking functions.START/PAUSE: When the START/PAUSE button is pressed,the unit begins or pauses cooking. The START/PAUSEbutton is also used to mute and unmute the Brio’s beepingsounds for a quiet operation if desired.[ ] & [ ] Buttons: Use the arrow buttons to adjusttemperatures and times.WATTS: The unit comes with three (3) wattage adjustments(900, 1500 & 1800). Press the WATTS button to change therunning wattage the unit will use. When the unit is turned offand/or unplugged, the unit will run at the wattage previouslyused when plugged in and turned on.DELAY: Use the DELAY button to delay cooking for up to24-hours. Use the [ ] and [ ] buttons to adjust the delay time.To cancel delay at any time, simply press the DELAY button.STAGE: Use the STAGE button set to up to five (5) differentcooking parameters. Cooking temperatures and times canbe adjusted for each stage of cooking using the TEMP &TIME buttons and the [ ] and [ ] buttons.PREHEAT: Use the PREHEAT button to preheat the unitbefore cooking. Use the [ ] and [ ] buttons to adjust thetemperature before or during preheat. To cancel the preheatfunction press the PREHEAT button anytime.SEAR: The SEAR button is used to cook at high temperaturefor a short amount of time. Use the SEAR button to “sear”foods directly before and/or after the regular cooking cycle.Use the [ ] and [ ] buttons to adjust the temperature andtime (up to 5-minutes) before or during the searing cycle.WARM: Use the WARM button to keep your food warm aftercooking or when you simply want to keep something warmfor an extended amount of time. Use the [ ] and [ ] buttonsto adjust the warming temperature and warming time. Pressthe WARM button to cancel the warm cycle.PROGRAM: The unit comes with 100 pre-programedcooking recipes along with an additional 100 memory slots toadd your own unique recipes the way you like them cooked.Use the PROGRAM button to recall and saveprogrammed recipes.18instructions
ENGLISHPROBE: Use the PROBE button to set the DigitalTemperature Probe’s target temperature as-well-as to viewthe foods internal temperature during cooking. Use the [ ]and [ ] buttons to adjust the Digital Temperature Probetarget temperature.Order of Cooking Sequence:1. Delay2. Preheat3. Sear 14. Stage 1 5 / Program / Probe5. Sear 26. WarmFUNCTION USESPlug the power cord into an electrical outlet. Press the ON/OFF button to turn the unit on. The LED display will show360F and TEMP.ON/OFF1. Press the ON/OFF button to turn the unit on and off.Once turned on the LED display will show the defaultcooking temperature (360F) and the word temp.2. The temperature can be adjusted up or down byusing the [ ] and [ ] buttons above and below thetemperature icon.3. The default cooking time is 15-minutes. To adjust thecooking time, press the [ ] and [ ] buttons above andbelow the time icon.4. Press the START/PAUSE button to begin cooking.Note: Before setting any other cooking function, set theregular stage 1 cooking temperature and time. Stagecooking is explained in the STAGE section of theseOperating Instructions.START/PAUSE1. Press the START/PAUSE button to begin cooking. The“:” will flash indicating the unit is now cooking.2. To pause cooking, press the START/PAUSE button orsimply remove the Fry Pan Basket with Base Tray. The“:” will no longer flash indicating the unit is now pausedand the LED display will show open.nuwavenow.com19
INSTRUCTIONS3. To un-pause and go back to cooking, slide the Fry PanBasket with Base Tray back into the Brio or press theSTART/PAUSE button again.4. Once the unit finishes cooking, the LED display will showEnd with three (3) beep sounds.5. The START/PAUSE button is also used to mute andunmute the beep sounds. To mute the beep sounds,press and hold the START/PAUSE button for twoseconds. The Brio will remain mute until it is unmuted byagain pressing and holding the START/PAUSE buttonfor two seconds.DELAY1. Adjust the cooking temperature and time after turning onthe Brio with the ON/OFF button, then press the DELAYbutton to add a delay before cooking.2. When the DELAY button is pressed, the LED display willshow 01:00 (default delay time), delay, and time.3. Use the [ ] and [ ] buttons above and below the timeicon to adjust the delay time up or down. Delay time canbe adjusted up to 24-hours (24:00).4. During the delay cycle, the “:” will flash indicating thedelay time has started counting down.5. The delay time can be increased or decreased usingthe [ ] and [ ] buttons above and below the time iconanytime during the delay cycle.6. To stop the delay cycle at any time, simply press theDELAY button. The unit will end the delay cycle andmove directly into the next cooking function.7. After the delay time has elapsed, the unit willautomatically move into the next cooking function.8. Once the unit finishes cooking, the LED display will showEnd with three (3) beep sounds.TEMP1. To set a different cooking temperature, press the [ ] and[ ] buttons above and below the temperature icon. Thecontrol panel will display 360F and temp. The temperature will adjust in 5-degree incrementsbetween 60 F and 400 F.202. To quickly adjust the temperature, hold down the arrowsuntil desired cooking temperature is reached.instructions
ENGLISHNote: Cooking temperature can be adjusted at any timebefore or during the cooking process. Once the displayis switched to temperature display, it will remain in thetemperature display.TIME1. To set a different cooking time, press the [ ] and [ ]buttons above and below the time icon. The controlpanel will display 00:15 and time. The time will adjust in 1-minute increments.2. To quickly adjust the time, hold down the arrows untildesired cooking time is reached. The maximum selectable cooking time differsdepending on the selected cooking temperature. 60 F - 200 F, maximum cooking time is 99 days, 99hours (99.99). 205 F - 275 F, maximum cooking time is 99 hours, 99minutes (99:99). 280 F - 345 F, maximum cooking time is 10 hours(10:00). 350 F - 400 F, maximum cooking time is 1 hour(01:00).Note: Cooking time can be adjusted at any time before orduring the cooking process.PREHEATThe unit will preheat to the temperature of the nextcooking cycle. For example, if Sear 1 is set to 400F, theunit will preheat to 400F. If Sear 1 is not used, the unitwill preheat to the set cooking temperature.1. Press the ON/OFF button and adjust your cookingtemperature and time for stage 1 cooking.2. Press the PREHEAT button to engage the preheat function. The LED display will show set cooking temperature,pre, and temp. The unit will ALWAYS preheat to the cookingtemperature of the next cooking cycle.3. Press the START/PAUSE button to begin preheating.nuwavenow.com21
INSTRUCTIONS The unit will begin preheating to the set temperature. The LED display will show set cooking/preheattemperature (flashing), pre, and temp. During preheat the cooking temperature can beadjusted by using the [ ] and [ ] buttons above andbelow the temperature icon. The cooking time can be adjusted also by pressing the[ ] and [ ] buttons above and below the time icon.4. When the unit reaches the preheat temperature theunit will move into a five (5) minute hold. The unit willmaintain the preheat temperature during this five (5)minute hold. During the five (5) minute hold the LED display willshow 5 (flashing), ready, and time and will beep one(1) time. If no action is taken with in the five (5) minute hold, theunit will automatically go into standby mode.5. Place your food into the unit, slide the Fry Pan Baskedwith Base Tray back int the Brio. The unit will begincooking at the set temperature and time.6. The preheat cycle can be canceled anytime by pressingthe PREHEAT button. The unit will end the preheat cycleand automatically go into the next cooking cycle.7. When the unit is finished cooking the LED display willshow End and beep three (3) times.STAGEStage cooking is used to cook food at differenttemperatures and times throughout the cookingprocess. Up to five (5) stages of cooking can be setup. Delay, Preheat, Sear 1, Sear 2, and Warm are NOTconsidered stages in the cooking process. Stage1 cooking is the default (360F for 15-minutes). Thetemperature and time can be adjusted.1. Press the ON/OFF button. The LED display will show360F and temp. This is Stage 1. Adjust the cookingtemperature and time using the [ ] and [ ] buttons.2. To add additional stages, press the STAGE button one(1) time. The LED display will show 360F, temp, stage,and 2 (above stage). This is Stage 2 cooking.22instructions
4. To set additional stage cooking settings, repeat steps2 and 3. The number above stage will change as youcontinue to press the STAGE button and set temperatureand time. After Stage 5, if the STAGE button is pressedagain it will go back to Stage 1. The LED display willshow Stage 1 set cooking temperature, temp, stage, and1 (above stage).ENGLISH3. Adjust Stage 2 cooking temperature and time by usingthe [ ] and [ ] buttons.5. If you only want two (2) stages of cooking, leave the timeat 00:00 for stages 3 5 and those stages will be skipped.6. Press the START/PAUSE button to begin cooking. Theunit will cook with the set parameters.7. During cooking, press the STAGE button to see andadjust upcoming cooking stages.8. When the unit is finished cooking the LED display willshow End and beep three (3) times.9. The STAGE button is also used to scroll through thecooking function that have been set for a particularrecipe. Press the STAGE button, either before or duringcooking, to see and edit each function of the cookingcycle as desired. This is explained later in this Manual.Note: The LED display will only indicate the stage cookingnumber when two (2) or more stages are used. The LEDdisplay will not show stage number if only one (1) stageof cooking is used. Stage 1 default: 360F, 00:15 If no time is set for stages 2 5, those stages will beskipped in the cooking cycle. Stage 2 5 default: 360F, 00:00nuwavenow.com23
INSTRUCTIONSSEARSear 1 will ALWAYS be directly before regular stagecooking and Sear 2 will ALWAYS be directly after regularstage cooking.Sear 1Default sear 1 temperature is 400F and default sear 1time is five (5) minutes (00:05).1. Press the ON/OFF button and adjust your cookingtemperature and time for stage cooking.2. Press the SEAR button one (1) time. This will engagethe sear 1 function.3. The LED display will show 400F, sear, 1 (flashing),and temp. Sear 1 searing temperature can be adjusted byusing the [ ] and [ ] buttons above and below thetemperature icon. 400F is the maximum searingtemperature. Sear 1 searing time can be adjusted by using the [ ]and [ ] buttons above and below the time icon up tofive (5) minutes (00:05).4. Press the START/PAUSE button to begin cooking. TheLED display will show sear 1 (flashing), time, and the setsear time (00:05 default) with the “:” flashing.5. Once the Sear 1 cycle is complete the unit willautomatically go into stage (regular) cooking.6. When the unit is finished cooking the LED display willshow End and beep three (3) times.Sear 1 & 2Sear 1 & 2 is used to sear before and after regularstage cooking.1. Press the ON/OFF button and adjust your cookingtemperature and time for stage cooking.2. If you want to set a different temperature and/or time forSear 1, press the SEAR button one time and adjust thesear 1 temperature and time.3. Press the SEAR button again. The LED display will show400F, sear, 1, 2 (flashing), and temp.4. Adjust the Sear 2 temperature and time if desired.24instructions
6. Once the Sear 1 cycle is complete the unit will beepone (1) time and automatically go into regular stagecooking. The LED display will show sear 2 , time, andthe set regular stage cooking time (00:15 default) withthe “:” flashing.ENGLISH5. Press the START/PAUSE button to begin cooking. TheLED display will show sear 1 (flashing), 2, time, and theset sear 1 time with the “:” flashing.7. Once the stage cooking cycle is complete the unit willbeep one (1) time and automatically go into sear 2cooking. The LED display will show sear 2 (flashing), time,and the set sear time (00:05 default) with the “:” flashing.8. When the unit is finished cooking the LED display willshow End and beep three (3) times.Sear 2Default sear 2 temperature is 400F and default sear 2time is five (5) minutes (00:05).1. Press the ON/OFF button and adjust your cookingtemperature and time for stage 1 cooking.2. Press the SEAR button three (3) times. This will engagethe sear 2 function.3. The LED display will show 400F, sear, 2 (flashing),and temp. Sear 2 searing temperature can be adjusted by usingthe [ ] and [ ] buttons above and below the temperatureicon. 400F is the maximum searing temperature. Adjust the sear 2 time by using the [ ] and [ ]buttons above and below the time icon up to five (5)minutes (00:05).4. Press the START/PAUSE button to begin cooking.5. Once the stage cooking cycle is complete the unit willbeep one (1) time and automatically go into sear 2cooking. The LED display will show sear 2 (flashing),time, and the set sear time (00:05 default) with the “:”flashing.6. When the unit is finished cooking the LED display willshow End and beep three (3) times.nuwavenow.com25
INSTRUCTIONSWARM1. Press the WARM button to engage the warm functionand keep your food warm after cooking until you’re readyto serve.2. The LED display will show 145F, temp and warm.3. Use the [ ] and [ ] buttons above and below thetemperature icon to adjust the warm temperature.4. Press the [ ] and [ ] buttons above and below the timeicon to adjust the warm time. The LED display will show01:00 (default), time and warm.5. Use the [ ] and [ ] buttons above and below the timeicon to adjust the warm time.6. Press the START/PAUSE button to start cooking. Theunit will go through the regular stage cooking cycle thenwill go into warm at the temperature set as well as theset time.Using Warm as an Independent Function1. Warm can be used as an independent function. Pre
8. Do not place the Brio on or near a hot gas, electric burner, or in a heated oven. 9. Extreme caution must be used when moving the Brio containing hot oil or other hot liquids. 10. To disconnect, turn the Brio "OFF", then remove plug from the wall outlet. 11. During air-frying, hot steam is released from the air outlet vent.