Transcription
MEENERGY RIC RReceiver-In-The-Canal User Manualwww.miracle-ear.com
ContentWelcome 4Your hearing aids Hearing aid type Getting to know your hearing aids Components and names Controls Hearing programs Features 5566899Daily use Charging Turning on and off Switching to standby mode Inserting and removing your hearing aids Adjusting the volume Changing your hearing programs Further adjustments (optional) 1010111213171718Special listening situations On the phone Audio streaming with iPhone Traveling on an airplane 191920202
Maintenance and care Hearing aids Ear pieces Professional maintenance 21212325Important safety information 26Further information Safety information Accessories Operating, transport, and storage conditions Disposal information Symbols used in this document Troubleshooting Country-specific information Service and warranty 2828282930313233343
WelcomeThank you for choosing Miracle-Ear hearing aids toaccompany you through everyday life. Like anythingnew, it may take you a little time to become familiarwith them.This guide, along with support from your Hearing CareSpecialist, will help you understand the advantages andgreater quality of life your hearing aids offer.To receive the most benefit from your hearing aids, it isrecommended that you wear them every day, all day.This will help you get adjusted to them.CAUTIONIt is important to read this user manual and thesafety manual thoroughly and completely. Followthe safety information to avoid damage or injury.Before using your hearing aids for the first time,fully charge them. Follow the instructions in thecharger’s user manual.4
Your hearing aidsThis user manual describes optional features thatyour hearing aids may have.Ask your Hearing Care Specialist to indicate thefeatures that apply to your hearing aids.Hearing aid typeYour hearing aids are a RIC (Receiver-in-Canal)model. The receiver is placed within the ear canal andconnected to the hearing aid via a receiver cable. Thehearing aids are not intended for children under theage of 3 years or persons with a developmental age ofunder 3 years.A power cell (lithium-ion rechargeable battery) ispermanently built into your hearing aid. This enableseasy charging with our inductive charger.The wireless functionality enables advancedaudiological features and synchronization between yourtwo hearing aids.Your hearing aids feature Bluetooth low energy*technology allowing for easy data exchange with yoursmartphone, and for seamless audio streaming withyour iPhone.***The Bluetooth word mark and logos are owned by the Bluetooth SIG, Inc., and anyuse of such marks by the legal manufacturer of this product is under licenses. Othertrademarks and trade names are those of their respective owners.** iPad, iPhone, and iPod touch are trademarks of Apple Inc., registered in the U.S.and other countries.5
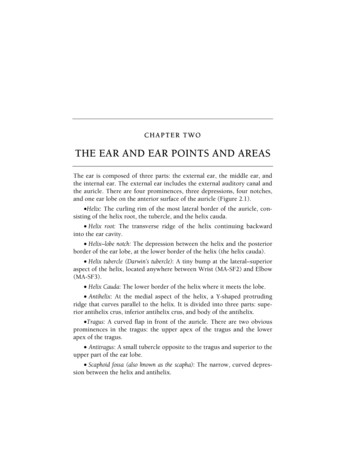
Getting to know your hearing aidsIt is recommended you familiarize yourself with yournew hearing aids. With the hearing aids in your hand,try using the controls and note their location on thehearing aid. This will make it easier for you to feel andpress the controls while wearing the hearing aids.If you have problems pressing the controls of yourhearing aids while wearing them, you can ask yourHearing Care Specialist whether a remote controlor a smartphone app to control your hearing aidsis available.Components and namesEar pieceReceiverReceiver cableMicrophone openingsRocker switch(control, on/off switch)Side indicator(red right ear,blue left ear) andreceiver connection6
You can use the following standard ear pieces:Standard ear piecesSizeClick Sleeve(vented or closed)Click Dome single(open or closed)Click Dome semi‑openClick Dome doubleYou can easily exchange the standard ear pieces. Readmore in section “Maintenance and care”.Custom-made ear piecesCustom shellClick Mold 7
ControlsThe rocker switch allows you to switch hearing programs.Your Hearing Care Specialist has programmed yourdesired functions to the rocker switch.Rocker switch functionLPress briefly:Program upVolume upVolume downTinnitus control signal level upTinnitus control signal level downTV stream on/offPress for about 2 seconds:Program upVolume upVolume downTinnitus control signal level upTinnitus control signal level downTV stream on/offPress for more than 3 seconds:Turn on/offL Left, R Right8 R
You can also use a remote control to changehearing programs and adjust the volume of yourhearing aids. With our smartphone app you haveeven more control options.Hearing programs123456Read more in section “Changing hearing programs.”FeaturesThe Tinnitus control feature generates a sound todistract you from your tinnitus.9
Daily useTo ensure easy use of your hearing aids, they areequipped with a rocker switch. In addition, we offeran app for Android as well as iPhones which makeshandling your devices even easier. Contact yourHearing Care Specialist for help downloading andinstalling the smartphone app.ChargingPlace your hearing aids in the charger.X Follow the instructions inthe charger’s user manual.You can also find useful tipsfor charging in the charger’suser manual.Low power indicationYou will hear an alert signalto indicate the power cell isrunning low. The signal will berepeated every 20 minutes.Depending on the usage of your hearing aids, you haveapproximately 1.5 hours to charge your hearing aidsbefore they stop working.Note that the power cell runtime is reduced if too manyfeatures are used simultaneously.10
Turning on and offYou have the following options to turn your hearing aidson or off.Via charger:X Turning on: Take the hearing aids out of the charger.The startup melody is played in your hearing aids.The default volume and hearing program are set.X Turning off: Place the hearing aids in the charger.Note that the charger must be connected to a powersupply. For details refer to the charger’s user manual.Via rocker switch:X Turning on: Press and hold the lowerpart of the rocker switch until thestartup melody starts to play. Releasethe rocker switch while the melody isplaying.The default volume and hearingprogram are set.X Turning off: Press and hold upperor lower part of the rocker switchfor several seconds. A power downmelody is played.See also the tips for charging in the charger’s usermanual.11
Switching to standby modeVia remote control or smartphone app, you can switchyour hearing aids to standby mode. This mutes thehearing aids. When you leave standby mode, thepreviously used volume and hearing program are set.Note: In standby mode, the hearing aids are not turned offcompletely. They draw some power.Therefore, we recommend using standby mode onlyfor a short period of time. If you want to leave standby mode, but the remotecontrol or app is not available, turn your hearingaids off and on again (via rocker switch or by shortlyplacing them in the charger until one or more orangeLEDs light up). In this case, the default volume andhearing program are set.12
Inserting and removing your hearing aidsYour hearing aids have been fine-tuned for your rightand left ear. Colored markers indicatethe side: red marker right earblue marker left earInserting a hearing aid:X For Click Sleeves, take care that the bend of theClick Sleeve is in line with the bend of the receivercable.Correct:Incorrect:13
X Hold the receiver cable at the bend closer to theear piece.X Carefully push the ear piece inthe ear canal .X Twist it slightly until it sits well.Open and close your mouthto avoid accumulation of air inthe ear canal.X Lift the hearing hearing aidand slide it over the top ofyour ear .CAUTIONRisk of injury!X Insert the ear piece carefully and not toodeeply into the ear. It may be helpful to insert the right hearing aidwith the right hand and the left hearing aidwith the left hand. If you have problems inserting the ear piece,use the other hand to gently pull your earlobedownwards. This opens the ear canal and easesinsertion of the ear piece.14
The optional retention strand helps to securely retainthe ear piece in your ear. To position the retentionstrand:X Bend the retention strand andposition it carefully into thebottom of the bowl of your ear(refer to the picture).15
Removing a hearing aid:X Lift the hearing aid and slideit over the top of your ear .X If your hearing aid isequipped with a custom shellor a Click Mold, remove itby pulling the small removalcord toward the back of yourhead.X For all other ear pieces: Grip the receiver in theear canal with two fingers and pull it carefully out.Do not pull the receiver cable.CAUTIONRisk of injury!X In very rare cases the ear piece could remainin your ear when removing the hearing aid. Ifthis happens, have the ear piece removed by amedical professional.Clean and dry your hearing aids after usage. Read morein section “Maintenance and care”.16
Adjusting the volumeYour hearing aids automatically adjust the volume to thelistening situation.X If you prefer manual volume adjustment, pressthe upper part of the rocker switch to increase thevolume or press the lower part to decrease thevolume.Refer to section “Controls” for the setting of yourrocker switch.An optional signal can indicate the volume change.Once the maximum or minimum volume has beenreached, you may hear an optional signal tone.Changing hearing programsDepending on the listening situation, your hearing aidsautomatically adjust their sound.Your hearing aids may also have several hearingprograms which allow you to change the sound, ifneeded. An optional signal tone can indicate theprogram change.X To change the hearing program, press the rockerswitch briefly.Refer to section “Controls” for the setting of therocker switch. Refer to section “Hearing programs”for a list of your hearing programs.The default volume is applied.17
Further adjustments (optional)You can also use the hearing aid controls to changeother features, for example, the level of the Tinnituscontrol signal.Refer to section “Controls” for the setting of yourcontrols.18
Special listening situationsOn the phoneWhen you are on the phone, holdthe telephone receiver slightlyabove your ear. The hearing aidand telephone receiver should bealigned. Turn the receiver slightlyso that the ear is not completelycovered.Telephone programYou may prefer a certain volume when using thephone. Ask your Hearing Care Specialist to configure atelephone program.X Switch to the telephone program whenever you areon the phone.If a telephone program is configured for your hearingaids, it is listed in section “Hearing programs”.19
Audio streaming with iPhone Your hearing aids are Made for iPhone hearing aids.This means you can get phone calls and listen to musicfrom your iPhone directly into your hearing aids.For more information about compatible iOS devices,pairing, audio streaming and other useful functions,contact your Hearing Care Specialist.Traveling on an airplaneThe charger is allowed in both, carry-on luggage andchecked luggage.You need to turn off the Bluetooth connection onyour hearing aids by using the app. There is no risk oftransmitting from the hearing aids 2.4 GHz transmitteras long as the hearing aids are not connected to themobile phone.20
Maintenance and careTo prevent damage it is important that you take care ofyour hearing aids and follow a few basic rules, whichwill soon become a part of your daily routine.Hearing aidsCleaningYour hearing aids have a protective coating. However,if not cleaned regularly you may damage the hearingaids or cause personal injury.X Clean your hearing aids daily with a soft, dry tissue.X Never use running water or immerse thedevices in water.X Never apply pressure while cleaning.X Ask your Hearing Care Specialist for recommendedcleaning products, special care sets, or moreinformation on how to keep your hearing aids ingood condition.DryingYour charger dries the hearing aids while charging.You can also use conventional products to dry yourhearing aids. Ask your Hearing Care Specialist forrecommended drying products and for individualinstructions on when to dry your hearing aids.21
Storage Short-term storage (up to several days): Turn off yourhearing aids via the rocker switch or place them inthe powered charger.The charger must be connected to a power supply.If the charger is not connected to a power supplyand you place your hearing aids in the charger, thehearing aids are not turned off.Note that when you turn off the hearing aids viaa remote control or smartphone app, the hearingaids are not turned off completely. They are instandby‑mode and still draw some power. Long-term storage (weeks, months, .): First, fullycharge your hearing aids. Turn them off via the rockerswitch before storing them. We recommend usingdrying products while storing your hearing aids.At 6 month intervals you will have to chargethe hearing aids to avoid an unrecoverabledeep‑discharge of the power cell. Deep‑dischargedpower cells cannot be charged and have to bereplaced. We recommend recharging morefrequently than 6 month intervals.Observe the storage conditions in section“Operating, transport and storage conditions”.22
Ear piecesCleaningCerumen (ear wax) may accumulate on the ear pieces.This may affect sound quality. Clean the ear pieces daily.For all types of ear pieces:X Clean theear piece rightafter removalwith a soft anddry tissue.This preventsthat cerumenbecomes dryand hard.For Click Domes or Click Sleeves:X Squeeze the tip of the ear piece.23
ExchangingExchange standard ear pieces approximately everythree months. Replace them sooner if you notice cracksor other changes. The procedure for exchangingstandard ear pieces depends on the type of ear piece.In section “Components and names”, your Hearing CareSpecialist has marked your type of ear piece.Exchanging Click DomesX To remove the old Click Dome, use the removaltool or follow the instructions on the packaging ofthe Click Domes. Be careful not to pull the receivercable.The removal tool is available as an accessory.X Take particular care thatthe new Click Dome clicksnoticeably in place.X Check the firm fit of thenew Click Dome.24
Exchanging Click SleevesX Turn the Click Sleeve insideout.X Grasp the Click Sleeveand the receiver (notthe receiver cable) withyour fingers and pull theClick Sleeve off.X Take particular care thatthe new Click Sleeve clicksnoticeably in place.Professional maintenanceYour Hearing Care Specialist can perform thoroughprofessional cleaning and maintenance.Custom-made ear pieces and wax filters should beexchanged as needed by your Hearing Care Specialist.Ask your Hearing Care Specialist for recommendedmaintenance intervals and support.25
Important safety informationThis section contains important safety informationregarding the power cell. For more safety information,refer to the safety manual supplied with the hearingaids.WARNINGA power cell (lithium-ion rechargeable battery) ispermanently built into your hearing aid. Incorrectuse of the power cell or the hearing aid can causethe power cell to burst.Risk of injury, chemical hazard, fire or explosion!X Observe the operating conditions. Refer tosection “Operating, transport and storageconditions”.X Pay special attention to protect your hearingaids from extreme heat (e.g. fire, microwaveoven, inductive oven or other high‑inductionfields) and sunlight. Do not crush, short-circuit,incinerate or heat power cells or the hearingaid above 100 C (212 F).X Charge your hearing aids only with theapproved charger. Ask your Hearing CareSpecialist for support.X Do not disassemble the power cell.26
WARNINGIncorrect use of the power cell or the hearing aidcan cause the power cell to burst.Risk of injury, chemical hazard, fire or explosion!Replacement and repair have to be performed bya Service Center only. Therefore:X Do not repair or replace the power cellyourself.X Do not use the hearing aids when theirperformance after charging reducesconsiderably.X In the unlikely event of a power cell leaking,bursting or exploding:Z Keep away from all flammable materials.Z If the electrolyte comes into contact withthe skin, eyes or other parts of body, flushimmediately with water. Consult a physicianfor medical advice.In any of the above cases, return your hearing aids toyour Hearing Care Specialist.27
Further informationSafety informationFor more safety information, refer to the safety manualsupplied with the device.AccessoriesYou can use the smartphone app for convenient remotecontrol of your hearing aids. The app also allows youto deactivate signal tones, to create individual soundprofiles and many more functions.You can also use a remote control.Consult your Hearing Care Specialist for furtherinformation.28
Operating, transport, and storage conditionsYour hearing aids operate in the followingenvironmental conditions (also valid in between ature0 to 45 C(32 to 113 F)10 to 30 C(50 to 86 F)Relative humidity 5 to 93 %5 to 93 %Atmosphericpressure700 to 1060 hPa700 to 1060 hPaDuring extended periods of transport and storage,please observe the following )10 to 25 C(50 to 77 F)-20 to 60 C(-4 to 140 F)Temperature(maximum range)0 to 40 C(32 to 104 F)-20 to 60 C(-4 to 140 F)Relative humidity(recommended)20 to 80 %5 to 90 %Relative humidity(maximum range)10 to 80 %5 to 90 %Atmosphericpressure700 to 1060 hPa 700 to 1060 hPa29
Note that you have to charge the hearing aids atleast every 6 months. We recommend to charge thehearing aids every 3 months. For details refer to section“Maintenance and care”.For other parts, such as the charger, other conditionsmay apply.WARNINGRisk of injury, fire or explosion during shipment.X Ship power cells or hearing aids according tolocal regulations.Disposal informationX To avoid environmental pollution, do not throwpower cells or hearing aids into household trash.X Recycle or dispose of power cells or hearing aidsaccording to local regulations.30
Symbols used in this documentPoints out a situation that could lead to serious,moderate, or minor injuries.Indicates possible property damage.Advice and tips on how to handle your devicebetter.“Made for iPhone”, “Made for iPad”,and “Made for iPod” mean that an electronic accessoryhas been designed to connect specifically to iPhone,iPad, or iPod, respectively, and has been certified bythe developer to meet Apple performance standards.Apple is not responsible for the operation of this deviceor its compliance with safety and regulatory standards.Please note that the use of this accessory with iPhone,iPad, or iPod may affect wireless performance.31
TroubleshootingProblem and possible solutionsSound is weak. Increase the volume.Charge the hearing aid.Clean or exchange the ear piece.Hearing aid emits whistling sounds. Reinsert the ear piece until it fits securely.Decrease the volume.Clean or exchange the ear piece.Sound is distorted. Decrease the volume.Charge the hearing aid.Clean or exchange the ear piece.Hearing aid emits signal tones. Charge the hearing aid.Hearing aid does not work. Turn the hearing aid on.Charge the hearing aid. Observe also the statusLEDs on the charger.Consult your Hearing Care Specialist if you encounterfurther problems.32
Country-specific informationUSACertification information for hearing aids with wirelessfunctionality:MEENERGY RIC R XP HVIN: RFM002Contains FCC ID: SGI-RFM00233
Service and warrantySerial numbersHearing AidLeft:Right:Service dates1:4:2:5:3:6:WarrantyDate of purchase:Warranty period in months:Your Hearing Care Specialist34 Receiver unit
35
MEENERGY RIC RReceptor en el canal manualdel operadorwww.miracle-ear.com
ContenidosBienvenido 4Los audífonos Tipo de audífono La importancia de conocer el audífono Componentes y nombres Controles Programas de audición Características 5566899Uso diario Carga Conexión y desconexión Cambio al modo de reposo Inserción y extracción de los audífonos Regulación del volumen Cambio del programa de audición Más ajustes (opcional) 1010111213171718Situaciones de escucha especiales Al teléfono Transmisión de audio con iPhone Viaje en avión 191920202
Mantenimiento y cuidados Audífonos Moldes Mantenimiento profesional 21212325Información importante de seguridad 26Información adicional Información de seguridad Accesorios Condiciones de funcionamiento, transporte yalmacenamiento Información sobre la eliminación Símbolos utilizados en este documento Solución de problemas Información específica por país Servicio y garantía 2828282930313233353
BienvenidoGracias por elegir nuestros audífonos para que leacompañen en su vida cotidiana. Como todas las cosasnuevas, es posible que tarde un poco en familiarizarsecon ellos.Este manual, junto con la asistencia de su especialistaen audición, le ayudará a conocer las ventajas y lacalidad de vida superior que le ofrecen los audífonos.Para obtener el máximo beneficio posible de losaudífonos, se recomienda que los lleve a diario ydurante todo el día. Esto le ayudará a adaptarse a ellos.ATENCIÓNEs importante que lea detenidamente estemanual del operador y el manual de seguridad deprincipio a fin. Siga la información de seguridadpara evitar daños o lesiones.Antes de utilizar los audífonos por primera vez,cárguelos completamente. Siga las instruccionesdel manual del operador del cargador.4
Los audífonosEn este manual del operador se describencaracterísticas opcionales que sus audífonospueden tener o no tener.Solicite al especialista en audición que le indiquequé características son válidas para sus audífonos.Tipo de audífonoSus audífonos son un modelo con auricular en el canal(RIC, por sus siglas en inglés). El auricular se coloca dentrodel canal auditivo y se conecta al instrumento por mediode un cable del auricular. Estos audífonos no se handiseñado para niños menores de 3 años ni para personascuya edad de desarrollo esté por debajo de los 3 años.El audífono está equipado de manera permanente conuna pila (recargable de ion de litio). Esta característicapermite cargarlo fácilmente con el cargador inductivo.La funcionalidad inalámbrica proporciona característicasaudiológicas avanzadas entre los dos audífonos.Los audífonos incorporan la tecnologíaBluetooth low energy,* que permite intercambiar datosde manera sencilla con su smartphone y transmitir audiosin problemas con su iPhone.***La marca del término Bluetooth y sus logotipos son propiedad de Bluetooth SIG, Inc.y el uso de dichas marcas por parte del fabricante autorizado se realiza bajo licencia.Las demás marcas registradas y nombres comerciales pertenecen a sus respectivospropietarios.** iPad, iPhone y iPod touch son marcas registradas de Apple Inc. en EE. UU. y en otrospaíses.5
La importancia de conocer el audífonoSe recomienda familiarizarse con el nuevo audífono.Con el instrumento en la mano, intente utilizar loscontroles y recordar su ubicación en el instrumento.Esto facilita la localización de los controles parapulsarlos al llevar el audífono puesto.Si tiene problemas para pulsar los controles delos audífonos cuando los lleva puestos, puedepreguntar al especialista en audición si haydisponible un telemando o una aplicación parasmartphone que permita controlar los audífonos.Componentes y nombres➌➊➋MoldeAuricularCable del auricularOrificios delmicrófono➍➏➎Conmutador (control,interruptor deencendido/apagado)Indicador lateral(rojo oído derecho,azul oído izquierdo)y conexión del auricular6
Puede utilizar los moldes estándar siguientes:Moldes estándarTamañoClick Sleeve(ventilado o cerrado)Click Dome único(abierto o cerrado)Click Dome semiabiertoClick Dome dobleLos moldes estándar son muy fáciles de sustituir.Obtenga más información en la sección“Mantenimiento y cuidados”.Moldes a medidaCarcasa personalizadaClick Mold 7
ControlesCon el conmutador podrá, por ejemplo, cambiar deprograma de audición. Su especialista en audiciónha programado las funciones deseadas para elconmutador.Función del conmutadorLPulsación corta:Subir programaSubir volumenBajar volumenSubir nivel de señal terapéutica para TinitusBajar nivel de señal terapéutica para TinitusTransmisión de TV activada/desactivadaPulsación durante 2 s aprox.:Subir programaSubir volumenBajar volumenSubir nivel de señal terapéutica para TinitusBajar nivel de señal terapéutica para TinitusTransmisión de TV activada/desactivadaPulsación durante más de 3 s:Encender/ApagarL izquierda, R derecha8 R
También puede utilizar un telemando paracambiar los programas de audición y ajustar elvolumen de los audífonos. Con nuestra aplicaciónpara smartphone, dispone incluso de másopciones de control.Programas de audición123456Obtenga más información en la sección“Cambio del programa de audición”.CaracterísticasLa función terapéutica para acúfenos genera unruido para distraerle de los acúfenos.9
Uso diarioPara garantizar un uso cómodo y fácil de sus audífonos,estos cuentan con un elemento de control integrado.Además, ofrecemos una aplicación para iPhoney Android que facilita aún más el manejo de susdispositivos. Póngase en contacto con su especialistaen audición si desea descargar e instalar la aplicaciónpara smartphones.CargaColoque los audífonos en el cargador.X Siga las instrucciones delmanual del operador delcargador. En el manualdel operador del cargadortambién encontraráconsejos útiles para lacarga.Indicación de nivel bajode bateríaSe oirá una señal de aviso para indicar que la bateríase está agotando. Se repetirá la señal cada 20 minutos.Según el nivel de uso de los audífonos, tieneaproximadamente 1,5 horas para cargar los audífonosantes de que dejen de funcionar.Tenga en cuenta que el tiempo de ejecución de labatería se reduce si se utilizan demasiadas funciones almismo tiempo.10
Conexión y desconexiónDispone de las siguientes opciones para conectar ydesconectar los audífonos.Mediante cargador:X Conexión: Saque los instrumentos del cargador.Se reproduce la melodía de inicio en los audífonos.Se restablecen el volumen y el programa de audiciónpredeterminados.X Desconexión: Coloque los audífonos en el cargador.Tenga en cuenta que el cargador debe estar conectado ala fuente de alimentación. Para obtener más información,consulte el manual del operador del cargador.Con el conmutador:X Conexión: Mantenga pulsada laparte inferior del conmutador hastaque la melodía de inicio comience areproducirse. Suelte el conmutadormientras se reproduce la melodía.Se restablecen el volumeny el programa de audiciónpredeterminados.X Desconexión: Mantenga pulsadala parte superior o inferior delconmutador durante variossegundos. Se reproducirá unamelodía de apagado.Consulte también los consejos sobre la carga en el manualdel operador del cargador.11
Cambio al modo de reposoPuede poner los audífonos en modo de espera(standby) con un control remoto o la aplicación parasmartphone. De este modo se silencian los audífonos.Cuando se sale del modo de espera, se recuperanel volumen y el programa de audición utilizadosanteriormente.Nota: En el modo de espera, los audífonos no estánapagados completamente. Siguen consumiendoalgo de energía.Por este motivo, se recomienda utilizar el modo deespera solo durante períodos breves. Si desea salir del modo de espera, pero notiene a mano el control remoto o la aplicación:Apague y vuelva a encender los audífonos(utilice el conmutador o colóquelos brevementeen el cargador hasta que se enciendan unao más luces LED naranjas). En ese caso, serestablecen el volumen y el programa de audiciónpredeterminados.12
Inserción y extracción de los audífonosLos audífonos se han ajustado para el oído derecho eizquierdo. Las marcas de color indicanel lado: Marca roja Oído derechoMarca azul Oído izquierdoInserción de un audífono:X Para Click Sleeves, asegúrese de que la curva deClick Sleeve esté alineada con la curva del cable delauricular.Correcto:Incorrecto:13
X Sujete el cable del auricular por la curva máspróxima al molde.X Introduzca con cuidado el moldeen el canal auditivo .X Gírelo un poco para que se asiente bien.Abra y cierre la boca para evitarla acumulación de aire en elcanal auditivo. X Levante el audífono y deslícelo por la parte superiorde la oreja.ATENCIÓNPeligro de lesiones.X Inserte el molde cuidadosamente en el oído yno profundice demasiado. Puede resultarle útil insertar el audífonoderecho con la mano derecha y el audífonoizquierdo con la mano izquierda. Si tiene problemas para insertar el molde,utilice la otra mano para tirar suavemente dellóbulo de la oreja hacia abajo. Esto abre elcanal auditivo y facilita la inserción del molde.14
El filamento de sujeción opcional ayuda aretener de forma segura el molde en el oído.Para colocar el filamento de sujeción:X Doble el filamento de sujeción ycolóquelo con cuidado en la parteinferior de la cavidad de la oreja(consulte la imagen).15
Extracción de un audífono:X Levante el audífono ydeslícelo por la partesuperior de la oreja . X Si su audífono está equipadocon molde a medida o unClick Mold, extráigalostirando de la pequeñacuerda de extracción hacia laparte de atrás de la cabeza. X Para todos los demás moldes: Sujete el auriculardel canal auditivo con dos dedos y tire de él concuidado .No tire del cable del auricular.ATENCIÓNPeligro de lesiones.X En casos muy raros, el molde podríapermanecer en el oído al retirar el audífono.En este caso, pida que un profesional médicose lo extraiga.Limpie y seque los audífonos después deutilizarlos. Obtenga más información en la sección“Mantenimiento y cuidados”.16
Regulación del volumenLos audífonos ajustan automáticamente el volumen a lasituación auditiva.X Si prefiere el ajuste manual del volumen, pulse lapa
Removing a hearing aid: X Lift the hearing aid and slide it over the top of your ear . X If your hearing aid is equipped with a custom shell or a Click Mold, remove it by pulling the small removal cord toward the back of your head. X For all other ear pieces: Grip the receiver in the ear canal with two fingers and pull it carefully out .