Transcription
MEMINI RIC 10with GENIUS 3.0 Technology User Manualwww.miracle-ear.com
Content2Welcome 4Your hearing aids Hearing aid type Components and names Controls Hearing programs Features 556899Batteries Battery size and handling tips Replacing batteries 101011Daily use Turning on and off Inserting and removing the hearing aids Adjusting the volume Changing the hearing program 1212131717Special listening situations On the phone 1818Maintenance and care Hearing aids Ear pieces Professional maintenance 19192022
Further information Safety information Accessories Symbols used in this document Troubleshooting Service and warranty 2323232324253
WelcomeThank you for choosing Miracle-Ear hearing aids toaccompany you through everyday life. Like anythingnew, it may take you a little time to become familiar withthem.This guide, along with support from your Hearing CareSpecialist, will help you understand the advantages andgreater quality of life your hearing aids offer.To receive the most benefit from your hearing aids, it isrecommended that you wear them every day, all day.This will help you get adjusted to them.CAUTIONIt is important to read this user guide and thesafety manual thoroughly and completely. Followthe safety information to avoid damage or injury.4
Your hearing aidsThis user guide describes optional features thatyour hearing aids may or may not have.Ask your Hearing Care Specialist to indicate thefeatures that are valid for your hearing aids.Hearing aid typeYour hearing aids are a RIC (Receiver-in-Canal)model. The receiver is placed within the ear canal andconnected to the hearing aid via a receiver cable. Thehearing aids are not intended for children under theage of 3 years or persons with a developmental age ofunder 3 years.5
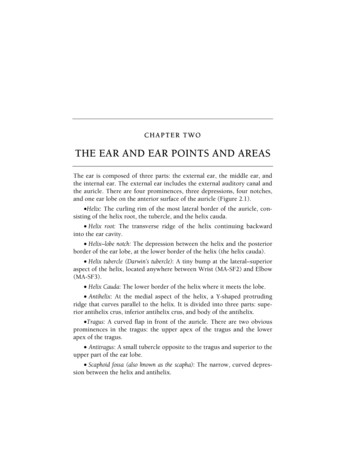
Components and namesMEMINI RIC 10➌➊➋➍➐➎➏➊ Ear piece➋ Receiver➌ Receiver cable➍ Microphone openings➎ Push button (optional)6➏ Battery compartment(on/off switch)➐ Side indicator(red right ear,blue left ear) andreceiver connection
You can use the following standard ear pieces:Standard ear piecesSizeClick Sleeve(vented or closed)Click Dome single(open or closed)Click Dome semi‑openClick Dome doubleYou can easily exchange the standard ear pieces. Readmore in section “Maintenance and care”.Custom-made ear piecesCustom shellClick Mold 7
ControlsWith the controls you can, for example, switch hearingprograms. Your hearing aids either have a push buttonor no control.Your Hearing Care Specialist has programmed yourdesired functions to the push button.ControlLeftRightPush buttonNo controlYou can also ask your Hearing Care Specialistwhether a remote control or a smartphone app tocontrol your hearing aids is available.Push button functionPress briefly:Program changePress long:Standby/turn onL Left, R Right8LR
Hearing programs123456Read more in section “Changing the hearing program”.FeaturesPower-on delay enables whistle-free insertion ofhearing aids.Read more in section “Turning on and off”.The tinnitus control feature generates a sound todistract you from your tinnitus.9
BatteriesWhen the battery is low the sound becomes weakeror you will hear an alert signal. The battery type willdetermine how long you have to replace the battery.Battery size and handling tipsAsk your Hearing Care Specialist for recommendedbatteries.Battery size:1010 Always use the correct battery size for your hearingaids. Remove the batteries if you intend not to use thehearing aids for several days. Always carry spare batteries.Remove empty batteries immediately and follow yourlocal recycling rules for battery disposal.
Replacing batteriesRemoving the battery:X Open the battery compartment.X Use your finger or an optionalmagnet stick to remove the battery.The magnet stick is available as anaccessory from your Hearing CareSpecialist.Inserting the battery:X If the battery has a protective film, remove itonly when you are ready to use the battery.X Insert the battery withthe “ ” symbol facing up(refer to the picture).X Carefully close the battery compartment. If you feelresistance, the battery is not inserted correctly.Do not attempt to close the battery compartment byforce. It can be damaged.11
Daily useTurning on and offYou have the following options to turn your hearing aidson or off.Via battery compartment:X Turning on: Close the battery compartment.The default volume and hearing program are set.X Turning off: Open the battery compartment to thefirst catch.Via push button:X Turning on or off: Press and hold the push button forseveral seconds. Refer to section “Controls” for thesettings of your controls.After turning on, the previously used volume andhearing program remain set.When wearing the hearing aids, an alert tone canindicate when a hearing aid is being turned on or off.When the power-on delay is activated, the hearingaids turn on after a delay of several seconds. Duringthis time you can insert the hearing aids into your earswithout experiencing unpleasant feedback whistling.The “power-on delay” can be activated by your HearingCare Specialist.12
Inserting and removing the hearing aidsYour hearing aids have been fine-tuned for your rightand left ear. Colored markers indicate the side: Red marker right earBlue marker left earInserting a hearing aid:X For Click Sleeves, make sure that the bend of theClick Sleeve is in line with the bend of the receivercable.Correct:Incorrect:13
X Hold the receiver cable at the bend closer to theear piece.X Carefully push the ear piece inthe ear canal ➊.X Twist it slightly until it sits well. Open and close your mouthto avoid accumulation of air inthe ear canal.X Lift the hearing aid and slide itover the top of your ear ➋. CAUTIONRisk of injury!X Insert the ear piece carefully and not toodeeply into the ear.14 It may be helpful to insert the right hearing aidwith the right hand and the left hearing aid withthe left hand. If you have problems inserting the ear piece,use the other hand to gently pull your earlobedownwards. This opens the ear canal and easesinsertion of the ear piece.
The optional retention strand helps to securely retainthe ear piece in your ear. To position the retentionstrand:X Bend the retention strand and positionit carefully into the bottom of the bowlof your ear (refer to the picture).15
Removing the hearing aid:X Lift the hearing aid and slideit over the top of your ear ➊. X If your hearing aid isequipped with a custom shellor a Click Mold, remove itby pulling the small removalcord toward the back of yourhead. X For all other ear pieces: Grip the receiver in theear canal with two fingers and pull it carefully out ➋.Do not pull the receiver cable.CAUTIONRisk of injury!X In very rare cases the ear piece could remainin your ear when removing the hearing aid. Ifthis happens, have the ear piece removed by amedical professional.Clean and dry your hearing aids after usage. Read morein section “Maintenance and care”.16
Adjusting the volumeYour hearing aids automatically adjust the volume to thelistening situation.X If you prefer manual volume adjustment, use aremote control option.An optional signal can indicate the volume change.Changing the hearing programDepending on the listening situation, your hearing aidsautomatically adjust their sound.Your hearing aids may also have several hearingprograms which allow you to change the sound, ifneeded. An optional signal tone can indicate theprogram change.X To change the hearing program, press thepush button briefly.Refer to section “Controls” for the setting of yourcontrols. Refer to section “Hearing programs” for alist of your hearing programs.The default volume is applied.You can also ask your Hearing Care Specialistwhether a remote control or a smartphone app tocontrol your hearing aids is available.17
Special listening situationsOn the phoneWhen you are on the phone, hold thetelephone receiver slightly above yourear. The hearing aid and telephonereceiver have to be aligned. Turn thereceiver slightly so that the earis not completely covered.Telephone programYou may prefer a certain volume when using thephone. Ask your Hearing Care Specialist to configure atelephone program.X Switch to the telephone program whenever you areon the phone.If a telephone program is configured for your hearingaids, it is listed in section “Hearing programs”.18
Maintenance and careTo prevent damage it is important that you take care ofyour hearing aids and follow a few basic rules, whichwill soon become a part of your daily routine.Hearing aidsDrying and storageX Dry your hearing aids overnight.X For longer periods of non-use, store your hearingaids in a dry environment with an open batterycompartment and the batteries removed.X Ask your Hearing Care Specialist for moreinformation.CleaningYour hearing aids have a protective coating. However, ifnot cleaned regularly you may damage the hearing aidsor cause personal injury.X Clean your hearing aids daily with a soft, dry tissue.X Never use running water or immerse thedevices in water.X Never apply pressure while cleaning.19
X Ask your Hearing Care Specialist for recommendedcleaning products, special care sets, or moreinformation on how to keep your hearing aids ingood condition.Ear piecesCleaningCerumen (ear wax) may accumulate on the ear pieces.This may affect sound quality. Clean the ear pieces daily.For all types of ear pieces:X Clean the ear pieceright after removalwith a soft and drytissue.This preventscerumen frombecoming dryand hard.For Click Domes or Click Sleeves:X Squeeze the tip of the ear piece.20
ExchangingExchange standard ear pieces approximately everythree months. Replace them sooner if you notice cracksor other changes. The procedure for exchangingstandard ear pieces depends on the type of ear piece.In section “Components and names,” your Hearing CareSpecialist has marked your type of ear piece.Exchanging Click DomesX To remove the old Click Dome, use the removaltool or follow the instructions on the packaging ofthe Click Domes. Be careful not to pull the receivercable.The removal tool is available as an accessory.X Make sure that thenew Click Dome clicksnoticeably in place.X Check the firm fit of thenew Click Dome.click21
Exchanging Click SleevesX Turn the Click Sleeve insideout.X Grasp the Click Sleeveand the receiver (notthe receiver cable) withyour fingers and pull theClick Sleeve off.X Make sure that thenew Click Sleeve clicksnoticeably in place.clickProfessional maintenanceYour Hearing Care Specialist can perform a thoroughprofessional cleaning and maintenance.Custom-made ear pieces and wax filters should beexchanged as needed by your Hearing Care Specialist.Ask your Hearing Care Specialist for theirrecommendation of maintenance intervals andsupport.22
Further informationSafety informationFor more safety information, refer to the safety manualsupplied with the device.AccessoriesThe type of available accessories depends on thehearing aid type. Examples are: a remote control or asmartphone app for remote control.Consult your Hearing Care Specialist for furtherinformation.Symbols used in this documentPoints out a situation that could lead to serious,moderate, or minor injuries.Indicates possible property damage.Advice and tips on how to handle your devicebetter.23
TroubleshootingProblem and possible solutionsSound is weak. Increase the volume.Replace the empty battery.Clean or exchange the ear piece.Hearing aid emits whistling sounds. Reinsert the ear piece until it fits securely.Decrease the volume.Clean or exchange the ear piece.Sound is distorted. Decrease the volume.Replace the empty battery.Clean or exchange the ear piece.Hearing aid emits signal tones. Replace the empty battery.Hearing aid does not work. Turn the hearing aid on.Gently close the battery compartmentcompletely.Replace the empty battery.Make sure the battery is inserted correctly.Power-on delay is active. Wait several secondsand check again.Consult your Hearing Care Specialist if you encounterfurther problems.24
Service and warrantySerial numbersHearing aidReceiver unitLeft:Right:Service dates1:4:2:5:3:6:WarrantyDate of purchase:Warranty period in months:Your Hearing Care Specialist25
26
MEMINI RIC 10con tecnología GENIUS 3.0 Manual del usuariowww.miracle-ear.com
ContenidosBienvenido 4Los audífonos Tipo de audífono Componentes y nombres Controles Programas de audición Características 556899Pilas 10Tamaño de la pila y consejos para el manejo 10Sustituir las pilas 112Uso diario Conexión y desconexión Inserción y extracción de los audífonos Regulación del volumen Cambio del programa de audición 1212141818Situaciones de escucha especiales Al teléfono 1919Mantenimiento y cuidados Audífonos Moldes Mantenimiento profesional 20202124
Información adicional Información de seguridad Accesorios Símbolos utilizados en este documento Solución de problemas Servicio y garantía 2525252526273
BienvenidoGracias por elegir nuestros audífonos para que leacompañen en su vida cotidiana. Como todas las cosasnuevas, es posible que tarde un poco en familiarizarsecon ellos.Este manual, junto con la asistencia de su especialistaen audición, le ayudará a conocer las ventajas y lacalidad de vida superior que le ofrecen los audífonos.Para obtener el máximo beneficio posible de losaudífonos, se recomienda que los lleve a diario ydurante todo el día. Esto le ayudará a adaptarse a ellos.ATENCIÓNEs importante que lea detenidamente estemanual del operador y el manual de seguridad deprincipio a fin. Siga la información de seguridadpara evitar daños o lesiones.4
Los audífonosEn este manual del operador se describenprestaciones opcionales que sus audífonospueden tener o no tener.Solicite al especialista en audición que le indiquequé prestaciones son válidas para sus audífonos.Tipo de audífonoSus audífonos son un modelo con auricular en el canal(RIC, por sus siglas en inglés). El auricular se colocadentro del canal auditivo y se conecta al instrumentopor medio de un cable del auricular. Estos audífonos nose han diseñado para niños menores de 3 años ni parapersonas cuya edad de desarrollo esté por debajo delos 3 años.5
Componentes y nombresMEMINI RIC 10➌➊➋➍➐➎➏➊ Molde➎ Pulsador (opcional)➋ Auricular➏ Compartimento de la pila➌ Cable delauricular➍ Orificios delmicrófono6(interruptor de encendido/apagado)➐ Indicador lateral(rojo oído derecho,azul oído izquierdo)y conexión del auricular
Puede utilizar los moldes estándar siguientes:Moldes estándarTamañoClick Sleeve(ventilado o cerrado)Click Dome único(abierto o cerrado)Click Dome semiabiertoClick Dome dobleLos moldes estándar son muy fáciles de sustituir.Obtenga más información en la sección“Mantenimiento y cuidados.”Moldes a medidaCarcasa personalizadaClick Mold 7
ControlesCon los controles podrá, por ejemplo, cambiar deprograma de audición. Los audífonos tienen unpulsador o bien no tienen controles.Su especialista en audición ha programado lasfunciones deseadas para el pulsador.ControlIzquierdaDerechaPulsadorNingún controlTambién puede preguntar al especialista enaudición si existe un telemando o una aplicaciónde smartphone para controlar los audífonos.Función del pulsadorSi se pulsa brevemente:Cambio de programaPulsación larga:En espera/ConectarL izquierda, R derecha8LR
Programas de audición123456Obtenga más información en la sección“Cambio del programa de audición”.CaracterísticasEl retardo de la conexión activa la inserción deaudífonos sin silbidos.Obtenga más información en la sección“Conexión y desconexión”.La función controlar para acúfenos genera unruido para distraerle de los acúfenos.9
PilasCuando el nivel de la pila es bajo, el sonido se vuelvemás débil o se oye una señal de alerta. El tipo de piladeterminará el tiempo disponible hasta tener quesustituir la pila.Tamaño de la pila y consejos para el manejoSolicite las pilas recomendadas a su especialista enaudición.Tamaño de la pila:1010 Utilice siempre el tamaño de pila adecuado parasus audífonos. Extraiga las pilas si no va a usar los audífonosdurante varios días. Lleve siempre pilas de repuesto.Extraiga inmediatamente las pilas descargadas y sigala normativa local de reciclaje para eliminar las pilas.
Sustituir las pilasRetirar la pila:X Abra el compartimento de la pila.X Utilice el quitapilas magnéticopara extraer la pila. El quitapilasmagnético está disponible comoaccesorio.Colocar la pila:X Si la pila tiene una película protectora,retírela solo cuando vaya a utilizar la pila.X Inserte la pila con el símbolo “ ”hacia arriba (consulte la imagen).X Cierre con cuidado el compartimento de la pila.Si ofrece resistencia, la pila no se ha insertadocorrectamente.No intente cerrar el compartimento de la pilahaciendo fuerza. Puede dañarlo.11
Uso diarioConexión y desconexiónDispone de las siguientes opciones para conectar ydesconectar los audífonos.Con el compartimento de la pila:X Conexión: Cierre el compartimento de la pila.Se restablecen el volumen y el programa de audiciónpredeterminados.X Desconexión: Abra el compartimento de la pila hastael primer tope.Con el pulsador:X Conexión o desconexión: Pulse y mantenga pulsadoel pulsador durante varios segundos. Consultela configuración de los controles en la sección“Controles”.Tras la conexión, se restablecen el volumen y elprograma de audición utilizados anteriormente.12
Al llevar los audífonos puestos, un tono de alerta puedeindicar cuándo se conecta o se desconecta el audífono.Cuando se activa el retardo de la conexión, el audífonose conecta tras un retardo de varios segundos. Duranteese tiempo, podrá ponerse los audífonos en losoídos sin experimentar silbidos de retroalimentacióndesagradables.El especialista en audífonos puede activar el“retardo de la conexión”.13
Inserción y extracción de los audífonosLos audífonos se han ajustado para el oído derechoe izquierdo. Las marcas de color indicanel lado: Marca roja Oído derechoMarca azul Oído izquierdoInserción de un audífono:X Para Click Sleeves, asegúrese de que la curva deClick Sleeve esté alineada con la curva del cabledel auricular.Correcto:Incorrecto:14
X Sujete el cable del auricular por la curva máspróxima al molde.X Introduzca concuidado el molde en elcanal auditivo ➊. X Gírelo un poco para que seasiente bien.Abra y cierre la boca paraevitar la acumulación de aireen el canal auditivo. X Levante el audífono y deslícelo por la parte superiorde la oreja ➋.ATENCIÓNPeligro de lesiones.X Inserte el molde cuidadosamente en el oído yno profundice demasiado. Puede resultarle útil insertar el audífonoderecho con la mano derecha y el audífonoizquierdo con la mano izquierda. Si tiene problemas para insertar el molde,utilice la otra mano para tirar suavemente dellóbulo de la oreja hacia abajo. Esto abre elcanal auditivo y facilita la inserción del molde.15
El filamento de sujeción opcional ayuda aretener de forma segura el molde en el oído.Para colocar el filamento de sujeción:X Doble el filamento de sujeción ycolóquelo con cuidado en la parteinferior de la cavidad de la oreja(consulte la imagen).16
Extracción de un audífono:X Levante el audífono ydeslícelo por la partesuperior de la oreja ➊. X Si su audífono está equipadocon molde a medida o unClick Mold, extráigalostirando de la pequeñacuerda de extracción hacia laparte de atrás de la cabeza. X Para todos los demás moldes: Sujete el auriculardel canal auditivo con dos dedos y tire de él concuidado ➋.No tire del cable del auricular.ATENCIÓNPeligro de lesiones.X En casos muy raros, el molde podríapermanecer en el oído al retirar el audífono.En este caso, pida que un profesional médicose lo extraiga.Limpie y seque los audífonos después deutilizarlos. Obtenga más información en la sección“Mantenimiento y cuidados”.17
Regulación del volumenLos audífonos ajustan automáticamente el volumen a lasituación auditiva.X Si prefiere el ajuste manual del volumen, utilice untelemando opcional.Una señal opcional puede indicar el cambio devolumen.Cambio del programa de audiciónSegún la situación de escucha, los audífonos ajustanautomáticamente el sonido.Es posible que sus audífonos también tengan variosprogramas de audición que permitan cambiar el sonidosi es necesario. Un tono de aviso opcional puedeindicar el cambio de programa.X Para cambiar el programa de audición, accione elpulsador brevemente.Consulte la configuración de los controles en lasección “Controles”. Para obtener una lista delos programas de audición, consulte la sección“Programas de audición”.Se ha aplicado el volumen predeterminado.También puede preguntar al especialista enaudición si existe un telemando o una aplicaciónde smartphone para controlar los audífonos.18
Situaciones de escucha especialesAl teléfonoCuando esté al teléfono, sostenga elreceptor del teléfono un poco porencima de la oreja. El audífono y elreceptor del teléfono deben estaralineados. Gire el receptor ligeramentehacia fuera, de modo que la oreja noquede totalmente cubierta.Programa de teléfonoAl utilizar el teléfono puede ser necesario un volumendeterminado. Pregunte a su especialista en audiciónpara configurar un programa de teléfono.X Cambie al programa de teléfono siempre que estéal teléfono.Si se ha configurado un programa de teléfonopara los audífonos, aparece en la lista de la sección“Programas de audición”.19
Mantenimiento y cuidadosPara evitar daños, es importante cuidar los audífonos yseguir unas reglas básicas que pronto se convertirán enparte de su rutina diaria.AudífonosSecado y almacenamientoX Seque el audífono durante la noche.X Durante períodos más largos de no utilización,guarde los audífonos en un entorno seco con elcompartimento de la pila abierto y las pilas quitadas.X Si desea más información, pregunte a su especialistaen audición.LimpiezaLos audífonos tienen una capa protectora. No obstante,si no se limpian periódicamente, pueden producirsedaños en los audífonos o daños personales.X Limpie los audífonos a diario con un pañosuave y seco.20
X No utilice nunca agua corriente nisumerja los dispositivos en agua.X No aplique nunca presión durantela limpieza.X Pregunte a su especialista en audición sobre losproductos de limpieza recomendados y los kits demantenimiento, o pídale más información sobrecómo mantener los audífonos en buen estado.MoldesLimpiezaPuede acumularse cerumen (cera del oído) en losmoldes. Esto puede afectar a la calidad del sonido.Limpie los moldes a diario.Para todos los tipos de moldes:X Limpie el molde con unpaño suave y seco justodespués de extraerlo.De este modo se evitaque el cerumen seseque yse endurezca.21
Para Click Domes o Click Sleeves:X Apriete la punta del molde.SustituciónSustituya los moldes estándar aproximadamente cadatres meses. Sustitúyalos más pronto si observa grietasu otros cambios. El procedimiento para sustituir losmoldes estándar depende del tipo de molde. En lasección “Componentes y nombres”, su especialista enaudición ha marcado el tipo de molde.Sustitución de Click DomesX Para extraer el Click Dome antiguo, utilice laherramienta de extracción o siga las instruccionesdel embalaje de los Click Domes. Tenga cuidado deno tirar del cable del auricular.22
La herramienta de extracción está disponiblecomo accesorio.X Ponga especial cuidado enque el nuevo Click Domequede bien colocado(deberá oír un clic).X Compruebe que elnuevo Click Dome encajafirmemente.clickSustitución de Click SleevesX Dé la vuelta al Click Sleevede dentro afuera.X Sujete el Click Sleeve y elauricular (no el cable delauricular) con los dedos ytire del Click Sleevepara extraerlo.X Ponga especial cuidadoen que el nuevoClick Sleeve quede biencolocado (deberá oír unclic).click23
Mantenimiento profesionalEl especialista en audición puede realizar una limpiezay un mantenimiento exhaustivos y profesionales.Los moldes a medida y los filtros de cera debensustituirse según sea necesario por un especialista enaudición.Solicite a su especialista en audición unarecomendación personalizada de los intervalos demantenimiento y asistencia.24
Información adicionalInformación de seguridadPara obtener más información de seguridad, consulte elmanual de seguridad suministrado con el dispositivo.AccesoriosEl tipo de accesorios disponibles depende del tipode audífono. Como ejemplos: un telemando o unaaplicación de smartphone para telemando.Si desea más información, consulte a su especialistaen audición.Símbolos utilizados en este documentoIndica una situación que podría provocar lesionesleves, moderadas o graves.Indica posibles daños materiales.Consejos y sugerencias para manejar mejor eldispositivo.25
Solución de problemasProblema y posibles solucionesEl sonido es débil. Suba el volumen.Sustituya la pila descargada.Limpie o intercambie el molde.El audífono emite silbidos. Vuelva a colocar el molde hasta que quedebien asentado.Baje el volumen.Limpie o intercambie el molde.El sonido se distorsiona. Baje el volumen.Sustituya la pila descargada.Limpie o intercambie el molde.El audífono emite tonos de aviso. Sustituya la pila descargada.El audífono no funciona. Conecte el audífono.Cierre completamente el compartimento de la pilacon suavidad.Sustituya la pila descargada.Compruebe si la pila está bien colocada.El retardo de la conexión está activado. Espere unossegundos y vuelva a comprobarlo.En caso de otros problemas, consulte al especialistaen audición.26
Servicio y garantíaNúmeros de serieAudífonoUnidad auricularIzquierda:Derecha:Fechas de servicio1:4:2:5:3:6:GarantíaFecha de compra:Período de garantía (meses):Su especialista en audición27
Your Miracle-Ear Representative:Su representante de Miracle-Ear :Distributed By Miracle-Ear, Inc.150 South Fifth Street, Suite 2300Minneapolis, MN 55402www.miracle-ear.comInformation in this manual subject to change without notice.Copyright 2020 Miracle-Ear, Inc. All rights reserved.La información de este manual está sujeta a cambio sin previo aviso.Derechos de autor 2020 Miracle-Ear, Inc.Hearing instrument made in SingaporeInstrumento de audición hecho en Singapur 2020 Miracle-Ear, Inc.10959247 Rev 416583USRB/D
with GENIUS 3.0 Technology User Manual www.miracle-ear.com G43021_MEMINI_RIC10_Manual.indd 1 2/13/20 8:38 AM. 2 Content Welcome 4 . Control Left Right Push button No control You can also ask your Hearing Care Specialist whether a remote control or a smartphone app to