Transcription
MECONNECT RIC 312Receiver-In-The-Canal User Manualwww.miracle-ear.com
ContentWelcome 4Your hearing aids Hearing aid type Getting to know your hearing aids Components and names Controls Hearing programs Features 556791010Batteries Battery size and handling tips Replacing batteries 111112Daily use Turning on and off Inserting and removing your hearing aids Adjusting the volume Changing hearing programs Further adjustments (optional) 131314181819Special listening situations On the phone Audio streaming with iPhone Airplane mode Audio induction loops (optional) 20202121222
Maintenance and care Hearing aids Ear pieces Professional maintenance 23232426Further information Safety information Accessories Symbols used in this document Troubleshooting Country-specific information Service and warranty 272727272829303
WelcomeThank you for choosing Miracle-Ear hearing aids toaccompany you through everyday life. Like anything new, itmay take you a little time to become familiar with them.This guide, along with support from your Hearing CareSpecialist, will help you understand the advantages andgreater quality of life your hearing aids offer.To receive the most benefit from your hearing aids, it isrecommended that you wear them every day, all day. Thiswill help you get adjusted to them.CAUTIONIt is important to read this user guide and the safetymanual thoroughly and completely. Follow the safetyinformation to avoid damage or injury.4
Your hearing aidsThis user guide describes optional features thatyour hearing aids may have. Ask your Hearing CareSpecialist to indicate the features that apply to yourhearing aids.Hearing aid typeYour hearing aids are a RIC (Receiver-in-Canal) model. Thereceiver is placed within the ear canal and connected tothe instrument via a receiver cable. The instruments are notintended for children under the age of 3 years or personswith a developmental age of under 3 years.The wireless functionality enables advanced audiologicalfeatures and synchronization between your two hearing aids.Your hearing aids feature Bluetooth low energy* technologyallowing for easy data exchange with your smartphone, andfor seamless audio streaming with your iPhone.***The Bluetooth word mark and logos are owned by the Bluetooth SIG, Inc., and any use ofsuch marks by the legal manufacturer of this product is under licenses. Other trademarksand trade names are those of their respective owners.** iPad, iPhone, and iPod touch are trademarks of Apple Inc., registered in the U.S. and othercountries.5
Getting to know your hearing aidsIt is recommended you familiarize yourself with your newhearing aids. With the instruments in your hand, try usingthe controls and note their location on the instrument. Thiswill make it easier for you to feel and press the controls whilewearing the hearing aids.If you have problems pressing the controls of yourhearing aids while wearing them, you can use aremote control to control your instruments. With adedicated smartphone app you have even morecontrol options.6
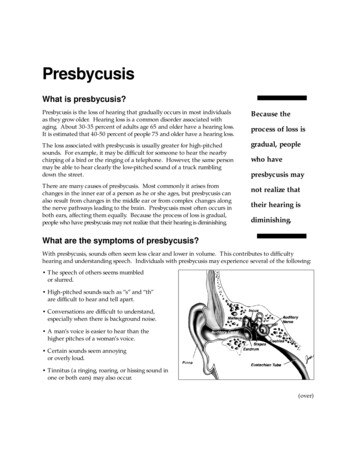
Components and namesThis user guide describes the hearing aid with severalvariations. Use the following pictures to identify the type ofhearing instrument that you use.Ear pieceBattery compartment(on/off switch)ReceiverSide indicator(red right ear,blue left ear) andreceiver connectionReceiver cableMicrophone openingsRocker switch (control)7
You can use the following standard ear pieces:Standard ear piecesSizeClick sleeve(vented or closed)Open or closed domeSemi-open domeDouble domeYou can easily exchange the standard ear pieces. Read morein section “Maintenance and care”.Custom-made ear piecesCustom shellClick Mold8
ControlsThe rocker switch allows you to adjust thevolume or switch hearing programs. YourHearing Care Specialist has programmed yourdesired functions to the rocker switch.Rocker switch functionLRPress briefly:Program up/downVolume up/downTinnitus control signal level up/downTV stream on/offPress for about 2 seconds:Program up/downVolume up/downTinnitus control signal level up/downTV stream on/offPress for more than 3 seconds:Standby/turn onActivate/deactivate airplane modeL Left, R Right9
You can also use a remote control to change hearingprograms and adjust the volume of your hearing aids.With our smartphone app you have even more controloptions.Hearing programs123456Read more in section “Changing hearing programs.”FeaturesPower-on delay enables whistle-free insertion ofhearing aids.Read more in section “Turning on and off”.The tinnitus therapy feature generates a sound todistract you from your tinnitus.A telecoil is integrated in the battery compartment,enabling the hearing instrument to connect with audioinduction loops.Read more in section “Audio induction loops”.10
BatteriesWhen the battery is low the sound becomes weaker or youmay hear an alert signal. The battery type will determine howlong you have to replace the battery.Battery size and handling tipsAsk your Hearing Care Specialist for recommended batteries.Battery size:312 Always use the correct battery size for your hearing aids. Always carry spare batteries.Remove the batteries if you intend not to use the hearingaids for several days.Remove empty batteries immediately and follow your localrecycling rules for battery disposal.11
Replacing batteriesRemoving the battery:X Open the battery compartment.X Use the magnet stick to pull out thebattery. The magnet stick is available asan optional accessory from your HearingCare Specialist.Inserting the battery:X If the battery has a protective film, remove itonly when you are ready to use the battery.X Insert the battery with the “ ” symbolfacing up (refer to the picture).X Carefully close the battery compartment. If you feelresistance, the battery is not inserted correctly.Do not attempt to close the battery compartment by force.It can be damaged.12
Daily useTurning on and offYou have the following options to turn your hearing aids onor off.Via battery compartment:X Turning on: Close the battery compartment.The default volume and hearing program are set.X Turning off: Open the battery compartment to the firstcatch.Via rocker switch:X Turning on or off: Press and hold the rocker switch forseveral seconds. Refer to section “Controls” for the settingsof the rocker switch.After turning on, the previously used volume and hearingprogram remain set.When wearing the hearing aids, an alert tone can indicatewhen a hearing aid is being turned on or off.When the power-on delay is activated, the hearing aids turnon after a delay of several seconds. During this time you caninsert the hearing aids into your ears without experiencingunpleasant feedback or whistling.The “power-on delay” can be activated by your Hearing CareSpecialist.13
Inserting and removing your hearing aidsYour hearing aids have been fine-tuned for your right and leftear. Colored markers indicate the side: red marker right earblue marker left earInserting a hearing instrument:X For Click Sleeves, make sure that the bendof the Click Sleeve is in line with the bend of the receivercable.Correct:Incorrect:14
X Hold the receiver cable at the bend closer to the ear piece.X Carefully push the ear piece in theear canal.X Twist it slightly until it sits well.Open and close your mouth toavoid accumulation of air in theear canal.X Lift the hearing instrument andslide it over the top of your ear.CAUTIONRisk of injury!X Insert the ear piece carefully and not too deeply intothe ear. It may be helpful to insert the right hearing instrumentwith the right hand and the left hearing instrumentwith the left hand. If you have problems inserting the ear piece, use theother hand to gently pull your earlobe downwards.This opens the ear canal and eases insertion of theear piece.15
The optional retention strand helps to securely retain theear piece in your ear. To position the retention strand:X Bend the retention strand and position itcarefully into the bottom of the bowl ofyour ear (refer to the picture).16
Removing a hearing instrument:X Lift the hearing instrument andslide it over the top of your ear.X If your hearing instrument isequipped with a custom shell ora click mold, remove it by pullingthe small removal cord toward theback of your head.X For all other ear pieces: Grip the receiver in the ear canalwith two fingers and pull it carefully out.Do not pull the receiver cable.CAUTIONRisk of injury!X In very rare cases the ear piece could remain in yourear when removing the hearing instrument. If thishappens, have the ear piece removed by a medicalprofessional.Clean and dry your hearing aids after usage. Read more insection “Maintenance and care”.17
Adjusting the volumeYour hearing aids automatically adjust the volume to thelistening situation.X If you prefer manual volume adjustment, press therocker switch.Refer to section “Controls” for the setting of therocker switch.An optional signal tone can indicate the volume change.Once the maximum or minimum volume has been reached,you may hear an optional signal tone.Changing hearing programsDepending on the listening situation, your hearing aidsautomatically adjust their sound.Your hearing aids may also have several hearing programswhich allow you to change the sound, if needed. An optionalsignal tone can indicate the program change.X To change the hearing program, press the rocker switch.Refer to section “Controls” for the setting of the rockerswitch. Refer to section “Hearing programs” for a list ofyour hearing programs.The default volume is applied.18
Further adjustments (optional)You can also use the hearing instrument controls to changeother features, for example, the level of the tinnitus controlsignal.Refer to section “Controls” for the setting of your controls.19
Special listening situationsOn the phoneWhen you are on the phone, hold thetelephone receiver slightly above your ear.The hearing instrument and telephonereceiver should be aligned. Turn thereceiver slightly so that the ear is notcompletely covered.Telephone programYou may prefer a certain volume when using the phone.Ask your Hearing Care Specialist to configure a telephoneprogram.X Switch to the telephone program whenever you are on thephone.If a telephone program is configured for your hearing aids,it is listed in section “Hearing programs”.20
Audio streaming with iPhoneYour hearing aids are Made for iPhone hearing aids. Thismeans you can get phone calls and listen to music from youriPhone directly into your hearing aids.For more information about compatible iOS devices, pairing,audio streaming and other useful functions, contact yourHearing Care Specialist.Airplane modeIn areas where the use of Bluetooth technology is not allowed(e.g. on some airplanes), you can activate airplane mode.This turns Bluetooth in your hearing aids off temporarily.The hearing aids still work without Bluetooth, however directaudio streaming will not be possible and other functions maynot be available.X To activate or deactivate the airplane mode, use thecontrols of your hearing aids.Refer to section “Controls” for more information.An alert tone indicates when airplane mode is activated ordeactivated.21
Audio induction loops (optional)Some telephones and public places like theatres offer theaudio signal (music and speech) via an audio induction loop.With this system, your hearing aids can directly receive thedesired signal – without distracting noise in the environment.You can usually recognize audio induction loopsystems by certain signs.If you want to use this system, a special battery compartmentis required. It is available as an accessory only for certaintypes of instruments. Consult your Hearing Care Specialist formore information.Whenever you are in a place with an audio induction loop:X Switch to the telecoil program.If a telecoil program is configured for your hearing aids, itis listed in section “Hearing programs”.Telecoil program and remote controlNOTICEFor hearing aids with wireless connectivity:When the telecoil program is active, the remote controlmay cause a pulsing noise.X Use the remote control with a distance greater than10 cm (4 inches).22
Maintenance and careTo prevent damage it is important that you take care of yourhearing aids and follow a few basic rules, which will soonbecome a part of your daily routine.Hearing aidsDrying and storageX Dry your hearing aids overnight.X For longer periods of non-use, store your hearing aids ina dry environment with an open battery compartment andthe batteries removed.X Ask your Hearing Care Specialist for more information.CleaningYour hearing aids have a protective coating. However, if notcleaned regularly you may damage the hearing aids or causepersonal injury.X Clean your hearing aids daily with a soft, dry tissue.X Never use running water or immerse thedevices in water.X Never apply pressure while cleaning.X Ask your Hearing Care Specialist for recommendedcleaning products, special care sets, or more informationon how to keep your hearing aids in good condition.23
Ear piecesCleaningCerumen (ear wax) may accumulate on the ear pieces. Thismay affect the sound quality. Clean the ear pieces daily.For all types of ear pieces:X Clean the ear pieceright after removalwith a soft and drytissue.This prevents thatcerumen becomesdry and hard.For click domes or click sleeves:X Squeeze the tip of the ear piece.24
ExchangingExchange standard ear pieces approximately everythree months. Replace them sooner if you notice cracks,discoloration or other changes. The procedure forexchanging standard ear pieces depends on the type ofear piece. In section “Components and names,” your HearingCare Specialist has marked your type of ear piece.Exchanging click domesX To remove the old click dome, use the removal toolor follow the instructions on the packaging of theclick domes. Be careful not to pull the receiver cable.The removal tool is available as an accessory.X Take particular care that the newclick dome clicks noticeably inplace.X Check the firm fit of the newclick dome.25
Exchanging Click SleevesX Turn the click sleeve inside out.X Grasp the click sleeve and thereceiver (not the receiver cable)with your fingers and pull theclick sleeve off.X Take particular care thatthe new click sleeve clicksnoticeably in place.Professional maintenanceYour Hearing Care Specialist can perform thoroughprofessional cleaning and maintenance.Custom-made and standard ear pieces and wax filters shouldbe exchanged as needed by your Hearing Care Specialist.Ask your Hearing Care Specialist for recommendedmaintenance intervals and support.26
Further informationSafety informationFor more safety information, refer to the safety manualsupplied with the device.AccessoriesYou can use the Miracle-Ear App for convenient remotecontrol of your hearing aids. The app also allows you topersonalize your hearing experience with more functions.You can also use a remote control.Consult your Hearing Care Specialist for further information.Symbols used in this documentPoints out a situation that could lead to serious,moderate, or minor injuries.Indicates possible property damage.Advice and tips on how to handle your device better.“Made for iPhone”, “Made for iPad”, and“Made for iPod” mean that an electronic accessory has beendesigned to connect specifically to iPhone, iPad, or iPod,respectively, and has been certified by the developer to meetApple performance standards. Apple is not responsible forthe operation of this device or its compliance with safety27
and regulatory standards. Please note that the use of thisaccessory with iPhone, iPad, or iPod may affect wirelessperformance.TroubleshootingProblem and possible solutionsSound is weak. Increase the volume.Replace the empty battery.Clean or exchange the ear piece.Hearing instrument emits whistling sounds. Reinsert the ear piece until it fits securely.Decrease the volume.Clean or exchange the ear piece.Sound is distorted. Decrease the volume.Replace the empty battery.Clean or exchange the ear piece.Hearing instrument emits signal tones. Replace the discharged battery.28
Problem and possible solutionsHearing instrument does not work. Turn the hearing instrument on.Gently close the battery compartment completely.Replace the empty battery.Make sure the battery is inserted correctly.Power-on delay is active. Wait several seconds andcheck again.Consult your Hearing Care Specialist if you encounter furtherproblems.Country-specific informationUSACertification information for hearing aids with wirelessfunctionality:MECONNECT R 312 XPMECONNECT R 312T XP HVIN: RFM002Contains FCC ID: SGI-RFM00229
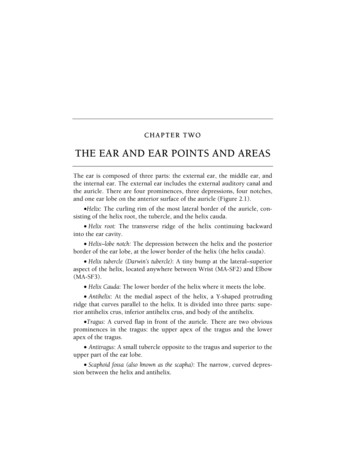
Service and warrantySerial numbersInstrumentLeft:Right:Service dates1:4:2:5:3:6:WarrantyDate of purchase:Warranty period in months:Your Hearing Care Specialist30 Receiver unit
31
32
33
MECONNECT RIC 312Receptor en el Canal Manual del Operadorwww.miracle-ear.com
ContenidosBienvenido 4Los audífonos Tipo de audífono La importancia de conocer el audífono Componentes y nombres Controles Programas de audición Características 556791010Pilas Tamaño de la pila y consejos para el manejo Sustituir las pilas 111112Uso diario Conexión y desconexión Inserción y extracción de los audífonos Regulación del volumen Cambio del programa de audición Más ajustes (opcional) 131314181819Situaciones de escucha especiales Al teléfono Transmisión de audio con iPhone Modo avión Bucles de inducción de audio (opcional) 20202121222
Mantenimiento y cuidados Audífonos Moldes Mantenimiento profesional 23232426Información adicional Información de seguridad Accesorios Símbolos utilizados en este documento Solución de problemas Información específica por país Servicio y garantía 272727272830313
BienvenidoGracias por elegir nuestros audífonos para que leacompañen en su vida cotidiana. Como todas las cosasnuevas, es posible que tarde un poco en familiarizarse conellos.Este manual, junto con la asistencia de su especialista enaudición, le ayudará a conocer las ventajas y la calidad devida superior que le ofrecen los audífonos.Para obtener el máximo beneficio posible de los audífonos,se recomienda que los lleve a diario y durante todo el día.Esto le ayudará a adaptarse a ellos.ATENCIÓNEs importante que lea detenidamente este manualdel operador y el manual de seguridad de principioa fin. Siga la información de seguridad para evitardaños o lesiones.4
Los audífonosEn este manual del operador se describencaracterísticas opcionales que sus audífonos puedentener o no tener.Solicite al especialista en audición que le indique quécaracterísticas son válidas para sus audífonos.Tipo de audífonoSus audífonos son un modelo con auricular en el canal (RIC,por sus siglas en inglés). El auricular se coloca dentro delcanal auditivo y se conecta al instrumento por medio de uncable del auricular. Estos audífonos no se han diseñado paraniños menores de 3 años ni para personas cuya edad dedesarrollo esté por debajo de los 3 años.La funcionalidad inalámbrica proporciona característicasaudiológicas avanzadas entre los dos audífonos.Los audífonos incorporan la tecnologíaBluetooth low energy,* que permite intercambiar datos demanera sencilla con su smartphone y transmitir audio sinproblemas con su iPhone.**La importancia de conocer el audífonoSe recomienda familiarizarse con el nuevo audífono. Con*La marca del término Bluetooth y sus logotipos son propiedad de Bluetooth SIG, Inc. y eluso de dichas marcas por parte del fabricante autorizado se realiza bajo licencia. Las demásmarcas registradas y nombres comerciales pertenecen a sus respectivos propietarios.** iPad, iPhone y iPod touch son marcas registradas de Apple Inc. en EE. UU. y en otrospaíses.5
el instrumento en la mano, intente utilizar los controlesy recordar su ubicación en el instrumento. Esto facilitala localización de los controles para pulsarlos al llevar elaudífono puesto.Si tiene problemas para pulsar los controles de losaudífonos cuando los lleva puestos, puede utilizar untelemando para controlarlos. Con una aplicación parasmartphone especializada, dispone incluso de másopciones de control.6
Componentes y nombresEn este manual del operador se describen diversos tipos deaudífonos. Utilice las imágenes siguientes para identificar sutipo de audífono.MoldeCompartimento de la pila(interruptor deencendido/apagado)AuricularCable del auricularIndicador lateral(rojo oído derecho,azul oído izquierdo)y conexión del auricularOrificios del micrófonoConmutador (control)7
Puede utilizar los moldes estándar siguientes:Moldes estándarTamañoClick sleeve(ventilado o cerrado)Domo abierto o cerradoDome semiabiertoDome dobleLos moldes estándar son muy fáciles de sustituir.Obtenga más información en la sección“Mantenimiento y cuidados”.Moldes a medidaCarcasa personalizadaClick mold8
ControlesCon el conmutador podrá, por ejemplo,ajustar el volumen o cambiar deprograma de audición. Su especialista enaudición ha programado las funcionesdeseadas para el conmutador.Función del conmutadorLRPulsación corta:Programa arriba o abajoVolumen arriba o abajoSubir/Bajar nivel de señalcontrolar para TinitusTransmisión de TVactivada/desactivadaPulse durante unos 2 segundos:Programa arriba o abajoVolumen arriba o abajoSubir/Bajar nivel de señalcontrolar para TinitusTransmisión de TV activada/desactivadaPulse durante más de 3 segundos:En espera/ConectarActivar/desactivar el modo aviónL izquierda, R derecha9
También puede utilizar un telemando para cambiarlos programas de audición y ajustar el volumen de losaudífonos. Con nuestra aplicación para smartphone,dispone incluso de más opciones de control.Programas de audición123456Obtenga más información en la sección“Cambio del programa de audición”.CaracterísticasEl retardo de la conexión activa la inserción deaudífonos sin silbidos.Obtenga más información en la sección“Conexión y desconexión”.La función controlar para acúfenos genera un ruidopara distraerle de los acúfenos.Hay una bobina telefónica integrada en elcompartimento de la pila que permite que el audífonose conecte con bucles de inducción de audio.10Obtenga más información en la sección“Bucles de inducción de audio”.
PilasCuando el nivel de la pila es bajo, el sonido se vuelvemás débil o se oye una señal de alerta. El tipo de piladeterminará el tiempo disponible hasta tener quesustituir la pila.Tamaño de la pila y consejos para el manejoSolicite las pilas recomendadas a su especialista enaudición.Tamaño de la pila:312 Utilice siempre el tamaño de pila adecuado para susaudífonos. Extraiga las pilas si no va a usar los audífonosdurante varios días. Lleve siempre pilas de repuesto.Extraiga inmediatamente las pilas descargadas y sigala normativa local de reciclaje para eliminar las pilas.11
Sustituir las pilasRetirar la pila:X Abra el compartimento de la pila.X Utilice el quitapilas magnético paraextraer la pila. El palo magnético estádisponible como accesorio opcionalde su Especialista en CuidadosAuditivos.Colocar la pila:X Si la pila tiene una película protectora,retírela solo cuando vaya a utilizar la pila.X Inserte la pila con el símbolo “ ”hacia arriba (consulte la imagen).X Cierre con cuidado el compartimento de la pila. Si ofreceresistencia, la pila no se ha insertado correctamente.No intente cerrar el compartimento de la pilahaciendo fuerza. Puede dañarlo.12
Uso diarioConexión y desconexiónDispone de las siguientes opciones para conectar ydesconectar los audífonos.Con el compartimento de la pila:X Conexión: Cierre el compartimento de la pila.Se restablecen el volumen y el programa de audiciónpredeterminados.X Desconexión: Abra el compartimento de la pila hasta elprimer tope.Con el conmutador:X Conexión o desconexión: Pulse el conmutador ymanténgalo pulsado durante unos segundos. Consulte laconfiguración del conmutador en la sección “Controles”.Tras la conexión, se restablecen el volumen y el programade audición utilizados anteriormente.Al llevar los audífonos puestos, un tono de alerta puedeindicar cuándo se conecta o se desconecta el audífono.Cuando se activa el retardo de la conexión, el audífonose conecta tras un retardo de varios segundos. Duranteese tiempo, podrá ponerse los audífonos en los oídos sinexperimentar silbidos de retroalimentación desagradables.El especialista en audífonos puede activar el“retardo de la conexión”.13
Inserción y extracción de los audífonosLos audífonos se han ajustado para el oído derecho eizquierdo. Las marcas de color indican ellado: Marca roja Oído derechoMarca azul Oído izquierdoInserción de un audífono:X Para Click Sleeves, asegúrese de que la curva deClick Sleeve esté alineada con la curva del cable delauricular.Correcto:Incorrecto:14
X Sujete el cable del auricular por la curva más próxima almolde.X Introduzca con cuidadoel molde en el canalauditivo .X Gírelo un poco para que seasiente bien.Abra y cierre la boca paraevitar la acumulación de aireen el canal auditivo.X Levante el audífono y deslícelo por la parte superior de laoreja.ATENCIÓNPeligro de lesiones.X Inserte el molde cuidadosamente en el oído y noprofundice demasiado. Puede resultarle útil insertar el audífono derecho conla mano derecha y el audífono izquierdo con la manoizquierda. Si tiene problemas para insertar el molde, utilice laotra mano para tirar suavemente del lóbulo de laoreja hacia abajo. Esto abre el canal auditivo y facilitala inserción del molde.15
El filamento de sujeción opcional ayuda a retener de formasegura el molde en el oído. Para colocar el filamento desujeción:X Doble el filamento de sujeción ycolóquelo con cuidado en la parteinferior de la cavidad de la oreja(consulte la imagen).16
Extracción de un audífono:X Levante el audífono ydeslícelo por la partesuperior de la oreja .X Si su audífono está equipadocon molde a medida o unClick Mold, extráigalostirando de la pequeñacuerda de extracción hacia laparte de atrás de la cabeza.X Para todos los demás moldes: Sujete el auricular delcanal auditivo con dos dedos y tire de él con cuidado.No tire del cable del auricular.ATENCIÓNPeligro de lesiones.X En casos muy raros, el molde podría permaneceren el oído al retirar el audífono. En este caso, pidaque un profesional médico se lo extraiga.Limpie y seque los audífonos después de utilizarlos. Obtengamás información en la sección “Mantenimiento y cuidados”.17
Regulación del volumenLos audífonos ajustan automáticamente el volumen a lasituación auditiva.X Si prefiere el ajuste manual del volumen, accione elconmutador.Consulte la configuración del conmutador en la sección“Controles”.Un tono de aviso opcional puede indicar el cambio devolumen. Cuando se haya alcanzado el volumen máximo omínimo, puede oír un tono de aviso opcional.Cambio del programa de audiciónSegún la situación de escucha, los audífonos ajustanautomáticamente el sonido.Es posible que sus audífonos también tengan variosprogramas de audición que permitan cambiar el sonidosi es necesario. Un tono de aviso opcional puede indicarel cambio de programa.X Para cambiar el programa de audición, accione elconmutador.Consulte la configuración del conmutador en la sección“Controles”. Para obtener una lista de los programas deaudición, consulte la sección “Programas de audición”.Se ha aplicado el volumen predeterminado.18
Más ajustes (opcional)También puede usar los controles del audífono para cambiarotras características, por ejemplo, el nivel de la señal de laterapia de tinnitus.Consulte la configuración de los controles en la sección“Controles”.19
Situaciones de escucha especialesAl teléfonoCuando esté al teléfono, sostengael receptor del teléfono un pocopor encima de la oreja. El audífonoy el receptor del teléfono debenestar alineados. Gire el receptorligeramente hacia fuera, de modo quela oreja no quede totalmente cubierta.Programa de teléfonoAl utilizar el teléfono puede ser necesario un volumendeterminado. Pregunte a su especialista en audición paraconfigurar un programa de teléfono.X Cambie al programa de teléfono siempre que esté alteléfono.Si se ha configurado un programa de teléfonopara los audífonos, aparece en la lista de la sección“Programas de audición”.20
Transmisión de audio con iPhoneLos audífonos son del modelo Made for iPhone. Estosignifica que puede atender llamadas telefónicas y escucharmúsica de su iPhone directamente en los audífonos.Para obtener más información sobre dispositivos iOScompatibles, emparejamiento, transmisión de audio y otrasfunciones útiles, póngase en contacto con su especialista enaudición.Modo aviónEn áreas en las que no se permite el uso de tecnologíaBluetooth (por ejemplo, en algunos aviones), puede activar elmodo avión. Esto desconecta el Bluetooth de los audífonostemporalmente. Los audífonos siguen funcionando sinBluetooth. Sin embargo, la transmisión directa de audio no esposible y otras funciones no están disponibles.X Para activar o desactivar el modo avión, use los controlesde los audífonos.Consulte la sección “Controles” para obtener másinformación.Un tono de alerta indica cuándo está activado o desactivadoel modo avión.21
Bucles de inducción de audio (opcional)Algunos teléfonos y lugares públicos como los teatrosofrecen la señal de audio (música y voz) a través de un buclede inducción de audio. Con este sistema, los audífonospueden recibir directamente la señal deseada, sin ruidoambiental molesto.Normalmente los sistemas de bucle de inducciónde audio se reconocen por ciertas señales.Si desea utilizar este sistema, se requiere un compartimentoespecial de la pila. Está disponible como accesorio solo paraalgunos tipos de instrumentos. Si desea más información,consulte a su especialista en audición.Cuando se encue
www.miracle-ear.com G42743_16684_USRB MECONNECT RIC 312.indd 1 1/21/20 3:30 PM. 2 Content Welcome 4 Your hearing aids 5 Hearing aid type 5 Getting to know your hearing aids 6 . remote control to control your instruments. With a dedicated smartphone app you have even more control options.