Transcription
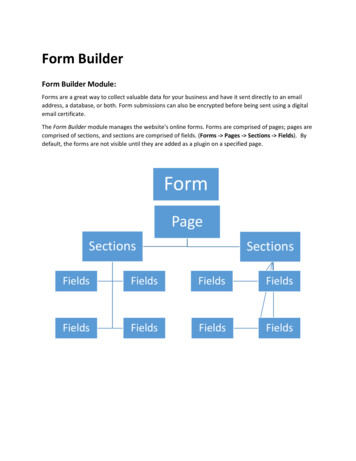
Form BuilderForm Builder Module:Forms are a great way to collect valuable data for your business and have it sent directly to an emailaddress, a database, or both. Form submissions can also be encrypted before being sent using a digitalemail certificate.The Form Builder module manages the website’s online forms. Forms are comprised of pages; pages arecomprised of sections, and sections are comprised of fields. (Forms - Pages - Sections - Fields). Bydefault, the forms are not visible until they are added as a plugin on a specified ldsFieldsFieldsFieldsFields
For example, let’s say we are a company and want to build a form for employee data. A form might bestructured like this:Job FormApplicant InfoContact infoEmploymentinfoFirst namePastemploymentLast NameSkillsTell us aboutyourselfCurrentlyemployed?Here’s how Form Builder looks in LRS Antilles:
There are 3 steps to add a form to your site:1. Create the form in Form Builder.2. Add the form to a Page.3. Test the form.Let’s get started!Step-by-step: Add a Form (Settings)Once on the Form Builder page, click the “Add New Form”button in the upper right-hand corner. Then follow these steps:Form Details:1. Enter the Name of the form. This will autofill the Form Stub (right column under Settings)with a hyphenated lowercase version of the title. This is the text that will display in the URL.Try to keep this short (one or two words)
2. Add the Header Text of the form. This is the text that displays before the header, giving theuser more details about the form. This could be a call to action, prompting the visitor tocomplete the form.3. Add the Footer of the form. This is an end message, such as a disclaimer to the form or anasterisk about information within the form.4. Form Submission Message. This message verifies that the user has sent a form. A custommessage will pop up after a form is submitted. If desired, you can change the message toanything you like. This verifies that the user sent a form with a custom message and willdisplay after a form is filled and submitted.5. Custom JavaScript on Form Submission – This section can be used to write customJavaScript functions that will be triggered when a user submits a form.LRS developers will complete this section if required. This section is useful for GoogleAnalytics snippets.Right Column Settings:1. Form Stub: This is the last words in the url. Keep this short, one or two words.2. Add the Recipient of the form. This determines where the form information is going to,most likely an email address.3. Change the text of the submit button if desired. This is the display text on the submit buttonfor the form.4. Check optional boxes in Settings: Active: Determines whether the current form is live on the site. If you want to build your form over time, click the “Allow Progress to be Saved”button. Enable Google reCAPTCHA: Uses Google’s captcha tool, which is important fordetermining if the person submitting the form is a bot. This requires that thereCAPTCHA Site and Secret Keys have been setup in the Settings Module. Encrypt using digital email certificate: If checked, this will encrypt the formsubmission before the email is sent. Save Encrypted Copy to Database: Saves the encrypted form submission to thedatabase. These forms can be viewed in the Submissions section of the Form BuilderModule.
Confirmation EmailSend Confirmation Email: When enabled, this will sendan email to the user who fills out this form based on theiremail address they use.1.Email Address Field: This is the field that containsthe users email address when they submit the form. Youcan have multiple people receive the form. Just usecommas to separate the email addresses.2.Confirmation Email Subject: This is the subject linefor the email sent to the user3.Confirmation Email: This is the email message sentto the userClick “Save Form" and you are ready to start adding sections tothe form.Step-by-step: Add a Form (Sections)Once you save the Form, you should be back at the AllForms management page. The form you just createdwill be included in the list. Now that you have thesettings done on your form, it’s time to build pages andpopulate the pages with fields.
To begin, Select your form and click “Pages.” [a defaultpage will be added]. Name the page and it will beincluded in the list.Now you have pages on which you can place the content of the form in the “Fields.” Butfirst, the content must be organized in Sections. Click on Fields and you will see threeboxes: “Form Fields”; “Add Fields” and “Sections.”In the Sections box, enter the name of the section and press Add. This will add the section to your form.This section will appear in the Section dropdown list. Once you add a Section, you can add fields to thesections.
Step-by-step: Add a Form (Fields)Fields can contain a variety of content, from a person’s age, to their name, to anyinformation that is required for the form. NOTE: To add a field, you must first add a Sectionwithin the form.1. In the “Add Fields” section, select the Field Type from the dropdown menu. Forexample, a Text Field would be selected for anything that is text-related, like aname.2. Enter the Form Label of the input (First Name, Last Name). This will be the displaythat the user will see when going through the form.3. Add the field with the ‘Add Field’ button.4. Now you can sort this among other fields, mark if the field is required, clone(duplicate) it, or delete. In the Options box, you can mark if you want anyvalidations.5. Click Save Field.6. Continue to create fields as you need.
Step-by-step: Add a Form (Advanced Fields)The advanced button leads you to option to customize your fields. Label: Label is the words that will appear before the radio buttons within the page.CSS Class: This is how the list will be styled, and for the more tech savvy, it is theclass that will be used to style the form field. Fields can have multiple classes.
Separate classes with spaces like shown above with full and last. Classes are indexedon the last page.Tooltip text: This includes adding a small icon to help your user understand whatdata you want entered in the field.Last On: Last on is used for the field depending on which platform the field willdisplay in the rightmost column on, and generally used for style purposes.Most forms will have grid styles defined in the /style-guide page Placeholder Text: This is text that will show in the field giving the person a Option Values: These are the different radio buttons that can be clicked on andshould be separated with the character. This is just above the enter button onmost keyboards on the shifted backslash key.Default Value: This is for a field that has a preselected field. When the form loads, ifthere is a default value then that option value will be the checked value.Option Required Trigger: This is the value from the list of options that cannot beselected to submit the form. For example, “–select a value—” is commonly used forthis field. description of what the expected value in the field is.Function can be removed in this version.
Step-by-step: Add a Form (Add to Page)Now that you have pages, sections and fields, youare ready to add the form to page on the website.Forms are considered “plugins” to the page.First a page must exist to house the form (See Adda Page). Once the webpage is added and ready,edit the page and click the plug icon. Select FormBuilder and select the form you want to add fromthe dropdown menu. Click “Validate Plugin”NOTE: Plugins can only be added after they are validated.Insert the form, save the page and then preview it to see your form.
Step-by-step: Add a Form (Section – Advanced Options)
Here you can set conditions on the section that allow it tobe hidden or shown. This includes adding or hidingsections based on criteria and user’s information.To add a condition: (1) Select a section of the form thatcontains a control you want to watch. (2) Select thecontrol you want to watch the value of. (3) Select yourequality operator. (4) Select the value that will satisfy thecondition.You can add as many conditions as you like to build thelogic for your form. You can (5) choose to combine thevarious conditions with an OR clause or an AND clause.Condition values cannot be edited but they can be (6)deleted.You can move this section to another part of the form byselecting a different Form Page Part (7)
1. Create the form in Form Builder. 2. Add the form to a Page. 3. Test the form. Lets get started! Step-by-step: Add a Form (Settings) Once on the Form Builder page, click the Add New Form button in the upper right-hand corner. Then follow these steps: Form Details: 1. Enter the Name of the form. This will autofill the Form Stub (right column .