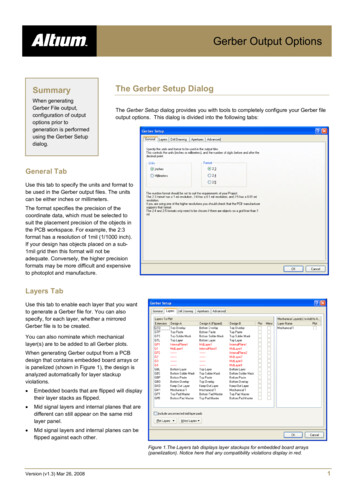
Transcription
How to export Gerber files from Altium Designer (Protel)matching Olimex’ PCB productionDesign Setup from AltiumContents1.2.3.4.5.6.7.Clearance Setup . 3Routing Width . 4Plane Connect . 4Plane Clearance . 5Using Polygon Pour. 5Design Rule Check . 6Gerber Export . 7General Setting . 8Layers Setting . 9Drill Drawing Setting . 10Aperture Setting . 11Advanced Setting . 118. CAMtasticx.Cam file. 139. Exporting your drill settings . 15List of FiguresFigure 1 - Clearance Setup . 3Figure 2 - Routing Width . 4Figure 3 - Plane Connect . 4Figure 4 - Plane Clearance . 5Figure 5 - Polygon Pour . 5Figure 6 - Design Rule Check . 6Figure 7 - Gerber Export - Tracks . 7Figure 8 - Gerber Setup - General . 8Figure 9 - Gerber Setup - Layers . 9Figure 10 - Gerber Setup - Drill Drawing . 10Figure 11 - Gerber Setup - Apertures . 11Figure 12 - Gerber Setup - Advanced . 12Figure 13 - Gerber Setup - OK . 12Figure 14 - CAMtasticx.Cam file . 13Figure 15 - Export Gerber. 14Figure 16 - Export Gerber - RS-274-X (extended Gerber). 14Figure 17 - Write Gerber(s) . 15Figure 18 - Exporting Drills . 15Figure 19 - NC Drill Outputs . 16Figure 20 - NC Drill Setup (Altium Designer 2009) . 16Figure 22 - Import Drill Data. 17Figure 23 - Export NC Drill Files to Gerber. 17Figure 24 - Export Gerber(s) - RS-274-X. 18H.J. KochVersion 1.1Olimex 2009Page 1 of 18
Version History1.1 Figure 20 changed to use “absolute origin”Change format of document1.0 originalH.J. KochVersion 1.1Olimex 2009Page 2 of 18
1. Clearance SetupBefore routing and placing anything be sure to setup clearance to minimum 10mill (Olimexcan handle a minimum of 8mill but I had problems even though – a setting of 10 mill hassolving the problems.)This setting can be set in the menu: Design Rules Figure 1 - Clearance SetupChange this to 10mill as shown by the blue arrowH.J. KochVersion 1.1Olimex 2009Page 3 of 18
2. Routing WidthBe sure to use minimum 8 mill setting for the Routing Width.This can also be changed in the menu: Design Rules Figure 2 - Routing Width3. Plane ConnectGo to menu: Design Rules and choose the setting for Plane PlaneConnectAlso here be sure to use minimum 8 mill.Figure 3 - Plane ConnectH.J. KochVersion 1.1Olimex 2009Page 4 of 18
4. Plane ClearanceGo to menu: Design Rules and choose the setting for Plane PlaneCleanceAlso here be sure to use minimum 8 mill.Figure 4 - Plane Clearance5. Using Polygon PourWhen using a copper surface (Polygon Pours) also remember to use minimum of 8 mills hereFigure 5 - Polygon PourNOTE !The pour needs to be Hatched (made by Tracks and Arcs) instead of a solidcopper area.Remember to set Track Width, Grid Size, Minimum Primitive Length also to minimum 8 mill.A setting of 10 mill works every time !H.J. KochVersion 1.1Olimex 2009Page 5 of 18
6. Design Rule CheckAfter finishing the design and before generating the Gerber files you should run a DesignRule check.This check will use the setting and distances that you have already set up in the previousitems following this tutorial.Figure 6 - Design Rule CheckGo to the menu: Tools Design Rule Check .Run the check and go no further with gerber files if errors are found.Read the errors if any – correct them until no further errors are found.H.J. KochVersion 1.1Olimex 2009Page 6 of 18
7. Gerber ExportTo make the Gerber files to the menu: Files Fabrication Outputs and choose “Gerber Files”Figure 7 - Gerber Export - TracksYou will now see 5 pages in the following dialog boxH.J. KochVersion 1.1Olimex 2009Page 7 of 18
General SettingIn the General Setting set the precision to 2:4(0,1 mill resolution)Figure 8 - Gerber Setup - GeneralH.J. KochVersion 1.1Olimex 2009Page 8 of 18
Layers SettingInclude the layers that you want to export by marking theseFigure 9 - Gerber Setup - LayersH.J. KochVersion 1.1Olimex 2009Page 9 of 18
Drill Drawing SettingMark both layers for Drill Drawing PlotsFigure 10 - Gerber Setup - Drill DrawingH.J. KochVersion 1.1Olimex 2009Page 10 of 18
Aperture SettingBe sure to mark “Embedded apertures (RS274X)”Figure 11 - Gerber Setup - AperturesAdvanced SettingBe sure to set the Leading/Trailing Zeroes to: “Keep leading and trailing zeroes”and the Position on Film to: “Reference to absolute origin”H.J. KochVersion 1.1Olimex 2009Page 11 of 18
Figure 12 - Gerber Setup - AdvancedNow press the button “OK” to go further on.Figure 13 - Gerber Setup - OKH.J. KochVersion 1.1Olimex 2009Page 12 of 18
8. CAMtasticx.Cam fileA new page called CAMtasticx.Cam will now arrive showing your PCB.Figure 14 - CAMtasticx.Cam fileH.J. KochVersion 1.1Olimex 2009Page 13 of 18
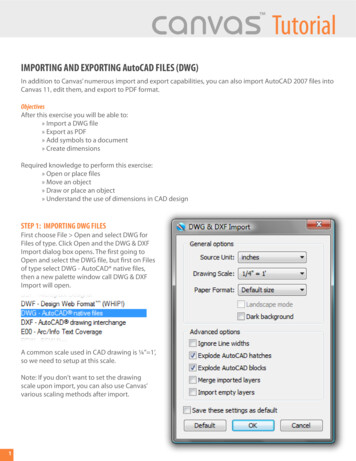
Go selecting menu: File Export Gerber Figure 15 - Export GerberIn the dialog box be sure to set these settingsFigure 16 - Export Gerber - RS-274-X (extended Gerber)H.J. KochVersion 1.1Olimex 2009Page 14 of 18
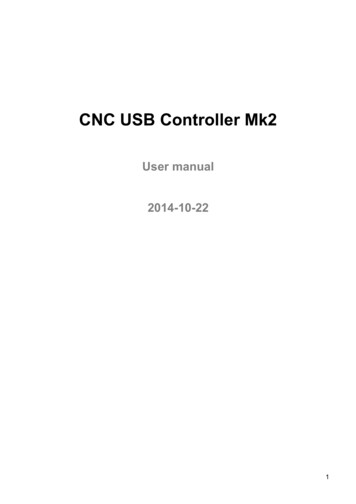
Finally Press “OK” and you can select where to put your gerber files for each layer.Figure 17 - Write Gerber(s)9. Exporting your drill settingsGo back to your design PcbDoc file by pressing the Design page in top of your windowFigure 18 - Exporting DrillsGo to the menu: File Fabrication Outputs and choose “NC Drill Files”!H.J. KochVersion 1.1Olimex 2009Page 15 of 18
Figure 19 - NC Drill OutputsSetup the following showed by the blue arrowsFigure 20 - NC Drill Setup (Altium Designer 2009)H.J. KochVersion 1.1Olimex 2009Page 16 of 18
Press OK and the following dialog box will be shownFigure 21 - Import Drill DataAgain press the button “OK”And another CAM page with all your drillings will be shown. From within this new pageGo to the menu: File Export and choose “Gerber”Figure 22 - Export NC Drill Files to GerberNow we are near the endH.J. KochVersion 1.1Olimex 2009Page 17 of 18
A new dialog box will be shown:Figure 23 - Export Gerber(s) - RS-274-XCheck that this has been selected.NB: Be sure that exactly RS-274-X has been selected !!!!!(default is RS-274 which are not extended gerbers !!)Finally press „OK‟ save this gerber file and your are ready to email them to OlimexUsing the email: fastpcb@olimex.comA happy user of OlimexH.J. Koch 2009henrik@koch-enginering.comH.J. KochVersion 1.1Olimex 2009Page 18 of 18
Figure 16 - Export Gerber - RS-274-X (extended Gerber) H.J. Koch Version 1.1 Olimex 2009 Page 15 of 18 Finally Press "OK" and you can select where to put your gerber files for each layer.