Transcription
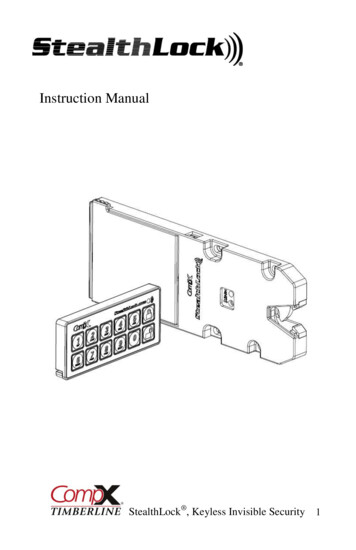
meSpyDigitalCameraImportant Battery lnformation- Only use Alkaline or Lithium batteries. We recommend the use of Duracell or Energizer batteries.- Do not mix old and new batteries. Always replace ALL the batteries at the same time.- When the camera is not in use, please remove the batteries.Moultrie Limited WarrantyThis product has been thoroughly tested and inspected before shipment. It is guaranteed fromdefects in material and workmanship from the date of purchase for 1 year. Under this limitedguarantee we agree to replace or repair free of charge any part or parts which have been found tobe defective in original material or workmanship. Should you require in-warranty service, call ourCustomer Service Department. If your problem cannot be addressed over the telephone, we mayneed you to send us your defective product plus proof of DigitalCamera.PleaseTHANKYOUforforyourpurchaseof theM-990iDigitalGame Camera.Pleaseread unit.Ifyoushouldhaveanyquestionsaboutbooklet before using the unit. If you should have any questions about this product uct,pleasecontactususingtheany other Moultrie product, please contact us using the information on the back easeregisteryourcamerathisbooklet. Pleaseregisteryourcameraat mtoactivateyourwarranty.to activate your warranty.ICAMERA OVERVIEWFRONT VIEWLED FlashCamera LensLight SensorSecond Light SensorAim LEDAIM/OFF/ONMode ButtonEnter ButtonMotion SensorNavigation ButtonsLCD DisplayMicrophoneExternal Power PortUnlock for slide-out battery compartmentSIDE VIEWUSB PortSD Card SlotOur Service Department will gladly answer any questions youhave. Call 800-653-3334, Monday - Friday, 8:00 AM to 5:00 PM CST.www.moultriefeeders.com01112013 / MCG-1259611202011R1/ MCG-DGS-M990i11202011R1/ MCG-DGS-M990iM-990iGameCameraM990i DigitalGameSpyDigitalCameraM990i GameSpy Digital CameraPage 1
ICAMERA OVERVIEW (cont.)ON/ AIMON/ OFF/ OFF/ IR TESTIR- TestWhenIR Testis ONand thedetectsthe redAIMWhen (defaultAIM is ONOff)and thePIR sensordetectsmotion,thePIRred sensorLED on thefrontmotion,of the camerawillcomeforthe2 secondsshut off.LEDononfront ofandthethencamerawill come on for 2 sec and then shut off.MODE BUTTONThe Mode Button selects Camera Setup or Main Screen. When camera mode is selected,TheButtonselects buttonsCamera Setupor MainScreen.theWhencameramode Theis selected,UP andtheModeUP OWN buttons navigate through the menu options. The Mode Button is also used to wake-up enthecameraisinapowercamera and turn on the display when the camera is in power saving (or sleep) mode.saving mode.MODE /DOWNLEFT/RIGHTBUTTONSTheENTERbuttonthetoitemto be changed.The lectsthe itembe changed.The UP/DOWNand LEFT/RIGHTare usedtobuttonsstep throughthe menuoptions.Pressingthe ENTERbuttonagain selectsthe optionindicatedonare usedto stepthroughthe menuoptions.Pressingthe n is alsouseddisplay.to manuallya picture.selectstheoptionon theThetakeENTERbutton is also used tomanually take a picture.SAVE FILECPLOTSTALKERSAVE FILEC PLOTSTALKERSAVING FILES OVERVIEWUse the SaveFile featuresof the PlotStalkerSAVINGFILESOVERVIEWsoftwareto createsingle photo,theUsethe SaveFileafeaturesof thereducePlotStalkeroverall sizethe .mltfile, excludesoftwaretoofcreatea singlephoto,unwantedreduce thephotos intheoffront,or createvideo thatcanoverallsizethe .mltfile, aexcludeunwantedbe viewed using a standard media player.photos in the front, or create a video that canbe viewed using a standard media player.EXPORTING AN IMAGE/PHOTO1. On the main screen, choose a starting image/EXPORTINGANIMAGE/PHOTOphoto (frame) byusingthe scroll bar on thethe displayorchoosethe frame-by-frameOn theofmainscreen,a starting image/1 bottomsearchphotofeature.(frame) by using the scroll bar on thebottomof thebutton.display or the frame-by-frame2. Pressthe SAVEsearch feature.3. SelectPressthetheCurrentSAVEImagebutton(*.jpg) radio button.2Selectthe CurrentImage(*.jpg) radio4. PressChange.to enterthe directoryand button3PHOTO REVIEWBATTERY COMPARTMENTTo view pictures use the RIGHT or LEFT button to sequence to the next/previous captured pictureThe Camera is powered by eight(8) AA size alkaline or lithium batteries. Slide theor video clip. The camera’s menu display shows the picture number being viewed. To delete currentUnlockswitchto thegrab the small handle under the switch to slide-out thepictureor videopressthe rightDOWNandbutton.battery compartment tray.NOTE: ItCOMPARTMENTis recommended to use lithium batteries for best performance.BATTERY(Do not mix battery types)The camera is powered by eight (8) AA alkaline or lithium batteries. Slide the Unlock switch to therightgrab thesmall handle under the switch to slide-out the battery compartment tray.SDandCARDSLOTAccepts up to a 32GB SD Card for photo and video storage.Note: An SD Card must be installed for the camera to operate (sold separately).NOTE: It is recommended to use lithium batteries for best performance (do not mix battery types).SDCARDSLOTUSBPORTDownloadpicturesvideo andontovideoyourstorage.computer by connecting a USB toAcceptsup to stilla 32GBSD Cardandfor phototo save thetoimage.Press Change.enter the directory and4 filenamefilename to save the imagePress Export to save the file5. Press Export to save the file.5EXPORTINGMLTEXPORTING MLTFILEFILESelectappropriate50, or100,200 imagesvideoradio button.11. Selectthetheappropriate50, 100,200orimagesvideo clipradioclipbutton;thiswillwillcreatea MLTaformatfromfilethe startingframeplus theThiscreateMLT fileformatfrom thestartingframe plus thenext50,50,100,100,or 200nextor frames.200 frames.SelecttheChangebuttonto selectthe desiredlocationthefile.export file.22. Select the Change buttonto choosethe desiredlocationto savetothesaveexport3 Enter the directory and filename to save the file3. Enter the directory and filename to save the file.4 Select the Export button to save the file. These files are viewable withPlottheStalker4. SelectExportSoftware.button to save the file. These files are viewable withPlot Stalker Software.Mini-USBcablemust(soldNOTE:An SD Cardbeseparately).installed for the camera to operate (sold separately). For best results,wePOWERPANELrecommend that youformatPORT the SD card inside the camera before taking pictures. We alsorecommend that the SD card be Class 4 or Class 10 for HD video recording.Accepts the Moultrie PowerPanel accessory (sold separately) only. Refer towww.moultriefeeders.com for more information.EXPORTING WMV FILEDownload still pictures and video onto your computer by connecting a USB cable (sold separately)to the USB port.4USB PORTEXTERNAL POWER PORTAccepts the Moultrie PowerPanel or Moultrie Battery Box accessories only (sold separately).Refer to www.moultriefeeders.com for more information.EXPORTINGFILESelect theWMVappropriate150, 100, or 200 images video clip radio button. This will1. Selectthe aappropriate50, 100,videoclip plusradiothebutton;createa .wmvformatcreate.wmv will100,or or200frames.Select the Change button to select the desired location to save the export file.2Enterdirectoryfilenamesave locationthe file to save the export file.32. SelectthetheChangebuttonandto choosethetodesiredSelect the Export button to save the file. The program will convert the imagesto video based on the chosen settings. The .wmv file can be viewed using a4. Selectthe Exportbuttonto save the file. The program will convert the images to video based onstandardmediaplayer.3. Enter the directory and filename to save the file.the chosen settings. The .wmv file can be viewed using a standard media player and is great forGreat forinternet or emailing.uploadingto uploadingthe internettoor theemailing.NOTE: The use of any other power source will void your warranty and possibly harm your camera.Page22PageM-880 GameSpy Digital CameraM-990i Digital Game CameraPlotStalker SoftwarePlot Stalker SoftwarePage15 15Page
ACTIVITY SEARCHSearch Feature willscan throughyour photos and KERACTIVITYSEARCHPLOTSTALKERACTIVITYlook for changes in regions that you identify inSEARCHSetup.BPLOTSTALKER ACTIVITY SEARCHBSEARCHACTIVITYACTIVITYSEARCHIISlide the UNLOCK switch on the bottom ofslide-out Battery Tray. Install or eight(8) AAQUICK START INSTRUCTIONSwith polarities as indicated in the Battery TrSlidethetheUNLOCKUNLOCK switchon onthethebottomof Cameraand useknobpull theslide-outSTEP 1 to pullpullthe througSlidethe TheTheSearchFeaturewill scanyour photosautomaticallyslide-outTray. Installoroneight(8)AA sizealkalineor lithiumbatteriesTheSearchFeaturewillthroughscan throughthroughyourandphotosand automaticallyautomaticallyindicatedin theBatteryTray.Re-installBatteryTrayand insertyourSDorcard.Slide to polaritiesas thatindicatedin angesin regionsthatyouidentifyin orlithiumbatterieslookThefor SearchchangesFeaturein regionsthatyouidentifyinSetup.will scan through your photos and pinthethroughBatteryRe-installBatteryTray.2 Threadthechangesin adtheprovidedMountingStrapthroughtheEyeletsonthe ofbackofthe andTurnCameraonbytheonslidingON/OFF/IRTEIn ,thestopsvideoona photowhen area to hthe dasshown.thebluehighlights.cameraand thesecureto a treeor poleapproximately36"fromtheproperly.groundas shown.the detectionONposition.onphotowhenchanges areare found inin youryour identifiedidentified region,region, and thenthen nEyeletsonthe backof thebeThreadattachedtoprovideda ode,the PlotStalkersoftwarescansthrough theand.mlt photofile, stopsanywherein thewhenvideoviewingarea foundto removethe ameraonbyslidingON/OFF/IRTESTswitchthe changesin blue.can clickanywherein identifiedthe video viewingareathento removeon era onON/OFF/AIMswitchto theON position.STEP 3 Turnon a photowhenYouchangesare foundin yourregion, andhighlightsPresstheMODEbuttononetimeto get to ion.the bluehighlights.to theONCameraposition.Eyeletthe changesin blue. You can click anywhere in the video viewing area to removeTurnon by sliding ON/OFF/IRTESTswitch EyeletgettotheMainSelectionSTEP 4 Press the MODE button one time toACTIVITYSEARCHSETUPCameraSetupMenu. Set Time and Date byClickthe SEARCHSettingsbutton to activatethe bluehighlights.tothetheselectON position.PresstheMODEbuttonone andtimeto getgetto thetheACTIVITYSETUPScreen,Setup.Set TimeDateby kthe SettingsSEARCHbutton to activateACTIVITYSETUPENTER,usingUP/DOWNto adjust upMenu.SetTimeandDatebypressingClickthe SettingsSEARCHbutton to activatePressthefieldMODEbuttononedone.time to get to theACTIVITYSETUPtothenextandENTERwhenENTER, usingusing UP/DOWNUP/DOWN toto adjustadjustselected field,field, to move to the next field ysettingsforthe theActivitySearchCamera SetupMenu. Set TimeandDate by pressingClickSettingsbuttonto creenis or theSearchENTER, using UP/DOWN toadjustdone.selectedthe ActivityRegion andSensitivity settingswhendisplayed.whendone. Use the UP/DOWN buttons until the MAINwhendone.LEFT/RIGHT to move to the next field and ENTERfor the Activity SearchSCREEN option is highlighted yellow. Press ENTER.whendone.PressMODE buttonuntil MENU SELECTPressMODEbutton untiluntil merabuttonto Aim. Aim MENUcamera usingmotionSTEP 6 e UP/DOWN buscreenis displayed.Usethe untilMENUdetectionto determinetargetarea.Walk SELECTIONin frontof theStrapMountinguntilthe MAINMAINSCREENoptionishighlightedcameraat P/DOWNbuttonsthe MAIN SCREENoption is highligStrapyellow.Press ENTER.ENTER.DEFINE SEARCHSEARCH REGIONREGIONflashshowingthe coveredarea. option is highlightedyellow.PressDEFINEuntilthe MAINSCREENyellow.automaticallyPress ENTER.DEFINESEARCHProvidesthe abilityabilityto o ON.Yourcamera will nowyellow.PressENTER.DEFINESEARCHREGIONSTEP 7 YourYourCamerawillnowautomaticallytake theabilityto searchtake pictureswheneveran animalinis detectedin range,changesin thephotoin atospecificProvidesthefor forwheneveran animalanimalis detecteddetectedrangeCamera-basedonwill now automatically take tysearchforsearchYourYouronCamerawillnow automaticallytake picturesregion theratherthantheentirephoto.basedthe o.changesinthephotoinaspecificchangesthein photothe defaultdefault settingssettings below.below.changesin the inphotoa specificin a specificthewhenever an animal is detectedin range -basedonwheneveran animalis detected in range faultsettingsbelow.DEFAULT SETTINGSIIIClickon thetheSet SearchMotionSearchArea Button.Button.1 on1. Clickthe ick on the Set Motion Search Area Button.2. Usemouseto selecttodragandthe dragred outlinearoundthearoundarea youthewantto searchfor toUsethe mousemousetoandselectanddragthe redredoutlinearoundtheareayou wantwantto2 averypreciseareaifrequired.1 ypreciseareaiffor movement. This allows you to focus on a very precise area ifthe default settings below.CaptureModeCaptureModeCapture ePhotoDelayaftereachphotois takentakenPhotoDelayaftereach eachphotophotois takenisPhotoDelayafterPhotoQualityMOTION CAMDETECT(Still)TRAILTRAILCAM(Still)2.0MPHIGH(4.0 MP)2.0MPTRAIL CAM (Still)SECSECONDS555 SEC2.0 MPCapture ModeMotionFreezeONMotionFreezeON 5 SECUse the mouse to select and drag the red outline around the area you want toMotionFreezeONPhotoDelay after each photo is otCountOFFMultiShotCountOFF ONMultiMotionShot CountOFF3. Click OK button on the Settings Popup window to confirm your settings and exit the DigitalZoomNONEPhoto Delayafter each photo is takenVideoResolutionVGAMultiShot CountOFFClick OKOK buttonbutton onon thethe SettingsSettings PopupPopup windowwindow toto confirmconfirm youryour settingssettings andand3 eoLength5 SECVideoResolutionVGAexit thethe menu.menu.Motion FreezeexitClickOK button on the Settings Popup window to confirm your settings and3VideoAudioONVideoLength10 SECONDSVideoAudioONVideoLength5 SECrequired.exit the menu.Multi OULTRIECAMVideoResolution1to t.MOULTRIECAMCamera NameSetto High,Mediumor Lowthe- This sets the levelof pixelchangetotheconfirmprogram your settings andClickOKbuttonPopupwindow3 willInfo TemperatureStrip printedprinted onon photosphotosONdetect.Note;pixelonchange Settingswill occuroccur withwithcolor,intensity,lighting ororTemperatureFAHRENHEITInfoStripONFAHRENHEITwill Setdetect.Note;aa pixelchangeaa color,intensity,lightingto High,MediumorLow-color,Thisintensity,sets the lightingleveloforpixelchangethe programVideo LengthNote: A1pixelchangeoccurswhena changein willmovementis detected,soexitthemovementsomenu.thissettingis tocriticalto obtainobtain thethe desireddesired ntedphotos on otFrequency15InfoStriponprintedONthis settingiswillcriticaltobeableto ajumpthe desireddetect.Note;pixelchangewillframes.occur witha color, intensity, lighting orVideo LTSETTINGSDEFAULT SETTINGS000.000000 NN // 000.000000000.000000 lot Duration3 HOURClickon DefaultDefaultbutton toto returnreturn toto thethe defaultdefault valuesvalues forfor SearchSearch AreaArea andandDEFAULTSETTINGS1 Longitude& Latitude:& Latitude:000.000000N / 000.000000W W000.000000N / 000.000000Click1on Defaultbuttonto returnto the defaultforSearch setsArea ensitivitysettings.SettoonHigh,Mediumor valuesLow- on to returnto thedefault valuesforlevelSearchAreaandchange the tude- settings.000.000000Info Strip printed on photosSensitivitywilldetect.Note; aNpixelchange will occur with a color, intensity, lighting orSecurityCode00000GPS LongitudeLongitude -- 000.000000000.000000 WWDefaultSettingNO 000Nmovement so this setting is critical to obtain the desired results.PlotFrequencySecurityCode Code00000Security00000GPS Longitude - 000.000000 W2Page14PlotStalker otStalkerSoftwareon DefaultPlotStalkerbutton toSoftwarereturn to the default values for Search Area andPage 14141PageClickPlotDigitalDurationM-880 GameSpyGameSpyCameraM-880Digital CameraGPSLongitude& Latitude:M-990iDigitalGameCameraM-880 GameSpy Digital CameraPage 33PagePage 3Page 3
ACAPTUREMODESeSpy offersfour capture modesas described below.ult capture mode is Trail Cam.PLOTSTALKER SOFTWARE INTROINTRODUCTIONIn time-lapse photography a seriesThe GameSpy offers four capture modes as described below.INTRODUCTIONCAPTUREMODESPLOTSTALKERof still photosaretaken at regular SOFTWARE INTROIVAPLOTSTALKERThe CAPTUREdefault capture modeMODESis Trail Cam.In time-lapsephotography a series SOFTWARE INTROAIL CAM MODEtime intervals.ThePlotStalkerof still photos are taken at berofphotostakenSoftwareallowsyoutoPlotStalkerload theSOFTWAREINSTALLATIONTheoffersfourcaptureas describedTRAILMODEINTRODUCTIONtimeintervals. TheThe GameSpyM-990ioffersCAMfour capturemodes modesas describedbelow. Thebelow.default capture mode is Motion Detect.DownloadyourfreePlot Stalkern anTheanimaldetectedisconfigurablein Settings.PhotosstoredtimeInlapsefile allowsthatwasdefaultcapturearemodeis whenTrail Cam.Stillisphotostakenan animalis detected.Thearenumberof inphotos takentime-lapsephotographya seriesSoftwareyoucapturedto loadthesoftware at www.moultriefeeders.com/plotsoftwaren the DCIM/100MFCAMfolder onis theSD card. in Settings. Photos are stored infromofyourMoultrieGamestill photosaretakenregularwhenCAPTUREan animal is pturedPLOTSTALKERSOFTWARE e andPlotStalkerthe intheDCIM/100MFCAMfolder on the SD card.and timescrollbackwardforwardfromyour MoultrieGameCameraStill photosare takenanimaldetected.numberof photostakenwhen ananimal malis Thedetected.Thenumberof eOT heDCIM/100MFCAMfolderonthe SD low.INTRODUCTIONInlapsetime-lapsephotographya MODEthroughyourphotos,singlestep,camera takesphotoscaptureat a specifiedintervalduring the day and combinessearch hya yinadesignatedm together to create a Plot Video (*.MLT file) which can be viewed on thearea, andsavethefiles.timeintervals.The and forwardthem Plottogetherto createa Plot TheVideo(*.MLTfile)awhichcan be viewedarea,andbackwardsavetheyoufiles.plied MoultrieStalkersoftware.cameratakesPlot Videotwice on theSoftwareallowsto uredby step,yourTIMELAPSEMODEy; d thetakesat aandspecifiedduringThethe dayand combinessearchfor activityin a designateda day;takesoncephotosin thephotosonce duringinintervalthe theevening.morningPlotVideotoMoultrieGameCameraand scroll 4 or AMD Athlon 64 processor or above; dcombinesthemtogetherComputer:Intel Pentium ns restoredintimelapsefilethatwascapturedIntel Pentium 4 or AMD Athlon 64 processor or above; 1GBtogetherto viewedonthe gins15 minTheeveningPlotVideoends15 minPlotafterthroughcreatethema TimeLapseVideo(*.MLTasunrise.file)canbe ddiskthein theDCIM/100MFCAMfolderontheSDcard.et. isyourphotos,searchforactivitysoftware. The camera takes a Time Lapse Video twice a day; once in the morning and once in theSYSTEMREQUIREMENTSOperatingSystem:Microsoft Windows withServiceServicePackPack2 or2 or ingin m:32bitbit -- XPXP emorningPlotTimeVideo in a designatedand Microsoft Windows oresunrise.TheTheeveningLapse Computer:Intel Pentium 4orAMDAthlon 64processororabove;1GBlater;WindowsVista HomePremium,Business,Ultimate,orEnterprisewith save later;the ows Vista Home Premium, Business, Ultimate, or Enterprise withct thecorrectandsunsettimesand lowasautomaticallyaeveningreference.The lengthofendseachTimeLapseVideo mum.ServicePackPack1; or1;Windows7 7determinedbySeetheTimeDurationsettingin thecameramenu.Thecamerawillthesunset.chartbelowas a in:reference.Thelengthof oneachPlotis card.Serviceor rtoDurationcreatea PlotVideo(*.MLTfile)whichcanbe viewedon tself accordingly.TimeLapsedeterminedthe Plotsettinginadjustthecameramenu.TheThecamerawill yadjusttothecorrectORTANT:It willtake thecameraproperlyadjust to andthe adjustcorrectitself twicedetectthe correctsunriseand24hrssunsettotimesautomatically OperatingSystem:Microsoft Windows 32 bit - XP with Service Pack 2 orarea, and savethe REINSTALLATIONlater; WindowsVista Home Premium, Business, Ultimate, or Enterprise withSYSTEM REQUIREMENTS{{{{atimes.day;inthemorningand onceintheevening.ThemorningServicePack1;or Windows7yoursunriseand oncesunsetAsa tructions.Intel Pentium 4CDorintoAMDAthlon 64 processorabove; on-screen1GBRAM derontheSDPlotcard. Computer:ise andsunsetAsPlota otInsertthe ions.IMPORTANT:It will Thetakethecamera24hrsto properlyadjustto thesunriseandsunsettimes. Intel Pentium 4 or AMD Athlon 64 processor or above; 1GB .Toresetthesunrise100MBharddiskspaceminimum.eo at As5:45amandthewilleveningatTime6:15pm.To resetthe andsunrisea default,theendcamerastart thevideomorningLapse Videoat 5:45amend the evening videoSOFTWAREINSTALLATIONRAMminimum;IMPORTANT:It backwilltakethedefaultcamera24hrsuseto properlyadjustto thePlotcorrectLOADINGPLOTFILES 100 MB hard disk space minimum.sunset.Seechartasa reference.lengtheachVideoand ionin isLOADINGPLOTFILESat 6:15pm.resetthesunriseandsunsettimesbackDefaultto theThedefaulttimes,ofusethe etheSettingsoptioninOperatingSystem:Microsoft 32 bit- XPServicePack2 lstartthemorningPlotOperatingSystem:Microsoft bitWindows -FileXP withService2Computer),orwithlater;WindowsVista InsertthePlotStalkerCD Windows intoyour 32computerandfollowon-screeninstructions. plorer–PackMythemenu.1in the mium,File– MyComputer),menu.option1Premium,Business,or ExplorerEnterprisewithServicePackor Windowswith7Videodetectat 5:45amand endsunrisethe eveningvideo at6:15pm.To reset theVista HomeBusiness,Ultimate,or1;theEnterprisethe correctand sunsettimesautomaticallyandsunriseadjust itselfcopy later;the ctoryonLOADINGPLOTFILEScopy SDthecardPlotFiles(extensionis .MLT)the PLOTdirectorytheand sunsettimes backtheVideosdefault aretimes,usein:theDCIM/PLOTDefault Settingsoptioni
the display. The ENTER button is also used to manually take a picture. PHOTO REVIEW To view pictures use the RIGHT or LEFT button to sequence to the next/previous captured picture or video clip. The camera's menu display shows the picture number being viewed. To delete current picture or video press the DOWN button. BATTERY COMPARTMENT


![Smarter Battery Crack [2022-Latest]](/img/13/eliamari.jpg)