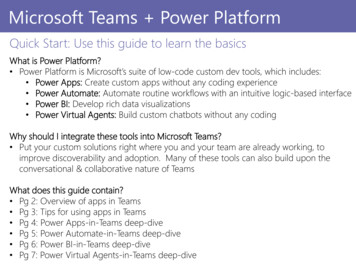
Transcription
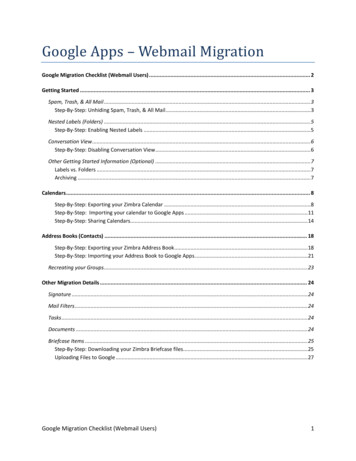
Google Apps – Webmail MigrationGoogle Migration Checklist (Webmail Users) . 2Getting Started . 3Spam, Trash, & All Mail .3Step-By-Step: Unhiding Spam, Trash, & All Mail .3Nested Labels (Folders) .5Step-By-Step: Enabling Nested Labels .5Conversation View .6Step-By-Step: Disabling Conversation View .6Other Getting Started Information (Optional) .7Labels vs. Folders .7Archiving .7Calendars . 8Step-By-Step: Exporting your Zimbra Calendar .8Step-By-Step: Importing your calendar to Google Apps .11Step-By-Step: Sharing Calendars.14Address Books (Contacts) . 18Step-By-Step: Exporting your Zimbra Address Book .18Step-By-Step: Importing your Address Book to Google Apps .21Recreating your Groups .23Other Migration Details . 24Signature .24Mail Filters .24Tasks .24Documents .24Briefcase Items .25Step-By-Step: Downloading your Zimbra Briefcase files .25Uploading Files to Google .27Google Migration Checklist (Webmail Users)1
Google Migration Checklist (Webmail Users)If you run into any problems, contact your ITC or the Help Desk (707.826.4357)Preparation Set aside 1-2 hours to complete these tasksMigration Login to Google Apps (webmail.humboldt.edu) Follow the steps in “Getting Started” – www.humboldt.edu/its/google-change Unhide your Spam, Trash, & All Mail labels Enable the Nested Labels Lab Turn off Conversation View (if you want to) Follow the steps in “What to Move” for each of these – www.humboldt.edu/its/google-move-zimbra Export & Import your Calendar(s) Export & Import your Contacts (Address Book(s)) Fix your distribution lists Setup your signature If you used them, re-create your Mail Filters If you used them, migrate your Tasks If you used them, migrate your Documents If you used them, migrate your Briefcase itemsLearn More (optional) Read our Mail and Calendar QuickStart Guides. See www.humboldt.edu/its/quickstart Learn about Labels (folders) – www.humboldt.edu/its/google-labels Find some Labs (add-ons) to enhance your google experience – www.humboldt.edu/its/google-labsGoogle Migration Checklist (Webmail Users)2
Getting StartedYou'll notice that things in Google Apps are a bit different than what you were used to in Zimbra. Tohelp you get comfortable, there are a few things we want to point out (and have you change).Video tutorial available: www.humboldt.edu/its/google-changeSpam, Trash, & All MailThere are three labels (folders) that Google has hidden by default. You're likely to use theselabels frequently. We'll show you how to unhide them.Spam - Google Apps does its own spam filtering. Anything Google believes is Spam it places inthe Spam label. If you don't delete them, they will be purged after 30 days.Trash - Anything you delete goes in the Trash. You can empty the trash whenever you feel likeit. Once a message is in Trash, Gmail will delete it in 30 days.All Mail - Shows almost all of your mail (Inbox, Starred, Chats, Sent, Drafts, and archived mail)Step-By-Step: Unhiding Spam, Trash, & All MailStep 1: Log in to Google Apps (webmail.humboldt.edu).Step 2: Click the Settings link on the top of any Gmail page.Step 3: Select the Labels tab.Step 4: In the Systems labels section, click show next to All Mail, Spam, andTrash. (You can tell they are hidden because the word "hide" is in bold.)Getting Started3
Step 5: Click the Gmail logo in the top left-hand corner to return to your mail.Notice that these labels now show up in your list of labels.If you prefer to keep your label list short, you can keep these labels hidden and use the "X more"pull-down below your list of labels:Getting Started4
Nested Labels (Folders)Google Apps groups all messages in a conversation together. Some people love this, some people hateit. If you prefer to see each message individually, you should disable Conversation View.Step-By-Step: Enabling Nested LabelsStep 1: Log in to Google Apps (webmail.humboldt.edu).Step 2: Click the Settings link on the top of any Gmail page.Step 3: Select the Labs tab.Step 4: Scroll down until you find the Nested Labels lab (they are in alphabetical order)Step 5: Click the Enable radio buttonStep 6: Scroll all the way up to the top of the page and click Save Changes.Getting Started5
Conversation ViewGoogle Apps groups all messages in a conversation together. Some people love this, some people hateit. If you prefer to see each message individually, you should disable Conversation View.Step-By-Step: Disabling Conversation ViewStep 1: Log in to Google Apps (webmail.humboldt.edu).Step 2: Click the Settings link on the top of any Gmail page.Step 3:In the General tab, under the Conversation View section, click Conversationview off.Step 4: Scroll to the bottom of the page and click Save Changes.Getting Started6
Other Getting Started Information (Optional)Labels vs. FoldersIn Google Apps, you have labels instead of Folders. A message can be in more than one label ata time. For example, in Zimbra you might have had a folder for travel and one forreimbursements. If you had an email related to a travel reimbursement, you would have had tomake a decision about which folder to file that message in. In Google Apps, you can applyBOTH labels to the message. If you're ready to use labels, visit www.humboldt.edu/its/googlelabels.Video tutorial available: www.humboldt.edu/its/google-labels.ArchivingIn Google Apps, things seem to stay in your Inbox even if you've moved them to a label. Googlesees the message as being in two Labels, one of which is "Inbox" (see Labels vs. Folders). Thiscan be frustrating if you don't know what's going on. The Archive button (right above all of yourmail) will take things out of your Inbox without deleting them (even if they aren't in anotherlabel). To access those archived messages, click the "All Mail" label on the left-hand side of thescreen (if it's hidden, you'll see a link that says "X more" with a down arrow).Getting Started7
CalendarsTo move your Zimbra calendar(s) to Google, you'll need to export them from Zimbra and import theminto Google. If you have more than one calendar, repeat these steps for each calendar you want tomove. You'll also need to re-share them.Video tutorial available: Step: Exporting your Zimbra CalendarStep 1: Log in to Zimbra (zimbra.humboldt.edu).Step 2: Click Preferences on the right-side of the navigation bar.Step 3: Click the Import/Export tab.Step 4: Scroll down to the Export section.Step 5: Next to Type: select Calendar.Step 6: Next to Source: click Calendar (or Browse)Calendars8
Step 7: Choose the calendar you wish to export. Click OK.Step 8: Click Export.Calendars9
Step 9: If you are prompted, you want to SAVE this file (not open). Take note of where yousave the file (it might be your Downloads or Desktop folder). The file has a name likeCalendar.ics (or the name of the calendar).Repeat steps 6-9 if you have more than one calendar to move.Calendars10
Step-By-Step: Importing your calendar to Google AppsNote: It's important to know that only your primary calendar (abc123@humboldt.edu) affectsyour free/busy time in Google Apps. In Zimbra, you could specify which calendars did and didnot, in Google, you can't. If you had two calendars such as "Work" and "Personal" that both hadappointments, you may want to consider importing both to your primary calendar(abc123@humboldt.edu) to avoid scheduling conflicts. If you use additional calendar for thingslike birthday reminders, those are safe to keep separate.If you have to move more than one calendar, makes sure you know which ones to move andwhere to put them. See Understanding calendaring types: ndar-understand.In this example, we're importing into your primary calendar. If you are importing into a differentcalendar, you'll want to add a new calendar first.Step 1: Log in to Google Apps (webmail.humboldt.edu).Step 2: Click the Calendar link on the top, left-hand side of the screenStep 3: On the left-hand side of the screen (under Other calendars), click Add, thenImport calendar. (Note, this isn't the "Add" that is under My calendars).Calendars11
Step 4: In the window that opens, click Browse or Choose File and locate the file youdownloaded earlier (named Calendar.ics or the name of the Zimbra Calendar). The file isprobably in your Downloads location or on your Desktop, but it depends on how your webbrowser is configured.Step 5: Choose the Calendar you want to import to. Your primary calendar (whichaffects free/busy time) looks like your HSU email address.Calendars12
Step 6: Click Import. This may take a while! Only click the Import button once! Youcan watch your browser' status bar to see your import progress.If everything went well, you should see a message telling you how many events wereprocessed and how many were successfully imported. It's possible you'll also get a blankbox. That also means that the import was successful.If all of your events were successful, click Close. You're done! If you have an error,proceed to Troubleshooting Calendar Imports.If you have additional calendars, repeat these steps.Calendars13
Step-By-Step: Sharing CalendarsIf you shared your calendars in Zimbra, you'll need to reshare them in Google Apps.Video tutorial available: p 1: Login to Zimbra (zimbra.humboldt.edu).Step 2: Click the Calendar tab.Step 3: Right-click on your primary calendar ("Calendar"). (You'll be repeating these steps foreach calendar)Step 4: Click Edit PropertiesCalendars14
In the window that opens, the section Sharing for this folder shows who you have shared yourcalendar with and the permissions they have. In this example, abc123 is a Manager, whichmeans they can make changes to your calendar. Blg10 can only View your calendar, andbjt7001 is an Admin who can make changes AND share this calendar out with other people.Step 5: Open a new browser window and log into Google Apps(webmail.humboldt.edu). You're going to want to have both windows open at the same so youcan compare. Your screen might look like this:Step 6: In Google click the Calendar link on the top, left-hand side of the screen.Step 7: Click the arrow next to the calendar you wish to share. Your primary calendar lookslike abc123@humboldt.edu (demo@humboldt.edu in this example).Calendars15
Step 8: Click Share this Calendar.The Share with specific people section asks for the email address of the person with whomyou'd like to share and the permission settings.Step 9: Refer back to your Zimbra share information and enter the email address of the personwith whom you'd like to share.Step 10: Enter the permission settings you'd like to apply. In this example,abc123@humboldt.edu was a Manager, so we'll give them Make changes to events permissions.Step 11: Click Add Person.Step 12: Repeat steps 9-11 until you've added all of the shares for this calendar.Calendars16
Here's a comparison of what we had in Zimbra and how it will look in Google:Step 13: Click Save to return to your calendars.If you have additional calendars to save, repeat steps 3-13.Calendars17
Address Books (Contacts)To move your Zimbra contacts (Address Books) to Google, you'll need to export them from Zimbra andimport them into Google. If you have more than one address book, repeat these steps for each addressbook you want to move.Video tutorial available: ere are three tasks to complete:1. Exporting your Zimbra Address Book2. Importing your Zimbra Address Book to Google Apps3. Recreating your GroupsStep-By-Step: Exporting your Zimbra Address BookStep 1: Log in to Zimbra (zimbra.humboldt.edu)Step 2: Click on Preferences on the right-side of the navigation bar.Step 3: Click the Import/Export tab.Step 4: Scroll down to the Export section.Step 5: Next to Type: select Contacts.Step 6: Click the Account Contacts pull-down menu and select Account Contacts.***Former Outlook users: Select the type Outlook Contacts if you EVER used Outlook withZimbra***Address Books (Contacts)18
Step 7: Click Browse.Step 8: Select the Address Book you'd like to export. Contacts is your primary AddressBook. Emailed Contacts stores every address you've ever emailed in Zimbra.Step 9: Click OK.Step 10: Click Export.Address Books (Contacts)19
Step 11: You will be prompted to Save the file (do not Open). Take note of the filename and location where you save this file. The file name will end in .csv. It may bedownloaded to your Downloads folder or Desktop, but this depends on how your browser isconfigured.Step 12: Repeat steps 7-11 if you have more than one address book to export.Address Books (Contacts)20
Step-By-Step: Importing your Address Book to Google AppsStep 1: Log in to Google Apps (webmail.humboldt.edu)Step 2: In the left-hand navigation, click Contacts.Step 3: Click the Import link in the top right-hand corner.Address Books (Contacts)21
Step 4: In the Import window, click Browse or Choose File.Step 5: Navigate to your download location and select the file you exported earlier.Step 6: Click the Import button.Step 7: A message displays telling you how many contacts were imported. Click OK todisplay your contacts.Your imported contacts display.Step 8: Repeat steps 3-7 if you have more than one address book to import.Address Books (Contacts)22
Recreating your GroupsIf you had any distribution lists or groups in Zimbra, unfortunately, you'll need to manuallyrecreate them from scratch. You can fix these now, or do them as-needed.Step 1: In your Google contacts, select the contact group that you want to recreate.You can see who the members of your groups are by clicking on the group name. You'll seeall of your members listed in the Notes field.Step 2: Copy the list of members and paste it in another document so you can review it whilecreating the group.Step 3: for instructions on how to create and add contacts to a group, visit www.google.com/supportand search for “Creating Contact Groups”.Address Books (Contacts)23
Other Migration DetailsSignatureYou'll need to setup your signature in Google Mail. Visit www.google.com/support and searchfor “Adding a signature”.If you used more than one signature in Zimbra, check out the Canned Responses lab. Seehttp://www.humboldt.edu/its/google-labs for information on enabling this.Mail FiltersYou'll need to re-create your mail filters from Zimbra. We recommend you have both Zimbra and GoogleApps open at the same time so you can view your Zimbra filters while creating your Google filters.Visit www.google.com/support and search for “Using filters”.Video tutorial available: unately, Google doesn't allow you to import tasks. You'll have to re-create your tasks one-by-one.We recommend you have both Zimbra and Google Apps open at the same time.Visit www.google.com/support and search for “Using tasks”.DocumentsUnfortunately, Zimbra Documents don't export well, and Google can't recognize them when youimport. You'll need to copy and paste each Zimbra Document into a new Google Doc one-byone.Other Migration Details24
Briefcase ItemsYou'll need to export each of your Briefcases in Zimbra and import them into Google Docs. If you don'tneed the files online, you can skip the step of uploading to Google Docs.Video tutorial available: Step: Downloading your Zimbra Briefcase filesStep 1: Login to Zimbra (zimbra.humboldt.edu)Step 2: Click on the Briefcase tab.Your Briefcase(s) and files display.Step 3: Right-click on your Briefcase and select Share Folder.Other Migration Details25
Step 4: Right-click the link at the bottom of the pop-up window and select Copy LinkLocation (Firefox) or Copy Shortcut (Internet Explorer).Step 5: Click Cancel. (Yes, it feels wrong, but you're going to use that link in the next step)Step 6: Open a new web browser window or tab. Paste the url you copied in step 4 into theaddress bar and add ".zip" to the end of it.Step 7: If you are prompted to login, do so. Save the file items.zip to your computer. Thismay download to your Downloads folder or your Desktop, depending on how your browser isconfigured.Other Migration Details26
Step 8: Locate the items.zip file that you just downloaded.Step 9: Windows users, right-click on items.zip and select Extract All. Take note of whereit is saving the extracted files. Mac users, double-click on items.zip to extract the files.You now have a Briefcase folder that contains all of your files. Keep track of itslocation. You're going to need this later.Repeat steps 3-9 if you have additional Briefcases.Uploading Files to GoogleFollow the instructions on the Google Docs Help Center to upload your Zimbra Briefcase files.Visit www.google.com/support and search for “uploading files”.Other Migration Details27
Google Migration Checklist (Webmail Users) 2 Google Migration Checklist (Webmail Users) If you run into any problems, contact your ITC or the Help Desk (707.826.4357) Preparation Set aside 1-2 hours to complete these tasks . Migration Login to Google Apps (webmail.humboldt.edu) Follow the steps in "Getting Started" -