Transcription
eData Access Database Template GuideA Guide to the Setup and Basic Functions of theeData Access Database TemplateeData Access Database Template Guide1
ContentsIntroduction . 4Step One – C:\data Folder . 4Step Two – Download . 5Step Three – Export. 5Step Four – Settings . 6Step Five – Update Template . 7Next Steps . 7Helpful Hint . 7Useful Features in Access . 8Find . 8Filter. 8Sort . 8Create a New Query . 9Importing Custom Queries/Reports . 10eData Table Relationships . 11What’s Inside . 13Template Main Interface . 13Data Checking . 14Adult Assignments/Hours . 14Assessments . 15Miscellaneous Data Checks . 16Distance Learning. 16Monthly Attendance/Hours . 16Group Data Checks . 17Tutor/Pair Data Checks. 17Class Data Checks . 17Family Literacy Data Checking Statistics Form . 18Family Adult Data Checks . 18Family Data Checks . 18Child Data Checks. 19Reports . 19Enrollment Reports . 19Instructional Hours/Attendance. 20eData Access Database Template Guide2
Adult Assignments . 21Pair Performance . 21Special Needs Adults. 21Adult Data . 21PA Secure ID Near Matches . 21Outcomes . 21Assessments . 22NRS Reports . 22Class/Group Reporting . 23Class Performance Reports . 23Group Performance Reports . 24Reports by Class/Group Selection . 24Family Reporting . 25Family Summary Reports . 25Assessments . 26Goals/Outcomes . 26Family Hours by Month . 26Comprehensive Report . 27NRS Reports . 27Data Validation Reports . 27Adult Ed 064 . 28EL/Civics 061. 28Family Literacy Reports . 28Scrub . 28Reports II . 29Reports. 29Distance Learning. 30Family Literacy Enrollment. 30Performance Reports . 31Performance Report Utilities . 31For additional information, please contact eData Tech Support at 1 877-857-8869or eDataTechSupport@psu.edueData Access Database Template Guide3
IntroductionUsing Exported Data from eData in the Access Template:This guide shows users how to set up the Microsoft Access database template (Accesstemplate) specifically for use with exports from the eData v2 (eData) system.Also included in this document are several procedures that allow for analyzingexported data from the eData system. The various procedures that follow are notintended to be an in-depth Access training but are presented to provide generalinformation about tools in the Access template. Agencies who plan to further customizethe Access template should obtain training in the detailed use of Microsoft Access.Step One – C:\data FolderCreate a folder on your computer’s hard drive (commonly labeled as the C: drive).NOTE: You may already have a data folder created on your hard drive if you used theAccess template during a previous program year (PY). If so, you may skip this step.However, some users simply rename last year’s data folder (using a name such as“data2020-21”), and then create a new data folder following the steps below.Creating this folder with the previous program year’s information can be useful forcomparing yearly program data.To create the folder for data exports, follow these steps:1. On the desktop, in the Start menu, or in the taskbar, click: File Explorer2. In the Computer or File Explorer window, locate and double-click the (C:)drive. In Windows 10 click on This PC / Local Disk (C:).3. Once in the (C:) drive window, click New Folder in the ribbon/toolbar nearthe top of the window.4. By default, the new folder will be assigned the name “New Folder” and willbe highlighted. Type the word data and press the Enter key on yourkeyboard to rename the folder. You should now have a folder named data.If still have a New Folder, then right-click on it and select Rename.eData Access Database Template Guide4
Step Two – DownloadDownload a copy of the Microsoft Access database template.To download a copy of the template, follow these steps:1. Open your internet browser (e.g. Chrome, Firefox, or Edge) and navigate tothe following website: www.paadultedresources.org/edata2. Click the section marked eData Access Database Template.3. Click the link named eData Access Database Template.4. When prompted, click Open.5. Single click the template file to highlight it, then click the Extract All Filesicon in the toolbar at the top of the window.6. In the text box that appears, type C:\data and click Extract.Step Three – ExportExport data from the eData website.NOTE: Data in the eData system is available for exporting. Keep in mind, however, thatany adult records locked due to a PASecureID near match will not have a PASecureID inthe export.To export data from the eData website, follow these steps:1. Open an internet browser (Chrome or Firefox recommended; InternetExplorer is not recommended for use with the eData website.) and navigateto the PDE website at http://www.education.state.pa.us.2. Navigate to the MyPDESuite link at the bottom of the page, click on the link,and then log in.3. Click on the eData link under the “My PDE Applications” heading near thetop of the screen.4. Once in eData, click Export Data from the Maintenance dropdown menuin the top navigation bar.5. Click your agency name and verify that the current year is selected in theProgram Year drop-down. If your agency holds direct contracts and has oneor more subcontracting agencies listed on the export screen, select –ALL–when exporting. Click Generate Export.6. When prompted, click Open.7. On the Window that appears, click Extract All Files in the toolbar at the topof the window.8. In the text box, type C:\data and click Extract.9. If prompted to replace all files, click Yes.eData Access Database Template Guide5
Step Four – SettingsTo prevent errors while updating the template with exported data from eData, usersmust change some default settings in Microsoft Access. The directions listed in this stepare different depending on the version of Microsoft Access installed on your computer.To change the Access settings, follow these steps:Access 2007Turn Off Action Query Prompts and Adjust Macro Security:1.2.3.4.5.6.7.8.9.Open Microsoft Access.Click the Office Button at the top left.Click Access Options at the bottom of the menu.Click Advanced in the menu on the left.Uncheck the Action Queries checkbox in the Confirm section on the rightof the window.Click Trust Center in the menu on the left.Click the Trust Center Settings button.Click Macro Settings in the menu on the left.Select Enable all macros.Access 2010 / 2013 / 2016Turn Off Action Query Prompts and Adjust Macro Security:1. Open Microsoft Access.2. Click the File tab at the top left.3. Click Options at the bottom of the left navigation menu in the Help section.4. Click Client Settings in the menu on the left.5. Uncheck the Action Queries checkbox in the Confirm section.6. Click Trust Center in the menu on the left.7. Click the Trust Center Settings button.8. Click Macro Settings in the menu on the left.9. Select Enable all macros, click OK twice, and close Microsoft Access.eData Access Database Template Guide6
Step Five – Update TemplateThe next step is to update the database template.To update the template, follow these steps:1. On the desktop, in the Start menu, or in the taskbar click: File Explorer2. On the My Computer (Computer) window, double-click the (C:) drive.3. Double-click the data folder.4. Double-click the eData Agency template.accdb file to open the database(if not already open).5. Once the template is running, click the “Update Existing and Add NewRecords” button near the upper left side. This process takes a few minutesto read the eData files that were exported to the C:\data folder.Next StepsAfter completing the five steps above, users should have successfully updated thedatabase template. Be aware that if new data has been added in the eData system andthe export has not been run, then it is not included in the Access template. Users mustrepeat steps 3 and 5 to update the Access database with any new information saved ineData.Helpful HintIn Step 2 listed above, users are directed to extract the template file to the C:\datafolder. It is not necessary to save the database template file in the C:\data folder.Users may save the database template file in any location, including folders on a sharedserver. The export process in Step 3 is not as flexible. Exports must be extracted to theC:\data folder. However, if there is a requirement that prevents you from having all thedata on the local PC, then contact eData Tech Support.If multiple users at one agency are interested in using the Access database template, itis possible for one user to download and update the template then save it in a sharedlocation. This will allow multiple users at one agency to access the same template fileand will eliminate the need for every person to individually export and update datafrom the eData system.NOTE: If this scenario is used by an agency, please note that ALL users must completestep 4 above to update their settings.eData Access Database Template Guide7
Useful Features in AccessFindUsing the Access Ribbon, you can perform a Find operation in a selected column byclicking the binoculars or magnifying glass button.FilterUsing the Access Ribbon, you can perform filters on selected information by clicking onthe Filter by Selection button. Remove the filter by clicking on the Remove Filter button.You may also use the drop-down arrow in the header row to filter by one or morefields. In the screenshot below, the drop-down arrow was clicked for the Entry EFL field.Users have the option to sort ascending or descending here, to use a Text Filter, or toselect/deselect certain EFLs to filter. A “Select All” and “Blanks” option is available to seeall records or to see only blank records.Each field type includes different filter options. For example, it is possible to filter datefields using one specific date, month, year, quarter, date range, and many otherparameters. Filters on numeric field types allow users to look for values less than,greater than, equal to, between, etc.SortUsing the Access Ribbon, you can sort by selected columns in ascending anddescending order by clicking the Ascending and Descending buttons. After sorting atable/query, when you close the table/query, Access will prompt you to save thechanges; say No to return the table/query to its original sort order.eData Access Database Template Guide8
Create a New QueryTo create a customized display of information, including related information, begin byclicking the Create New Query button at the bottom of the View SelectedInformation section on the main form.Then proceed with the following:1. Select Design View from the New Query dialog box, then click OK.2. From the Show Table dialog, scroll toward the bottom and select one ormore tables or queries from which you would like to create a display ofinformation (see the eData relationship index at the end of the SystemManual).3. Click Add to add a table or query.4. Click Close to finish.5. From the top pane of the Select Query Design window, select the desiredfields to add to the query design grid in the bottom pane by either doubleclicking or dragging the field to the grid below.6. The Run button on the toolbar will display the query results. Clicking theDesign View button on the tool bar will return the user to the Query Designwindow. In Access the Run and Design View buttons appear in the Ribbonat the top of the screen.7. The Totals button on the tool bar allows queries to subtotal and summarizedata by grouping like items together. The Total row will be added to thedesign grid by clicking this button. In Access the Totals button appears inthe Access Ribbon on the top of the screen.Closing the main form by clicking the Close button allows users to view the Accessdatabase window. To maintain the processes already in place, none of the tablesstarting with the words “Code,” “Link,” or “Move” should be altered in any way.The tables starting with “tbl” can have fields added to them, but none of the existingfields should be changed in any way or the database may cease to function properly.The existing queries starting with the letters “qryView” should not be altered to suitindividual agency’s needs. These queries are linked to the buttons on the MainInterface, such as Adult, Adult Goals, etc., and are used in many of the reports thatappear in the template. None of these queries or any other queries should be deletedor altered in any way or the system may cease to function properly, or reports will notshow accurate results. Users may adjust these queries but be sure to “Save As.” tosave any changes to a new file so that the existing queries remain intact. Additionalobjects and processes may be created for an agency’s use and data needs within thedatabase. Agencies are encouraged to share information and processes that will makeall external systems better and openly communicate research and achievements inthese areas.eData Access Database Template Guide9
NOTE: When creating custom reports or queries, it is recommended to use a commonnaming scheme. For example, agencies may choose to start the name of each query orreport with the word “LOCAL.” This enables users to easily find custom queries andreports. In addition, queries and reports can be imported from prior year’s templatesinto the current year’s version of the database template. The import process is verysimple if all custom queries and reports follow a similar naming scheme. If you needhelp, please contact eData Tech Support.Importing Custom Queries/ReportsOver the course of a program year, the eData Tech Support project occasionallyupdates the database template to include additional reports, queries, and/or datachecking items. When a new version of the template is released, users must import anycustom queries/reports from the previous version of the template into the new version.In some cases, the version number of the template does not change, so make sure thatyou back up your existing template or rename it so your custom queries/reports arenot lost.To import custom queries/reports from one template to another, follow the stepsbelow:1. In the External Data tab, select Access from the Import section of thetoolbar.2. On the window that appears, click the Browse button. Browse to find yourprevious version of the template that holds your custom queries/reports.Highlight it and click Open.3. Click OK.4. Select the queries/reports you want to import by clicking them individually. Ifyou have used the tip above and prefaced all your custom queries and reportswith the phrase “LOCAL”, they will all be together in the Import Objects list.5. After selecting all objects to import, click OK. This process can be repeatedas needed.eData Access Database Template Guide10
eData Table RelationshipsThe eData system is a relational database. The database uses primary keys (PK) andforeign keys (FK) to link related tables. For example, the field named AdultPK is theunique identifier for adult records and is included in tblAdult. This field can be used tolink tblAdult to other fields in the database, such as tblAdultProgramDetail. The fieldnamed AdultFK in tblAdultProgramDetail is linked to tblAdult through the field AdultPK.Understanding the key fields is instrumental in understanding how to link tables andqueries when creating queries or reports. The most common relationships are alreadymade in the database and will automatically appear when adding tables to a query.In this example, the Adult, Adult Program Detail, and Labor Force Status Code tablesare linked to produce a list of adults by Labor Force Status.Note the links made between the tables. The fields AdultPK and AdultFK provide thelink between the Adult and Adult Program Detail tables. The Adult Program Detail tablelinks to the Code LaborForceStatus table using the LaborForceStatusCodePK andLaborForceStatusCodeFK fields.The Access database template includes “Code” tables like the Labor Force Status tableabove. The code tables allow text values to be displayed instead of numeric codes.eData Access Database Template Guide11
The main page of the Access database template includes buttons that display pre-builtqueries for the various export tables. It is recommended that these queries be used asthe base for any agency custom queries to eliminate the need to link tables to the codetables. (These queries all start with “qryView.”)For example, connecting the Adult and Adult Assessments queries eliminates the needto connect multiple code tables, as displayed below.eData Access Database Template Guide12
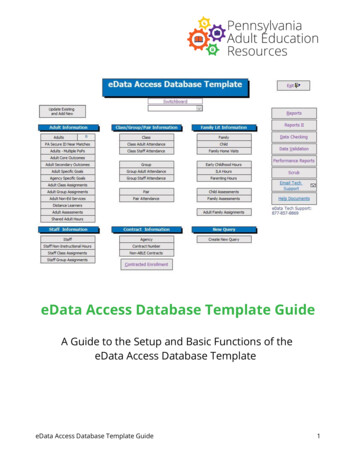
What’s InsideThe following section describes the pages in the eData Access Database template andincludes a list of queries and reports found on each page. Each query and report titleincludes a description of the data it displays.Template Main InterfaceWhen a user first opens the database template, the main page (form) appears asshown below. This page includes numerous buttons that open either additional pagesin the template or queries that include agency data (if the template has been updatedwith an export from the eData system). The buttons are labeled to represent the datathat will appear when clicked.For example, clicking the Adult button will return a table with all adults entered by youragency (and subcontractors, if applicable). Selecting any of these buttons will show ALLrecords for the selected item. The buttons on this page are linked to queries thatdisplay data where it is possible to use filters and sorting options to further analyzeyour data.This screen also includes buttons on the right labeled Reports, Reports II, DataChecking, Data Validation, Performance Reports, and Scrub. Clicking on theseeData Access Database Template Guide13
buttons will take you to another page where additional queries and reports areavailable. Once on these pages, clicking the button for a query or report will produce anon-screen copy of the data that can be printed, while clicking on the underlined title willproduce an explanation of that report or query. Below, you will find a list of each of theitems that appear on each page.Data CheckingThis page includes data checking items for all programs and/or contract types. Keep inmind that it may not be possible to correct all items that appear in the data checkingreport. For example, if an adult appears in the “Adults Missing Exit Assessments” datacheck, was never post tested, and subsequently left your program, this item will remainin the data checks and cannot be corrected.Data Check Summary Report – Provides a summary count of potential errors in yourdata. The items that appear on this report all have a corresponding item that appearson the data checking page. The items that appear in this report are in bold font on thedata-checking page. Users should print this report and then use it in conjunction withthe items on the data checking page. For example, in the report, if you see “AdultsMissing Hours” appear with five errors, that means that five adults are missing hours.Return to the data checking page and click the button next to “Adults Missing Hours” toidentify the five adults by name.Counts – On the left side of the data checking page, a list of buttons appears in the“Counts” section. Each of these items provides a numeric count. For example, byclicking Adult, a count of the total number of adults entered in eData compared toenrolled adults ( 12 hours) will appear.Adult Assignments/HoursAdults with 0 Hours in Last 90 Days – Adults who have not had hours recorded in thelast 90 days and have not been exited. These adults are in "limbo," and they may havehours not entered or they may also have left the program and should be exited.Adults Missing Assignments – Adults in the eData system who have not beenassigned to a class, group, or pair.Adults Missing Hours – Adults in the eData system with no attendance hours.Adults Assignments – Age Ineligible – The youngest age for contract 061 is 16,whereas the youngest age for contracts 064 and 054 is 17.Adults in 061 and 054 – Adults who are active in both 061 and 054 contracts and theirhours.Adults in Multiple Classes – Adults assigned to more than one class.eData Access Database Template Guide14
AssessmentsAdults 1st Assessment 30 Days from Start Date – Adults whose first assessmentadministration was more than 30 days after their Period of Participation EnrollmentDate for the current program year.Adults Missing Assessments – Adults who do not have an assessment in the eDatasystem. Please note that some adults may have been given an assessment, but theassessment may not have been added to the eData system. This report shows alladults who are missing an assessment, not just the adults who have earned 12 or moreinstructional hours.Adults Missing Assessments 12 Hours – Adults who have 12 or more instructionalhours but do not have an assessment entered in the eData system.Assessed Adults Missing Entry Level – Adults who have an assessment entered in theeData system but do not have an entry level identified.Adults Without a Post Test and Hours XX – Adults who have not been given a posttest. By default, the report runs based on 40 hours obtained since the pretest, butusers can adjust this number based on the test publisher's guidelines for hoursbetween assessments.Adults Missing Exit Assessments – Adults missing an exit level assessment in theeData system. This data check looks to see if the eData system has identified an entrylevel for the adult but has not identified an exit level. In addition, this data check looksat the number of hours earned by the adult and compares that number to the testpublisher’s guidelines, as defined in Policy D.100 Adult Learner Assessment. If the adulthas reached the minimum number of instructional hours defined in the policy and theydo not have an exit assessment, they will appear in this data check.Post Tested Adults Missing Exit Level – Adults who have a posttest in the eDatasystem but are missing an exit level.Adults Assessed with Same Test-Same Date – Adults with more than one a
2. Click the section marked eData Access Database Template. 3. Click the link named eData Access Database Template. 4. When prompted, click Open. 5. Single click the template file to highlight it, then click the Extract All Files icon in the toolbar at the top of the window. 6. In the text box that appears, type C:\data and click Extract.