Transcription
Microsoft Access Tutorial - FunctionX- Introduction - Creating A Database - Tables Design - Introduction To Microsoft Access Objects - Controlling The User's Input - Relationships - Subdatasheets - Forms Design Overview - Exploring And Analyzing Data - Query Design And Exploration - Forms Properties - Calculated Fields - Advanced Queries - Exploring Forms Controls - Designing And Improving A Report - Importing From And Exporting Data To Other Applications - Macros - Switchboard - Introduction to VBA - Shortcuts - A Complete Database Created With The Keyboard -Introduction To A Microsoft AccessDatabase1 - Introduction:A database is a collection of information organized as to make it easy to view it, search it, retrievethe right detail, and collect the necessary facts in an easier, timely, and effortless manner aspossible.2 - Relational Database:http://www.functionx.com/access/print.htm (1 of 95) [2000/11/04 09:42:31 AM]
Microsoft Access Tutorial - FunctionXAn organized database is composed of inter-related parts. Since you define these parts, you alsoorganize them in a manner that helps some parts of your database to supply specific information toothers. In one part, you would cover one category of data, such as people's personal information(name, date of birth, salary, hobbies, etc), in another you would cover what they buy in a store.3 - Microsoft Access:Microsoft Access is a relational database used on desktop computers to manage information ondifferent levels for different purposes.Microsoft Access can be used for personal information management, in a small business toorganize and manage all data, or in an enterprise to communicate with servers.4 - Database Management System (DBMS):A database is an organized collection of data. Organization means method, it assumes discipline, italso anticipates efficient manner in using that information. Unless you are creating smallapplications for your personal use (and I don't think you are exclusively doing just that), you willusually need to share your data either with other people (users, DB developers, etc) or othermachines. To make your job easier, Microsoft Access provides in one package the databaseinformation and the tools you need to use your database. To be organized, you will divide yourdatabase in different related parts. The method of management you will use makes MicrosoftAccess a Database Management System.When you create a database in Microsoft Access, you create a database file that will includedifferent parts of your database. These are referred to as tables, queries, forms, reports, etc.5 - Components of a Microsoft Access database:When you open an instance of Microsoft Access, you encounter the database window, which is thecontrol point of the different parts of your htm (2 of 95) [2000/11/04 09:42:31 AM]
Microsoft Access Tutorial - FunctionXFrom here, you can click an icon to access a specific category, referred to as objects.Microsoft Access keeps different details about your database in different formats. If you click theTables button under the Objects button, you get to the Tables category.Tables:This is the central point of your development, because all data is stored in tables. The functioningof your database relies on how you design your tables. For better organization, you will havevarious tables in your database, each for a different purpose. For example, for a video clubapplication, you would use one table to store employees information, another table to storecustomers records, yet another table to list different video tapes (their titles, ratings, actors names),etc.A table is made of rows and columns.A row is considered a Record, it is a group of details about one specific item of the table. It couldcontain a customer's name, his phone number, his member ID, his work number, his marital tm (3 of 95) [2000/11/04 09:42:31 AM]
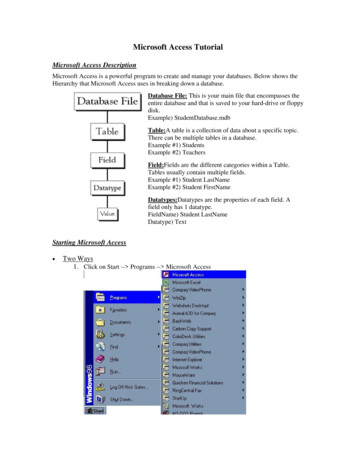
Microsoft Access Tutorial - FunctionXA column is a field representing one particular category of information about the records in thetable. For example, it would hold the names of all actors in a particular movie, another columnwould hold the titles of different movies in the video store.Queries:A table can be large depending on the information it holds. To further organize your data, youshould be able to retrieve necessary information for a specific purpose. The solution is to create aquery (or queries) so that you will limit part of the data in a table for a specific goal, for bettermanagement or search. That's the role of a query.Forms:Tables are used to create the data in your database. Sometimes, they are not very cute, as far as theusers are concerned. Forms are windows objects used to view and/or enter data in your database.http://www.functionx.com/access/print.htm (4 of 95) [2000/11/04 09:42:31 AM]
Microsoft Access Tutorial - FunctionXA form can combine data that is part of one or more tables or queries. Forms are the windowinterfaces that you usually will ask your users will access when editing data in your database.Reports:A report in the organized document that you will print from your data. A report can includedifferent parts or details about your database; it includes data from a table or a query, it could alsoget its data from various tables, queries, forms, or data that is calculated from other data comingfrom different tables or forms.Pages:New to Microsoft Access 2000, Data Access Pages allow you to publish your forms as web pageson the Internet or on an intranet.Macros:Using Microsoft Access, you can customize certain behaviors of your application. Some of thesebehaviors can be automated through a combination of buttons. For example, you might want toopen one document (form) from another. You can use macros to do that; in this case, you wouldnot have to write code.http://www.functionx.com/access/print.htm (5 of 95) [2000/11/04 09:42:31 AM]
Microsoft Access Tutorial - FunctionXModules:Modules are pieces of code used to impose particular behaviors to your application to make itbetter. They are written in Microsoft Visual Basic. Modules are more flexible and extensive thanmacros, although they are usually written for various and particular circumstances. One example isto print a receipt after a customer has bought paint in a store.Macros and Visual Basic code can be used on the same application. Sometimes you will prefer oneto the other, and sometimes you will stick to VBA (Visual Basic for Applications).Creating A Database1 - Introduction:Creating a database is, of course, your first concern. The usual problem lies on how and where tostart. The primary decision you will make, and that you will be changing, is the purpose of yourdatabase. What do you expect from the database? Actually, that's the first mistake. The questionis, what do your users expect from this database? If an auto part dealer hires you to design andcreate her database, you would spend some time finding out how she wants the software tobehave, what kinds of business partners and customers she has, what information she will beentering in it, will this same piece of software be used for other purposes besides running herbusiness (pay roll, appointments, etc)?Once the business sides have been discussed (normally, this stage will never stop, until youdeliver the final product), you will need to plan your database. At this time, we will not coversoftware engineering. Start Microsoft Access.http://www.functionx.com/access/print.htm (6 of 95) [2000/11/04 09:42:31 AM]
Microsoft Access Tutorial - FunctionX2 - Creating a Database from a Template:Microsoft Access ships with a few sample databases that you can use or learn from (don't hold thisagainst me but this is an area where MS Access 97 is better than MS Access 2000). To experimentwith one, we will create a database using one of the templates.1. Start Microsoft Access. If you just started the application, you will see the startingMicrosoft Access dialog. Click the second radio button; in MS Access 97, it is the DatabaseWizard radio button; in MS Access 2000 it is the Access database wizards, pages, andreports radio button.2.3.4.5.6.7.8.9.10.And click OK. This opens the New dialog.From the New dialog, click the Databases tab.From the Databases tab, click Asset Tracking, and click OK.In the File New Database dialog, type My Personal Resources to replace the suggested FileName, and click Create.After a few seconds, the Database Wizard is ready to guide you in creating your databaseproject. Click Next.The Database Wizard has a few suggestions to create your database. You can examinethem, then add some fields you think are important for your database. For this exercise,accept only the defaults and click Next.For the style of the screen display, choose Stone and click Next.For the style of the printed report, choose Bold and click Next (if you don't have a printerinstalled and connected to your computer, you will not have access to the report features; analternative is to install a "fake" printer and make the computer "think" that there is printer;although you will not be able to print, at least you can preview the reports).For the title of the database, type Personal Resources and click Next. Then click Finish. Fora few seconds (sometimes minutes), the Database Wizard will create a database for you.http://www.functionx.com/access/print.htm (7 of 95) [2000/11/04 09:42:31 AM]
Microsoft Access Tutorial - FunctionX3 - Creating A Database From Scratch:Creating a database from scratch gives you theadvantage of overall control about your application.As you might have found out, the (few) templatesshipped with Microsoft Access (2000) cover a very tinnypart of the database issues. This is because they wereprovided as samples you could learn and experimentfrom. Most of the time, they don't cover what you want.So, you will have to be a little more creative.Fortunately, Microsoft Access comes equipped to helpyou throughout the whole process.Creating a database from scratch simply means starting from a blank database and adding thedifferent components.4 - Creating A Blank Database:1. If you had already started Microsoft Access, from the Standard toolbar, click the Newbutton; or from the main menu, click File - New. This opens the New property sheets.From the General tab, click Databases (the second property sheet), and click OK.2. If you don't have a database opened yet, start Microsoft Access. From the Microsoft Accessdialog box, choose the Blank Access Database radio button. Then click OK.3. Since Microsoft Access is going to create a file to store the necessary components of yourdatabase, it requires a name. From the File New Database dialog box, in the Save In combobox, choose one of your drives, for example C:, then click the New Folder icon to create afolder called Microsoft Access Exercises. Normally, that folder becomes the base folder,otherwise, make sure that's the folder in your Save In combo box. In the File Name editbox, type Books as the name of your database. Click Create to create the new database file.http://www.functionx.com/access/print.htm (8 of 95) [2000/11/04 09:42:31 AM]
Microsoft Access Tutorial - FunctionX5 - Setting Some Startup Options:To make sure that Microsoft Access always first goes to your favorite folderwhenever you are creating or saving a database, you change the options in the Toolsmenu.1. From Microsoft Access main menu, click Tools - Options.2. In the General tab, change the Default Database Folder toC:\Microsoft Access Exercises.3. Now, download the exercises necessary for this tutorial and install them in C:\MicrosoftAccess Exercises. If you are using WinZip, when WinZip prompts you to choose where tounzip the files, type the path as C:\Microsoft Access Exercises. If you are using a programlike ZipCentral (you can get it free), when the program has finished unzipping the files,copy or cut all the files (in ZipCentral, on the main menu, click Actions - Select All). Thenpaste the selected files to your default folder which is C:\Microsoft Access Exercises.6 - Database Properties:Whether you work alone or in a group, communication and documentation are important. Yourdatabase project has its own properties that you can use to find out some details about your file, toenter some notes about the project, or to give directives to other people who have access to thedatabase.I know when you created and saved the My Personal Resources database, I didn't specify where itwould be saved. If you too don't remember, let's find out; and while we are at it, let's do somemaintenance work.1. From Microsoft Access, if you are not currently running the My Personal Resourcesdatabase, click File. A list of most recently opened databases appears. From that list, clickMy Personal Resources.2. Once more, from the main menu, click File - Database Properties.3. From the Properties dialog, click the General property sheet. Examine the various sections.These are self-explanatory. Note and write down the path where the database is located. Bydefault, it would be C:\My m (9 of 95) [2000/11/04 09:42:31 AM]
Microsoft Access Tutorial - FunctionX4. Click the Summary property sheet. Change the summary sheet to look as follows (besidesthe Author and Manager, you can change any item(s) to whatever you like):5. Explore the other property sheets and examine what they have to offer. The Statistics tabgives you statistics about your database and its summary access. The Contents tab shows alist of the components that are part of your database. The Custom tab shows, and allows youto customize, the field named associated with your database. When you have finishedworking with the database Properties, click OK (if you click Cancel, any change you madewill be discarded).6. On the main menu, click File - Exit.7 - Deleting, Renaming, Or Moving A DatabaseFile:A database that you create in Microsoft Access is considered a file just like any other files you arefamiliar with. This means you can delete it using the same usual process. From My Computer orWindows Explorer, right-click the file's icon and choose Delete, then confirm or cancel yourintentions.To rename or move a database file, you have to do it manually. Unfortunately, Microsoft Accessunusually doesn't provide a Save As feature to save a database in a different name. The Save Asmenu only renames an object.1. Open Windows Explorer (Start - Programs - Windows m (10 of 95) [2000/11/04 09:42:31 AM]
Microsoft Access Tutorial - FunctionX2. In the folder you created for your own database projects, right-click Books and chooseDelete. Click No.3. Highlight My Documents or the folder where the My Personal Resources database wassaved. Right-click My Personal Resources and click Cut.4. Right-click the folder C:\Microsoft Access Exercises. and choose Paste.5. Right-click My Personal Resources. Click Rename to change the database's name and type:DCMS.Press Enter.8 - Exercises:1. Using the Database Wizard, create a database based on the Ledger sample. Name thedatabase Personal Finances and make sure you save it in your default folder. Accept allfields defaults. For the screen display style, choose International. For the Reports style,choose Formal. Make sure you specify the database title as Personal Finances. Access thedatabase properties. In the Comments box of the Summary tab, tell people who access yourdatabase, "Please don't change any of the fields or data in this database. Since this databaseis for my personal use, it is important that I keep track of the whole process of designing it.For any concern, e-mail me (not my mother). Thanks."2. Create a blank database named Georgetown Cleaning Services.9 - Getting Help In Microsoft Access:1.2.3.4.5.6.Click the Office Assistant and type: How to create a database?Click Create a database.Click Create a database by using a Database Wizard.After reading, click the Back button.Click Create a database without using a Database Wizard.Continue exploring the Help files provided by Microsoft Access. When you finish, close thehelp window and the MS Access application.Introduction To Tables1 - Introduction: The Table is the central point of your database. That's why you should and will spendsome time planning, organizing and tuning your tables.Start Microsoft Access and open the Books database that you created last time.http://www.functionx.com/access/print.htm (11 of 95) [2000/11/04 09:42:31 AM]
Microsoft Access Tutorial - FunctionX2 - Creating A Table From Scratch:You obtain a table from three ways in Microsoft Access: a table can be created from atemplate database; you can also use a wizard to create a table; or you can create a tablefrom scratch. Still, you can use any combination of features and techniques to designyour table(s).The database window is a little different from Microsoft Access 97 to MS Access2000.1. From the Database Window, click the Tables button if necessary.The Database Window offers three ways of creating a table. The first option allows you tocreate a table from the Design view. If you need help from a wizard, you use the secondbutton. The third button is used to create a table from the Datasheet view.2. From the Database Window, click New.3. You receive a dialog box offering various ways of creating a table.The Datasheet View allows you to work in a spreadsheet environment with a window madeof rows and columns. The Design View is a little more explicit and detailed, it offers morecontrol while you are designing your table. Since Microsoft Access comes with a host ofsample tables, you can use the wizard to design and customize your table to suit your needs.http://www.functionx.com/access/print.htm (12 of 95) [2000/11/04 09:42:31 AM]
Microsoft Access Tutorial - FunctionXOn the other hand, you might have a good existing table somewhere either in your computer,on the network or somewhere else; then you have the choice of importing it or linking to it.Click Datasheet View and click OK.4. You are presented with a window document that looks like a spreadsheet. This is your firsttable.a) Table Description:A table is made of various parts to help your creativity.On top of the table, you have columns. These are fields of data. They are originallynamed Field1, Field2, Field3, etc. Each column represents one category of information.On the left side of the table, you have rows that represent records for each item of ourdatabase. Each row has a Row Selector, the gray square; it allows you to select thewhole row.On the main area of the datasheet, the white rectangles separated by gray borders arethe cells. Each cell is the intersection of a column and a row. Each cell is considered afield of data.On the right side of the datasheet, there is a vertical scroll bar. It allows you to move upand down on your datasheet, this happens if/when your table has more items than canbe displayed all at once, and this will happen (almost) all the time.There is usually another scroll bar on the bottom right side of the table. It allows you tomove left and right between unseen areas of the table. Finally, the lower left side of thetable is made of five buttons used to navigate the table, and an edit box.The most left button allows you to move to the first record of the table. The secondbutton moves you one record back from the current record. The edit box shows thenumber representing the current record. The third button moves you one record ahead.The fourth button moves you to the last record of the table. And the last button is usedto enter a new record on the table.http://www.functionx.com/access/print.htm (13 of 95) [2000/11/04 09:42:31 AM]
Microsoft Access Tutorial - FunctionXb) Naming The Fields:1. Double-click the header of the first field (Field1). When it is highlighted, type BookTitle (inone word), and press Enter. A field can have almost any name: "Book Title", "This Is TheBook Title", "My Book Titles", etc. Some of your fields will have only tinny data, like aperson's age, the number of books in her office, her MI (middle initial name), etc. So, it mightnot be a good idea to give them a name that would take too much space. In the future, whenyou start programming, it would be easier to handle field names that are composed of onlyone word, without space. Therefore, it is a good idea to stick to good habits. Also, if you areplanning to develop SQL applications or front-end applications that will communicate with aSQL server in the back (if you are planning to get into this business, that's what you willcertainly be doing), you will have to stick to one-word names, it would make your lifesimpler. So, to name a field, first figure out what the data in the category will be made of. Ifyou are planning to enter employees salaries in a field, you can just call it Salary. If you wantto divide employees names by first name, middle name, and last name, these are the fieldnames you will use to make them distinct. In this case, you could name the first name field,firstname (in one word), the last name would be called lastname. Although this goodtechnique allows you to use one word name, some people including yourself might beconfused. The suggestion is to distinguish wherever a new English (or the language you areusing to design your database) name starts in the field name, by using a starting uppercase.Instead of firstname, use FirstName. Instead of fullname, use FullName. Instead offirstdayofmonth, use FirstDayOfMonth. Now, this looks more explicit, doesn't it?2. Double-click the second field and name it CopyrightYear. Change the third field to Author.The fourth field will be ISBNNumber. The last field will be Publisher.The table as we have it now is in Datasheet view.c) Saving A Table: On the Standard toolbar, click the Save button to save the current table. A table can have anyname. This time also, there are suggestions made to you. First, the name of a table shouldreflect the kind of data it is holding. Second, you can name a table with a few words, withspaces; but for the same reasons mentioned earlier, stick to a name of one word, withoutspaces. The last suggestion recommends that you use a prefix that identifies the table as such,a table, to reduce confusion. So, instead of naming your table Books, or BookTitles, save it astblBooks. Then click OK.d) The Primary Key:1. Microsoft Access needs one more information, actually, this is a suggestion.We have already seen that a database in Microsoft Access is made of different inter-relatedparts. To identify these parts, mainly tables, Microsoft Access needs to have a Primary Keyon each table. When you create relationships between tables in the future, Microsoft Accesshttp://www.functionx.com/access/print.htm (14 of 95) [2000/11/04 09:42:31 AM]
Microsoft Access Tutorial - FunctionXwill need to refer to each table from its Primary Key. There are cases when you don't want ordon't need a Primary Key, this time, we will use one.So, click Yes and let Microsoft Access create a Primary Key for you.2. Next, click the (Design) View button on the Standard toolbar (it should be the most leftbutton). Now, we have our table on a different view, namely the design view. MicrosoftAccess created a Primary Key and called it ID.e) Renaming A Field:1. If you create other tables and always let Microsoft Access create or set a Primary Key foryou, it will call all of them, ID. Not only this name is not very explicit, but it createsconfusion of its own.There are also times when you change your mind about the name given to a field. That's whyyou should rename that field.Double-click the name ID and type BookID. Then, press Tab.The data type of the Primary Key has been identified as an AutoNumber, which means it willhold a value set automatically by Microsoft Access. In the Description, you can write acomment that will display on the status bar when somebody, a user, is accessing a field. Forthis one, type Automatic number set by Microsoft Access.2. Move to the lower part of the design table.The data type of the Primary Key will be a Long Integer with incrementing values. For itscaption, type Book ID.3. Click the BookTitle row. Its data type is text, this is the default data type that MicrosoftAccess sets for all newly created fields. Since a book title is really a text format, leave it thatway. In its Description section, you can type Title of the book.4. Click the lower part of the view and type Book Title for the caption.f) A Field's Data Type:1. Click the CopyrightYear row on the upper part of the view. Click the combo box of its DataType, to display its values.There are different kinds of data we can display on a table.A Text represents a group of characters of any kind, but it is limited to 255 characters.A Memo is used to write a larger text with a maximum of 64000 characters.A Number is for numeric data.You use the Date/Time to show date or time.The Currency is used to represent a currency (money) value.The AutoNumber sets numeric values automatically.The OLE Object allows you to include other kinds of files in your database, for examplepictures, graphics, other applications files (Microsoft Word documents Microsoft Excelspreadsheets, etc).With the Hyperlink, you can provide a link from your document to a file in your computer orto a web page on the Internet.The Lookup Wizard specifies some predefined data on a particular column. These data areusually prepared by you.For the copyright year, choose Number; that will represent our years.2. Click the lower part of the view. The field size has been set to Long Integer.Click the field size combo box to display its values.A Byte is used for small numbers (integers) that range from 0 to 255.The Integer (2-byte) is larger than a Byte, it goes from -32768 to -32767.The Long Integer (4-byte), the Single (4-byte), and the Double (8-byte) represent largernumbers.The Replication ID is a 16-byte Globally Unique Identifier (GUID).You use a Decimal (16-byte) when your number has a decimal value.For the year, choose Integer. Change the caption to Year. In the Default Value, delete the0.http://www.functionx.com/access/print.htm (15 of 95) [2000/11/04 09:42:31 AM]
Microsoft Access Tutorial - FunctionX3. If you don't supply a caption for a field, Microsoft Access will use the name that you gave tothe field. In this case, the fields Category and Author are fine; nevertheless, describe theAuthor's field as: Author or Authors, Sometimes a Publisher, Like Microsoft Press.4. Click the ISBNNumber field. Although this is a number, it includes - and numbers, but itusually doesn't cover more that 14 characters, set its field size to 16. Change its caption toISBN #. Although it is a good idea to supply an ISBN number or just a number for each bookin our record, we will not make it required. But each book is supposed to have a unique ISBNnumber. So, click the Indexed combo box and choose Yes (No Duplicates).g) Adding A Field In Design View:1. You can add a field in any part of the table in Datasheet View, as well as in Design View.Click the last row of the upper part of the Design View and type Comments. Set its data typeto Memo.2. To add a field inside of a table, we will add a shelf number to the table as if we were writing aprogram for a library. We would like the column identifying the shelf number to be betweenthe Comments and the ISBN Number fields. To insert a column, click the column that will beahead of it, and then click the Insert Rows button on the toolbar.In this case, click the Comments field; then on Microsoft Access main menu, click Insert - Rows. Then type ShelfNumber. Set its data type as Text, and its Description as Number setby Management.Press F6 to move to the lower part of the design view. Set its caption to Shelf #.h) Moving A Field:1. To move a field, you select it entirely from the Row Selector, release the mouse, then clickagain and drag it.We will move the ShelfNumber field from where it is, to place it between the BookID and theBookTitle rows.Place the mouse on the left of the ShelfNumber field, on the Row Selector, until it becomesan arrow (pointing right), then press it once and release the mouse; this selects the whole row.Press the same Row Selector again, hold your mouse down, and drag the whole row; whileyou are moving, it becomes a (horizontal) line. When the line reaches and corresponds to theline between BookID and BookTitle, release the mouse.2. On the main menu, click View - Datasheet View to move to the datasheet view. MicrosoftAccess asks you to save the last changes. Click Yes to accept.i) Inserting A Field In Datasheet View:1. You insert and move fields in Datasheet View the same way you would in the Design View.This time, you select the column from its header.To move the Author column, click the Author header once to select it. Click it again and dragit to be between the ShelfNumber and the BookTitle.2. To insert a new field, click the Year header column once to select it. From the MicrosoftAccess main menu, click Insert - Column. Now, you have a new field, change its header toCategory.Good Table.http://www.functionx.com/access/print.htm (16 of 95) [2000/11/04 09:42:31 AM]
Microsoft Access Tutorial - FunctionX3 - Table In Design View:1. We should still have the Books database open. Make sure that the Tables button is clicked inthe Objects of the Database Window, otherwise, click it.From the Database Window toolbar, click the New button to create a new table. This time,double-click Design View. (In Microsoft Access 97, click the Tables tab in the DatabaseWindow, click the New button, and double-click Design View from the dialog).2. When the Design View opens, in the first row, type BookCategoryID. On Microsoft Accessmain toolbar, click the Primary Key button to make s
When you create a database in Microsoft Access, you create a database file that will include different parts of your database. These are referred to as tables, queries, forms, reports, etc. 5 - Components of a Microsoft Access database: When you open an instance of Microsoft Access, you encounter the database window, which is the