Transcription
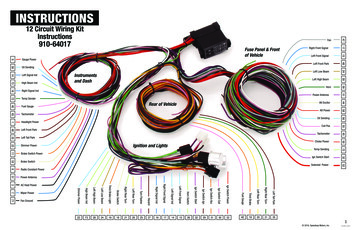
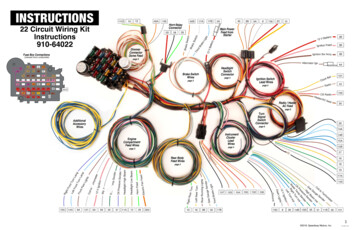
INSTRUCTIONS910-64017 Speedway Motors, inc. November 200912 Circuit Wiring HarnessPlease Read Instructions CompletelyBefore Starting Your InstallationThis kit contains the following:One pre-wired fuse panel with 12 fusesTwo signal flashers and two pre-wired relay connectors for horn relayand fan relayTwo pre-wired headlight plugsOne pre-wired Late GM alternator plugTwo pre-wired GM column ignition switch plugsOne pre-wired dimmer switch plugTwo GM turn signal connectors for the pre-terminated wires(3-7/8" and 4-1/4")One fusible link (3"black wire with ring terminal)One large grommet24 miscellaneous insulated terminals and some small cable ties2 loose wires (neutral safety switch wire and panel light wire)Speedway Motors Inc.,P.O. Box 81906 Lincoln, NE 68501402-323-3200 www.SpeedwayMotors.com1 2009, Speedway Motors, Inc.
STEP 1 READ THE INSTRUCTIONSRead these instructions before starting this installation. These instructions were developedafter installing this system in over a dozen different vehicles and should make this aquick job.To aid you we have used BOLD PRINT to note IMPORTANT items and provided generaldiagrams for FORD, GM and MOPAR. There is also a DOs and DONʼTs section that youmay find useful. Please remember that these are GENERAL INSTRUCTIONS for yourUNIQUE and SPECIFIC vehicle and you may need to MODIFY them for your application.Also, whenever using AFTERMARKET or SPECIALTY equipment, always use thediagrams PROVIDED WITH that equipment.This WORKBOOK is designed for both our labeled and color-coded harnesses. Whenevera specific wire is referred to , it will be displayed with its LABEL and COLOR. If a diagramshows ONLY a color OR label then that wire is not provided by this kit. An example of thiswould be GROUND WIRES on our color-coded harness.Remember this is a WORKBOOK! So make use of the blank space we provide for yournotes. Write things down so you wonʼt forget.STEP 2 COMPLETE THE WORKSHEETComplete the worksheet at the back of this workbook. This should be done while looking atthe vehicle, so that you can identify what accessories you will be using and what switcheswill be necessary. Here is where A LITTLE PLANNING WILL SAVE A LOT OF TIME!The WORKBOOK has been divided into the same basic sections that make-up yourharness. They are the FRONT SECTION, DASH SECTION, STEERING COLUMNSECTION AND REAR SECTION.For each section compare the list of wires to your applications and note it will be USED,MOVED OR REMOVED. Before making wires to be removed consider accessories youmay want to add at a later time or those not provided for by this kit. The design of yourvehicle may require some of the wires to be moved from one section to another. (Anexample of this would be, if the horn was mounted on the rear of the car, you would wantto move THE HORN-GREEN wire to the tail section.) When marking a wire to be movedDON”T FORGET to WRITE IT into the new section in the extra space provided. The extraspaces should also be used for any extra wires you need to add, such as ground wires.2
STEP 3 PREPARE THEHARNESS FOR INSTALLATIONFor this you will need a LARGE, CLEAR WORK AREA to spread out the harness. (Thefloor next to the project car works well.) Your harness, as purchased, will have each of the4 SECTIONS coiled and tied with cable ties. When working with the harness, it is VERYIMPORTANT NOT TO REMOVE THE 3 CABLE TIES CLOSEST TO THE FUSE PANEL.Start with the largest coil of wires, That will be the FRONT SECTION. So remove the cableties and uncoil the wires toward the front of the vehicle. The next largest coil of wires will bethe TAIL SECTION. Cut off the cable ties and uncoil those wires toward the rear of thevehicle. The remaining coils of wire are the DASH SECTION and the STEERING COLUMNSECTION. The STEERING COLUMN SECTION is the one with the pre-attached plugs andwill not need to be changed in most applications. Remove the cable ties from under theDASH SECTION and uncoil those wires to the side of the FUSE PANEL.Now using the WORK SHEET that you completed in STEP #2, start by removing anyunused wires. Work one section at a time and remove those wires ONE WIRE AT A TIMEby pulling them through the remaining harness cable ties. (REMEMBER DO NOT REMOVETHE 3 TIES NEAREST THE FUSE PANEL.) Unused wires that come directly from theFUSE PANEL are HOT LEADS and should be cut as CLOSE to the back of the panel aspossible. Use CAUTION and only cut wires that you are sure you will NEVER NEED!After removing all unused wires from all sections. Move on to those wires that you notedyou would have to move from one section to another. Working one wire at a time, movethose wires to their new sections by pulling them out of there original section and passingthem through the harness ties into their new sections.Now, a section at a time, add any wires you noted you would need that are NOTPROVIDED in your kit. ( Note – you can use the wire you removed, but KEEP NOTES asnot to get CONFUSED.)The last part of this step is to compare the WORK SHEET to the harness as you have itnow prepared. If everything is accounted for, use the cable ties and recoil the sections oneat a time. If the ties nearest the panel are loose either tighten them or replace them asnecessary.3
STEP 4 MOUNTING THE FUSE PANELThe FUSE PANEL on this harness is designed to be mounted under the dash on thedriverʼs side of the vehicle.The FUSE PANEL should be mounted securely to a FLAT SURFACE. Care should betaken to keep it and the wires away from MOVING OBJECTS such as gas and brakecontrols and the panel SHOULD BE ACCESSIBLE in case you ever blow a fuse. Whenselecting the panel location make sure that the STEERING COLUMN SECTION WILLREACH YOUR COLUMN.Now that the FUSE PANEL is mounted, note where the FRONT SECTION wires exit thepanel. Find a spot on the fire wall where these wires can enter the ENGINECOMPARTMENT without interfering with other components, such as brake boosters,wipers, the engine, steering gear, etc. At that spot drill a 1-1/4” HOLE and install thegrommet provided in your kit.As the last part of this step, remove the cable ties you put on the FRONT SECTION wiresand pass them through the grommet into the engine compartment ONE WIRE AT A TIME.STEP 5 ROUTING ANDATTACHING THE WIRESIn this step you will be completing the job by terminating all those loose ends. As before this willbe done by section. We suggest you start with the TAIL SECTION and end with the DASHSECTION. Each section has its own set of instructions and we suggest you review the DOs andDONʼTs page and your WORKBOOK before starting each section. As you complete each sectionuse cable ties to group the wires together and at points where wires branch off from the harness.The REAR SECTION harness is designed to be routed to the back of the vehicle inside along thefloor. The wires can be taped to the floor or run under the driverʼs side door sills. They need to berouted where they WON'T BE WALKED ON and where the seats wonʼt interfere. At the rear of thevehicle you will attach the wires to your lights and gas tank sender, as indicated on the TAILSECTION DIAGRAM.The FRONT SECTION wires include the front lighting, engine and accessories normally mountedon the front of the vehicle. For this section start by separating the ENGINE wires from the rest.When installing front lighting and accessory wires follow the FRONT LIGHTING DIAGRAM. Wheninstalling the ENGINE WIRING use the diagram from the FORD, GM or MOPAR section thatcomes closest to you vehicle. Remember when connecting the 10 gauge SOLENOID PWR REDwire to use the FUSIBLE LINK provided in our kit. Failure to install the FUSIBLE LINK VOIDSANY AND ALL WARRANTY on this harness system. If you are using an AMP METER pleasefollow the AMP METER section on the DASH DIAGRAM.4
STEP 5 ROUTING ANDATTACHING THE WIRES (CONTINUED)The STEERING COLUMN SECTION has the wires for your turn signals, ignition switch anddimmer switch. The plugs on these wires are for a GM STEERING COLUMN that has a columnmounted ignition switch. If you are using that type of column, plug the black and clear plugs intothe ignition switch. The dimmer switch plug will fit a floor mounted dimmer or GM column mounteddimmer. The turn signal wires are pre-terminated and you will be using the diagram in theCOLUMN SECTION to determine the correct plug and order that the wires should be installed.Note that the plugs are letter coded to help.If you are using a LATE MODEL GM VAN type column the turn signals will match the plugs inyour kit but you will have to use the IGNITION SWITCH DIAGRAM in the COLUMN SECTION.If you are using a FORD or MOPAR COLUMN use the diagrams in the FORD and MOPARSECTIONS. But REMEMBER they change colors often, these interchanges may NOT match yourcolumn. If the colors donʼt match or youʼre using something not listed, you may have to sort theturn signal wires out with and ohm meter. Most original ignition switches are marked on the backof the switch.The DASH SECTION contains the wires for the gauges and the headlight switch. The order youinstall these wires depends greatly on your dash configuration. Here it is best to start working fromthe driverʼs side of the dash toward the passenger side. Use the cable ties provides in your kit totie up the harness as you go.By now you should be out of wires. All that remains is a simple start up procedure. Start byTURNING OFF ALL ACCESSORIES. Place the ignition switch in the OFF position and close thedoors to make sure the dome light is off. Now connect the POS. BATTERY CABLE. BEFOREconnecting the NEG. CABLE you should check for a current draw. This can be done easily with atest light connected between the neg. battery post and the neg. battery cable. No light-no draw. Ifyou have no draw or just a really dim light, it is safe to connect the neg. battery cable and startchecking the system.NOTES:5
FRONT SECTIONUSE THE FRONT SECTION DIAGRAM FOR THE FOLLOWING CONNECTIONS:FAN FAN - GRAY This is the feed from the relay to your electric fan.RIGHT FRONT SIGNAL - DR. BLUE Connect this wire to your right front turn signal lamp socket. If you areusing a single front turn light with an 1157 or dual filament bulb, this wire should be connected to the highfilament of the bulb.LEFT FRONT SIGNAL - LT. BLUE Connect this wire to your left front turn signal lamp socket. If you are usinga single front turn light with an 1157 or dual filament bulb. This wire should be connected to the high filament ofthe bulb.LEFT FRONT PARK - BROWN Connect this wire to both front park / running lights sockets. If you are using asingle front turn light with an 1157 or dual filament bulb, this wire should be connected to the low filament of thebulb on each of the front running lights.LEFT LOW BEAM - TAN Connect this wire to the headlight low beam on both headlights.LEFT HIGH BEAM - LT. GREEN Connect this wire to the headlight high beam on both headlights.HORN-DR. GREEN This is the horn feed wire from the relay, connect it to the horn power terminal.POWER ANTENNA - PURPLE This is the feed wire for the power antenna.USE THE CHARGING SYSTEM DIAGRAMS FOR YOUR SPECIFIC APPLICATIONFOR THE FOLLOWING CONNECTIONS.ALT EXCITOR - WHITE Use the specific charging diagram for your application.ALT POWER - RED Use the specific charging diagram for your application.OIL SENDING - LT. BLUE Connect this wire to the electric oil pressure sender.COIL POS - PINK Connect this wire to the positive side of the coil.TACHOMETER - PURPLE Connect this wire to the negative side of the coil or on a GM HEI distributor connectdirectly to the tach. terminal.CHOKE POWER - RED Connect this wire to your electric choke.TEMP SENDING - GREEN Connect this wire to water temperature sender.IGN SWITCH START- PURPLE Use the specific charging diagram for your application.SOLENOID POWER - RED Use the specific charging diagram for your application. Make sure you use thefuseable link supplied on this connection.6
DASH SECTIONUSE THE DASH SECTION DIAGRAM FOR THE FOLLOWING CONNECTIONS:GAUGE POWER - RED Connect this wire to the “I” terminal on the gauges that require 12 volt power.OIL SENDING - LT. BLUE Connect this wire to “S” terminal on the oil pressure gauge.LEFT SIGNAL IND - DR. BLUE Connect this wire to the left turn signal indicator.HIGH BEAM IND - LT. GREEN Connect this wire to the high beam indicator light.RIGHT SIGNAL IND - DR. BLUE Connect this wire to right turn signal indicator.TEMP SENDER – GREEN Connect this wire to “S” terminal on the water temp. gauge.FUEL GAUGE – PINK Connect this wire to the “S” terminal on the fuel gauge.TACHOMETER – PURPLE Connect this wire to the “S” terminal on the tachometer.USE THE HEADLIGHT SWITCH DIAGRAM FOR THE FOLLOWING CONNECTIONS:HEADLIGHT POWER – RED 12 Volt feed, connect to bat. terminal on the headlight switch.LEFT FRONT PARK – BROWN Connect to the rear tail light terminal on headlight switch.LEFT TAIL PARK - BROWN Connect to the parking light terminal on headlight switch.DIMMER POWER - GRAY Connect to the headlight terminal on the headlight switch.BRAKE LIGHT SWITCH CONNECTIONS:BRAKE SWITCH POWER - ORANGE Connect this wire to the input side of the brake light switch.BRAKE SWITCH – WHITE Connect this wire to the output side of the brake light switch.FUSED 12 VOLT POWER FOR ACCESSORIES:RADIO CONSTANT POWER - RED Connect to radio power wire.POWER ANTENNA - PURPLE Connect to antenna power wire.AC/HEAT POWER – BLACK Connect to AC/HEAT power wire.WIPER POWER - DR. BLUE Connect to wiper motor power wire.FAN GROUND – BLACK Fan relay trigger, connect to ground.7
COLUMN SECTIONUSE THE COLUMN SECTION DIAGRAM FOR THE FOLLOWING CONNECTIONS:IGNITION SWITCHIGNITION SWITCH POWER – RED Connect this wire to the BATTERY terminal on the ignition switch.IGNITION SWITCH COIL - PINK Connect this wire to the IGNITION terminal on the ignition switch.IGNITION SWITCH ACC – ORANGE Connect this wire to the ACCESSORY terminal on the ignition switch.IGNITION SWITCH IGN – BROWN Connect this wire to IGNITION terminal on the ignition switch.IGNITION SWITCH START – PURPLE Connect this wire to the START terminal on the ignition switch.STEERING COLUMNThis kit contains two connectors for GM turn signal switches. The 3-7/8” long connecter was used on GMcolumns from 69-74 and the 4-1/4” connecter was used on columns from 75 and up; and is also used on manyafter market columns. For Ford or Mopar applications use the specific turn signal switch conversion chart.CODEHORN SWITCH - LT. GREENGHorn button ground to the horn trigger relay.LEFT FRONT SIGNAL - LT. BLUELEFT SIGNAL IND – DR. BLUEHHFeeds the high filament of the bulb on theleft turn signal lamp and the indicator lamp.RIGHT FRONT SIGNAL – BLUERIGHT SIGNAL IND - DR BLUEJJFeeds the high filament of the bulb on rightturn signal lamp and the indicator lamp.HAZARD - BROWNKFour way hazard power feed.TURN FLASHER - PURPLELTurn signal power feed.LEFT REAR TURN – YELLOWMFeeds the left rear turn signal and brake lamp highfilament bulb.RIGHT REAR TURN – GREENNFeeds the right rear turn signal and brake lamp highfilament bulb.BRAKE SWITCH – WHITETHIRD BRAKE LIGHT - ORANGEPPPower feed from the output side of the brakeswitch and feed for the third brake light.DIMMER SWITCHLEFT LOW BEAM - TAN From headlight low beam connect to dimmer switch.LEFT HIGH BEAM - LT GREEN From headlight high beam connect to dimmer switch .HIGH BEAM IND - LT GREEN From high beam indicator bulb connect to dimmer switch .DIMMER POWER - GRAY Feed from headlight switch connect to dimmer switch.8
REAR SECTIONUSE THE REAR SECTION DIAGRAM FOR THE FOLLOWING CONNECTIONS:LEFT TAIL PARK – BROWN Connect this wire to both rear running lamp sockets. If you are using an 1157 or dualfilament bulb this would be connected to the low filament of the bulb.RIGHT REAR TURN - DR. GREEN Connect this wire to right rear turn signal lamp socket. If you are using an 1157 or dualfilament bulb this would be connected to the high filament of the bulb.LEFT REAR TURN – YELLOW Connect this wire to left rear turn signal lamp socket. If you are using an 1157 or dualfilament bulb this would be connected to the high filament of the bulb.THIRD BRAKE – ORANGE Connect this wire to your third brake light. If you are not running a third brake light this wireshould be taped back against the harness and left unconnected.FUEL GAUGE – PINK Connect this wire to the sending unit on the fuel tank.WIRING DOs AND DON'TsDo install main ground cables fromthe engine to the frame and from theengine to the body. Main groundcable should be the same size as thebattery cables.Don’t let the size of this job scare you. We make thisinstallation an easy job.Do remember to ground allaccessories.Don’t forget a good ground is a clean, (no rust, no paint)connection to metal.Do use cable ties to help loom andsort the harness.Don’t route wires over sharp edges or next to the exhaust.Do route the wires before installingterminals or making connections.Do fasten the harness down withclamps and ties to keep it secure.Don’t start this installation until disconnecting bothbattery cables.Don’t route wires too near moving parts like fans, belts,steering gear, hood latches or hinges.Don’t stretch wires to make them reach. Always lengthen asnecessary.Don’t over crimp the terminals.Do use grommets when passingwires through the holes.Don’t forget if you are using and amp meter you must followthe special instruction on the dash diagram.Do use the loom provided in theengine compartment.Don’tskip around a section- start a section and finish it.Do use insulated terminals or heatshrink over the connections.Don’t forget to do the WORKSHEET. It will save you a lot oftime.Do use the correct size terminal forthe gauge of wire-ALWAYS.Don’t forget these are only general instructions and you mayneed to modify them for your vehicle.Do use the diagrams provided withaftermarket or specialty accessories.Don’t discard these instructions when you are finished. Thisworkbook and your notes will be useful later if you are addingon or making repairs.9
FRONT SECTION DIAGRAMHEADLIGHTPLUGHEADLIGHTPLUGLEFT FRONTPARK/ TURNLIGHTRIGHT FRONTPARK/ TURNLIGHT POWERANT.HORNFANHORN-DR. GREENIMPORTANTAMP METER INSTRUCTIONSIF YOU ARE USING AN AMP METERYOU WILL NEED TO ROUTE THE10 GA SOLENOID PWR-RED WIRE FROMTHE FUSE PANEL TO THE AMP METERAND THEN FROM THE OTHER POST OFTHE AMP METER OUT TO YOURPOSITIVE BATTERY SOURCE.DO THIS BEFORE INSTALLINGTHE FRONT SECTION.POWER ANTENNA-PURPLEFAN FAN-GRAYLEFT LOW BEAM-TANLEFT HIGH BEAM- LT. GREENLEFT FRONT PARK-BROWNLEFT FRONT SIGNAL- LT. BLUERIGHT FRONT SIGNAL- DR. BLUE10
GM DIAGRAMSALT. EXCITOR -WHITEALT. POWER-REDOIL SENDING-LT. BLUECOIL POS.-PINKTACHOMETER-PURPLECHOKE POWER-REDTEMP. SENDING-GREENIGN SWITCH START-PURPLESOLENOID POWER-REDCOIL POS.-PINKTACHOMETER-PURPLEGM HEADLIGHT DIAGRAMLT PARK-BROWNLF PARK-BROWNDIMMER POWER-BLUE/YELDASH LIGHTS-BROWNSPLICE HEADLIGHT POWER-RED/BLKDOME RETURN11
FORD DIAGRAMSALT. PWR-REDALT. EXCITOR-WHITEOIL SENDING-LT. BLUETEMP. SENDING-GREENCOIL POS-PINKTACHOMETER-PURPLECHOKE POWER-REDSOLENOID POWER-REDIGN. SWITCH START-PURPLEIGN SW PWR-REDTOYELLOWIGN SW IGN-PINKTORED/GREENIGN SW ACC-ORANGETOBLACKIGN SW START-PURPLETOWHITE/BLUECOIL POS-PINKTACHOMETER-PURPLE/WHITEWHITEREDLF SIGNAL LT. BLUETOGREEN/WHITERF SIGNAL - BLUETOWHITE/BLUELF TURN-YELLOWTOGREEN/ORANGERR TURN GREENTOORANGE/BLUEHORN SW-LT. GREENTOYELLOWBRAKE SW-WHITETOGREENTURN FLASHER-PURPLETOBLUEHAZARD-DK. BROWNTOWHITE/REDGREENORANGEPURPLEBLACK12
MOPAR DIAGRAMSALT. PWR-REDALT EXCITOR-WHITELF SIGNAL-LT. BLUERF SIGNAL-BLUELR TURN-YELLOWRR-TURN-GREENHORN SW LT. GREENBRAKE SW-WHITETURN FLASHER-PURPLEHAZARD DK. BROWNTOTOTOTOTOTOTOTOGREENTANDK GREENBROWNBLACKWHITEREDLF SIGNAL-LT. BLUERF SIGNAL-BLUELR TURN-YELLOWRR-TURN-GREENHORN SW LT. GREENBRAKE SW-WHITETURN FLASHER-PURPLEHAZARD DK. BROWNTOTOTOTOTOTOTOTOLT. GREENTANDK NIGNTOTOTOTOTOREDBROWNBLUEBLACKYELLOWSW PWR-REDSW IGN-PINKSW ACC ORANGESW ACC BROWNSW START-PURPLEOIL SENDING- LT. BLUETEMP. SENDING-GREENCOIL POS-PINKTACHOMETER-PURPLECHOKE POWER-REDSOLENOID POWER-REDIGN SWITCH START-PURPLECOIL POS-PINKTACHOMETER-PURPLE/WHITE13
DASH SECTION DIAGRAMSGAUGE POWER-REDOIL SENDING-LT/ BLUELEFT SIGNAL IND. BLUEHIGH BEAM IND-LT. GREENRIGHT SIGNAL IND-BLUETEMP SENDING-GREENFUEL GAUGE-PINKTACHOMETER-PURPLEHEADLIGHT POWER-REDLEFT FRONT PARK-BROWNDIMMER POWER-GRAYLEFT TAIL PARK-BROWNBRAKE SWITCH POWER-ORANGEBRAKE SWITCH-WHITEFAN GROUND-BLACKIMPORTANTAMP METER INSTRUCTIONSIF YOU ARE USING AN AMP METER YOUWILL NEED TO ROUTE THE 10 GASOLENOID PRW-RED WIRE FROMTHE FUSE PANEL TO THE AMP METER ANDTHEN FROM THE OTHER POST OF THE AMPMETER OUT TO YOU POSITIVE BATTERYSOURCE. DO THIS BEFORE INSTALLING14
COLUMN SECTION DIAGRAMSLABELCODEHORN SWITCH-LT. GREENLEFT FRONT SIGNAL-LT. BLUELEFT SIGNAL IND.-DR. BLUERIGHT FRONT SIGNAL-BLUERIGHT SIGNAL IND. DR. BLUEHAZARD-BROWNTURN FLASHER-PURPLELEFT REAR TURN-YELLOWRIGHT REAR TURN-GREENBRAKE SWITCHTHIRD BRAKE LIGHT-ORANGEGHHJJKLMNPPGM COLORBLACKLT. BLUEBLUEBROWNPURPLEYELLOWGREENWHITEIGNITION SWITCHIGN SW POWERIGN SW STARTIGN SW COILIGN SW IGNIGN SW ACCDIMMER SWITCHDIMMER POWER-GRAYLEFT LOW BEAM-TANLEFT HIGH BEAM- LT. GREENHIGH BEAM IND- LT. GREEN15
REAR SECTION DIAGRAMSLEFT REAR TURN-YELLOWRIGHT REAR TURN- DR. GREENLEFT TAIL PARK-BROWNTHIRD BRAKE LIGHT-ORANGEFUEL GAUGE-PINKFUEL GAUGESENDING UNITTHIRD BRAKELIGHTLICENSEPLATE LIGHTLEFT REARTAILLIGHTRIGHT REARTAILLIGHT16
NEUTRAL SAFETY SWITCHYou will cut the ignition switch start wire and attachboth ends to each port on the switch. This ends byconnecting to the "S" terminal on the starter.NEUTRAL SAFETY SWITCHALTERNATOR BYPASS CIRCUITIf you are using an 80 amp or more alternator, here is the schematic for use of the bypass wire, which is included inthe bag of materials.NEUTRAL SAFETY SWITCHCIRCUITS12 CIRCUIT PANELWIPERSGAUGESCOILHEADLIGHTSFANTURN SIGNALRADIOBRAKEA/C HEATCHOKEHORNHAZARD17AMPS151030302015101530102015
WORKSHEET FOR FRONT SECTIONACCESSORYLABELCOLORGAUGELOW BEAMLEFT LOW BEAMTAN14HIGH BEAMLEFT HIGH BEAMLT. GREEN14FRONT PARK LIGHTLEFT FRONT PARKBROWN18LEFT FRONT TURNLEFT FRONT SIGNALLT. BLUE18RIGHT FRONT TURNRIGHT FRONT SIGNALDR. BLUE18HORNHORNDR. GREEN14ELECTRIC FANFAN FANGRAY14POWER ANTENNAPOWER ANTENNAPURPLE18BATTERY POWERSOLENOID POWERRED10ALTERNATOR POWERALT POWERRED12ALTERNATOR EXCITORALT EXCITORWHITE14COIL POSITIVECOIL POSPINK14TACHOMETERTACHOMETERPURPLE18OIL SENDEROIL SENDINGLT. BLUE18WATER TEMP. SENDERTEMP SENDINGGREEN18STARTER SOLENOIDIGN SWITCH STARTPURPLE12ELECTRIC CHOKECHOKE POWERRED18USEMOVEREMOVEUSEMOVEREMOVEWORKSHEET FOR DASH SECTIONACCESSORYLABELCOLORGAUGEHEADLIGHT BATTERYHEADLIGHT POWERRED12HEADLIGHTSDIMMER POWERGRAY12TAIL LIGHTSLEFT TAIL PARKBROWN14PARK LIGHTSLEFT FRONT PARKBROWN18GAUGE POWERGAUGE POWERRED18OIL SENDEROIL SENDINGLT. BLUE18TEMP. SENDERTEMP. SENDERGREEN18TACHOMETERTACHOMETERPURPLE18FUEL GAUGEFUEL GAUGEPINK18LEFT TURN INDICATORLEFT SIGNAL IND.DR. BLUE18HIGH BEAM INDICATORHIGH BEAM IND.LT. GREEN18RIGHT TURN INDICATORRIGHT SIGNAL IND.DR.BLUE18RADIO BATTERYRADIO CONSTANT POWERRED18POWER ANTENNAPOWER ANTENNAPURPLE18STOP LIGHT POWERBRAKE SWITCH POWER ORANGE14STOPLIGHTSBRAKE SWITCHWHITE14A/C HEAT POWERA/C HEAT POWERBLACK14WIPER POWERWIPER POWERDR. BLUE14FAN GROUNDFAN GROUNDBLACK1418
WORKSHEET FOR COLUMN ON SWITCHIGN. SWITCH BATIGNITION SWITCH POWERRED12IGN SWITCH IGN.IGNITION SWITCH COILPINK12IGN SWITCH ACCIGNITION SWITCH ACCORANGE12IGN SWITCH IGN.IGNITION SWITCH IGNBROWN12IGN SWITCH STARTIGNITION SWITCH STARTPURPLE12LEFT FRONT TURN SIGNALLEFT FRONT SIGNALLT. BLUE18LEFT SIGNAL INDICATORLEFT SIGNAL INDSTEERING COLUMNDR. BLUE18RIGHT FRONT TURN SIGNAL RIGHT FRONT SIGNALBLUE18RIGHT SIGNAL INDICATORRIGHT SIGNAL INDDR. BLUE18BRAKE SWITCHBRAKE SWITCHWHITE18THIRD BRAKE LIGHTTHIRD BRAKE LIGHTORANGE18LEFT REAR TURNLEFT REAR TURNYELLOW14RIGHT REAR TURNRIGHT REAR TURNGREEN14HORN SWITCHHORN SWITCHLT. GREEN14TURN FLASHERTURN FLASHERPURPLE14HAZARD FLASHERHAZARDBROWN14LOW BEAMLEFT LOW BEAMTAN14HIGH BEAMLEFT HIGH BEAMLT. GREEN14HIGH BEAM INDICATORHIGH BEAM IND.LT. GREEN18DIMMER POWERDIMMER POWERGRAY12DIMMER SWITCHWORKSHEET FOR REAR SECTIONACCESSORYLABELCOLORGAUGEREAR TAIL LIGHTLEFT TAIL PARKBROWN14RIGHT REAR TURNRIGHT REAR TURNDR. GREEN14LEFT REAR TURNLEFT REAR TURNYELLOW14FUEL GAUGE SENDERFUEL GAUGEPINK18THIRD BRAKE LIGHTTHIRD BRAKEORANGE1819USEMOVEREMOVE
IMPORTANTDISCLAIMERIn an effort to offer our customers the low prices, quick service and great value, Speedway Motors reserves the right to changesuppliers, specifications, colors, prices, materials. Each of the previous items is subject to change without notice. Speedway is notresponsible for any typographical errors or misinterpretations. Quantities are limited on some items.WARRANTY DISCLAIMERThe purchaser understands and recognizes that racing parts, specialized street rod equipment, and all parts and services sold bySpeedway Motors, Inc. are exposed to many and varied conditions due to the manner in which they are installed and used. SpeedwayMotors, Inc. makes no warranties, either express or implied, including any warranty of merchantability or fitness for a particularpurpose other than those contained in its current catalog with respect to the goods identified on the face of the invoice. There is nowarranty expressed or implied as to whether the goods sold hereby will protect purchaser or ultimate user of such goods from injuryor death. Speedway Motors assumes no liability after this period.DAMAGE CLAIMSAlways inspect your package upon delivery. Inspect all packages in the presence of the delivery driver. The driver must note anydamage. Ask the driver the Carrier’s procedures for handling damage claims. You must hold the original box, packing material anddamaged merchandise for inspection or the carrier will not honor the claim. Notify Speedway Motors customer service departmentfor instructions on returning damaged goods. Speedway is not responsible if no notification is given within 5 days of receipt.SHORTAGESAlways check the contents of your delivery to insure all the parts that you ordered were received. Please read the invoice. Doublecheck all packing materials, small items may be wrapped inside with these products. Shortages may occur from damage to the box,so save all packing materials. Inspect the box for holes that would allow parts to fall out. If you are missing any item(s) be sure tocheck your invoice for back orders or canceled items before calling the customer service department. If Speedway has to split ashipment into multiple boxes, packages may be delivered on different days. You need to contact the customer service departmentwithin 5 days of delivery to assure the prompt replacement. Speedway Motors assumes no liability after this period.REFUSALSAll refused COD customers will be billed a 15% restocking charge plus freight to and from the destination! If you have questionsplease contact Speedway’s customer service department.WARRANTY CLAIMSIf an item has a manufacturer’s warranty as being free from defects we will exchange only. If the item has been used and you arerequesting warranty work, this may take up to 30 days as warranty work is done by the manufacturer NOT Speedway Motors.If you have any questions please contact customer service.RETURNSSpeedway wants you to be satisfied with your purchase. If within 30 days after you receive your shipment you are not satisfied, youmay return the item for refund or exchange. All exchanged or returned merchandise must be in original factory condition with nomodifications or alterations. Returned merchandise must include all packaging materials, warranty cards, manuals, and accessories.If the items being returned need to be repackaged there will be a re-packing charge. Re-pack the item in a sturdy box and include acopy of your invoice and complete the form on the back of the invoice. You must ship orders back PRE-PAID. WE DO NOTACCEPT COD SHIPMENTS. All exchanges need to have reshipping charges included. Items that are returned after 30 days aresubject to 15% restocking charges. All fiberglass returned will have 15% restocking charge. No returns on electrical parts, videotapes, and books. Absolutely no returns on special order or close out merchandise.FREE CATALOGSSpeedway Motors offers FREE catalogs for Race, Street, Sprint and Midget, Sport Compact and Pedal Car Restoration.Some items are not legal for sale or use in California on pollution controlled motor vehicles. These items are legal in Californiafor racing vehicles only which may never be used upon a highway.Speedway Motors Inc.,P.O. Box 81906 Lincoln, NE 68501402-323-3200 www.SpeedwayMotors.com20
4 STEP 4 MOUNTING THE FUSE PANEL The FUSE PANELon this harness is designed to be mounted under the dash on the driverʼs side of the vehicle. The FUSE PANELshould be mounted securely to a FLAT SURFACE.Care should be taken to keep it and the wires away from MOVING OBJECTSsuch as gas and brake controls and the panel SHOULD BE ACCESSIBLEin case you ever blow a fuse.
