Transcription
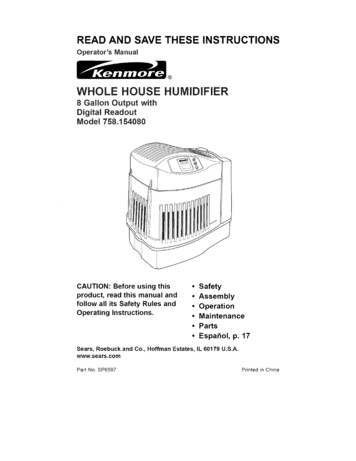
READ AND SAVE THESE INSTRUCTIONSOperator'sManual WHOLE HOUSE HUMIDIFIER8 Gallon Output withDigital ReadoutModel 758.154080CAUTION:Before using thisproduct,read this manual andfollow all its Safety Rules andOperatingInstructions. Safety Assembly Operation Maintenance Parts Espa ol,p. 17Sears, Roebuck and Co., Hoffman Estates, IL 60179 U.S.A.www.sears.comPart No. SP6597Printedin China
P ONE YEARFULL WARRANTYON KENMOREHUMIDIFIERIf any part of this humidifier fails due to a defect in material or workmanshipwithin one year from the date of purchase, or it the humidifier motor fails dueto a defect in material or workmanshipduring the second year from the dateof purchase, RETURN THE HUMIDIFIERTO THE NEARESTSEARS PARTS &REPAIR CENTER, and it will be repaired free of charge. This warranty doesnot include humidifier filters, which are expendableparts that can wear outfrom normal use in less than one year. This warranty gives you specific legalrights, and you may also have other rights which vary from state to state.Sears, Roebuckand Co., Dept. 817WA,HoffmanEstates,IL 60179GENERAL SAFETY INSTRUCTIONSSafetySignal WordsDANGER:informationmeans if the safetyis not followed someonebe seriouslyinjuredWARNING:informationcould4.Keep the humidifier5.Do not put foreignhumidifier.6.Do not allowwillor killed.Closemeans if the safetyis not followed someonebe seriouslyinjuredCAUTION:meansinformationis not followed7.or killed.Neversomeonemay8.use your humidifierTo reducethe risk of fire or shock120V, A.C. electricalextensioncords.2.Keep the electricareas. To reducehazard,neverdirectlyoutlet.unplugDo not usecord out of trafficthe risk of firethe humidifierwhileanyin anythe risk of electricalor damageto humidifier,dowhileunitis running.9.10.To reducethe risk of damagehumidifier,unplugTo reducethe risk of accidentalwhentonot in use.electrical shock, do not touch thecord or controls with wet hands.cordunder rugs, near heat registers,radiators,stoves or heaters.3. Alwaysthewhenor damagednot tilt, jolt or tip humidifierinto aput the electricis necessarypart is missingmanner.if the safetyplug humidifierinsideto be used as a toy.attentionhazardhazard,objectsused by or near children.be injured.1. To reduceclean.11.beforeNote the warninglabel shownbelow.WARNING:To reduce risk of fire,electric shock, or injury always unplugbefore servicing or cleaning.moving it, before cleaning,orwheneverthe humidifieris not inservice.Table of ContentsWarrantyGeneralTo SaveKnowYour HumidifierHow YourStepInformationHumidifier1. GettingUp and.Safety Instructions.A Service Call .Works.Electrical23Step 3. Water3Using4ReplacementYour HumidifierInstructions.Hook-Up.5Fill .6Step 4. OperatingYourCleaningRunning .Step 2. Location2the ControlsHumidifierand Care.Troubleshooting5Repair8-9of Filters . 10and Maintenance4. 7-8.Parts .1112-1314-15
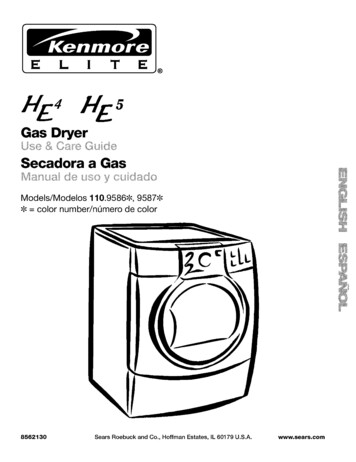
To Save A ServiceCheckthe followingif yourCall --humidifierisnot operating.1. Is power2. Is therecord attachedelectricalto outlet?power3. Is humiditycontrol4. Is the cabinetsurface?set high enough?sittingon a levelto outlet?Know Your HumidifierFan Assembly-. Bottle.HousingAssemblyHandleSpeed &HumidityControls :.BottleBaseHumidistat(On lonOutput/24Capacityof BottleCapacityof BasehrsSq. Ft. CoverageFan SpeedsAutoFan SpeedReplacementAutoFilterHumidistatAuto ShutOffControlsRubberCUL758.15408081.2 Gallons1.2 Gallons17003Yes32-15508YesYesElectronic (Push Button)Feet6ListedYesVolts120 edon an area with averageceilingheightinsulationand an 8 footNo.
How Your HumidifierYour new Kenmoreto satisfyhomehumidifierhumiditythrough the principlewater in the air.Oncein, passesis designedrequirementsof evaporationthe filter becomesdrawnWorks --saturated,throughofair isthe filter andCAUTION:injury,To reduceairvirtuallyhousingthe risk offire or damageto humidifier,use only cleaners specificallyrecommendedfor humidifiers.use flammable,Dryentersthroughthelouversin themoisture is absorbedinto the air. Allevaporationoccurs in the humidifiersoany residue remains in the filter. Thisnatural process of evaporationeliminateswhite dust.Humidifiedair isthen ialsto cleanTo reducethe risk of scaldsdamage to humidifier,water in humidifier.neverNeveroryourandput hotStep 1. Getting Your Humidifier Up and Running -Onceremovedfrompackingmaterials.properlyseatedits carton,Verify(Seeremovethe filter ispg.10).all
Step 2. Locationand ElectricalPositioningWARNING:For your own safety, donot use humidifierif any parts aredamagedor missing.shouldthe backexit side) and left side, atPlacehumidifieron a flat leveltake extra carein levelingthe unit on carpet.wherewhereMoistair (humidity)humidifierplacingbe positionedaway fromthroughthe wall. Airall of the louversassemblyto operatewithin order for theat peak efficiency.the humidifierthe most humidity is neededthe most air will be circulatedthroughoutthe housecold air return.to enterin the housingsurface,whenPosition(cord2 inchesneedsA LocationThe UnitThe humidifierleastSelectingHook-Upsuchoras near aproducedAt least 2"from wallwilldisperseinto the whole house, but thearea closest to the unit will have thehighesthumidity.If the unit is positionedcloseto a window,formon the windowthe unit shouldlocation.NOTE:fromcondensationpane.be repositionedDue to releasehumidifier,away frommayIf this occursof cool,in anothermoistit is best to directthermostatairairNOTE:and hot airregisters and to position humidifiernextto an inside wall. Unit should not beplacedwhereor warmcoldair fromdirectlyair fromoutsidea hot air registerwallshumidifierhumidistat4 inchesbody on powerfrom obstruction(locatedoutsideand awaycord)is freefrom any hotair register.blowson it.ElectricalLocatenearestHook-Up120V A.C. wall socketinIf the plug does not fit fully in the outlet,the location desired, preferablyon insidewall. With the humidifierin the desiredreverselocation,outlet.route the electricalcord safelyso no one will trip or upsetPlug in the electricalWARNING:or shockTo reducehazard,the humidifier.cord.the risk of firehumidifierbe plugged into a 120VA.C.Do not use extensioncords.To reducethe risk of electricalhumidifierhas a polarizedbladeBe sureapproximatelyis wideroutletoutlet.shock,thisplug (onethan the other).will fit in a polarizedshouldThis plugonly one way.plug. If it still does not fit, contacta qualifiedway.electricianDo not changeto installthe properthe plug in any
Step 3. Water Fifl ,WARNING:To reduceBottlethe risk of fire\or shock hazard, do not pour or spillwater into control or motor area.If controls get wet, let them drycompletelyand have unit checkedbyauthorizedservice personnelbeforepluggingin.Afterthe humidifierwill be operatingis positionedwhereyou are readyhumidifier.The bottlelifts straightaway fromthe base. Take care not tobump or damage fill valvethe bottom of the bottle.Invertbuttonthe bottle.to lock in openundercarefulDebrisseating.assemblyonthe valve stemPlacebottleFill the bottle,not to allowbeingany debristo get inmay interferewith theOncez Baseup andand turn clockwiseposition.the faucet.the bottle.valvePressinto the bottleitto fill thePUSH iNthe bottle is full,press the valve stem buttoncounter clockwiseto releaseTURNCLOCKWISEand turnand close.CAUTION:Use only 32-14900Registeredfrom SearsBacteriostatavailableRetail store. Under noEPAcircumstancesshould you use watertreatmentproducts designedforRoto belt or Ultrasonichumidifiers.Placethe waterhumidifierbottlebase. WhenbackSpringValveAssemblyinto thepositionedproperly, the plunger will open and thewater will flow into the base. The basewill hold the entirebottle.Onceand repeathumidifiercontentsthe bottlethe fillingof the wateris empty,process.removeitTheis now filled to capacity.Tobenefit from less frequent filling let thehumidifierexhaust both the water fromthe bottleand the base beforefilling.\
Step 4. OperatingWhereyou set your desiredlevelsdependslevel,outsideon yourA startinghumiditypersonaltemperaturetemperature.the ControlsdifferentWhen OutdoorTemperature is:comfortand insideset point of 30% -40% ROOM humidityis recommendedbut there may be conditionsthat requireasetting.IMPORTANT:Waterresult if condensationdamage maystarts to formon windowsHumidityor walls.---10 F2 F10 F20 F Recommended indoorRelative Humidity is:-24 C-18 C-12 C6 C 20%25%3O%35%* and aboveSETpoint should be lowered untilcondensationno longer forms. Werecommendroom humidity levels donot exceed 50%.To Operatethe ControlsDigitalDisplayPressthe powerunit on*delay).whilebuttoninitiallyOncereadingbe displayed.duringthis time.a ROOMbetweenA flashingNOTE:The defaultstartupare (LOW)SET humidity.After20% - 95% willis no powersettingsdesiredpluggedthe original\is lessat initialFI fan speedinterruption.\20 displayhumidityand 65%settingsby the user, they remainas the unit remainsunpluggedcalibrate.is completeindicates that the roomthan 20%.selectedis a slightthe electronicscalibrationhumidityonce to turn thethereTwo bars (- -) appearFunctionButtonsareas longin and thereIf the unit isdefaultsettingsare employed.* Humidifier fan should operate at initial startup. If it does not, refer to, "Fan not operating(digital display is illuminated)" in the "TroubleShooting" section on page !2 of this manual.' DigitalDisplay
OperatingSpeedButtonthe ControlsOThis humidifierHumidityis equippedspeedfan control.speedbuttonspeedsetting.(cont'd.)with a 3-Initiallywill displayEachthethe currentpushControlThis buttondepressinghumiditywill automaticallyrequiredof the speed(%) settingsdigital(AUTO)readout.A.is displayedThe higheron thethe setting,theis pressed.rangetheThis humidifiercycle on and off asto maintain(LOW}settingyou to adjustto suit your needs.The readoutand desiredFI andOallowsbutton advancesthe mode through thesettings of (HIGH) F3, (MEDIUM)F2,The selected--the selectedsetting.displays both actual (ROOM)(SET) humidity percentagewhenhumidityThe ROOMcontrolreadoutof 20% to 95%.buttonhas aif the room humidityfaster water is evaporatedand releasedinto the air. FI (LOW) is the quietestlevel is equal to or less than 20% thedisplay will show a flashing 20.settingThe SETand is providedfor conditionsde not requirea rapid evaporationWhenA is selected(AUTO)humidifierwill determinespeedneeded to bringhumiditythatrate.theinitiallythe required fanthe actual roomup to the set humidity.readoutdepressingwill displayEachincreasesButton ,,the humidityhumiditypressof 5%.buttonsetting.of the buttonthe settingcontinuouslyof 25% toin incrementsthe currentadditionalof 65% operatesSpeedhas a range65% and is adjustedby 5%. A SET pointthe humidifierregardlessof the ROOM'\reading.The humidistatthat sensesthereadings is located on the power cord.insure that it is free from obstruction.HumidityButton,1UsingRefillYour HumidifierDisplayFor maximumrun timeand the base shouldthe bottleboth the bottlebe filled.Whenand the base emptiesdisplayalternatesreadingand "F"additionalwaterthe room(FILL),boththehumidityinformingis required.Also at thistime the unit will automaticallyswitch intoDRY OUT MODE and continueto run onthe lowestspeeduntil the filter is dry.Refill/DryDisplayOut Mode
NOTE:DuringhumidityHumidistatthis time the roomlevel will continueto beThe humidistatlocatedmonitoredand the humidifierwill cyclethe fan on and off until the filter issensescompletelyand off to maintainleavingair. It causesdry. The fan will shut offyou with a dry humidifierthat ison the powerthe percentageSET point.of humiditythe humidifier"ROOM"the humidifierhumidifieruntil a readingSET pointis achieved.with waterand the fan willto the set speed.NOTE:Fan The abilityswitchesDRYto efficientlysupply humidity output relies heavily on thecondition of the filter. As the filter loads withimpuritiesit graduallycapability.When this happens,outputis reducedloses its wickinghas towork longer to satisfy the selected setting.This humidifier has a check filter remindertimed to appearafter 720 hours ofoperation.When the displayalternating"CF"showsthe SETanand "room humidity"Some areas have high watercontentfrequentcausingon pageand Care of Filter"10. If a build-upsevere discolorationfilter to restoreCheckDisplayof depositsis evidentmaximumreplaceefficiency.falls 3%unwantedtamperingwith thehumidifierlocked.settingsthe controlscan beActivationOutProcedurethe humidifierfunctionsset up, hold the powerseconds.The displayhave beenbuttondownwill show2 seconds;releasethe controlwill resume"CL"filter changes.Refer to "Replacementreadingpoint again.Locksettings.the need for moreorthe powerIf buttonsis active,for 5"CL"the displayare operatedthe "CL"forbuttonandof thewillinwhileis displayedandare unaffected.DeactivationProcedureTo deactivatethe "CL"functionsimplypress and hold the power button for 5seconds."CL" will flash at the rate of1 secondthetheTo avoidsettingsmineralof 1% aboveThe fan will turnroom humidity.The room humidifiercontinueto function with the lockedsetting at 5 second intervals it is areminder to check the filter condition.NOTE:the SETto run theControlAftermoistureand the humidifierfalls 3% belowpoint and will continuebelowOUT MODE.of any humidifierreadingoff until the ROOMtoonhumidityThe fan will turn on if theless prone to mold and mildew growth.If DRY OUT MODE is not desired, refillreturnto cyclethe selectedcordin theperiodon and1 secondof 2 secondsdisplayof roomNOTE:Be sureoff for aand then resumethehumidity.Filter /approximatelybody on powerobstructionregister.humidistat4 inchescordand awaylocatedoutsidehumidifieris free fromfrom any hot air
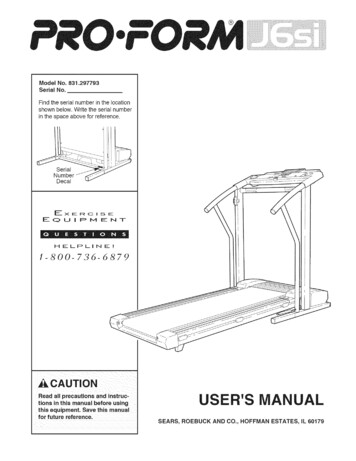
ReplacementWARNING:and Care of Filter --To reducethe risk ofGrasp housingassemblysecurelyandshock or injury from moving parts,always unplug humidifierbeforeremovingor replacingany parts.liftoff .CAUTION:To help retard bacteriagrowth and keep maximumefficiency,the filter should be replacedat leastonce per season, or more oftenunder hard water tReplacefilter.the evaporativewickingleastonce per humidificationmoredependingon waterfilter atseasonorconditionsinPosition startand finishofcoiled filter atcenter of baseyour area.FilterReplacement1. Unplug humidifier.Before removingthe filter, we recommendmoving thehumidifierto an area where floorcoveringsare notdamage.(i.e.2. Removethe waterBe surevalve.3. Graspsusceptiblekitchenbottle and set aside.not to bumpthe housingto wateror bath areas.)or damageassemblythe filland liftstraight up and away from the baseand set aside. The filter is nowaccessible.4. Take note of the filter position.Remove the filter. You may want toclean the base at this time. See the"CleaningYourthis manual.5. Installbase.Humidifier"sectiona new filter (32-15508)Align housingassemblybottomwithtop of baseand repositionofinto theCoil the filter and positionitbetween the uprights in the bottom ofthe base. The start and finish of thecoil shouldbe capturedof the basefilter should(see diagram) and thebe resting on the floor ofcurelyat the centerthe base.6. Returnthe housingtop of the base.humidifierassemblyRepositionto its operating7. The humidifieris nowto thetheposition.readyto be filledfor operation.i0
Cleaningand Maintenance-NOTE: Removeexcesswater before cleaningWARNING:To reduce the risk of injury,fire or damage to humidifier,use er use flammable,combustibleclean yourforor poisonousmaterialstohumidifier.To reduce therisk of scalds and damage tohumidifier,never put hot waterhumidifier.inStep 3Bi-WeeklyCAUTION:Local water purity variesfrom area to area and under certainconditionswater impuritiesandairborne bacteria may promote thegrowth of microorganismsin thereservoirof the humidifier.cleaningeasier,be emptyfollowingmethod:a.the humidifierAllowREFILLmessage3.Unplug1.use theilluminatesandhas stopped2.Partsand Care of Filter"may be a little waterthe base. Carefully dumpremove with a sponge.the waterexposedto water.Empty base after 20 minutes.Rinse with water until bleachEnd of Season2ThereBasePour 1/2 gallon of water and 1/2teaspoonchlorine bleach into thesmellbase. Rinse thoroughlywith cleanwater after all steps are complete.page 10.NOTE:warmis gone. Allow unit to dry outcompletely.NOTE: The water bottle should becleaned in the same manner as the1.See "Replacementwith cleanscale andsolution.normallythehumidifier.To Removea soft clothbase. Let solution stay for 20minutes,carefully swishing everyfew minutes.Wet all surfacesWARNING:To reduce the risk of shock,always unplug humidifierbeforecleaning or servicing.If humidifieris notun-plugged,fan could start afterhousing is removed.StepRinse thoroughlywater to removeDisinfectingto run until the"F"Dampenwith undilutedwhite vinegar andwipe out the base to remove scale.the humidifierthis,the automaticshutoffhumidifierfan.b.soft brush.and completelyout. To accomplishcup ofundilutedwhite vinegar. Letsolution stay 20 minutes.Clean all interior surfaceswith acleaningbase shoulddried2.1To makebase with waterand add one 8 ounceTo retard bacteria growth that maycause odors and be harmful to yourhealth, use only Kenmore replacementfilters. We also recommendusing EPAapprovedbacteriostat,and humidifiercleaner, available at your local Searsstore.StepMaintenanceRemovingScale1. Fill the humidifierMaintenanceFollow "Bi-WeeklyMaintenance"instructionsat end of humidification2.season.Remove3.Let humidifierstill infilter.dry completelybeforestoring.4.5.out orStore in cool, dry location.Install a new filter in cleanhumidifierbefore next season begins.NOTE: "Bi-WeeklyMaintenance"procedure11is also recommendeddo not plan to run the humidifierone week or more.if youfor
Troubleshooting,TroubleProbableCauseRemedyDigital display not illuminated. No Power. Power button has not beendepressed, Check 120 volt power source. Press power button once toturn on.Fan not operating (digitaldisplay is illuminated). ROOM humidity level is not3% or more below SEThumidity level. Reservoir is empty. Raise SET humidity level ifdesired. SET humidity level is 65%. A SET humidity percentageof 65% operates fancontinuously. Adjust SETlevel between 25% - 60%. Continue to run until desiredFan running continuously. ROOM humidity level has notreached 1% or more aboveSET humidity level.Poor evaporationof water. Increase fan speed. Fill humidifier with water.humidity level is achieved.This may take up to 48 hoursinitially. CHECK FILTER messageflashing, Mineral buildup on filter. Change to a fresh newfilter.NOTE: Local water purityvaries from area to area.Bottle empties completely. This is normal for initial filling. Refill bottle for maximum runtime.Bottle continues to emptyafter complete filling. Air is entering water bottle. Check for leak in water bottle.Bottle not emptying. Spring Valve Assemblydamaged or missing postin bottom of base. Check orientation of bottle. Base full of water.12Reposition so that fill valve onbottom of bottle is depressedby post in bottom of base. The base will hold thecontents of water bottle (1.2gallons). Continue to runhumidifier to deplete waterfrom base.
TroubleProbable CauseRemedyDisplay blinks or fan movesslightly when humidifier isplugged in. Normal No action required.Fan operating slower thanspeed registered on digitaldisplay, HumidifierMODE".Humidifier not shutting offduring "DRY OUT MODE". Filter not dry. During "DRY OUT MODE" thehumidifier will continue to runon "LOW" speed as requiredfor up to 2 hours or until thefilter is completely dry.Alternating "F" and roomhumidity displayed. Reservoir is empty. Fill humidifier with water.Alternating "CF" and roomhumidity displayed. Filter may be dirty. Replace filter. Unplug unit for 30 secondsand reptug in to clear display.in "DRY OUT13 Humidifier automaticallyswitches fan to (LOW) F1when "F" and alternating roomhumidity is displayed.
Repair PartsParts List for KenmoreHumidifierModel No. 758.1540801\.614
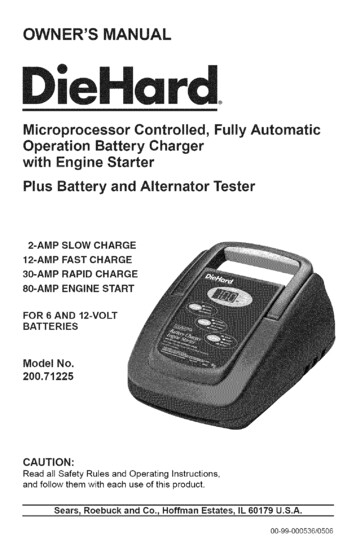
Parts List for Kenmore HumidifierModel No. 758.154080AlwaysKey Noorderby partnumber- NotPart No,Description758.154080Housing,1all 7-1Base6831190Foot Rubber7831199Bottle Assembly8831207Cap,9SP6597Owner'sHardwareitem - May be purchasedStandard1 Stock Any attemptof most Searsto repair1-9)1 Filteritem - May be securedDepartmentnumberUpper Assembly(includes*by keyFloatReservoirScrewthroughManual(not shown)locallythe Hardwareretail stores.the controlassemblycreate a hazard unless repair is donetechnician.Repair service is availablestore.15or motormayby a qualified serviceat your nearest Sears
YourHomeFor repair - in your home - of all major brand appliances,lawn and garden equipment, or heating and cooling systems,no matter who made it, no matter who sold it!For the replacement parts, accessories andowner's manuals that you need to do-it-yourself.For Sears professional installation of home appliancesand items like garage door openers and water heaters.1-800-4-MY-HOMEAnytime, day or night(1-800-469-4663)(U.S.A. and Canada)www.sears.comwww.sears.caOur HomeFor repair of carry-in products like vacuums, lawn equipment, andelectronics, call or go on-line for the nearestSears Parts and Repair Centre.1-800-533-6937www.sears.caTo purchase a protection agreement (U.S.A.) ormaintenanceagreement (Canada)on a product serviced by Sears:1-800-827-6655 (U.S.A.)1-800-381-6665 (Canada)Parapedirserviciodereparacionadomicilio,y iceenfran 7)www.sears.caC) Sears, Roebuck and Co.( ' Registered Trademark / TMTrademark / sMService Mark of Sears, Roebuck and Co.( ' Mama Registrada / TMMama de Fabrica / sMMama de Servicio de Sears, Roebuck and Co.Mc Marque de commerce / MoMarque deposee de Sears, Roebuck and Co.Sold by: SearsPart No. SP6597CanadaInc., Toronto,FormOntario,No. SP6597-1CanadaM5B2B8Printedin China05/06
LEA Y GUARDE ESTAS INSTRUCCIONESIVlanualdel usuario HUIViIDIFICADORPARA TODA LA CASAProduccion de 8 galones conlecturadigitalmodelo 758.154080PRECAUCION: Antes de utilizar este Seguridadproducto, lea este manual y sigatodas las normas de seguridad einstrucciones de utilizacion. Ensamblaje Utilizacion Mantenimiento PiezasSears, Roebuck and Co., HoffmanEstates, IL 60179 U.S.A.www.sears.comNo. de pieza SP6597Impreso en China
GARANTiACOMPLETADE UN ANO PARAEL HUMIDIFICADORKENMORE 'Si cualquierpiezade estehumidificadorfalla debidoa un defectodematerialo defabricaciondentrodelplazodeunanoa partirde la fechadecompra,o siel motordel humidificadorfalladebidoa undefectodematerialo defabricacionduranteel segundoanoa partirdela fechadecompra,DEVUELVAEL HUMIDIFICADORALCENTRODEPIEZASY REPARACl0NDESEARSMAsCERCANOy serzi reparado sin ning Jncargo. Esta garantia no incluye los filtros delhumidificador,queson piezasperecederasquesepuedendesgastarpor causadel uso normalen menosdeun ann. Estagarantiale confierea ustedderechoslegalesespecificosy es posiblequeustedtambientengaotros derechosquevarian deun estadoa otro.Sears, Roebuckand Co., Dept. 817WA,HoffmanEstates, IL 60179INSTRUCCIONESGENERALESDE SEGURIDAD5. No ponga objetos extranos dentro delhumidificador.Palabras de senal de seguridadPELIGRO: Significa que si no se sigue lainformaci0n de seguridad, alguien resultaralesionadogravementeo morir&6. Nodeje queel humidificador se use como unjuguete. Esnecesarioprestar mucha atencioncuando el humidificador sea usado por nifioso cercade ellos.7. No utilice nunca el humidificador mientrasalguna piezafalte o este daflada de cualquiermanera.ADVERTENClA:Significa que si no se sigue lainformacion de o morir.PREOAUCION:Significa que si no se sigue lainformacion de seguridad, alguien pudieraresultar lesionado.8. Para reducir el riesgo de peligro electrico odanos al humidificador, no incline, sacuda nivuelque el humidificador mientras la unidadeste en marcha.1. Parareducir el riesgo de peligro de incendioodescargas electricas, enchufe el humidificador directamenteen un tomacorriente de120 V C.A. Nouse cordones de extension.9. Para reducir el riesgo de dar os alhumidificador, desenchdelo cuando la baseeste vacia o cuando el humidificador no este2. Mantenga el cable electrico alejado de laszonas de trafico. Para reducir el riesgo depeligro de incendio, no ponga nunca elcordon electrico debajode alfombras ni cercade salidas de calor, radiadores de calor,estufas de cocina o calentadores.en USO.10. Parareducir el riesgo de descargas electricasaccidentales, no toque el cable de alimentacion ni los controles con las manos rnojadas.11. Fijeseen la etiqueta de advertencia que semuestra a continuacion.3. Desenchufe siempre el humidificador antesde trasladarlo, antes de limpiarlo o siempreque no este en servicio.4. Mantenga limpio el humidificador.ADVERTENClA:Parareducirel riesgode incendio,descargas electricas o lesiones, desenchufesiempreel humidificadorantesde Ilenarlo,hacerleservicio de ajustesy reparacioneso limpiarlo.indiceConexion electrica . 21Informacion de garantia . 18Instrucciones generales de seguridad .18Para ahorrarse una Ilamada de servicio .19Familiaricese con el humidificador . 19Como funciona el humidificador . 20Paso 3. Llenado con agua . 22Paso 4. UtilizaciOnde los controles .23-24Utilizacion del humidificador .24-25Reemplazoy cuidado de los filtros . 26Limpieza y mantenimiento . 27Resolucion de problemas .28-29Piezas de repuesto .30-31Paso 1. Preparacion y puesta enmarcha del hurnidificador . 20Paso 2. Instrucciones de ubicacion . 2118
Para ahorrarse una Ilamada de servicio-Compruebefunciona,Io siguiente si el humidificador1. Esta el cable de alimentacionun tomacorriente?no3. ,Esta el control de humedad ajustado a unnivel Io suficientemente alto?conectado a4. ,Esta el gabinete ubicado en una superficienivelada?2. gHay alimentaciOn electrica al tomacorriente?Familiaricese con el humidificador -Conjunto del .ventiladorAsa de la botellaControles develocidad yhumedadConjunto de la carcasaBotellaBaseHigrostato(en el cordon dealimentacion)"- Filtro:No. de repuesto32-15508758.154080Descripcion8 (30 litros)Producci0n en galones/24 hCapacidad de la botella1,2 galones (4,5 litros)Capacidad de la base1,2 galones1700 (158 m2)Cobertura en pies cuadradosVelocidades del ventilador3Velocidad automatica del ventiladorSi32-15508Filtro de repuestoSiHigrostato automaticoSiApagado automaticoControlesElectr6nicos (pulsadores)6Pies de gomaSiCatalogado por CUL120 V C.A.VoltajeFrecuencia60 HzIntensidad (alta velocidad)1,2APotencia (alta velocidad)81 WBasada en una zona con aislamiento promedio y una altura de habitacionde 2,44 m (8 pies).19
Como funciona el humidificador--Su nuevo humidificador Kenmoreesta disenadopara satisfacer los requisitos de humedad delhogar a traves del principio de la evaporaciondelagua en el aire,Luego, se expulsaaire humidificado atraves de la partesuperiorUnavezque elfiltro se satura,se haceentrar aire,el cual pasa a traves del filtro y absorbe humedad Todala evaporacionocurre en el humidificador,por Io quetodos los residuos permanecenen el filtro Este proceso natural de evaporacionelimina practicamenteel polvo blanco,[I airesecoentraa travesdelasrejillasubicadasen lacarcasaPRECAUCION:Parareducirel riesgo de lesiones,incendio o danos al humidificador,utilice unicamente limpiadores recomendadosespecificamente para humidificadores,No utilice nuncamaterialesinfiamables, combustibleso toxicospara limpiarel humidificador,Para reducir el riesgo de quemarse y de daflar elhumiditicador, no ponga nunca agua caliente en elhumidificador.Paso 1.Preparaciony puesta en marchadel humidificadorUna vez que hayasacado el humidificador de lacaja de carton, quite todos los materiales deempaquetamiento, Verifique que el filtro esteasentado apropiadamente (consulte la p igina26).2O
Paso 2. Ubicacion y conexion electricaColocacion de la unidadADVERTENCIA: Para su propia seguridad, noutilice el humidificador si alguna pieza esta danadao falta.El humidificador debe colocarse con la partetrasera (el lado de salida del cable de alimentaci6n) y el lado izquierdo al menos a 5 cm (2pulgadas) de la pared. El aire tiene que entrar atraves de todas las rejillas ubicadas en elconjunto de la carcasapara que el humidificadorfuncione con la maxima eficiencia,Selecci6n de una ubicaci6nColoqueel humidificador en una superficie planay nivelada,Tengacuidado adicional de nivelar launidad cuando la coloque sobre una alfombra,Coloque el humidificador en el lugar donde senecesite mas humedado donde se hagacircularla mayor cantidad de aire a traves de la casa,como por ejemplo cema de un retorno de airefrio,AI menosa5 cmEl aire hL medo(humedad) producido se dispersara por toda la casa, pero el areamas proxima ala unidad tendra la humedad mas alta. Si launidad esta ubicada cerca de una ventana, esposible que se forme condensacion en el vidriode la ventana. Si esto ocurre, se debe colocar launidad en otra ubicacion,NOTA:Debidoaque elhumidificador expulsaairefrio y hL medo,Io mejor es dirigir el aire alejandolo del termostato y las salidasde aire caliente,y posicionar el humidificador junto a una paredinterior, No debe colocarse la unidad en lugaresdonde el aire frio pr
WHOLE HOUSE 8 Gallon Output with Digital Readout Model 758.154080 HUMIDIFIER CAUTION: Before using this product, read this manual and follow all its Safety Rules and Operating Instructions. Safety Assembly Operation Maintenance Parts Espa_ol, p. 17 Sears, Roebuck and Co., Hoffman Estates, IL 60179 U.S.A. www.sears.com