Transcription
Stellar Phoenix Photo Recovery 8.0User Guide
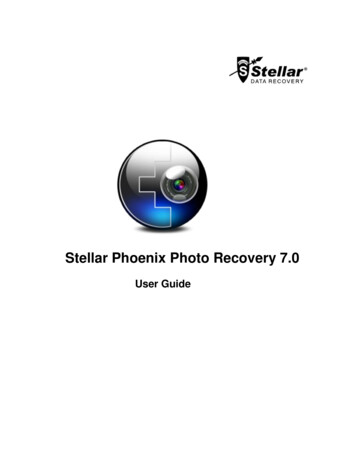
OverviewDigital multimedia files may accidentally get deleted while deleting files, or formatting storage device.Files may also get lost due to the corruption of the storage device. But now, there is no need to worry ifyour pictures, audio files or video files have got deleted or lost from your computer hard disk, pen drive, ormemory card.Stellar Phoenix Photo Recoverysoftware can easily recover allyour lost images and media files.It supports a range of digital photofile formats, audio file formats,and video file formats forrecovery. The software supportsalmost all the popular brands ofcameras. If the file type does notget listed in the list of supportedformats, it can be added usingAdd Header feature of the tool.Even if the lost media files getstored on a memory card, theycan be effectively found by thephoto recovery softwareStellar Phoenix Photo Recoveryalso supports digital card readeror external storage media. Whenyou attach a storage device to thecomputer, your computer mustrecognize it for running therecovery software on it. Thecomputer assigns a drive letter toall recognizable card readers orexternal storage media.Stellar Phoenix Photo Recoveryperforms a scan to find all therecoverable images and mediafiles. A preview of the scannedimages and media files getsprovided. A scan information fileof the scanned storage media canget saved. This saved scaninformation file can be used laterto recover lost images and mediafiles with the help of StellarPhoenix Photo Recovery.What's new in this version? New and enhanced user interface. Supports High Sierra.Stellar Phoenix Photo RecoveryMain Screen
Key Features Updated supported file formats for better recovery. The software supports thumbnail recovery for photo file formats. Displays deleted files and folders in a tree hierarchy (for FAT, exFAT, and NTFS file systems). Supports recovery of files with original date timestamp, camera model/name, resolution and filename, if available. Supports additional Classic, File List and Deleted List tree view for volume scan (of FAT, exFAT& NTFS file systems). Fast recovery of lost image and media formats. It provides Raw recovery from storage devices. It provides recovery from corrupt memory card. It provides recovery of files from formatted memory devices. Supports creating an image of the memory for recovery at a later stage. It supports a wide range of media formats for recovery. The user can resume recovery with the help of saved .dmg file, or scan information. It provides a preview of found photos, audio, and video files. It supports all type of memory card devices. Supports scanning of 2 terabytes of storage space. Provides option to add file headers. Auto-refreshing list of attached storage devices. New user-friendly interface (with re-size capability). Support for EI Capitan. Support for an encrypted drive. Support for Unicode. Support of four views of results - details view, list view, thumb view and cover flow view. The advanced option of Preview, Add Header and Edit Header in Preferences. Improved support for HFS , FAT32, exFAT, and NTFS. Support for MXF movies, Three Camera model of HD-MOV, Adobe EPS (Mac) and Adobe EPS(Windows). Preview support for corrupted files in safe mode, both in thumbnail view and running preview. Option to Check-Uncheck file(s) and folder(s) for recovery using Spacebar. Option for Zoom In and Zoom Out photos by the slider for Thumb view. Estimated time display for the scanning process. Enhanced rounded progress for creating Image instead of a grid.
Optimized Resume Recovery windows in a single page for DiskImage, VolumeImage and savedscan information.* For a complete list of supported files, click here.
Why Stellar Phoenix Photo Recovery?Stellar Phoenix Photo Recovery incorporates numerous features in it. It performs a thorough scan ofthe preferred storage device and recovers all the recoverable lost media files. Recovery of image files,video files, and audio files gets easily madeRecovers Deleted/Lost digital PhotosStellar Phoenix Photo Recovery is capable of recovering all the lost and deleted photos from anydigital storage device. Even if the storage device is formatted, damaged or corrupt, the software easilyrecovers the images from it. Canon (CR2 /CRW), EPSON (ERF), Fuzi (RAF), Fujifilm (RAF), Kodak(K25 /KDC /DCR), Konica Minolta (MRW), Leaf (MOS), Mamiya (MEF), Nikon (Nikon, NEF, NRW),Olympus (ORF), Panasonic (RAW), Pentax (PEF), Sony (SR2, ARW, SRF), Sigma (X3F), RW2, PSP,JP2, PCT, DNG, DJVU, PGM, Adobe EPS (Mac), Adobe EPS (Windows) and TGA photo formats aresupported by the software.Recovery of Video FilesPhoto Recovery software allows preview and recovery of lost,deleted, and inaccessible video files. Video recovery is madewithout hampering the visual quality of the videos. MP4, 3GP,AVI, DV, MPEG, Cannon Three Camera model of HD-MOV,Matroska Video File (MKV), AVCHD Video File (MTS), DivxEncoded Movie File (DIVX), MOI Video File, Video Object File(VOB), OGG Media Player (OGM), 3G2, ASX, MTS, AJP, F4V,VID, TOD, HDMOV, MOV, MQV, M4B, M4V, WMV, MXFmovies and SVI video file formats are supported by theapplication.Note: For a high recoveryrate, do not save new data inthe drive or card that youhave formatted, or fromwhich you have deletedphotos.Audio File RecoveryNow, you can hear your deleted favorite audio song collection once again. Stellar Phoenix PhotoRecovery has made possible recovery of lost songs, karaoke, music compositions, or any other lostaudio file. Audio file types recoverable by software are RPS, MP3, AU, WAV, MIDI, OGG, AIFF, RM,WMA, RA, M4P, M4A, ACD, AMR, AT3, CAFF, DSS, IFF, M4R, NRA, and SND files.Recovers Photos Stored in Memory Card of CameraStellar Phoenix Photo Recovery supports all the brands and models of cameras. Photo lost due todeletion and formatting of the memory card attached to the camera are recovered back. RAW recoveryof photos from camera manufactured by Sony, Nikon, Canon, Samsung, Pentax, Minolta, Kodak,Sigma, Fuji, Olympus, Epson, Mamiya, and Panasonic get supported.Memory Card RecoveryStellar Phoenix Photo Recovery supports removable storage media. If you have stored your imagesand other multimedia files in memory card devices, this recovery application support recovery ofdeleted files from them. The Macintosh operating system should recognize the corrupt or damagedinternal or external media. Memory cards, USB storages devices, Flash Cards, SD Card (Mini SD,Micro SD, and SDHC Card), CF Card, Mini Disks and all other Macintosh-based hard drives getsupported for recovery
Scan and Preview of Media FilesStellar Phoenix Photo Recovery scans through the preferred storage device and finds all the imagesand other media files. You can preview the recovered files. The scan information can be saved toresume recovery process at a later stage.Recover a Specific Hard Drive/Volume Region or Specific File TypesThe application allows you to perform a scan of the desired region of the hard drive. Media files found inthe region gets provided for preview and recovery. It is also possible to scan the memory only fordesired file types
InstallationBefore installing the software, ensure that your computer meets the minimum system requirements.Minimum System Requirements Processor:Intel Core i3 or better Operating System:Mac OS X 10.6 and above Memory (RAM):Minimum: 1 GBRecommended: 2 GB Hard Disk:100 MB of free spaceTo install the software:1. Unpack StellarPhoenixPhotoRecovery.dmg.zip file.2. Decompressing the zip file and double-click the dmg file. This step will mount a virtual volume StellarPhoenixPhotoRecovery.3. Double-click StellarPhoenixPhotoRecovery volume to open Stellar Phoenix Photo Recoveryapplication window.4. Drag Stellar Phoenix Photo Recovery file to the Applications folder.5. To launch the software, double-click on Stellar Phoenix Photo Recovery file in theApplications folder6. It displays License Agreement. If the user accepts the License Agreement, then the software islaunched; otherwise, it terminates.To remove the software, drag and drop the StellarPhoenixPhotoRecovery file from Applications folderto Trash.
Recover Data from System Disk with High SierraTo recover data from the system drive having High Sierra, you need to disable System IntegrityProtection (SIP). It is a new way of managing access to essential system files in OS X El Capitan whichprotects the system files and directories that are flagged for protection. This security feature does notallow access to files on the system drive in new macOS 10.13. If you want to recover lost files on thesystem drive, please turn off the SIP temporarily.How to disable SIP in macOS High Sierra (macOS 10.13)?Before turning SIP off, please ensure whether it is ON or OFF. Follow these steps: Click Utilities - Terminal. Type in csrutil status to see if the SIP has been disabled.If the SIP is enabled, follow below mentioned steps to disable it: Reboot/Restart your Mac. Before OS X starts up, hold down Command R until the Apple logo appears and boot into theRecovery Mode. From the Utilities menu, select Terminal. In the window that opens, type the following command into the terminal:csrutil disable; reboot Hit Return. This turns off the System Integrity Protection. Close the Terminal app. Restart your system again. Run Stellar Phoenix Mac Data Recovery. Scan the volume to recover your data.Once the recovery is complete, enable the SIP by typing csrutil enable in the recovery mode terminal.
Ordering the ToolOrder Stellar Phoenix Photo RecoveryYou can purchase the software online. For price details and to place an order, click here.Alternatively, if you are using the demo version, you can click the Buy link in the Help menu, or click Buyicon on the main interface.
Registering the ToolThe demo version is just for evaluation purposes and must be eventually registered to use the fullfunctionality of the software. The software can be registered using the Registration Key that you receivevia email after purchasing the software.To register the software:1. Run the demo version of Stellar Phoenix Photo Recovery software.2. On the main user interface, click the Register option. The Register window is displayed asshown below:3. If you don't have the registration key, click the Get it now button in the window to go online andpurchase the product.4. Once the order is confirmed, a Registration Key gets sent to the email provided.5. Type the Registration Key (received through email after purchasing the product) and clickRegister button (Please ensure that you have an active Internet connection).6. The software will automatically communicate with the license server to verify the entered key. Ifthe key you entered is valid, the software will be registered successfully.7. The 'Stellar Phoenix Photo Recovery Activated Successfully ' message is displayed after theprocess gets completed successfully. Click OK.
Updating the ToolStellar Phoenix Update Wizard helps you in keeping your application updated. Update option in theapplication is capable of checking and installing the latest updates. The wizard checks for latest minorand major versions available online. We can download the minor version through update wizard.However, the major version available needs to be purchased.If updates are available for the product, update wizard pops up while you are running Stellar PhoenixPhoto Recovery. While updating the software, it is recommended to close all the running programs.To update Stellar Phoenix Photo Recovery, do one of the following:To check automatically,1. Run Stellar Phoenix Photo Recovery. Update screen pops up along with the main userinterface.2. Click Update button to download the latest minor version, or click the displayed link to purchasethe major version. It may take few seconds or minutes to download the updates. After successfulupdate, the updated application gets launched automatically. Click Cancel, to check for updatesmanuallyTo check manually,1. Run Stellar Phoenix Photo Recovery.2. Select Preferences option on StellarPhoenixPhotoRecovery menu or selectfrom themain user interface. Preferences window opens.3. In the Preferences window, click Updatebutton.4. To check for updates instantly, click Check for updates now button.5. If updates are available, Update screen will be displayed. If no updates are available, you will geta 'Your Software has all latest updates installed' message.6. Click Update button to download the latest minor version, or click the displayed link to purchasethe major version. It may take few seconds or minutes to download the files. After successfulupdate, the updated application gets launched automatically.
Stellar SupportOur Technical Support professionals will provide solutions for all your queries related to Stellar Products.You can either Call Us or Go Online to our support section at https://www.stellarinfo.com/support/For price details and to place the order, coverymac/buy-now.phpChat Live with an Online technician at https://www.stellarinfo.comSearch in our extensive Knowledgebase at https://www.stellarinfo.com/support/kb/Submit enquiry at ail to Stellar Support at support@stellarinfo.comSupport HelplineMonday to Friday [ 24 Hrs. a day ]USA (Tollfree- Pre Sales Queries) 1-877-778-6087USA (Post Sales Queries) 1-732-584-2700UK (Europe) 44-203-026-5337Australia & Asia Pacific 61-280-149-899Netherlands Pre & Post Sales Support 31-208-111-188Worldwide 91-124-432-6777Email Ordersorders@stellarinfo.com
Starting Stellar Phoenix Photo RecoveryFollow any of the following methods to run Stellar Phoenix Photo Recovery on a Mac system. Double click on the Stellar Phoenix Photo Recovery file in the Applications folder. Double-click on the Stellar Phoenix Photo Recovery desktop shortcut (if it gets created). Click on the Stellar Phoenix Photo Recovery icon in the dock.
Main User InterfaceThe main user interface contains menus, toolbar, Recover Photo, Audio & Video, Create Image, ResumeRecovery button and many more user-friendly options to ease recovery process. Also, you can view itemslike icons, details, column and cover flow layouts. The help button provides a quick view of the userguide.
MenusStellarPhoenixPhotoRecoveryAbout Stellar Phoenix Photo RecoveryUse this option to read information aboutStellar Phoenix Photo Recovery.PreferencesUse this optionsettings.toapplypreferencesToolsRegisterUse this option to activate demo version of yourproduct.HelpHelp Topics.Use this option to view the help manualof the software.Order StellarPhoenixPhotoRecoveryUse this option to buy Stellar PhoenixPhoto Recovery.Email to Stellar SupportUse this option to mail for supportagainst any problem.View Support SectionUse this option to visit the support pageof stellarinfo.com.Submit EnquiryUse this option to submit enquiry tostellarinfo.comView Knowledgebase Articles.Usethis theof
Tabs and ButtonsRecover Photo, Audio & VideoThis tab is on the home screen of Stellar Phoenix Photo Recovery. Use it to Recover Photo, Audio &Video files.Resume RecoveryUse this tab to resume recovery process either from saved scan information or an image file.Create ImageUse this tab to create an image of preferred storage device for recovery at a later stage.Scan NowThis button starts the scanning process.Supported File FormatThis tab lists the file types from which you can select the required file types for scanning.Select RegionThis tab allows you to specify the range of hard drive/volume space for the scanning of media files.PreferencesUse this button to set preferences for Stellar Phoenix Photo Recovery.Help
Click this button to open the user help guide.RegisterUse this button to register Stellar Phoenix Photo Recovery.BuyUse this button to buy Stellar Phoenix Photo Recovery online.BackClick this button anytime to move to the previous screen of the current screen.Scan NowClick this button to start the scanning process in Recover Photo, Audio, Videooption of the software.RecoverClick this button to start the recovery process after the completion of scanning.ScanClick this button to start the scanning process in Resume Recovery option ofthe software.ContinueClick this button to continue the create image process in Create Image optionof the software.ScanThis button starts the scanning process.RecoverClick this button to recover photos, audio and video files.ContinueClick this button to continue.
How To.Stellar Phoenix Photo Recovery recovers images and media files from storage devices. It first scansthe preferred media and then recovers the files. You can save the scan information file to resumerecovery at a later stage. Advanced options are provided to scan and recover files of specific type, or fileslying in a specific hard drive region. Recover Photo, Audio & Video Create Image Resume Recovery Use Advance Option
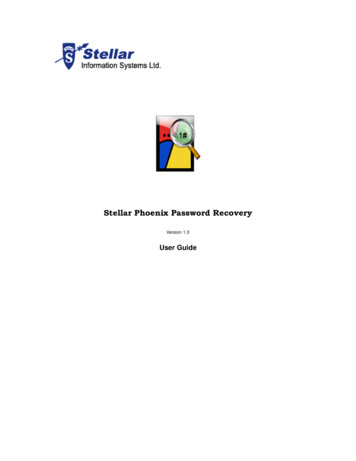
Recover Photo, Audio & VideoStellar Phoenix Photo Recovery helps you to recover all the supported images and media files.Recovery of all the files residing in the selected hard drive or recovery of selected files from the scannedresult can be by done using the software. Stellar Phoenix Photo Recovery allows you to search,preview and save recovered photos and media files.Stellar Phoenix Photo Recovery can recover all media files of supported file formats. The softwareallows initiating the recovery process for a logical drive, physical disk, attached storage media, or a savedimage file.To recover photo, audio, and video files:1. Run Stellar PhoenixPhotoRecoverysoftware.2. Select Recover Photo,Audio & Video optionfrom the main interfacescreen.3. All the hard drives andmedia attached to thecomputerarelisted.Selectthedesiredvolume, hard drive orexternalmediafromwhich you want torecover photo, audio &video files.4. SelectAdvancedSettings button to selecta specific region andspecific file types for thescanning process.5. Click Scan Now to startscanning process.6. Scan Result: Scanningprocess lists all files storagemedia. In the left-pane, allfoldersneedtogetgrouped according to filetypessuchasImageFormats, Audio Formats.In the bottom-right pane,files that get stored in theSelect Media for Recovery in Stellar Phoenix Photo Recovery
selected folder get listed.The top pane shows thepreview of the selectedfile. Double-click a folderto view files stored in it.You can change the viewof the file list in the scanresults7. Click Recover button orright-click on selectedphoto, audio & video filesandselectRecoveroption to recover thesephoto, audio & video files.8. Specifythelocationwhere you want to savethe files.All files get saved at thespecified location accordingto file types in the Rootfolder.Note: Preview scan results and select files and folders for recoveryIn case file recovery using filename is not possible, Stellar Phoenix Photo Recovery will try tofind out the file creation date & time and also the camera name/model to help identify the file.
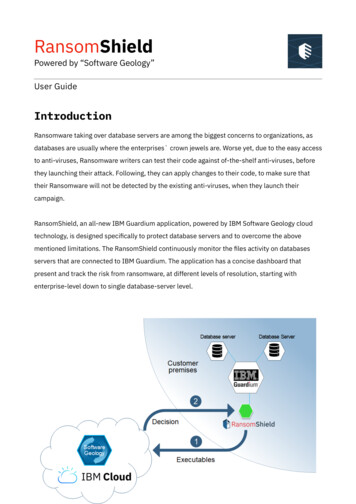
Create ImageThis option is useful if media has developed bad sectors. Stellar Phoenix Photo Recovery creates asector by sector image of the selected media that can be used to recover data. The user can also selectrange of the selected media to create an image.To create an image:1. SelectCreateImageoption from the main userinterface screen.2. Select the drive/volumefor which you want tocreate an image.3. Click Advanced Settingsbutton to selectrange of media to createan image for a specifiedregion.4. ClickContinueSelect Media to create an image of Stellar Phoenix PhotoRecovery.buttonand specify a location forsaving the image file.The software starts creatingan image of the heimage file gets saved at thespecified locationCreate Image screenNote: Specify a different location other than the source drive to save the image file. Specifying sourcedrive as a destination may lead to data loss.
You can stop the create image process by clicking Stop button. The message 'process cannot beresumed from the current stage' appears. Click Yes to stop the process. However, an image filewill be created up to the scanned point.
Resume RecoveryResume Recovery feature is used to start the recovery procedure from a saved scan information or animage file. You can use this option to resume your recovery process. To resume the recovery, yourequire previously stored information having recovery status or a previously stored image of drive/volumeUsers can resume recovery through the following options: Image(s) Saved Scan InformationTo resume recovery:1. Click Resume Recovery button on the main user Interface. Stellar Phoenix Photo Recoverywindow opens. This window contains a list of saved scan information and image file existing in thesystem.2. Select Image(s) tab and click on the desired file from the list and click Scan button.3. Select Recover button to start the recovery process.4. Select Saved Scan Information tab and click on the desired file from the list and click Scan button.5. Click Recover button and specify the location where recovered files/folders have to gets saved.Files/folders get recovered at the specified location.Note: To add image/saved scan in the list, click Add Filesbutton. To removeimage/saved scan from the list, select image file/saved a scan and click Remove Filesbutton. To refresh image/saved scan from the list, select image file/saved scan andclick Resetbutton.
Image(s)This option is used to start the recovery procedure from an image file. The image file appears as an iconin Image(s) tab of Stellar Phoenix Photo Recovery window. This image file help users resume recoveryprocess at a later stage.The software creates an image of the selected drive/volume during the scanning process. After theprocess gets finished, the image file gets saved at the specified location.The user can also add or remove images of drive/volume. To add multiple images of drive/volume clickAdd Filesbutton. To remove an image from list, click Remove FilesClick Resetbutton to refresh the list of the image created.You can perform the recovery procedure from an image file. Click Scan.
Saved Scan InformationSaved Scan is used to save directory tree structure generated after a drive scan. The user can choose adestination directory, and the file saves at the specified location. This file can be used to regenerate thetree structure of found files/folders. This saved scan file helps users to resume the recovery process at alater stageYou can save the scan result of a complete or incomplete recovery process. If you stop a scanningprocess, you can save scan information up to that point. However, you should perform a complete scanand then save scan resultYou are prompted to save scan information when you click BackPhoto Recovery after a completed scanning process.button or close Stellar PhoenixTo regenerate tree structure of found files/folders, go to the home screen of the software and clickResume Recovery button.Note: Ensure that the scanned storage media is attached to the computer before you resumerecovery by the help of scan information file.
Use Advance OptionAdditional options in Stellar Phoenix Photo Recovery make this software exceptional and easy tooperate.Advanced options contained in Stellar Phoenix Photo Recovery are as follows: Preferences Selecting File Format Select Region Types of Preview Supported File Formats
PreferencesPreferences can be set to run Stellar Phoenix Photo Recovery according to personal requirement.To set preferences:1. Run Stellar Phoenix Photo Recovery.2. Select Preferences option on StellarPhoenixPhotoRecovery menu or Selectmain interface screen and then click Preferences button. Preferences window opens. To set a preference for preview window, click Previewbutton. To add or edit file types for recovery, click Add Headerbutton. To view the help manual, clickbutton.from the
PreviewPreview option allows you to apply settings for preview window of the application.To apply preview settings:To show a preview offiles in thumbnails view:1. Run Stellar Phoenix PhotoRecovery.2. Select Preferences optiononStellarPhoenixPhotoRecovery menu or Selectfromthemaininterface screen and thenclick Preferences button.Preferenceswindowopens.3. Click Previewbuttonfrom Preferences window.4. Select 'Show file previewinstead of file icon'checkboxtopreviewthumbnail view instead ofassociated file icon.To preview corrupt photosin safe mode:1. Select 'Preview corruptphotos in safe mode'checkbox.To see running a preview ofphotos found duringscanning process:1. Select 'Show preview ofphotos files found duringscanning' checkbox.Note: You can recover thumbnails of following photo file formats (CR2, CRW, DNG, MRW, ORF,MOS, ERF, NRW, NEF, PEF, X3F, SR2, SRF, ARW, RAF, RAW).
Add HeaderAdd Header include following options: To add new file types manually or automatically, click Add Header button. To edit the size of existing file types, click Edit Header button.Add HeaderYou can add new file types to the predefined list of supported file types in Stellar Phoenix PhotoRecovery using Add Header functionality in the Preferences window.You can add header either Automatically ManuallyTo add headerautomatically:1. Run Stellar Phoenix PhotoRecovery.2. Select Preferences optiononStellarPhoenixPhotoRecovery menu or Select3.4.5.6.7.8.fromthemaininterface screen and thenclick Preferences button.Preferenceswindowopens.Select Add Header tabfrom Preferences window.Click Add Header button inAdd Header tab window.Click Addbutton tobrowse to the location ofthe file type you want toadd.You need to add at least 10or more samples/files of thesame type to include it inthe list of supported filetypes.Name of the added file typewill get listed in the lefthand side boxType in header file name in
the dialog box and thenselect the header file typefrom Select Group dropdown list and the size of PutAverage File Size text boxfrom Put Average File Sizetext box.9. Click Add Header button.To add header manually:1. Run Stellar Phoenix PhotoRecovery.2. Select Preferences optiononStellarPhoenixPhotoRecovery menu or Select3.4.5.6.from main interfacescreen and then ct Add Header tabfrom preferences window.Click Add Header button inAdd Header tab window.Select I know how to addheader option. Enter thefollowing: SpecifySoftwareName. Specify File Extension. Select Group from thedrop-down list. Specify Max File Size inKB and MB. SpecifyHeaderinhexadecimal. Specify At Offset indecimal.Click Add Header button.Edit HeaderStellar Phoenix Photo Recovery supports some Photo, Audio and Video file types for recovery.To change the size of supported file types/remove added file types:
1. Run Stellar Phoenix PhotoRecovery.2. Select Preferences optiononStellarPhoenixPhotoRecovery menu or Select3.4.5.6.7.from main interfacescreen and then clickPreferencesbutton.Preferences window opensSelect Add Header tabfrom preferences window.Click Edit Header button inAdd Header tab window.Select the desired file typefrom the list and enter thenew size of file type in PutNew Average Size box.Click Edit Size button tosave the size for your filetype.Click Remove button incase you want to delete theselected file type from thelist.
UpdateUpdate option allows you to apply settings for updates and customizes the software as per your needs.To set updates and to customize the software, perform the steps listed below:1. Run Stellar Phoenix PhotoRecovery.2. Select Preferences optiononStellarPhoenixPhotoRecovery menu or Selectfromthemaininterface screen and thenclick Preferences button.Preferences window opens3. Select Updatetabfrom Preferences window.4. To set frequency forupdates (daily, weekly, ormonthly), select Check forupdates now check boxand specify the desiredfrequency in the drop-downlist.5. To check for updatesinstantly, click Check forupdates now button.6. Click OK.
Selecting File FormatVarious file types get listed in the file list option of Stellar Phoenix Photo Recovery. You can select therequired file types for their recovery.To select file type:1. Run Stellar PhoenixPhotoRecoverysoftware.2. Select Recover Photo,Audio & Video optionfrommaininterfacescreen.3. All the hard drives andmedia attached to thecomputerarelisted.Selectthedesiredvolume, hard drive orexternalmediafromwhich you want torecover photo, audio &video files.4. You can view a list ofsupported file formats bysimplyclickingonAdvancedSettings button.5. Select the file types youwant to recover. In caseyou want to add a newfile format, click Add FileType button.6. Click OK.File List Screen
Select RegionYou can select a specific region of a hard disk or volume for the scanning process. The Scanning processwill search files only in the selected region.To select a region:1. Run Stellar PhoenixPhotoRecoverysoftware.2. Select Recover Photo,Audio & Video optionfrommaininterfacescreen.3. All the hard drives andmedia attached to thecomputerarelisted.Selectthedesiredvolume, hard drive orexternalmediafromwhich you want torecover photo, audio &video files.4. You can create an imagefor a selected range ofsectors by simply clickingonAdvancedSettings button.5. Set the Starting andEnding block by setting arange scale on the slider.6. Click OK.Select start and end memory range of the selected media
Types of PreviewStellar Phoenix Photo Recovery provides the following three types of previews for you to view lost or deleted files/foldersbefore recovering them: Classic ListFile ListDeleted ListClassic List: In this view, files/folders get listedas they are present on the hard disk. To seeClassic List preview, click Classic List tab inthe preview w
photo recovery software Stellar Phoenix Photo Recovery also supports digital card reader or external storage media. When you attach a storage device to the computer, your computer must recognize it for running the recovery software on it. The computer assigns a drive letter to all recognizable card readers or external storage media.