Transcription
liferay#liferay
Table of ContentsAbout1Chapter 1: Getting started with liferay2Remarks2Versions2Examples4A basic installation for development and testsChapter 2: Configure Google Tag manager(GTM) in liferay46Introduction6Examples6Using GTM to configure GA eventsChapter 3: Create a Quartz scheduler in liferay611Remarks11Examples11Create a quartz scheduler to display some information11Create a dynamic quartz scheduler programmatically12Chapter 4: Debug remote liferay server via Eclipse15ExamplesDebug remote liferay server via Eclipse(without Liferay Remote IDE connector eclipse plugiChapter 5: Deploying a PluginExamples15151818Deploying to Glassfish18Chapter 6: Hooks in Liferay19Remarks19Examples19JSP Hook19Struts Action Hooks20Hello User "Name" with hooks21Model Listener Hook22Background22Differences23
ing Started23Listener Development26Properties Configuration28Explanation29Build and Deploy29Please let me know if you have any questions, comments, concerns, etc. All constructive fe32Chapter 7: Inter portlet ing Public render parameter33Using Portlet session34Using eventing feature34Chapter 8: Setting up SSL37Remarks37Examples37How to enable SSL on Tomcat and LiferayChapter 9: Using Dynamic and custom SQL query in Liferay3738Introduction38Remarks38Examples38Using Dynamic query in LiferayChapter 10: Using Restful web service in LiferayExamplesConsume Liferay JSON service for GET requestsCredits3839393943
AboutYou can share this PDF with anyone you feel could benefit from it, downloaded the latest versionfrom: liferayIt is an unofficial and free liferay ebook created for educational purposes. All the content isextracted from Stack Overflow Documentation, which is written by many hardworking individuals atStack Overflow. It is neither affiliated with Stack Overflow nor official liferay.The content is released under Creative Commons BY-SA, and the list of contributors to eachchapter are provided in the credits section at the end of this book. Images may be copyright oftheir respective owners unless otherwise specified. All trademarks and registered trademarks arethe property of their respective company owners.Use the content presented in this book at your own risk; it is not guaranteed to be correct noraccurate, please send your feedback and corrections to info@zzzprojects.comhttps://riptutorial.com/1
Chapter 1: Getting started with liferayRemarksLiferay Portal CE is a portal software built in Java by Liferay Inc.Liferay DXP (Digital Experience Platform) is a platform built on top of Liferay Portal for digitalsolutions, integrating customer and user satisfaction analysis tools and Enterprise-grade qualityperformances and tooling. It was known as formerly known as Liferay Portal EE.Since version 7.0 it is built using OSGi through Apache Felix.VersionsVersionCode nameRelease typeRelease Date7.0.1 GA2WilberforceCommunity Edition2016-06-107.0.10WilberforceDigital Experience Platform2016-05-047.0.0 GA1WilberforceCommunity Edition2016-03-316.2.3 GA4NewtonCommunity Edition2015-04-176.2.2 GA3NewtonCommunity Edition2015-01-156.2.1 GA2NewtonCommunity Edition2014-02-286.2.10 GA1NewtonEnterprise Edition2013-12-036.2.0 GA1NewtonCommunity Edition2013-11-016.1.2 GA3PatonCommunity Edition2013-08-236.1.30 GA3PatonEnterprise Edition2013-08-166.1.1 GA2PatonCommunity Edition2012-07-316.1.20 GA2PatonEnterprise Edition2012-07-316.1.10 GA1PatonEnterprise Edition2012-02-156.1.0 GA1PatonCommunity Edition2012-01-016.0.12 SP2BunyanEnterprise Edition2011-11-076.0.6BunyanCommunity Edition2011-03-04https://riptutorial.com/2
VersionCode nameRelease typeRelease Date6.0.11 SP1BunyanEnterprise Edition2011-01-135.2 SP5AugustineEnterprise Edition2010-10-206.0.10BunyanEnterprise Edition2010-09-106.0.5BunyanCommunity Edition2010-08-166.0.4BunyanCommunity Edition2010-07-236.0.3BunyanCommunity Edition2010-07-206.0.2BunyanCommunity Edition2010-06-085.2 SP4AugustineEnterprise Edition2010-05-196.0.1BunyanCommunity Edition2010-04-205.1 SP5CalvinEnterprise Edition2010-03-126.0.0BunyanCommunity Edition2010-03-045.2 SP3AugustineEnterprise Edition2010-01-075.2 SP2AugustineEnterprise Edition2009-11-175.1 SP4CalvinEnterprise Edition2009-10-235.2 SP1AugustineEnterprise Edition2009-08-075.1 SP3CalvinEnterprise Edition2009-07-205.2AugustineEnterprise Edition2009-06-015.2.3AugustineCommunity Edition2009-05-125.1 SP2CalvinEnterprise Edition2009-05-125.2.2AugustineCommunity Edition2009-02-265.1 SP1CalvinEnterprise Edition2009-02-185.2.1AugustineCommunity Edition2009-02-035.2.0AugustineCommunity Edition2009-01-265.1 SPCalvinEnterprise Edition2008-12-165.1.2CalvinCommunity Edition2008-10-03https://riptutorial.com/3
VersionCode nameRelease typeRelease Date5.1.1CalvinCommunity Edition2008-08-115.1.0CalvinCommunity Edition2008-07-175.0.1 RCLutherCommunity Edition2008-04-145.0.0 RCLutherCommunity Edition2008-04-09ExamplesA basic installation for development and testsRunning the latest Liferay CE is straightforward:1. Go to https://www.liferay.com/downloads.2. Choose a bundle among the ones listed. For beginners, the Tomcat bundle is a good choice.Click in "Download."3. Unzip the download package whenever you find fit. The unzipped directory will be theLIFERAY HOME directory.4. To start Liferay, just run the script LIFERAY HOME/tomcat-x.xx.xx/bin/startup.sh; only onWindows environments run the script LIFERAY HOME\tomcat-x.xx.xx\bin\startup.bat.5. By default, once Liferay is up, a browser will open its local URL (http://localhost:8080/).6. To log in, use the email test@liferay.com, and the password test.7. To stop Liferay, just run the script LIFERAY HOME/tomcat-x.xx.xx/bin/shutdown.sh; only onWindows environments run the script LIFERAY HOME\tomcat-x.xx.xx\bin\shutdown.bat.With these steps, you will have Liferay up and running in a "demo" mode. Liferay will use anHypersonic DB by default, but it is unfit for production. Also, test@liferay.com is an administratoraccount with a default password, so it should be changed eventually. Yet, these steps are good tohttps://riptutorial.com/4
get some idea on how Liferay looks like and works.Read Getting started with liferay online: started-withliferayhttps://riptutorial.com/5
Chapter 2: Configure Google Tagmanager(GTM) in liferayIntroductionThis documentation is not specific to liferay but can be used with reference to any web application.Liferay provides Google Analytics(referred as GA ahead) by default,after configuring Analytics idGA-##### in Site settings.But this provides limited functionality,only allowing to track pageviews(Page title and URL).In order to expand it further,we can either embed GA script directly ontothe site theme to trigger the required events or use GTM.ExamplesUsing GTM to configure GA eventsGTM simplifies the whole process of managing tags.In GTM terminology1. We put a GTM javascript snippet on the concerned page,in portal normal.vm in customtheme in liferay, containing the GTM id and a data layer structure(if needed) to map valuesfrom page to variables2. Corresponding to data layer variables,we need to create Variables at GTM end,whichretrieve data from data layer3. Subsequently,we create tags,which are basically fields which maps variables from data layerto events,which are triggered on certain conditions,leading to events being sent to respectivetracking tool(GA,in our case).Below is a sample of GTM javascript snippet embedded on a page, body !-- 1) Data layer section -- script type "text/javascript" dataLayer [{"page" : " ? Virtual path of the page ? ","pageType" : " ? Page type ? ","user" : {"type" : " ? User type ? ","userId" : " ? Logged user id ? ","country" : " ? Logged user country ? ","userRole" : " ? Role of user ? "}}]; /script !-- 2) GTM Container -- noscript iframe src "//www.googletagmanager.com/ns.html?id GTM-PK9HK8"height "0" width "0" style "display:none;visibility:hidden" /iframe /noscript script (function(w,d,s,l,i){w[l] w[l] [];w[l].push({'gtm.start':new Date().getTime(),event:'gtm.js'});var f om/6
j d.createElement(s),dl l! 'dataLayer'?'&l ' l:'';j.async true;j.src '//www.googletagmanager.com/gtm.js?id ' i nt,'script','dataLayer',' GTM-ID '); /script !-- End Google Tag Manager -- Post including this script in page,we need to configure the respective variables and tags from GTMend.https://riptutorial.com/7
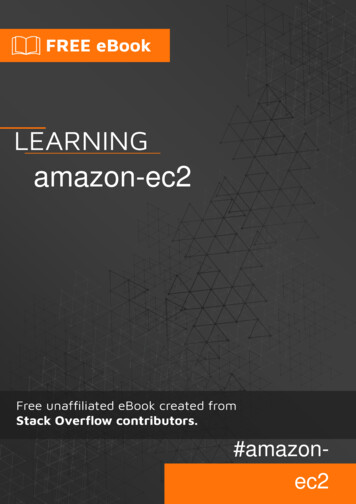
https://riptutorial.com/8
Post we have configured the required fields,we can view events on GA console upon a user view.https://riptutorial.com/9
In order to view the data sent from portal to GA,we can use Google Analytics Debugger plugin,toview events being sent to GA via browser console.Read Configure Google Tag manager(GTM) in liferay //riptutorial.com/10
Chapter 3: Create a Quartz scheduler inliferayRemarksA scheduler serves to perform background tasks at certain defined intervals.As per Liferay portlet DTD !- The scheduler-entry element contains the declarative data of a scheduler. - !ELEMENT scheduler-entry (scheduler-description?, scheduler-event-listener-class,trigger) !- The scheduler-description value describes a scheduler. - !ELEMENT scheduler-description (#PCDATA) !- The scheduler-event-listener-class value must be a class that ageListener. This class will receive a message at aregular interval specified by the trigger element. - !ELEMENT scheduler-event-listener-class (#PCDATA) !- The trigger element contains configuration data to indicate when to trigger the class specifiedin scheduler-event-listener-class. - !ELEMENT trigger (cron simple)ExamplesCreate a quartz scheduler to display some informationIn order to create a scheduler,the entry needs to be created inliferay-portlet.xmlprovding scheduler class and trigger value for timing of scheduler triggering portlet-name GetSetGo /portlet-name icon /icon.png /icon scheduler-entry scheduler-description This scheduler logs User count from portal /schedulerdescription scheduler-event-listener-class com.example.scheduler.SchedulerSample /schedulerevent-listener-class trigger https://riptutorial.com/11
simple simple-trigger-value 5 /simple-trigger-value time-unit minute /time-unit /simple /trigger /scheduler-entry The given entry provides1. Scheduler description2. Class name,which implements MessageListener class3. Trigger,which provides intervals for defining trigger point for scheduler-Using Cron-Using Simple trigger valueIn the given example,the scheduler will trigger after every 5 mins.Next up we need to create scheduler classpackage public class SchedulerSample implements MessageListener {@Overridepublic void receive(Message arg0) throws MessageListenerException {Log log LogFactoryUtil.getLog(SchedulerSample.class);try {log.info("User Count for portal:" UserLocalServiceUtil.getUsersCount());} catch (SystemException e) {log.info("User count is currently unavailable");}}}This scheduler simply displays output portal user count after every trigger interval to serverconsole.Create a dynamic quartz scheduler programmaticallyhttps://riptutorial.com/12
There are specific scenarios where in we might need to create a Quartz scheduler,based on userinput on when a scheduler should be triggered,apart from we can handle cases,where we havecertain pre-defined functionalities,which need to be triggered based on user action,at a certainperiod.This example receives user input on trigger timing,to trigger a scheduler.Here ScheduledJobListenerclass imlements MessageListener,which contains business logic to be executed on triggering thescheduler.The job is scheduled using SchedulerEngineHelperUtilclass to trigger the job,afterconfiguring the required params:1. Trigger(using the cron text string and job name)2. Message(using implementation for MessageListener class and portletId)3. Scheduler storage types(which is MEMORY CLUSTERED by default,can be set asPERSISTED to be stored in DB)4. DestinationNames(which is SCHEDULER DISPATCH for Liferay) which decides MessageBus destination to be usedThe below snippet is part of action phase of the portlet interacting with user,to create and schedulea quartz job.//Dynamic schedulingString portletId (String)req.getAttribute(WebKeys.PORTLET ID);String jobName ScheduledJobListener.class.getName();Calendar startCalendar new GregorianCalendar(year , month, day, hh, mm, ss);String jobCronPattern r, false);//Calendar object & flag for time zone sensitive calendarTrigger trigger ern);Message message new Message();message.put(SchedulerEngine.MESSAGE LISTENER CLASS NAME,jobName);message.put(SchedulerEngine.PORTLET ID, portletId);try eType.PERSISTED,"Message Desc",DestinationNames.SCHEDULER DISPATCH,message,0);} catch (SchedulerException e){e.printStackTrace();}Here,in order to create cron text,params are retrieved from user input For the cron text,we canalso use the given reference for creating the cron s://riptutorial.com/13
5. Month6. Day-of-Week7. Year (optional field)**Expression****Meaning**0 0 12 * * ?Fire at 12pm (noon) every day0 15 10 ? * *Fire at 10:15am every day0 15 10 * * ?Fire at 10:15am every day0 15 10 * * ? *Fire at 10:15am every day0 15 10 * * ? 2005Fire at 10:15am every day during the year 20050 * 14 * * ?Fire every minute starting at 2pm and ending at 2:59pm, every day0 0/5 14 * * ?Fire every 5 minutes starting at 2pm and ending at 2:55pm, every day0 0/5 14,18 * * ?Fire every 5 minutes starting at 2pm and ending at 2:55pm, AND fireevery 5 minutes starting at 6pm and ending at 6:55pm, every day0 0-5 14 * * ?Fire every minute starting at 2pm and ending at 2:05pm, every day0 10,44 14 ? 3 WEDFire at 2:10pm and at 2:44pm every Wednesday in the month of March.0 15 10 ? * MON-FRIFire at 10:15am every Monday, Tuesday, Wednesday, Thursday andFriday0 15 10 15 * ?Fire at 10:15am on the 15th day of every month0 15 10 L * ?Fire at 10:15am on the last day of every month0 15 10 L-2 * ?Fire at 10:15am on the 2nd-to-last last day of every month0 15 10 ? * 6LFire at 10:15am on the last Friday of every month0 15 10 ? * 6LFire at 10:15am on the last Friday of every month0 15 10 ? * 6L 2002-2005Fire at 10:15am on every last friday of every month duringthe years 2002, 2003, 2004 and 20050 15 10 ? * 6#3Fire at 10:15am on the third Friday of every month0 0 12 1/5 * ?Fire at 12pm (noon) every 5 days every month, starting on the first dayof the month.0 11 11 11 11 ?Fire every November 11th at 11:11am.and directly create a crontext string to be used based on user inputString jobCronPattern "0 */5 * * * ?";Here in this case,it fires after every five minutes.References:1. Dynamic scheduler creation2. Scheduler application3. Quartz FAQsRead Create a Quartz scheduler in liferay online: m/14
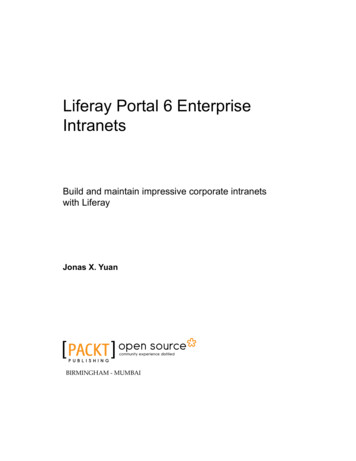
Chapter 4: Debug remote liferay server viaEclipseExamplesDebug remote liferay server via Eclipse(without Liferay Remote IDE connectoreclipse plugin)To debug a server instance, start in debug mode. To do so, configure these parameters to bepassed to the server:-Xdebug -Xrunjdwp:transport dt socket,address 8000,server y,suspend nto setenv.bat(Windows) or setenv.sh(Unix)These initialize the server in debug mode, and listen for debug requests on the given port. Startthe server and post the config.In eclipse, the remote debug config needs to be configured to attach the source to the remoteserver. Follow the given steps:1. Go to Run- Debug Configurations- Remote java application:https://riptutorial.com/15
2. Create a new configuration from Remote Java Application:https://riptutorial.com/16
3. Enter the given details:Host name:localhost(For local instance)or Ip of the machinePort:8000(By default)4. Click Debug to intitiate attachments to the server instance.Read Debug remote liferay server via Eclipse tutorial.com/17
Chapter 5: Deploying a PluginExamplesDeploying to GlassfishSo, you make first a .war file let's say a portlet of name YOURrunning on a glassfish domain under Liferay portal.PLUGIN .war.You wanna have itSteps to success:1. Navigate to Control Panel - Plugins Installation on Liferay2. Hit Install new portlets3. Hit Configuration4. Fill in to Deploy Directory a new place for deployment let's say YOUR DOMAIN /autodeploy25. Check that in the next line target is YOUR DOMAIN /autodeploy (it is the Glassfish defaultdeployment directory)6. Hit SaveNow deployment will be done by copy pasting files to that new directory YOURThe rest of it is handled automatically. Setting takes action immediately.DOMAIN /autodeploy2.Done with deployment: Make a victory jig and enjoy :).you stop dancing and face a bug. You want a new revision to be deployed. In this case, continuereading.So, you have built your war again and want to re-deploy. Do the following:1. undeploy old stuff from YOUR DOMAIN /autodeploy folder by deleting the war file. Don't deleteany other file.2. result is that YOUR PLUGIN .war UnDeployed file will appear.3. deploy new file by copying the newly built war in YOUR DOMAIN /autodeploy2 folder.4. result is that YOUR PLUGIN .war deployed will appear in YOUR DOMAIN /autodeploy folder.Make a dance again :)Read Deploying a Plugin online: ng-a-pluginhttps://riptutorial.com/18
Chapter 6: Hooks in LiferayRemarksThis works with Liferay Portal up to version 6.2.ExamplesJSP HookJSP hooks are a special liferay plugin that allow to modify core portlet jsp-s, lets say you want tomodify the login portlet to show Welcome in my custom login!.The minimal structure for a Hook Plugin is as follows:[project-name]-hook/ docroot/ WEB-INF/ src/ lib/ liferay-hook.xml liferay-plugin-package.properties web.xml META-INF/ custom jsps/ MANIFEST.MFis the file that distiguishes the type of hook you're using, here you define insidethe hook tag the proper parameter for the hook, for JSP hook:liferay-hook.xml ?xml version "1.0"? !DOCTYPE hook PUBLIC "-//Liferay//DTD Hook 6.2.0//EN" "http://www.liferay.com/dtd/liferayhook 6 2 0.dtd" hook custom-jsp-dir /custom jsps /custom-jsp-dir /hook is found in Liferay in /docroot/html/portlet/login/login.jsp, to make a hook of it we needto add a jsp with the same name and path in our custom jsps folder.login.jspWhen the hook is deployed, Liferay will look in the liferay-hook.xml for the custom-jsp-dir valueand will replace all the portal JSPs with the ones found in this directory. The original jsp's aresaved with name orginal name .portal.jsp to be restored in case of hook undeployment.We can even call the original JSPs in the new modified JSP if we want to keep the code makingthis adaptable to updates or upgrades of the underlying Liferay platform version. To do this, inyour custom JSP use the following pattern:https://riptutorial.com/19
liferay-util:buffer var "contentHtml" liferay-util:include page "/html/{ JSP file’s path }" / /liferay-util:buffer where { JSP file’s path } in this case will be portlet/login/login.portal.jsp. Doing this is calledextending the original jsp.Then we can add content to it with: %contentHtml StringUtil.add("Stuff I'm adding BEFORE the original content",contentHtml,"\n");contentHtml StringUtil.add(contentHtml,"Stuff I'm adding AFTER the original content","\n");% % contentHtml % Struts Action HooksThis type of Hook can be used to override core portal (e.g c/portal/login) and portlet strutsactions (e.g /login/forgot password), this actions for Liferay Portal are specified in a strutsconfig.xml file in its WEB-INF folder.To override an action:1. in liferay-hook.xml file of your hook plugin under docroot/WEB-INF, add a struts-actionelement within the hook element.2. Inside struts-action element, add struts-action-path that specifies the action path you’reoverriding and struts-action-impl that specifies your custom action class.This looks like: struts-action-path /login/login /struts-action-path struts-action-impl com.myhook.action.ExampleStrutsPortletAction /struts-action-impl /struts-action 3. Create a Struts portlet action class that extends BaseStrutsPortletAction. An example of thisclass is:public class ExampleStrutsPortletAction extends BaseStrutsPortletAction {public void processAction(StrutsPortletAction originalStrutsPortletAction,PortletConfig portletConfig, ActionRequest actionRequest,ActionResponse actionResponse) throws Exception {System.out.println("Custom Struts (originalStrutsPortletAction,portletConfig, actionRequest, actionResponse);}public String render(StrutsPortletAction originalStrutsPortletAction,PortletConfig portletConfig, RenderRequest renderRequest,RenderResponse renderResponse) throws Exception {System.out.println("Custom Struts Action");https://riptutorial.com/20
return originalStrutsPortletAction.render(null, portletConfig,renderRequest, renderResponse);}}Calling the method being overridden, like originalStrutsPortletAction.processAction, is notobligatory but a best practice to keep the behavior from the Action unchanged in regards of LiferayPortal. This type of hook can be used to add new Struts Actions also, it's the same as modifyingan existing action, in this case liferay-hook.xml would be: struts-action struts-action-path /my/custom/path /struts-action-path struts-action-impl com.myhook.action.ExampleStrutsAction /struts-action-impl /struts-action Hello User "Name" with hooksThis example will show how to make a simple "Hello User [name]" after the login. The example isbased on performing a custom action using a hookFrom your command line terminal, navigate to your Plugins SDK’s hooks folder. To create a hookproject, you must execute the create script. Here’s the format to follow in executing the script:create.[sh bat] [project-name] "[Hook Display Name]"On Linux and Mac OS X, you’d enter a command similar to the one in this example:./create.sh Hello-user "Hello User"On Windows, you’d enter a command similar to the one in this example:create.bat Hello-user "My Hook"Liferay IDE’s New Project wizard and the create scripts generate hook projects in your PluginSDK’s hooks folder. The Plugins SDK automatically appends “-hook” to your project name.Whether you created your hook project from the Liferay IDE or from the command line, you end upwith the same project structure (see before). Determine the event on which you want to trigger your custom action. Look in theportal.properties documentation to find the matching event property. Hint: the eventproperties have .event in their name. There are session, startup, shutdown, and portal eventproperties in the following sections of the portal.properties documentation: Session Startup Events - Shutdown Events - Portal Events In your hook project, create a Java class that extends thecom.liferay.portal.kernel.events.Action class. Override theAction.run(HttpServletRequest, HttpServletResponse) method.https://riptutorial.com/21
.PortalUtil;public class HelloUser extends Action {public void run(HttpServletRequest req, HttpServletResponse res) {User user PortalUtil.getUser(req);System.out.println("Hello User " user.getScreenName());}}Important: If your action access the HttpServletRequest object, extendcom.liferay.portal.kernel.events.Action; otherwise, extendcom.liferay.portal.struts.SimpleAction. Create a properties file, portal.properties, inside your hook project’s docroot/WEB-INF/srcfolder. Then add the name of the portal event property that corresponds to the event onwhich you want to perform your action. Specify your action class’ fully qualified name as theproperty’s value. login.events.post HelloUser For example, to perform a class’ action just prior to the portal logging in a user, you’d specifythe login.events.pre property with your action class as its value. It could look like thisproperty setting.Important: Since portal properties like login.events.pre accept multiple values, youmust append your values to the existing values. You can repeatedly modify theproperties from additional hooks.Only modify a portal property that accepts a single value from a single hook plugin. Ifyou modify a property’s value from multiple plugins, Liferay won’t know which value touse. Edit your docroot/WEB-INF/liferay-hook.xml file and add yourhook’s portal properties file name as the value for the portal-properties . /portal-properties element within yourhook’s hook . /hook element. For example, if your hook’s properties file name isportal.properties, you’d specify this element: portal-properties portal.properties /portal-properties Deploy your hook, go to your hook path and enter antthe dist folder.clean deployyouwill see the .war inNow if you login into liferay, you will see in the server log a message like "Hello user Admin".Model Listener Hookhttps://riptutorial.com/22
BackgroundModel Listener hook's are a type of Liferay plugin that listens for events taken on an model andexecutes code in response. Model Listener hooks are similar to Custom Struts Action hooks in thatthey respond to an action taken in the portal. However while Struts actions respond to an actiontaken by a user, a Model Listener responds (before or after) an event involving a Liferay model.DifferencesHere are a few examples of Struts Actions v. Model Listeners for comparison. Struts ActionUser LoginAccount CreationExtend SessionMove Folder Model ListenerAfter folder is createdWhen user information is updatedAfter bookmark is removedBefore a role association is made The best resource for learning Liferay's architecture is through their source code. Alltheir source files are located on GitHub and by viewing their JavaDocs. You can see allof the core portal models on the JavaDocs and all of the Struts Actions on the GitHub.ExampleIn this tutorial we are going to develop a Model Listener that sends an email to a User after theiraccount is first created. To do this we are going to write a class called UserModelListener whichwill extend Liferay's BaseModelListener. We will briefly go over hook creation and will cover thenecessary modifications to the following config files portal.properties liferay-hook.xmlGetting StartedTo begin developing your Model Listener hook you must first launch your Liferay IDE or LiferayDeveloper Studio application.https://riptutorial.com/23
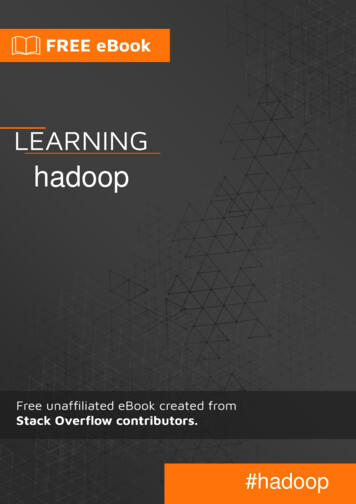
Both the Liferay IDE and the Liferay Developer Studio are customized Eclipsedevelopment environments. They are strikingly similar and one set of directions shouldbe sufficient for both environments.Inside your development environment execute the following steps.1. In the top left corner click File2. Hover your mouse over New3. Click Liferay Plugin ProjectYou will spawn this window.https://riptutorial.com/24
https://riptutorial.com/25
Select Use Default Location Build Type: Ant Plugin type: HookMake sure that your project is located inside your Liferays Plugins SDK Hookdirectory. You will need to select your SDK and your Runtime accordingly.In your Package Explorer perspective you will see the following directory structure.Listener DevelopmentNow that you have created your hook you will need to create your custom UserModelListenerclass. This class will extend Liferay's BaseModelListener class.https://riptutorial.com/26
Liferay's BaseModelListener class is an abstract class that implements theModelListener interface. You do not want to implement the ModelListener interfacedirectly as it will require you to override all of it's methods.The following methods are provided to you by the ModelListener interface through theBaseModelListener abstract class. sociationonBeforeUpdateCreate your UserModelListener class inside the following directory. To create the class via theGUI simply execute the following commands Click File in the top left corner Hover your mouse over New Click Classdocroot/WEB-INF/src/Enter the information shown belowhttps://riptutorial.com/27
https://riptutorial.com/28
class, packaged inside com.example.code, for the DLFolder model we would havethe following odel.DLFolder ly, locate your liferay-hook.xml file. In Source view, write the following. ?xml version "1.0"? !DOCTYPE hook PUBLIC "-//Liferay//DTD Hook 6.2.0//EN" "http://www.liferay.com/dtd/liferayhook 6 2 0.dtd" hook portal-properties portal.properties /portal-properties /hook Explanation1. Line one is an optional p
theme in liferay, containing the GTM id and a data layer structure(if needed) to map values from page to variables 1. Corresponding to data layer variables,we need to create Variables at GTM end,which retrieve data from data layer 2.