Transcription
Cisco Small Business SPA300 Series,SPA500 Series, and WIP310 IP PhoneAdministration GuideIP Phones Models SPA301, SPA303, SPA501G, SPA502G, SPA504G, SPA508G,SPA509G, SPA512G, SPA514G, SPA525G, SPA525G2, and WIP310Document Revised: May 2016Cisco Systems, Inc.www.cisco.comCisco has more than 200 offices worldwide.Addresses, phone numbers, and fax numbersare listed on the Cisco website atwww.cisco.com/go/offices.Text Part Number: OL-19749-09
THE SPECIFICATIONS AND INFORMATION REGARDING THE PRODUCTS IN THIS MANUAL ARE SUBJECT TO CHANGE WITHOUT NOTICE. ALLSTATEMENTS, INFORMATION, AND RECOMMENDATIONS IN THIS MANUAL ARE BELIEVED TO BE ACCURATE BUT ARE PRESENTED WITHOUTWARRANTY OF ANY KIND, EXPRESS OR IMPLIED. USERS MUST TAKE FULL RESPONSIBILITY FOR THEIR APPLICATION OF ANY PRODUCTS.THE SOFTWARE LICENSE AND LIMITED WARRANTY FOR THE ACCOMPANYING PRODUCT ARE SET FORTH IN THE INFORMATION PACKET THATSHIPPED WITH THE PRODUCT AND ARE INCORPORATED HEREIN BY THIS REFERENCE. IF YOU ARE UNABLE TO LOCATE THE SOFTWARE LICENSEOR LIMITED WARRANTY, CONTACT YOUR CISCO REPRESENTATIVE FOR A COPY.The following information is for FCC compliance of Class A devices: This equipment has been tested and found to comply with the limits for a Class A digital device, pursuantto part 15 of the FCC rules. These limits are designed to provide reasonable protection against harmful interference when the equipment is operated in a commercialenvironment. This equipment generates, uses, and can radiate radio-frequency energy and, if not installed and used in accordance with the instruction manual, may causeharmful interference to radio communications. Operation of this equipment in a residential area is likely to cause harmful interference, in which case users will be requiredto correct the interference at their own expense.The following information is for FCC compliance of Class B devices: This equipment has been tested and found to comply with the limits for a Class B digital device, pursuantto part 15 of the FCC rules. These limits are designed to provide reasonable protection against harmful interference in a residential installation. This equipment generates,uses and can radiate radio frequency energy and, if not installed and used in accordance with the instructions, may cause harmful interference to radio communications.However, there is no guarantee that interference will not occur in a particular installation. If the equipment causes interference to radio or television reception, which can bedetermined by turning the equipment off and on, users are encouraged to try to correct the interference by using one or more of the following measures: Reorient or relocate the receiving antenna.Increase the separation between the equipment and receiver.Connect the equipment into an outlet on a circuit different from that to which the receiver is connected.Consult the dealer or an experienced radio/TV technician for help.Modifications to this product not authorized by Cisco could void the FCC approval and negate your authority to operate the product.The Cisco implementation of TCP header compression is an adaptation of a program developed by the University of California, Berkeley (UCB) as part of UCB’s publicdomain version of the UNIX operating system. All rights reserved. Copyright 1981, Regents of the University of California.NOTWITHSTANDING ANY OTHER WARRANTY HEREIN, ALL DOCUMENT FILES AND SOFTWARE OF THESE SUPPLIERS ARE PROVIDED “AS IS” WITHALL FAULTS. CISCO AND THE ABOVE-NAMED SUPPLIERS DISCLAIM ALL WARRANTIES, EXPRESSED OR IMPLIED, INCLUDING, WITHOUTLIMITATION, THOSE OF MERCHANTABILITY, FITNESS FOR A PARTICULAR PURPOSE AND NONINFRINGEMENT OR ARISING FROM A COURSE OFDEALING, USAGE, OR TRADE PRACTICE.IN NO EVENT SHALL CISCO OR ITS SUPPLIERS BE LIABLE FOR ANY INDIRECT, SPECIAL, CONSEQUENTIAL, OR INCIDENTAL DAMAGES, INCLUDING,WITHOUT LIMITATION, LOST PROFITS OR LOSS OR DAMAGE TO DATA ARISING OUT OF THE USE OR INABILITY TO USE THIS MANUAL, EVEN IF CISCOOR ITS SUPPLIERS HAVE BEEN ADVISED OF THE POSSIBILITY OF SUCH DAMAGES.Cisco and the Cisco logo are trademarks or registered trademarks of Cisco and/or its affiliates in the U.S. and other countries. To view a list of Cisco trademarks, go to thisURL: www.cisco.com/go/trademarks. Third-party trademarks mentioned are the property of their respective owners. The use of the word partner does not imply a partnershiprelationship between Cisco and any other company. (1110R)Any Internet Protocol (IP) addresses and phone numbers used in this document are not intended to be actual addresses and phone numbers. Any examples, command displayoutput, network topology diagrams, and other figures included in the document are shown for illustrative purposes only. Any use of actual IP addresses or phone numbers inillustrative content is unintentional and coincidental. 2016 Cisco Systems, Inc. All rights reserved.
CONTENTSGetting Started1-1Overview of the Phones1-1Cisco Attendant Console 1-2Changing the Cisco SPA500DS Attendant Console Display1-2Network Configurations 1-3Cisco SPA9000 Voice System 1-4Cisco UC320W 1-4Cisco Unified Communications 500 Series for Small BusinessOther SIP IP PBX Call Control Systems 1-4Updating Firmware 1-5Upgrading Cisco SPA30X, SPA50X, and SPA51X IP PhonesUpgrading Cisco SPA525G and Cisco SPA525G2 IP PhonesUpgrading the Cisco WIP310 1-5Determining the Firmware Version 1-6Determining the IP Address of the Phone 1-7Downloading the Firmware 1-8Installing the Firmware 1-81-41-51-5Using the Web-Based Configuration Utility 1-9Allowing Web Access to the IP Phone 1-9Saving the Configuration Profile 1-11Understanding Administrator and User Views 1-11Restricting User Access to the Phone Interface Menus (Cisco SPA300 and Cisco SPA500Series) 1-11Accessing Administrative Options 1-12Using the Web Administration Tabs 1-12Viewing Phone Information 1-12Viewing Reboot Reasons 1-12Viewing the Reboot History on the Phone Web User Interface 1-13Viewing the Reboot History on the IP Phone Screen 1-14Viewing the Reboot History in the SPA Status Dump File 1-14Using IVR on IP Phones Without ScreensEnsuring Voice QualitySupported Codecs1-141-171-17Cisco Small Business SPA300 Series, SPA500 Series, and WIP310 IP Phone Administration GuideOL-19749-09iii
ContentsBandwidth Requirements 1-18Factors Affecting Voice Quality 1-18Voice Quality Report via SIP Publish 1-20Configuring Lines2-1Configuring a Line Key 2-1Configuring Shared–Line Appearance 2-2Configuring Call Appearance Per Line 2-3Expand Call Appearance Per Line 2-4Configuring Call Appearance Mapping Style 2-4Configuring Unused Line Keys to Access Services 2-4BroadSoft Advanced Call Park and Recall Support 2-5Assigning, Picking, and Monitoring a Parked Call 2-5Assigning Busy Lamp Field, Call Pickup, or Speed Dial Functions to Unused LinesConfiguring Call Pickup and Busy Lamp Field 2-6Configuring Speed Dial 2-7Configuring DTMF Wait and Pause Parameters 2-8Configuring Audio Indication for Call Pickup Event2-9Configuring Basic or Advanced Call Park Function to a Line KeyCustomizing Standard Features2-62-103-1Configuring Phone Information and Display Settings 3-2Configuring the Phone Name 3-2Customizing the Startup Screen 3-2Changing the Display Background (Wallpaper) 3-3Configuring the Screen Saver 3-4Configuring the LCD Contrast 3-5Configuring Back Light Settings (Cisco SPA525G or Cisco SPA525G2)Configuring Linksys Key System Parameters3-63-6Enabling Call Features 3-7Enabling Secure Calls 3-7Encryption Methods for a Secure Call 3-7Secure Call Indication Tone 3-7Enabling Anonymous Call and Caller ID Blocking Services 3-8Enabling ACD Service 3-8Enabling Call Back Service 3-8Enabling Call Park and Call Pickup Services 3-9Enabling Call Transfer and Call Forwarding Services 3-9Enabling Conferencing 3-9Enabling Do Not Disturb 3-9Cisco Small Business SPA300 Series, SPA500 Series, and WIP310 IP Phone Administration GuideivOL-19749-09
ContentsEnabling the Missed Call Shortcut 3-10Logging Missed Calls 3-10Enabling Paging (Intercom) 3-10Configuring Paging Groups 3-10Enabling Service Announcements 3-11Configuring Voice Mail and Message Waiting Settings 3-12Configuring Voice Mail 3-12Configuring Internal Voice Mail for Each Extension (Using a Cisco SPA400)Configuring the Message Waiting Indicator 3-123-12Customizing Phone Softkeys 3-12Programmable Softkeys 3-15Configuring PSK Fields 3-16Configuring Toggling for PSKs 3-17Configuring PSKs to Call XML Scripts 3-17Physical Hold Button and PSK Linking 3-18Configuring Ring Tones 3-18Configuring On-Demand Ring Tones (Cisco SPA525G or Cisco SPA525G2) 3-20User-Created MP3 Ring Tones (Cisco SPA525G or Cisco SPA525G2) 3-20Creating and Uploading Ring Tones Using the Ring Tone Utility (Cisco SPA300 Series andCisco SPA500 Series only) 3-20Assigning a Ring Tone to an Extension 3-22Configuring RSS Newsfeeds (Cisco SPA525G or Cisco SPA525G2)3-22Configuring Audio Settings 3-23Configuring Audio Input Gain (Cisco SPA300 Series and Cisco SPA500 Series)Enabling Wireless (Cisco SPA525G or Cisco SPA525G2 only)Configuring User Access Control 3-253-243-25Configuring Bluetooth (Cisco SPA525G or Cisco SPA525G2 only) 3-25Enabling Bluetooth from the Web Interface 3-25Enabling Bluetooth from the Phone 3-25Pairing a Bluetooth Headset 3-26Pairing Your Cisco SPA525G2 with a Bluetooth-Enabled Mobile Phone 3-27Initiating Pairing from the Cisco SPA525G2 3-27Initiating Pairing from Your Bluetooth-Enabled Mobile Phone 3-28Enabling SMS Messaging3-28Enabling and Configuring the Phone Web Server 3-29Configure the Web Server from the Phone Web Interface 3-29Configure the Web Server from the Phone Screen Interface 3-30Configuring WBPN for Cisco SPA30X, SPA50X, and SPA51X IP PhonesConfiguring the WBPN Device 3-313-30Cisco Small Business SPA300 Series, SPA500 Series, and WIP310 IP Phone Administration GuideOL-19749-09v
ContentsChecking the Wireless Status3-32Configuring LDAP for the Cisco SPA300 Series and Cisco SPA500 Series IP Phones3-33Configuring BroadSoft Settings (Cisco SPA300 Series and Cisco SPA500 Series) 3-35Configuring BroadSoft Directory 3-35Configuring Personal Address Book 3-36Synchronization of Do Not Disturb and Call Forward on a Per Line Basis (Applicable toBroadSoft) 3-37Configuring Synchronization of DND and CFWD 3-37Configuring Synchronization of DND and CFWD by Using the Configuration File 3-38Broadsoft ACD Support 3-38Configuring BroadSoft ACD Support 3-38Configuring XML Services 3-39XML Directory Service 3-39XML Applications 3-40Macro Variables 3-40Configuring Music On Hold3-42Configuring Extension Mobility3-43Configuring Video Surveillance (Cisco SPA525G or Cisco SPA525G2) 3-43Configuring the User Name and Account on the Camera 3-44Entering Camera Information Into the Cisco SPA525G or Cisco SPA525G2 Configuration UtilityViewing the Video 3-45Configuring SIP, SPCP, and NAT3-444-1SIP and Cisco IP Phones 4-1SIP Over TCP 4-2SIP Proxy Redundancy 4-2Configuring Survivable Remote Site Telephony (SRST) Support 4-3Dual Registration 4-3Limitations for Dual Registration and DNS SRV Redundancy 4-3Alternate Proxy and Dual Registration 4-4Register Upon Failover/Recovery 4-4Fallback Behavior 4-4RFC3311 Support 4-5Support for SIP NOTIFY XML-Service 4-5Configuring SIP 4-5Configuring Basic SIP Parameters 4-5Configuring SIP Timer Values 4-8Configuring Response Status Code HandlingConfiguring RTP Parameters 4-104-10Cisco Small Business SPA300 Series, SPA500 Series, and WIP310 IP Phone Administration GuideviOL-19749-09
ContentsConfiguring SDP Payload Types 4-11Configuring SIP Settings for Extensions 4-13Configuring a SIP Proxy Server 4-17Configuring Subscriber Information Parameters4-19Configuring the IP Phone Communications Protocol 4-20Configuring the Protocol on a Cisco SPA525G or Cisco SPA525G2 4-20Configuring the Protocol on a Cisco SPA300 Series or Cisco SPA500 Series IP PhoneManaging NAT Transversal with Cisco IP Phones 4-21NAT Mapping with Session Border Controller 4-21NAT Mapping with SIP-ALG Router 4-21NAT Mapping with a Static IP Address 4-21NAT Mapping with STUN 4-22Determining Whether the Router Uses Symmetric or Asymmetric NATConfiguring Security, Quality, and Network Features4-235-1Setting Security Features 5-1Configuring Domain and Internet Settings 5-1Configuring Restricted Access Domains 5-1Configuring DHCP, Static IP, or PPPoE Connection TypeChallenging SIP Initial INVITE and MWI Messages 5-3Encrypting Signaling with SIP Over TLS 5-3Securing Voice Traffic with SRTP 5-4Configuring Voice Codecs4-205-15-4Setting Optional Network Servers5-7Configuring VLAN Settings 5-8Configuring Cisco Discovery Protocol (CDP)Configuring LLDP-MED 5-8TLV Information 5-9Configuring the VLAN Settings 5-145-8Configuring SSL VPN on the Cisco SPA525G or Cisco SPA525G2 5-15Configuring the VPN on the Security Appliance 5-16Configuring the VPN on the Cisco SPA525G or Cisco SPA525G2 5-16Provisioning6-1Redundant Provisioning ServersCisco Small Business SPA300 Series, SPA500 Series, and WIP310 IP Phone Administration GuideOL-19749-09vii
ContentsClient Certificates 6-3Obtaining a Server Certificate6-4Manually Provisioning a Phone from the KeypadSample Configuration File 6-56-4Updating Profiles and Firmware 6-6Allow and Configure Profile Updates 6-6Allow and Configure Firmware Updates 6-9Launch a Firmware Update by Using a Browser Command 6-10Launch a Profile Update by using a Browser Command 6-11Rebooting a Phone by using a Browser Command 6-11Configuring a Custom Certificate AuthorityGeneral Purpose ParametersUsing TR-0696-116-126-12Configuring Regional Parameters and Supplementary Services7-1Scripting for Cadences, Call Progress Tones, and Ring Tones 7-1Cadence Script 7-1Example: Normal Ring 7-2Example 2: Distinctive Ring (short, short, short, long) 7-2Tone Script 7-2Example: Dial Tone 7-3Example: SIT Tone 7-3Ring Script 7-4Call Progress Tones7-4Distinctive Ring Patterns 7-5Example 1: Normal Ring 7-5Example 2: Distinctive Ring (short, short, short, long)Distinctive Call Waiting ToneControl Timer Values (sec)7-57-67-6Configuring Supplementary Services (Star Codes) 7-7Entering Star Code Values 7-7Activating or Deactivating Supplementary Services7-10Vertical Service Announcement Codes (Cisco SPA300 Series and Cisco SPA500 Series)Bonus Services Announcement Description 7-10Outbound Call Codec Selection Codes 7-127-10Miscellaneous Parameters 7-12DTMF Parameters 7-12Localizing Your IP Phone7-13Cisco Small Business SPA300 Series, SPA500 Series, and WIP310 IP Phone Administration GuideviiiOL-19749-09
ContentsManaging the Time and Date 7-13Configuring Daylight Saving Time 7-14Daylight Saving Time Examples 7-14Selecting a Display Language 7-15Creating a Dictionary Server Script 7-16Configuring Dial Plans8-1Cisco Small Business SPA300 Series, SPA500 Series, and WIP310 IP Phone Administration GuideOL-19749-09ix
ContentsStatic IP Settings A-11PPPoE Settings (Cisco SPA525G or Cisco SPA525G2 Only) A-12Optional Network Configuration A-12VLAN Settings A-13Wi-Fi Settings (Cisco SPA525G or Cisco SPA525G2 Only) A-14Bluetooth Settings (Cisco SPA525G or Cisco SPA525G2 Only) A-14VPN Settings (Cisco SPA525G or Cisco SPA525G2 Only) A-14Inventory Settings A-15SIP Tab A-15SIP Parameters A-15SIP Timer Values (sec) A-19Response Status Code Handling A-21RTP Parameters A-21SDP Payload Types A-23NAT Support Parameters A-25Linksys Key System Parameters A-26Provisioning TabA-27Regional Tab A-27Call Progress Tone Description A-27Distinctive Ring Patterns A-29Control Timer Values (sec) A-30Vertical Service Activation Codes A-30Vertical Service Announcement Codes A-34Outbound Call Codec Selection Codes A-34Time (Cisco SPA525G or Cisco SPA525G2 Only) A-36Language (Cisco SPA525G or Cisco SPA525G2 Only) A-37Miscellaneous A-37Phone Tab A-40General A-40Line Key A-43Miscellaneous Line Key Settings A-44Line Key LED Pattern A-45Supplementary Services A-47Ring Tone (Cisco SPA300 Series and Cisco SPA500 Series)Ring Tone (Cisco WIP310) A-49Audio Input Gain (dB) A-50Multiple Paging Group Parameters A-51BroadSoft Settings A-51LDAP Corporate Directory Search A-52A-48Cisco Small Business SPA300 Series, SPA500 Series, and WIP310 IP Phone Administration GuidexOL-19749-09
ContentsXML Service A-54Extension Mobility A-55Programmable Softkeys A-55Call Audio Recording (Cisco SPA525G and SPA525G2)A-57Ext Tab A-57General A-57Share Line Appearance A-58NAT Settings A-58Network Settings A-59SIP Settings A-59Call Feature Settings A-64Proxy and Registration A-67Subscriber Information A-70Audio Configuration A-71Dial Plan Script A-73User Tab A-74Call Forward A-74Speed Dial A-75Supplementary Services A-75Camera Settings (Cisco SPA525G or Cisco SPA525G2) A-77Web Information Service Settings (Cisco SPA525G or Cisco SPA525G2)Audio (SPA5XX)/Audio Volume (SPA525G/525G2) A-77Screen (Cisco SPA525G or Cisco SPA525G2) A-79Attendant Console Tab (Cisco SPA500 and Cisco SPA500DS)General A-81Attendant Key LED Patterns A-82Attendant Console StatusTR-069 TabA-77A-81A-83A-84Cisco SPA525G or Cisco SPA525G2-Specific TabsWi-Fi A-86Bluetooth A-86Personal Address Book A-87Call History A-87Speed Dials A-87Firmware Upgrade A-87Where to Go From HereB-1Behavior During Times of Network CongestionRelated InformationA-86B-1B-1Cisco Small Business SPA300 Series, SPA500 Series, and WIP310 IP Phone Administration GuideOL-19749-09xi
ContentsCisco Small Business SPA300 Series, SPA500 Series, and WIP310 IP Phone Administration GuidexiiOL-19749-09
CH A P T E R1Getting StartedThis chapter contains basic information on Cisco SPA300 Series, Cisco SPA500 Series, and CiscoWireless-G IP phones. This chapter contains the following sections: Overview of the Phones, page 1-1 Cisco Attendant Console, page 1-2 Network Configurations, page 1-3 Updating Firmware, page 1-5 Using the Web-Based Configuration Utility, page 1-9 Understanding Administrator and User Views, page 1-11 Viewing Phone Information, page 1-12 Using IVR on IP Phones Without Screens, page 1-14 Ensuring Voice Quality, page 1-17Overview of the PhonesThe Cisco SPA IP Phone family is a line of full-featured VoIP (Voice-over-Internet Protocol) phones thatprovide voice communication over an IP network. They provide all the features of traditional businessphones, such as call forwarding, redialing, speed dialing, transferring calls, conference calling, andaccessing voice mail. Calls can be made or received with a handset, a headset, or a speaker.For more information on phone features, see the data sheets for each product.Cisco Small Business SPA300 Series, SPA500 Series, and WIP310 IP Phone Administration GuideOL-19749-091-1
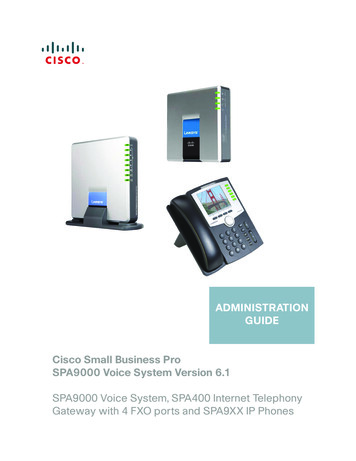
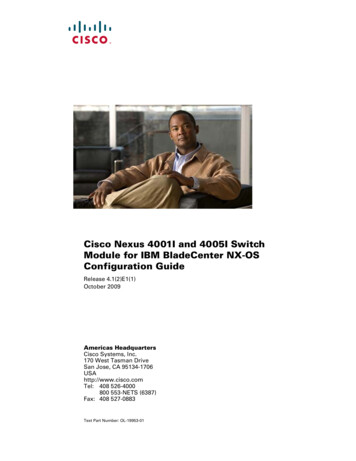
Chapter 1Getting StartedNetwork ConfigurationsTo configure these options from the web interface, navigate to Admin Login advanced Voice Attendant Console. In the General section, configure the following parameters: Attendant Console Font Size—Choose 10 or 12 point font. Attendant Console LCD Contrast—Enter a number value from 1 to 30. The higher the number,the greater the contrast on the display.Network ConfigurationsThe Cisco SPA IP phones can be used as part of a Cisco SPA9000 Voice System phone network, anyvendor SIP network, or Cisco Unified Communications 500. The Cisco SPA IP phones support SessionInitiation Protocol (SIP). The Cisco SPA300 Series or the Cisco SPA500 Series IP phones also supportSmart Phone Control Protocol (SPCP).SPAIP PhonesWIP310IPPSTNGatewaySmartSwitchIP PBXWirelessRouterAnalog Phonesor Fax MachinesAnalogPhone LinesInternetIntegratedAccess Device276459IADThis document describes some common network configurations; however, your configuration can vary,depending on the type of equipment used by your service provider.Cisco Small Business SPA300 Series, SPA500 Series, and WIP310 IP Phone Administration GuideOL-19749-091-3
Chapter 1Getting StartedNetwork ConfigurationsCisco SPA9000 Voice SystemThe Cisco SPA9000 Voice System is an affordable and feature-rich voice-over-IP (VoIP) telephonesystem that is designed for small businesses. The Cisco SPA9000 Voice System uses standard TCP/IPprotocols and can provide global connectivity through any Internet Telephony Service Provider (ITSP)that supports SIP.At minimum, the Cisco SPA9000 Voice System includes a Cisco IP PBX and one or more Cisco SPA IPphones. These devices are connected through a switch to a local area network (LAN). With an Internetconnection, the Cisco SPA9000 Voice System can subscribe to ITSP services to take advantage of lowcalling rates. With the optional Cisco SPA400, the Cisco SPA9000 Voice System can connect to thePublic Switched Telephone Network (PSTN) to support legacy phone lines and provide local voice mailservice.You can configure and manage the Cisco SPA IP phones by using the Interactive Voice Response (IVR)system, the Cisco SPA9000 Voice System Setup Wizard, or a built-in web server.Cisco UC320WThe phone web user interface is limited when the phone is connected to a Cisco UC320W. Forinformation on configuring the network phone system, refer to the Cisco UC320W AdministrationGuide.Cisco Unified Communications 500 Series for Small BusinessThe Cisco Unified Communications 500 Series for Small Business is an affordable SPCP appliance thatprovides voice, data, video, network security, and wireless communications capabilities whileintegrating with existing desktop applications, such as calendar, e-mail, and customer relationshipmanagement (CRM) programs. The Cisco SPA300 Series and Cisco SPA500 Series IP phones can beconfigured to work with this system.Other SIP IP PBX Call Control SystemsCisco SPA IP phones are compatible with other SIP IP PBX call control systems, such as BroadSoft andAsterisk. Configuration of these systems is not described in this document. For more information, seethe documentation for the SIP PBX system to which you are connecting the Cisco SPA IP phones.Cisco Small Business SPA300 Series, SPA500 Series, and WIP310 IP Phone Administration Guide1-4OL-19749-09
Chapter 1Getting StartedUpdating FirmwareUpdating FirmwarePhones should be updated to the latest firmware before using any administration features. There areseveral ways to update your firmware, depending on the phone model and call control system with whichthe phone is used.Upgrading Cisco SPA30X, SPA50X, and SPA51X IP PhonesWith SIP Call Control Systems Firmware Update Executable File—Download the firmware update utility from the related productpage on Cisco.com to your PC. Run the update by double-clicking the executable file. Yourcomputer must be on the same subnetwork as the Cisco SPA IP phones. Autoprovisioning—A configuration file that includes firmware upgrade information is downloadedby a phone when it is powered on or configured to do so. The configuration file (also referred to asa profile) includes parameters that direct how and when the phone firmware is to be updated. Seethe “Updating Profiles and Firmware” section on page 6-6 for more information. Cisco SPA9000 Voice System Setup Wizard—If you are using the Cisco SPA IP phones with aCisco SPA9000 Voice System, see the Cisco SPA9000 Voice System Setup Wizard User Guide forinstructions. (The Setup Wizard does not support Cisco SPA300 Series IP phones or SPA51Xphones; you must use a different process to upgrade those models.)With SPCP Call Control SystemsYou must use the management interface for the call control system to upgrade the software on yourphones (for example, Cisco Configuration Assistant, when the phones are used with the Cisco UC5XX).Upgrading Cisco SPA525G and Cisco SPA525G2 IP Phones Web-based configuration utility—Download the software from the related product page onCisco.com to your PC. Log in to the web-based configuration utility and choose Firmware Upgradefrom the menu at the top of the page. Click Firmware Upgrade Window and click Select File, thenlocate the software file that you have extracted and click Open. Click Submit. After the upgradefinishes, click Close to close the upgrade window. Autoprovisioning—A configuration file that includes firmware upgrade information is downloadedby a phone when it is powered on or configured to do so. The configuration file (also referred to asa profile) includes parameters that direct how and when the phone firmware is to be updated. Seethe “Updating Profiles and Firmware” section on page 6-6 for more information. Cisco SPA9000 Voice System Setup Wizard—If you are using the Cisco SPA IP phones with aCisco SPA9000 Voice System, see the Cisco SPA9000 Voice System Setup Wizard User Guide forinstructions. (The Setup Wizard does not support Cisco SPA300 Series IP phones or SPA51Xphones; you must use a different process to upgrade those models.)Upgrading the Cisco WIP310The latest firmware image file is loaded onto an HTTP/TFTP server and is accessed by a web browser.See the Cisco WIP310 User Guide for more information.Cisco Small Business SPA300 Series, SPA500 Series, and WIP310 IP Phone Administration GuideOL-19749-091-5
Chapter 1Getting StartedUpdating FirmwareDetermining the Firmware VersionTo determine the current firmware version:Cisco SPA301GStep 1Quickly press the asterisk (*) button four times to enter the IVR menu.Step 2Enter 150#. The firmware version is recited.Cisco SPA501GStep 1Press the Setup button. The IVR configuration menu is announced.Step 2Enter 150#. The firmware version is recited.Cisco SPA303, Cisco SPA500 SeriesStep 1Press the Setup button.Step 2Scroll to Product Info and press Select. The current firmware is displayed under Software Version.Cisco SPA525G or Cisco SPA525G2Step 1Press the Setup button.Step 2Scroll to Status and press Select.Step 3Select Product Information. The firmware version is displayed under Software Version.Cisco WIP310Step 1In the Home screen, press Options, highlight Phone Info, and press Select.Step 2Scroll to Software Version. The firmware is displayed.Cisco Small Business SPA300 Series, SPA500 Series, and WIP310 IP Phone Administration Guide1-6OL-19749-09
Chapter 1Getting StartedUpdating FirmwareDetermining the IP Address of the PhoneBefore you update the device, you must know the IP address of the phone you are upgrading. Often anIP address is assigned by a DHCP server, so the phone must be booted up and connected to thesubnetwork.To display your IP address:Cisco SPA301Step 1Quickly press the asterisk (*) button four times to enter the IVR menu.Step 2Enter 110#. The IP address is recited.Cisco SPA501GStep 1Press the Setup button. The IVR configuration menu is announced.Step 2Enter 110, then press #. The IP address is recited.Cisco SPA500 SeriesStep 1Press the Setup button.Step 2Scroll to Network and press Select. The IP Address is displayed under Current IP.Cisco SPA525G or Cisco SPA525G2Step 1Press the Setup button.Step 2Scroll to Status and press Select.Step 3Scroll to Network Status and press Select. The IP address is displayed.Cisco WIP310Step 1In the Home window, press Select and navigate to Settings.Step 2Press Select and navigate to Phone Info.Step 3The IP Address field displays the IP address.Cisco Small Business SPA300 Series, SPA500 Series, and WIP310 IP Phone Administration GuideOL-19749-091-7
Chapter 1Getting StartedUpdating FirmwareDownloading the FirmwareTo download firmware from Cisco.com to your PC:Step 1Direct your browser to the URL ?a a&i rpm.Step 2Follow the instructions on the page to locate your product and download the firmware file.Step 3If the firmware file you download is in zip format, double-click the file and extract its contents to a singlefolder or to the desktop.Installing the FirmwareYour computer must be on the same subnetwork as the phone you are upgrading.Cisco SPA300 Series and Cisco SPA500 SeriesStep 1With your PC attached to the same subnetwork as the phone, run the executable file for the firmwareupdate.Step 2Click Continue after reading the message regarding updating and your service provider information.Step 3Enter the IP address of the phone.Step 4Follow the on-screen directions.Cisco SPA525G or Cisco SPA525G2Step 1Log in to the configuration utility for the phone.Step 2Choose the Firmware Upgrade tab.Step 3Click Firmware Upgrade Window.Step 4Browse to select the firmware file from your PC. Click Submit. The firmware is installed and your phonereboots.Cisco WIP310Step 1Turn off your Cisco WIP310 and connect it to your computer by using a USB cable.Step 2Double-click the executable file for the firmware upgrade (for example, double-clickwip310-5-0-11.exe).Step 3Follow the on-screen instructions.Step 4When the upgrade is complete, disconnect the phone from your PC and power it on.Cisco Small Business SPA300 Series, SPA500 Series, and WIP310 IP Phone Administration Guide1-8OL-19749-09
Chapter 1Getting StartedUsing the Web-Based Configuration UtilityUsing the Web-Based Configuration UtilityYour phone system administrator can allow you to view the phone statistics and modify some or all ofthe parameters by using the phone web user interface. The features of the Cisco SPA phones that can bemodified by the user by using the phone web user interfaceare described in this document; however, notall features are available on all phones.If you are using the Cisco SPA IP phones with the Cisco Unified Communications 500 Series for SmallBusiness for Call Control, use Cisco Unified Communication Manager Express or Cisco ConfigurationAssistant (CCA) for phone administration. For more information, refer to the Cisco UnifiedCommunications 500 Office Administrator Guide or the Cisco Configuration Assistant Smart BusinessCommunications System Administrator Guide.To access the IP phone configuration utility, launch a web browser on a computer that can reach thephone on the subnetwork and enter the IP address of the phone in your web browser address bar. Forexample, http://192.168.1.8. To get the IP address of your phone, see Determining the IP Address ofthe Phone. If you are connected to a VPN, you must first exit the VPN.Not
Contents v Cisco Small Business SPA300 Series, SPA500 Series, and WIP310 IP Phone Administration Guide OL-19749-09 Enabling the Missed Call Shortcut 3-10 Logging Missed Calls 3-10 Enabling Paging (Intercom) 3-10 Configuring Paging Groups 3-10 Enabling Service Announcements 3-11 Configuring Voice Mail and Message Waiting Settings 3-12 Configuring Voice Mail 3-12 .