Transcription
ADMINISTRATIONGUIDECisco Small Business ProSPA9000 Voice System Version 6.1SPA9000 Voice System, SPA400 Internet TelephonyGateway with 4 FXO ports and SPA9XX IP Phones
CCDE, CCSI, CCENT, Cisco Eos, Cisco HealthPresence, the Cisco logo, Cisco Lumin, Cisco Nexus, Cisco Nurse Connect, Cisco Stackpower, Cisco StadiumVision,Cisco TelePresence, Cisco WebEx, DCE, and Welcome to the Human Network are trademarks; Changing the Way We Work, Live, Play, and Learn and Cisco Store are service marks;and Access Registrar, Aironet, AsyncOS, Bringing the Meeting To You, Catalyst, CCDA, CCDP, CCIE, CCIP, CCNA, CCNP, CCSP, CCVP, Cisco, the Cisco Certified InternetworkExpert logo, Cisco IOS, Cisco Press, Cisco Systems, Cisco Systems Capital, the Cisco Systems logo, Cisco Unity, Collaboration Without Limitation, EtherFast, EtherSwitch, EventCenter, Fast Step, Follow Me Browsing, FormShare, GigaDrive, HomeLink, Internet Quotient, IOS, iPhone, iQuick Study, IronPort, the IronPort logo, LightStream, Linksys,MediaTone, MeetingPlace, MeetingPlace Chime Sound, MGX, Networkers, Networking Academy, Network Registrar, PCNow, PIX, PowerPanels, ProConnect, ScriptShare,SenderBase, SMARTnet, Spectrum Expert, StackWise, The Fastest Way to Increase Your Internet Quotient, TransPath, WebEx, and the WebEx logo are registered trademarks ofCisco Systems, Inc. and/or its affiliates in the United States and certain other countries.All other trademarks mentioned in this document or website are the property of their respective owners. The use of the word partner does not imply a partnership relationship betweenCisco and any other company. (0903R) 2009 Cisco Systems, Inc. All rights reserved.OL-17899-02
ContentsAbout This xiDocument ConventionsxiiFinding Information in PDF FilesxiiiChapter 1: Getting Started16Introduction to the SPA9000 Voice System16SPA9000 IP PBX17SPA400 SIP-PSTN Gateway and Voicemail Server18IP Phones and Accessories18Deployment Scenarios18PSTN Access and Local Voice Mail19ITSP Service Only20ITSP Service, PSTN Access and Local Voice Mail21ITSP Service, PSTN and ISDN Access and Local Voice Mail22Initial Installation, and ConfigurationChapter 2: Basic Administration of the SPA90002324Upgrading Firmware for the SPA900025Connecting to the SPA9000 Administration Web Server27Saving or Discarding Changes SPA900027Access Levels28Setting Passwords for User and Administrator Accounts29SPA9000 Voice System Administration Guidei
ContentsConfiguring Basic Settings29Setting Up the WAN Connection for the SPA900030Setting the Date and Time30Configuring Daylight Saving Time31SPA9000 Ethernet Port33LAN and Application Guidelines33Configuring Multicast Addressing and Group Paging33Collecting System Logs and Debug Information36Viewing Information about the SPA900039Viewing Information about Client Stations39Using the Interactive Voice Response Unit40Using the IVR Menu40Entering a Password through the IVR45Chapter 3: Configuring Your System for ITSP Interoperability47About the SPA9000 Voice System and SIP47Network Address Translation (NAT) and Voice over IP (VoIP)49NAT Mapping with Session Border Controller49NAT Mapping with SIP-ALG Router49Configuring NAT Mapping with a Static IP Address49Configuring NAT Mapping with STUN51Determining the Router's NAT Mechanism53Firewalls and SIP54Configuring SIP Timer Values55Chapter 4: Configuring Phone Lines and Calling Routing BehaviorConfiguring SPA9000 FXS PortsSPA9000 Voice System Administration Guide5657ii
ContentsConfiguring Line Interfaces on the SPA900058Configuring a Line Interface for ITSP Service58Configuring a Line Interface for a SPA400 (PSTN or Voice Mail)60Configuring Call Capacity for a Line Interface63Configuring Dial Plans66About Dial Plans66Editing Dial Plans74Managing the Line Selection for Outbound Calls78Line Availability78Configuring a Call Routing Rule79Entering a Call Routing Rule81Managing Caller ID Settings for Outgoing Calls82Call Forwarding Support on SPA900082Call Transfer Support on SPA900084Call Forward Bridge Mode84Call Transfer Bridge Mode84Managing Inbound Calls with the Contact List85Routing an Inbound Call to the Auto Attendant85Routing an Inbound Call to a Receptionist or Client Stations85Example Contact List Rules86Supporting Multiple DID Numbers Per Line Interface87Supporting Direct Inward Dialing to Phone Extensions88Entering a Contact List Rule91Managing Inbound Calls with Hunt Groups92Syntax for Hunt Rules93Examples for Hunt Rules94Creating a Hunt Rule96Managing Inbound Calls with Shared Line AppearancesSPA9000 Voice System Administration Guide98iii
ContentsAbout Shared Line AppearancesChapter 5: Administering the SPA400 and Voice Mail Service98102Connecting to the SPA400 Administration Web Server103Configuring the SPA400 Network Connection104Saving or Discarding Changes on the SPA400105Managing Access to the SPA400 Configuration Utility106Upgrading the Firmware for the SPA400107Configuring a SPA400 to Interoperate with the SPA9000108Configuring a SPA400 for PSTN Access111Configuring a SPA400 for Voice Mail Service112Voice Mail Capacity112Configuring Local Voice Mail Service on a SPA400113Setting Up Voice Mail on Each Station116Enabling Remote Voice Mail Access (Optional)119Managing the Voice Mail Messages on the USB Key121Enabling Debugging on the SPA400122Chapter 6: Configuring Music on HoldUsing the Internal Music Source for Music On Hold125125Using the Internal Music Source125Changing the Music File for the Internal Music Source126Configuring a Streaming Audio Server127About the Streaming Audio Server127Configuring the Streaming Audio Server129Using the IVR with an SAS Line130SPA9000 Voice System Administration Guideiv
ContentsChapter 7: Configuring the Auto Attendant131How the Auto Attendant Works131Working with the Auto Attendant Greetings133Using Pre-Recorded Prompts133Recording an Auto Attendant Prompt134Downloading Prompts137Writing an Auto Attendant Script138An Introduction to XML Scripting Grammar in AA Script Examples 138Elements of XML Scripting Grammar142Auto Attendant XML Instructions Set145Entering an Auto Attendant Script147Configuring the DayTime, NightTime and Weekend/Holiday AutoAttendants148Configuring Dial Plans for the Auto AttendantChapter 8: Localization150151Localizing the SPA9000 Auto Attendant Prompts151Local Time Configuration154Configuring the SPA9000 and SPA9xx Call Progress Tones154Localizing the SPA400 Voice Mail Prompts160Localizing the SPA400 Call Disconnect Tones161Localizing the SPA400 Caller ID Method163Appendix A: Advanced Topics in SPA9000 AdministrationTechnology Background165165Session Initiation Protocol166SPA9000 Media Proxy167SPA9000 Voice System Administration Guidev
ContentsUsing the SPA9000 with a Firewall or Router168SPA400 SIP-PSTN Gateway169SPA9000 Architecture170SIP-NAT Interoperation172Advanced Call Control and Routing173Configuring Vertical (Supplementary) Service Codes173Managing the Outbound Call Routing Groups175Configuring Outbound Call Codec Selection Codes177Advanced Topics for SPA400 Voice Mail Service178How Voicemail Works179Checking Voicemail from an External Number180Depositing Voicemail180Subscribing to Voicemail Notification182Remote Provisioning Features183Using Configuration Profiles183Client Auto-Configuration184Manual Client Configuration185Client Registration188Using the Upgrade URL189Using the Resync URL190Using the Reboot URL190Appendix B: SPA9000 Field ReferenceRouter Tab191191Status page191Wan Setup page193Lan Setup page and Application page196Voice tabInfo pageSPA9000 Voice System Administration Guide197197vi
ContentsSystem page200SIP Page202Provisioning page224Regional page224FXS 1/2 page241Line 1/2/3/4 page251Appendix C: SPA400 Field ReferenceSetup261261Basic Setup262SPA9000 Interface262Voice264Voicemail Server268Voicemail Users269Administration270Management270Factory Default270USB Setting271Firmware Upgrade271Reboot271StatusGatewayEvent LogsSet Log LevelToneAppendix D: Where to Go From Here272272273273274275Product Resources275Related Documentation276SPA9000 Voice System Administration Guidevii
ContentsAppendix E: Glossary278Appendix F: Acronyms281SPA9000 Voice System Administration Guideviii
PrefaceAbout This DocumentThe SPA9000 Voice System Administration Guide is intended to help VARs andService Providers to manage and configure the SPA9000 Voice System. Thispreface provides helpful information about this guide and other resources that areavailable to you. Before you begin to use this guide, refer to the following topics: “Purpose,” on page ix “Audience,” on page ix “Firmware,” on page x “Organization,” on page xi “Document Conventions,” on page xii “Finding Information in PDF Files,” on page xiiiPurposeThis document provides information that an administrator needs to configure theSPA9000 Voice System, which typically consists of a SPA9000 IP PBX, one ormore SPA900 Series IP phones, and the optional SPA400 PSTN gateway andvoice mail server. This guide focuses primarily on the tasks that an administratorperforms to configure a SPA9000 with the SPA9000 administration web server.NOTE This guide does not cover initial installation and configuration, SPA900 Seriesphone configuration, the Setup Wizard, or provisioning. See “RelatedDocumentation” in Appendix D, on page 276.AudienceThis document is written for the following audience: Service providers offering services using Cisco SPA products VARs and resellers who need configuration references for Cisco SPA productsSPA9000 Voice System Administration Guideix
Preface System administrators or anyone who installs and administers the SPA9000Voice SystemNOTE This guide does not provide the configuration information required by specificservice providers. Please consult with the service provider for specific serviceparameters.FirmwareThis guide describes the features that are available in the following firmwarereleases (and higher versions). You can find all available firmware updates bygoing to Cisco.com and choosing Support. Or visit the following URL and enter themodel number in the Software Search tFirmware A9000 Voice System Administration Guidex
PrefaceOrganizationThe information in this guide is organized into the following chapters andappendices:ChapterDescriptionChapter 1, “GettingStarted.”This chapter introduces you to the SPA9000Voice System by describing the components andpresenting several deployment scenarios.Chapter 2, “BasicAdministration of theSPA9000.”This chapter introduces you to basicadministrative tasks using the SPA9000administration web server and the InteractiveVoice Response Unit.Chapter 3, “ConfiguringYour System for ITSPInteroperability”This chapter provides configuration details to helpyou to ensure that your infrastructure properlysupports voice services.Chapter 4, “ConfiguringPhone Lines and CallingRouting Behavior”This chapter describes many features that youcan configure on the SPA9000 to ensure smoothhandling of all inbound and outbound calls, andease of use.Chapter 5, “Administeringthe SPA400 and Voice MailService”This chapter guides you through the process ofconfiguring and managing the SPA400 for PSTNaccess and voice mail service.Chapter 6, “ConfiguringMusic on Hold”This chapter explains how to configure Music onHold using either a music file or streaming audio.Chapter 7, “Configuring theAuto Attendant”This chapter describes how to configure theSPA9000 Voice System Auto Attendant (AA) byusing the IVR and XML scripting.Chapter 8, “Localization”This chapter explains how to localize yourSPA9000 Voice System with the language files,tones, and ring patterns for your region.Appendix A, “AdvancedTopics in SPA9000Administration”This appendix provides more detailed technicalinformation for administrators who want tounderstand how the SPA9000 Voice Systemworks.SPA9000 Voice System Administration Guidexi
PrefaceChapterDescriptionAppendix B, “SPA9000Field Reference”This appendix describes the fields on each pageof the SPA9000 administration web server.Appendix C, “SPA400 FieldReference”This appendix describes the fields on each pageof the SPA400 administration web server.Appendix D, “Where to GoFrom Here”This appendix describes additional resourcesthat are available to help you and your customerobtain the full benefits of the SPA9000 VoiceSystem.Appendix E, “Glossary”Appendix F, “Acronyms”These resources help you to understand theterms and acronyms that are used in this guide.Document ConventionsThe following table describes the typographic conventions that are used in thisdocument.TypographicElementMeaningBoldfaceMay indicate either of the following:Italic A user interface element that you need to click, select, orotherwise act on A literal value to be entered in a field.May indicate either of the following: MonospacedFontSPA9000 Voice System Administration GuideA variable that should be replaced with a literal value.The name of a page, section, or field in the user interfaceIndicates code samples or system output.xii
PrefaceFinding Information in PDF FilesThe SPA9000 Voice System documents are published as PDF files. The PDF Find/Search tool within Adobe Reader lets you find information quickly and easilyonline. You can perform the following tasks: Search an individual PDF file. Search multiple PDF files at once (for example, all PDFs in a specific folder ordisk drive). Perform advanced searches.Finding Text in a PDFFollow this procedure to find text in a PDF file.STEP 1Enter your search terms in the Find text box on the toolbar.NOTE By default, the Find tool is available at the right end of the Acrobat toolbar. Ifthe Find tool does not appear, choose Edit Find.STEP 2Optionally, click the arrow next to the Find text box to refine your search bychoosing special options such as Whole Words Only.STEP 3Press Enter.STEP 4Acrobat displays the first instance of the search term.STEP 5Press Enter again to continue to more instances of the term.SPA9000 Voice System Administration Guidexiii
PrefaceFinding Text in Multiple PDF FilesThe Search window lets you search for terms in multiple PDF files that are storedon your PC or local network. The PDF files do not need to be open.STEP 1Start Acrobat Professional or Adobe Reader.STEP 2Choose Edit Search, or click the arrow next to the Find box and then chooseOpen Full Acrobat Search.STEP 3In the Search window, complete the following steps:a. Enter the text that you want to find.b. Choose All PDF Documents in.From the drop-down box, choose Browse for Location. Then choose thelocation on your computer or local network, and click OK.c. If you want to specify additional search criteria, click Use Advanced SearchOptions, and choose the options you want.d. Click Search.SPA9000 Voice System Administration Guidexiv
PrefaceSTEP 4When the Results appear, click to open a folder, and then click any link to openthe file where the search terms appear.For more information about the Find and Search functions, see the Adobe Acrobatonline help.SPA9000 Voice System Administration Guidexv
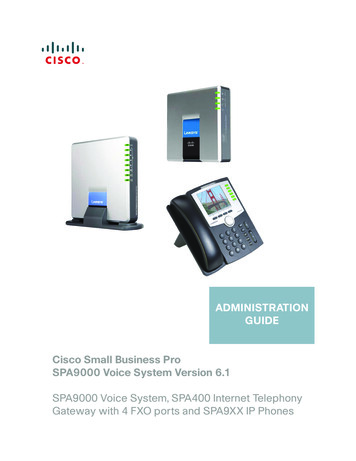
1Getting StartedThis chapter introduces you to the SPA9000 Voice System by describing thecomponents and presenting several deployment scenarios.NOTE This chapter is essential reading before you begin installing the equipment orconfiguring the system. “Introduction to the SPA9000 Voice System,” on page16 “Deployment Scenarios,” on page18 “Initial Installation, and Configuration,” on page 23Introduction to the SPA9000 Voice SystemThe SPA9000 Voice System is an affordable and feature-rich IP telephone systemthat is designed especially for the Small and Home Office. The SPA9000 VoiceSystem uses standard TCP/IP protocols and can provide global connectivitythrough any Internet Telephony Service Provider (ITSP) that supports the SessionInitiation Protocol (SIP).At minimum, the SPA9000 Voice System includes a SPA9000 IP PBX and one ormore SPA900 series IP phones. These devices are connected through a switch toa local area network. With an Internet connection, the SPA9000 Voice System cansubscribe to ITSP services to take advantage of low calling rates. With theSPA400, the SPA9000 Voice System can connect to the Public SwitchedTelephone Network (PSTN) to support analog phone lines. See Figure 1 “SPA9000Voice System with the SPA9000 and SPA400” on page17 to learn more about atypical deployment.SPA9000 Voice System Administration Guide16
Getting StartedIntroduction to the SPA9000 Voice SystemFigure 11SPA9000 Voice System with the SPA9000 and SPA400SPA9000 IP PBXThe SPA9000 is an IP PBX that supports up to 16 phones. It also has a built-inAnalog Telephone Adapter (ATA) with two FXS ports for analog telephones, faxdevices, or an external music source for the music on-hold service. Devicesconnected to the FXS ports are not included in the device count.The SPA9000 has four line interfaces, which can be configured in any combinationfor ITSP service, ISDN access, SPA400 PSTN access, or SPA400 voice mailservice. A different ITSP account can be configured on each line interface. If aservice provider supplies a group of sequential direct inward dial (DID) phonenumbers (such as 408-555-0100 through 555-0145) the SPA9000 can support allof the assigned numbers on a single line interface.SPA9000 Voice System Administration Guide17
1Getting StartedDeployment ScenariosThe SPA9000 includes an Auto Attendant service that plays pre-recorded voicemessages to offer the caller a menu of choices and to direct the call. When theAuto-Attendant is enabled, it parses and operates on user key presses accordingto the rules that are specified in the Auto Attendant script.SPA400 SIP-PSTN Gateway and Voicemail ServerThe SPA400 provides a SIP-PSTN gateway for voice connectivity between thePSTN and the local client stations that are connected to the SPA9000. It alsoincludes an integrated voice mail application that supports up to 32 voice mailaccounts with customized greetings, providing the ability to receive and playbackvoice mail messages.Each SPA400 occupies one of the four line interfaces on the SPA9000. TheSPA400 has four ports for that can be connected to PSTN or ISDN lines.IP Phones and AccessoriesThe SPA9000 Voice System supports any of the Cisco SPA900 Series SIP IPPhones, as well as the Cisco WIP310 Wireless IP Phone.NOTE This guide explains how to configure the SPA9000 and the SPA400 to support thecalling features on the phones. For more information about the phones, see theSPA9x2 Phone Administration Guide, the SPA9x2 Phone User Guide, and theCisco Wireless-G IP Phone User Guide.Deployment ScenariosThe SPA9000 Voice System can meet the calling needs of many small businesses.Various deployment scenarios are possible. This section includes the followingexamples: “PSTN Access and Local Voice Mail,” on page19 “ITSP Service Only,” on page 20 “ITSP Service, PSTN Access and Local Voice Mail,” on page 21 “ITSP Service, PSTN and ISDN Access and Local Voice Mail,” on page 22SPA9000 Voice System Administration Guide18
1Getting StartedDeployment ScenariosPSTN Access and Local Voice MailIn this scenario, the customer requires a robust phone system but is not using VoIPservices. The SPA9000 Voice System is deployed with a SPA9000 IP PBX, oneSPA400 for PSTN access with four FXO ports, and another SPA400 for local voicemail service. Up to 16 IP phones can be installed. Optionally, analog phones or faxmachines (not illustrated) can be connected to the two phone ports on theSPA9000.SPA9000 Voice System Administration Guide19
1Getting StartedDeployment ScenariosITSP Service OnlyIn this scenario, a customer has no legacy telephone numbers and either needs novoice mail at all or has voice mail hosted by the ITSP. The SPA9000 Voice Systemis deployed with the SPA9000 IP PB and VoIP service. Up to 16 IP phones can beinstalled. Optionally, analog phones or fax machines (not illustrated) can beconnected to the two phone ports on the SPA9000.SPA9000 Voice System Administration Guide20
1Getting StartedDeployment ScenariosITSP Service, PSTN Access and Local Voice MailIn this scenario, the customer wants to use ITSP service for reduced long distancefees but needs to support legacy local telephone numbers (for example, to receivecalls to a legacy telephone number or to place outbound calls in the local area).This customer also prefers local voice mail service. The SPA9000 Voice System isdeployed with the SPA9000 IP PBX, VoIP service, one SPA400 unit for voice mailservice, and another SPA400 unit for PSTN access with four FXO ports. Up to 16 IPphones can be installed. Optionally, analog phones or fax machines (not illustrated)can be connected to the two phone ports on the SPA9000.SPA9000 Voice System Administration Guide21
1Getting StartedDeployment ScenariosITSP Service, PSTN and ISDN Access and Local Voice MailIn this scenario, the customer takes full advantage of the SPA9000 Voice Systemsolution. This customer has the SPA9000 IP PBX, VoIP service, one SPA400 unit forvoice mail service, and another SPA400 for PSTN access with four FXO ports. Inaddition, this installation includes an ISDN Gateway for ISDN BRI access with fourBRI ports. Up to 16 IP phones can be installed. Optionally, analog phones or faxmachines (not illustrated) can be connected to the two phone ports on theSPA9000.SPA9000 Voice System Administration Guide22
Getting StartedInitial Installation, and Configuration1Initial Installation, and ConfigurationCisco strongly recommends that you use the SPA9000 Voice System Installationand Configuration Guide to design your system, to prepare the site, to connectand configure your equipment, and to set up the essential calling features. Byfollowing the instructions in the installation guide, you can get your system runningin less time and with the settings that help to ensure strong performance.After you complete the procedures in the installation guide, the users can makeand receive calls. When the optional SPA400 is installed, the users also can recordand retrieve voice mail messages. The SPA9000 has a fully functional AutoAttendant to greet callers, and a default dial plan that is suitable for most dialingscenarios. You can use this administration guide to refine the settings, to configureadvanced features, and to manage the system.NOTE Because the SPA9000 Voice System Installation and Configuration Guideprovides all of the procedures that you need for initial installation and configuration,those instructions are not duplicated in this administration guide.SPA9000 Voice System Administration Guide23
2Basic Administration of the SPA9000This chapter introduces you to basic administrative tasks using the SPA9000administration web server and the Interactive Voice Response Unit.NOTE This administration guide does not cover the initial installation and configuration ofthe system. For information about connecting the equipment to start using yoursystem, see the SPA9000 Voice System Installation and Configuration Guide.See the following topics: “Upgrading Firmware for the SPA9000,” on page 25 “Connecting to the SPA9000 Administration Web Server,” on page 27 “Saving or Discarding Changes SPA9000,” on page 27 “Access Levels,” on page 28 “Setting Passwords for User and Administrator Accounts,” on page 29 “Configuring Basic Settings,” on page 29 “Viewing Information about the SPA9000,” on page 39 “Viewing Information about Client Stations,” on page 39 “Configuring Multicast Addressing and Group Paging,” on page 33 “Using the Interactive Voice Response Unit,” on page 40SPA9000 Voice System Administration Guide24
Basic Administration of the SPA9000Upgrading Firmware for the SPA90002Upgrading Firmware for the SPA9000As needed, you can download new firmware and then install it on the SPA9000.STEP 1Download the latest SPA9000 firmware from the following direct.x?mdfid 282414116STEP 2Extract the Zip file, and then run the executable file to upgrade the firmware. Whenthe Firmware Upgrade Warning window appears, click Continue.STEP 3In the next window that appears, enter the IP address of the SPA9000, and thenclick OK.SPA9000 Voice System Administration Guide25
Basic Administration of the SPA9000Upgrading Firmware for the SPA90002STEP 4In the Confirm Upgrade window, verify that the correct device information andproduct number appear. Then click Upgrade.STEP 5When the confirmation message appears, click OK.STEP 6To verify the upgrade, complete the following steps:a. Connect to the SPA9000 administration web server, and choose Admin accesswith Advanced settings. (See “Connecting to the SPA9000 Administration WebServer,” on page 27).b. Review the Router Status page. The Software Version field should show thefirmware version that you installed.NOTE You may need to refresh your browser to display the updated pagereflecting the new version number.SPA9000 Voice System Administration Guide26
Basic Administration of the SPA9000Connecting to the SPA9000 Administration Web Server2Connecting to the SPA9000 Administration Web ServerTo connect to the administration web server, perform the following steps.NOTE You should have previously connected and configured the SPA9000 as describedin the SPA9000 Voice System Installation Guide.STEP 1Start Internet Explorer on a computer that is on the same network as the SPA9000.STEP 2Enter the IP address of the SPA9000.NOTE To find the IP address of the SPA9000, connect an analog telephone to thePhone 1 or Phone 2 port on the SPA9000. Then lift the receiver of the phoneand press **** on the keypad to access the IVR menu. Press 110# to hear theIP address.STEP 3To view administrative features, click Admin Login and then click Advanced. Bydefault, no password is required. For more information, see “Setting Passwords forUser and Administrator Accounts,” on page 29.ALTERNATIVELY: After starting Internet Explorer, enter: SPA9000 ipaddress /admin/advancedSaving or Discarding Changes SPA9000Changes can be saved or discarded at any time. Changes are submitted only when you click the Submit All Changes button atthe bottom of a page. When changes are saved, the SPA9000 may reboot,depending on the type of changes. To discard unsubmitted changes, click the Undo All Changes button at thebottom of the page.SPA9000 Voice System Administration Guide27
Basic Administration of the SPA9000Access Levels2 Unsubmitted changes are retained when you move among the pages withinthe Voice module or the Router module. This feature allows you to makechanges on various pages within a module before clicking Submit AllChanges. Unsubmitted changes are discarded when you switch between the Router andVoice tabs, between the User and Administrator accounts, or between theBasic and Advanced views.Before you make changes, it is recommended that you save a copy of your currentworking configuration:STEP 1In Internet Explorer, connect to the administration web server.STEP 2From the menu, choose File Save As.STEP 3Save the configuration as Web Page Complete. You can use the saved file toreview the saved settings in all pages of the administrative GUI.NOTE To save a Telephone Configuration, first enter the IP address for theconfiguration, and then follow the above procedure.Access LevelsYou can use the SPA9000 administration web server to configure and manageyour system. Three levels of access are available: User Level: The User account only has the privilege to access part of the webprofile parameters. Administrator Level: The Administrator account has the privilege to modify allthe web profile parameters and can also modify the passwords of bothAdministrator and User account. Advanced: Administrators and Users can view advanced features by clickingthe Advanced link in the top right corner or lower left corner of the menu bar.By default, no passwords are assigned for either the Administrator account or theUser account. If the password has been set for the Administrator account, thebrowser prompts for authentication.SPA9000 Voice System Administration Guide28
Basic Administration of the SPA9000Setting Passwords for User and Administrator Accounts2You can switch from User access to Administrator access by clicking the AdminLogin link. Likewise, you can switch from Administrator access to User access byclicking the User Login link. If a password is set, you will be prompted to enter thepassword after you click the link.Setting Passwords for User and Administrator AccountsThe Administrator account name for the SPA9000 is admin and the User accountname is user. These account names are case sensitive and cannot be changed.NOTE The system prompts for an Administrator account password only if a password hasbeen set. By default, there is no password. You should set a password to protectyour SPA9000 from unauthorized access.STEP 1Connect to the SPA9000 administration web server, and choose Admin accesswith Advanced settings. (See “Connecting to the SPA9000 Administration WebServer,” on page 27.)STEP 2Click Voice tab System.STEP 3In the System Configuration section, enter the Admin Password and the UserPassword, as needed. Up to 39 characters are allowed for the passwords.STEP 4Click Submit All Changes.Configuring Basic SettingsThis section provides information about the following tasks: “Setting Up the WAN Connection for the SPA9000,” on page 30 “Setting the Date and Time,” on page 30 “Configuring Daylight Saving Time,” on page 31 “LAN and Application Guidelines,” on page 33SPA9000 Voice System Administration Guide29
Basic Administration of the SPA9000Configuring Basic Settings “Configuring Multicast Addressing and Group Paging,” on page 33 “Collecting System Logs and Debug Information,” on page 362Setting Up the WAN Connectio
CCDE, CCSI, CCENT, Cisco Eos, Cisco HealthPresence, the Cisco logo, Cisco Lumin, Cisco Nexus, Cisco Nurse Connect, Cisco Stackpower, Cisco StadiumVision, Cisco TelePresence, Cisco WebEx, DCE, and Wel come to the Human Network are trademarks; Changing the Way We Wo rk, Live, Play, and Learn and Cisco Store are service marks;