Transcription
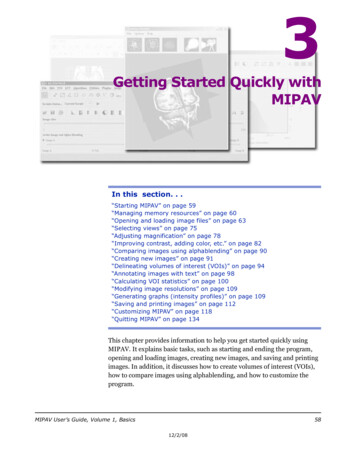
3Getting Started Quickly withMIPAVIn this section. . .“Starting MIPAV” on page 59“Managing memory resources” on page 60“Opening and loading image files” on page 63“Selecting views” on page 75“Adjusting magnification” on page 78“Improving contrast, adding color, etc.” on page 82“Comparing images using alphablending” on page 90“Creating new images” on page 91“Delineating volumes of interest (VOIs)” on page 94“Annotating images with text” on page 98“Calculating VOI statistics” on page 100“Modifying image resolutions” on page 109“Generating graphs (intensity profiles)” on page 109“Saving and printing images” on page 112“Customizing MIPAV” on page 118“Quitting MIPAV” on page 134This chapter provides information to help you get started quickly usingMIPAV. It explains basic tasks, such as starting and ending the program,opening and loading images, creating new images, and saving and printingimages. In addition, it discusses how to create volumes of interest (VOIs),how to compare images using alphablending, and how to customize theprogram.MIPAV User’s Guide, Volume 1, Basics5812/2/08
MIPAV User’s Guide, Volume 1, BasicsM I P A VM e d i c a l I m a g e P r o c e s s i n g, A n a l y s i s, & V i s u a l i z a t i o nStarting MIPAVStarting MIPAV differs depending on your platform. To begin a MIPAVsession, do the following:If your platform is . . .Then . . .Windows 95, 98, 2000,NT, XPSelect Start Programs mipav mipav.LinuxOpen a shell. Go to the directory where youdownloaded the installer. At the prompt, typesh ./installMIPAV.bin.Mac Operating System(OSX)Unzip the installer (StuffIt expander mayopen automatically). Double-click the installericon on your desktop.Unix OS (Sun Solaris,OS/2 Warp, and othersIn a shell tool, command tool, or terminalwindow, go to the directory where youinstalled MIPAV. At the prompt, type./mipav.Both the main Medical Image Processing, Analysis, & Visualization(MIPAV) window and the Output window (Figure 5) appear on yourdesktop. You can access most of MIPAV’s features from the main menu bar.The Output window menu optionsFigure 5. MIPAV–Main and Output windowsMIPAV User’s Guide, Volume 1, Basics5912/2/08
MIPAV User’s Guide, Volume 1, BasicsM I P A VM e d i c a l I m a g e P r o c e s s i n g, A n a l y s i s, & V i s u a l i z a t i o nFileSave Messages—Saves all of the messages displayed on the currently openpage (e.g., Global Data page, Data page, or Debug page). When you selectthis command, the Save dialog box opens.Add tab— Adds a new tab to the Output window. When you select thisoption, the Add Tab dialog box opens. In this dialog box, enter the name forthe new tab and press OK.EditClear messages—Clears all of the messages that are displayed on thecurrently open page. Be sure that you want to use this command. There isno undo!Copy—Copies the selected text on the currently open page.Cut—Removes the selected text from the currently open page.Select All—Selects all of the text on the currently open page.The Output window toolbarSave ResultsSaves all of the messages displayed on the currently open page. When youselect this command, the Save dialog box opens.CopyCopies the selected text on the currently open page.PastePastes copied text into the currently open page at the cursor point.CutRemoves the selected text from the currently open page.Remove selectedtabRemoves selected tab from the output window.The Output window default tabsData tabDisplays messages that apply to the currently active image.Debug tabDisplays debugging information for the currently selected image.Figure 5. MIPAV–Main and Output windows (continued)After starting MIPAV, you can open and load image files, create newimages, access DICOM images, customize MIPAV, and end the session.Managing memory resourcesMIPAV requires at least 35 Mb of random access memory (RAM).Additional memory is needed to correctly display image files and to quantifythe data. To determine the amount of additional memory needed, multiplythe size of the image file that you want to display by 10. Thus, if an image fileis 2 Mb, you must allocate an additional 20 Mb of RAM (in addition to thebase of 35 Mb) for it to display correctly. Because memory requirementsMIPAV User’s Guide, Volume 1, Basics6012/2/08
MIPAV User’s Guide, Volume 1, BasicsM I P A VM e d i c a l I m a g e P r o c e s s i n g, A n a l y s i s, & V i s u a l i z a t i o nfluctuate depending on the size and number of image files open, it may benecessary to allocate additional memory during a session.Allocating memory in MIPAVWhen you run MIPAV for the first time you must specify the amount ofmemory that you would like to allocate, so that MIPAV can take the fulladvantage of the memory resources available in your machine.1 Select Help Memory allocation in the MIPAV window. The ChangeJavaRuntime Memory Allocation dialog box opens. See Figure 6.2 Change the maximum heap size number so that it reflects the maximumamount of memory that should be allocated.In a Microsoft Windows system, you can specify a maximum to 1.2 or 1.3 Gb. Ifadditional memory is needed, MIPAV allocates it until the memory reaches themaximum heap size that you specify.3 Click OK to close the dialog box.Figure 6. Change Java-Runtime Memory Allocation dialog boxYou must restart of MIPAV for the changes to take effect. To exit MIPAV,select File Exit. Then, restart the software.T O ALLOCATE ADDITIONAL MEMORYThe first step is to view how much memory is currently being used and tofree needlessly reserved memory. Then, if necessary, you may need toallocate additional memory.MIPAV User’s Guide, Volume 1, Basics6112/2/08
MIPAV User’s Guide, Volume 1, BasicsM I P A VM e d i c a l I m a g e P r o c e s s i n g, A n a l y s i s, & V i s u a l i z a t i o nTo determine how much memory is currently beingused by MIPAV1 Select Help Memory Usage in the MIPAV window. The MemoryMonitor dialog box appears (Figure 7).When MIPAV performs a function, such as visualizing an image file, ituses memory. When the function completes (i.e., the visualized imageclosed), you can manually free the memory so it can be used for anotherfunction.The Memory Monitor dialog box shows how much memory is allocatedand how much memory has been used. The vertical bar on the right ofthe window displays a pictorial representation of the ratio of allocatedmemory or amount of memory used. The chart shows the memory usagefor the past 3 minutes and 45 seconds. The chart is updated everysecond.If you want to constantly monitor your memory resources, you can leavethe Memory Monitor dialog box open on your desktop. Otherwise, closeit.2 Click Free memory to free memory.Figure 7. Memory Monitor dialog boxIf you need more memory, you can allocate virtual memory or disk swapspace if there is free space on your hard drive. For instructions on how to dothis, refer to the documentation for your system. If you cannot assign morevirtual memory or disk swap space, you may need to install additionalmemory.To manually free the memoryAs Java-based programs run, they often leave old variables, objects, or constructors in memory. For instance, if you delineate a VOI, the coordinates ofMIPAV User’s Guide, Volume 1, Basics6212/2/08
MIPAV User’s Guide, Volume 1, BasicsM I P A VM e d i c a l I m a g e P r o c e s s i n g, A n a l y s i s, & V i s u a l i z a t i o nthe contours may remain in memory even after you close the image. Javaprovides a method called the garbage collector (or memory recycling) thatautomatically freeing objects that are no longer referenced by the programand clears all unnecessarily reserved memory. Generally, the software doesthis automatically when free memory becomes very limited. However, youcan run the garbage collector at any time to free memory by clicking theMemory Usage button. Refer to Figure 8.To allocate additional memory,Repeat the steps described in “Allocating memory in MIPAV” on page 61.Figure 8. Running the garbage collector to free the memory in MIPAVOpening and loading image filesMIPAV displays images in windows, or frames, that you can move orarrange around the desktop (Figure 9). You can display as many imagedatasets as needed as long as your computer has enough allocated memory.Note: The amount of memory required depends on the number of imagedatasets that are open and the size of each image file. For more information,refer to “Managing memory resources” on page 60.You can either open or load an image file. When you open an image file,MIPAV displays the image in a new image window. Loading an image fileimports the file into an image window in which another image file is open.In other words, two image files share a common image window.MIPAV User’s Guide, Volume 1, Basics6312/2/08
MIPAV User’s Guide, Volume 1, BasicsM I P A VM e d i c a l I m a g e P r o c e s s i n g, A n a l y s i s, & V i s u a l i z a t i o nU NDERSTANDING IMAGE WINDOWSAn image window (Figure 9) consists of a title bar and an image itself.The title bar displays: the image file name, e.g. “3DHead”; the number of the current slice andthe total number of slices in the dataset,e.g. 62/124; the magnification level, e.g. M:1.0.The number of the current slice is alsoshown in the lower left corner of theimage.Figure 9. An image windowYou can move an image window around your desktop by clicking the titlebar and dragging the window to a new location.Sometimes, depending on the view, a toolbar or menu bar also appears inthe image window. For example, the image window using the light box viewcontains a toolbar and menu bar. See also “Displaying images using thelightbox view” on page 76.IMAGE A AND IMAGE BIn MIPAV, the first image opened in an image window (see “Understandingimage windows” ) is referred to as Image A. When you load, or import, asecond image in the same window, MIPAV refers to the second image asImage B.MIPAV User’s Guide, Volume 1, Basics6412/2/08
MIPAV User’s Guide, Volume 1, BasicsM I P A VM e d i c a l I m a g e P r o c e s s i n g, A n a l y s i s, & V i s u a l i z a t i o nSupported formatsYou can use MIPAV to open or load files of a variety of medical and genericgraphics and multimedia file formats. Table 1 lists the format, extension,and whether MIPAV can read or write files of a particular format. Theextension, which is the last few characters of a file name including theperiod, indicates the file format. For example, in the file name DOE255.ima,the extension .ima indicates that the file is stored in DICOM format. In thetable, the Read column indicates that MIPAV can display image files of aparticular format. When a file is read, it is stored in main memory so thatMIPAV can access it. The Write column means that MIPAV can copy thedata from the memory to a storage destination, such as your hard disk. Inthis context, write is synonymous with save.For more information on file formats, the list of supported formats and otherinformation, refer to Appendix C: “Supported formats” Table 1 on page 628.MIPAV User’s Guide, Volume 1, Basics6512/2/08
MIPAV User’s Guide, Volume 1, BasicsM I P A VM e d i c a l I m a g e P r o c e s s i n g, A n a l y s i s, & V i s u a l i z a t i o nIMAGE B ROWSERYou can select the image formatsto display using the File OpenImage(A) Image Browser menu.This opens the Choose ImageFilter dialog box. In this dialogbox, use the check boxes to selectthe image types which you wouldlike to use in MIPAV.Select AllSelects allimage types.ClearRemoves selection.OKApplies the image type selection to MIPAV.CancelDisregards any changes you made in this dialogbox and closes the dialog box.Figure 10. Choose Image Filter dialog boxOpening image filesThe Open Image A from disk menu allows you to open an image whichis stored on your hard drive (or network drive).MIPAV User’s Guide, Volume 1, Basics6612/2/08
MIPAV User’s Guide, Volume 1, BasicsM I P A VM e d i c a l I m a g e P r o c e s s i n g, A n a l y s i s, & V i s u a l i z a t i o nFigure 11. FIle Open menuThe Open Image A menu (Figure 11) provides you with additional optionssuch as to open a single image file, or image sequence, or Leica seriesimages – the images that were taken on a Leica microscope. You can alsocall Create Blank Image to create a blank image (refer to “Creating newimages” on page 91).To open an image file or multifilesAn option on the Open Image dialog box (Figure 11), which appears afteryou select File Open Image(A), is Open as multifile. This option letsyou open the image as a multifile.Multifiles are image datasets that are composed of multiple files.1 Select File Open Image(A) from disk. The Open Image dialog box(Figure 12) opens.2 Navigate to the directory where the file is stored.3 Select an image file.4 To open the image file as a multifile, select the Open as multifile box.The name of the image appears in File Name.MIPAV User’s Guide, Volume 1, Basics6712/2/08
MIPAV User’s Guide, Volume 1, BasicsM I P A VM e d i c a l I m a g e P r o c e s s i n g, A n a l y s i s, & V i s u a l i z a t i o nFigure 12. Open as Multifile optionIf you can’t find the image,check the files types listed in Files of Type (showing in Figure 12) near thebottom of the dialog box. If the file type you are looking for does not appearin Files of Type, select All Files or All.To form a 4D dataset in Analyze format,use Open as multifile to open a series of individual 3D Analyze,formatted, consecutively ordered images.For example, you can use Open asmultifile to open an array of TIFF, JPEG, BMP, etc., files if their file namesmeet the following format: foo 001.tiff, foo 002.tiff, foo 003, etc. wherefoo is the name of the file.MIPAV windowAfter the first image is opened, the MIPAV window changes. It includesmore menus, the title bar displays more information, and tool bars appear.Because the MIPAV window is context sensitive, it displays or hidescommands on the menus depending on the characteristics of the image filethat is opened. If you opened a dataset file that contains more than oneimage, an image slice slider also appears. Refer to Figure 13.MIPAV User’s Guide, Volume 1, Basics6812/2/08
MIPAV User’s Guide, Volume 1, BasicsM I P A VM e d i c a l I m a g e P r o c e s s i n g, A n a l y s i s, & V i s u a l i z a t i o nFigure 13. Expanded MIPAV window showing toolbars, image slider, and more menus after thefirst image is opened. See also “MIPAV toolbars” on page 71If you prefer for MIPAV to use the style of Open and Save dialog boxes thatare used by the operating system (e.g., Microsoft Windows, Unix, or Apple)on your computer, read the section on “Using platform-specific Open andSave dialog boxes” on page 124.Loading image filesWhen you load an image file, MIPAV imports it into an existing imagewindow. The loaded image shares the same window with another image file.Loading a file allows you to compare two datasets.To load an image file1 Open the first image by selecting File Open Image(A) from disk. Theimage appears in an image window.2 Select the title bar of the image window (in this case, the image that youjust opened) in which you want to load another image.3 Select one of the following: File Load Image (B) From Frame to load another imagedataset from an already opened image dataset; File Load Image (B) From File to load another imagedataset;MIPAV User’s Guide, Volume 1, Basics6912/2/08
MIPAV User’s Guide, Volume 1, BasicsM I P A VM e d i c a l I m a g e P r o c e s s i n g, A n a l y s i s, & V i s u a l i z a t i o n File Load Image (B) Create a Blank Image to create ablank image.4 If you chose Image (B) from File, the Open dialog box appears, seeFigure 12. Select the image file you want to load, and click OK.If MIPAV does not recognize the type of file based on its extension, theChoose Image Filter dialog box opens (see also “Image Browser” onpage 66). Here, select the file type and click OK.As the image file is loading, a pop-up window appears with the status.When the image file finishes loading, it appears in the image window. Atthis point, take note of several changes: MIPAV pseudo-color was applied to the images in the image frame.The pseudo-color indicates that two images are loaded in the sameimage frame. In the MIPAV window, the Active Image and Alphablending sliderappears. The slider allows you to control which image is displayed inthe foreground of the window. The image in the foreground is theactive image. You can adjust the translucency of the alpha channelsin each image using the technique.5 If you chose Image (B) from Frame, the Load Image onto file name (Figure 14) opens. Select one of the images in Set as Image (B), and thenclick OK. The image is loaded onto the first image file.Note: The abbreviations (A) or (B) appear after some commands. (A), which isthe abbreviation for “Image A,” indicates that the option is applied to the firstimage opened in an image window. (B), which is the abbreviation for “Image B,”indicates that the option is applied to second image loaded in the image window.For example, if you select Close Image (B), MIPAV closes the second image(Image B) that was loaded in the image window.MIPAV User’s Guide, Volume 1, Basics7012/2/08
MIPAV User’s Guide, Volume 1, BasicsM I P A VM e d i c a l I m a g e P r o c e s s i n g, A n a l y s i s, & V i s u a l i z a t i o nFigure 14. After loading an Image B, the Active Image andAlphablending slider appears in the main MIPAV window. The sliderallows you to control which image is displayed in the foreground of thewindowNote: MIPAV recognizes files types by the file extension. For example, if youselect an image named “Smith.tiff”, MIPAV tries to open the file as a TIFF file. Ifthat image is actually a JPEG file and mistakenly has the TIFF extension, MIPAVfails to open the file.MIPAV toolbarsAfter you open an image in MIPAV and the MIPAV window expands todisplay all of its menus and toolbars, such as VOI toolbar. Volume of interest toolbar (Figure 15). The VOI toolbarcontains tools that help you in selecting the specific area of interest onthe image.MIPAV User’s Guide, Volume 1, Basics7112/2/08
MIPAV User’s Guide, Volume 1, BasicsM I P A VM e d i c a l I m a g e P r o c e s s i n g, A n a l y s i s, & V i s u a l i z a t i o n Paint toolbar. The Paint toolbar (Figure 16) includes tools that allowyou to add, adjust, or remove colors and color intensity, erase paint,and adjust the opacity level of the paint. Scripting toolbar. The Scripting toolbar allows you to locate and runpreviously recorded scripts, or macros, that contain two or morealgorithms on images. See Figure 17. Image toolbar. The Image toolbar includes tools for opening,printing, saving, maximizing, and minimizing an image; converting animage from gray scale to color or from color to gray scale; and addingto and removing slices from an image or changing their order; androtating, cropping, and flipping an image. See Figure 18.By default, the MIPAV window displays only the VOI and Image toolbars.IconNameIconNameIconNameDefault ModeProtractor toolChange VOI colorAnnotation ToolDraw rectangleVOIUndoDraw a point VOIDraw polyline VOICut VOIDraw inter-slicepolylineLevelset VOICopy VOIDraw line VOIDraw 3Drectangular VOIPaste contourPropagate VOIdownPropagate bothsidesPropagate VOI upSplit VOI contourLive wire VOIView VOI propertiesQuick AND VOImask operationQuick NOT VOIoperationFigure 15. VOI ToolbarIconNameIconNameIconNameAdd a blank maskFill an area withcolorPaint brush editorOpen a mask froma fileErase a paintChange paint colorFigure 16. Paint ToolbarMIPAV User’s Guide, Volume 1, Basics7212/2/08
MIPAV User’s Guide, Volume 1, BasicsM I P A VM e d i c a l I m a g e P r o c e s s i n g, A n a l y s i s, & V i s u a l i z a t i o nSave the currentmaskErase a paint froma current frameAND maskoperationErase all paintsChange opacity ofthe paintDisplay a borderaround paintedareasDraw using abrushPropagate thepaint to theprevious sliceMasks the inside ofthe painted areaLoad advancedbrush toolsPropagate thepaint both sidesMasks the outsideof the painted areaPick up a colorfrom an imagePropagate thepaint to the nextsliceUndoCalculate volumeLoad power painttoolsFigure 16. Paint ToolbarIconNameIconNameOpen the ScriptsHome catalogueRefresh the ScriptsHome catalogueShow the currentscript to runRun the script fromCurrent ScriptsStart recording thescriptFigure 17. Scripting ToolbarIconNameIconNameIconNameOpen image,CTRL FAdjust window andlevelDecrement imagesliceSave image,CTRL SQuick LUTIncrement imageslicePrint imageReset LUTLink imagesCapture image toTIFF fileInvert LUTZoom inView header,CTRL HGray LUTZoom outEdit attributes,CTRL EHot metal LUTMagnify regionFigure 18. Image ToolbarMIPAV User’s Guide, Volume 1, Basics7312/2/08
MIPAV User’s Guide, Volume 1, BasicsM I P A VM e d i c a l I m a g e P r o c e s s i n g, A n a l y s i s, & V i s u a l i z a t i o nDisplay LookuptableOpen user-definedLUTCT preset functionSave LUTMagnify 1:1Tri-planar viewVolume RendererGPU based volumerendererView light boxFlip horizontallyWindow region ofImage BChecker boardVolume Tri-planarviewGPU renderingFlip verticallyMulti histogramrenderingFigure 18. Image Toolbar (continued)Displaying MIPAV ToolbarsThe Toolbars menu contains check boxes for each of the four toolbars:Image, Paint, Scripting, and VOI. Use these check boxes to select whichtoolbars should appear. See Figure 19.Figure 19. Toolbars menuBy marking or clearing these check boxes, you can choose which toolbars todisplay and which to hide. For example, suppose you just started MIPAV amoment ago. You then open an image. The MIPAV window expands in sizeand displays its full complement of menus. Although it displays the VOI,Scripting, and Image toolbars, you want to work with the Paint toolbar aswell as the Image toolbars. However, you don’t need to use the VOI andScripting toolbars. The next section explains how to hide and show toolbars.MIPAV User’s Guide, Volume 1, Basics7412/2/08
MIPAV User’s Guide, Volume 1, BasicsM I P A VM e d i c a l I m a g e P r o c e s s i n g, A n a l y s i s, & V i s u a l i z a t i o nT O HIDE THE VOI AND S CRIPTING TOOLBARSAND DISPLAY THE P AINT TOOLBAR1 Select Toolbars VOI to hide the VOI toolbar. MIPAV removes thecheck mark from the check box and removes the VOI toolbar from theMIPAV window.2 Select Toolbars Scripting to hide the Scripting toolbar. MIPAVremoves the check mark from the check box and removes the Scriptingtoolbar from the MIPAV window.3 Select Toolbars Paint to display the Paint toolbar. The program marksthe check box and displays the Paint toolbar in the MIPAV window.Because the Image toolbar is already displayed, you do not need to doanything.Selecting viewsA view refers to the way an image file is displayed. A view indicates howmany images are shown at one time and whether images are advancedmanually or automatically. Depending on the view, the size and shape of theimage window in which an image is displayed can vary. MIPAV allows youto display images using the following views:IconViewIconViewDefaultSurface plotterAnimateVolume rendererCine (movie)Tri-planarLightboxTri-planar dualLink to anotherimageVolume Tri-planarThis section explains how to display image files in the default, lightbox, andcine view. To learn how to display image files in other views, refer toChapter 6 in the MIPAV User’s Guide.MIPAV User’s Guide, Volume 1, Basics7512/2/08
MIPAV User’s Guide, Volume 1, BasicsM I P A VM e d i c a l I m a g e P r o c e s s i n g, A n a l y s i s, & V i s u a l i z a t i o nDisplaying images using the default viewIn the default view, MIPAV displays the images in a dataset one at a time inan image window (Figure 20). This window can display datasets of anydimension.Figure 20. Images open in the default image windowsDisplaying images using the lightbox viewThe lightbox view is similar to the default view, except that all images in thedataset appear in one window at the same time (Figure 21).To display images in the lightbox view1 Open an image file. The image appears in an image window.2 Select the image window. Do one of the following in the MIPAV window: Click the View Light Box icon; Select Image Views Light box.The image now appears in a lightbox view.3 Select Options Settings in the lightbox view window to adjust the sizeand shape of the window. The Lightbox Settings dialog box (Figure 21)opens.4 In the dialog box, indicate the number of rows and columns, the gridsize, frame border size, color settings, and the magnification. For moreinformation on these attributes, see the MIPAV User’s Guide,“Visualizing Images” , “Adjusting the lightbox view” .MIPAV User’s Guide, Volume 1, Basics7612/2/08
MIPAV User’s Guide, Volume 1, BasicsM I P A VM e d i c a l I m a g e P r o c e s s i n g, A n a l y s i s, & V i s u a l i z a t i o n5 Click Close when complete. The image appears in the lightbox view, seeFigure 21.Figure 21. An image shown in the lightbox view and the LightboxSettings dialog boxTo magnify a portion of the image in the lightbox,click Magnify Region and move the pointer to the image section to bemagnified. Click Default Mode when finished.Double-clicking an image in the lightbox view updates the 2D image framefor that image.Displaying images using the cine viewWhen you view an image file in cine view, MIPAV automatically advancesimages one frame at a time. The effect is much like a film loop.To display images in cine view1 Open an image file. The image appears in the default image window.2 Select Image Views Cine (Movie). The images in the image windoware advanced automatically.MIPAV User’s Guide, Volume 1, Basics7712/2/08
MIPAV User’s Guide, Volume 1, BasicsM I P A VM e d i c a l I m a g e P r o c e s s i n g, A n a l y s i s, & V i s u a l i z a t i o nAdjusting magnificationMIPAV allows you to magnify images from ¼ to 32 times the size of theoriginal image. Using the magnification tools, you can magnify or minify theentire image or just a portion of the image. Much like a traditional magnifying glass, the magnification box can also minify—or reduce the level of magnification—a portion of the image.Changing the magnification levelThis section explains how to change the magnification level of the imageusing the icons on the Image toolbar in the MIPAV window.To learn how to adjust the magnification level using the Image toolbar,refer to “Magnifying images” on page 78“Reducing the magnification level” on page 78“Restoring the original level of magnification” on page 79“Magnifying regions within images” on page 79To learn how to set the magnification level using the other methods, seevolume 1 of the MIPAV User’s Guide.M AGNIFYING IMAGESTo magnify an image, click the Magnify Image icon, and then click theimage. Each time you click the Magnify Image icon and click the image, theimage doubles in size. If an image is too large for the current window size,scroll bars appear, and you may need to manually adjust the size of thewindow.R EDUCING THE MAGNIFICATION LEVELTo reduce the magnification level of an image, click Minify Image. Eachtime you click the Minify Image icon, MIPAV reduces the magnificationlevel of the image by half.MIPAV User’s Guide, Volume 1, Basics7812/2/08
MIPAV User’s Guide, Volume 1, BasicsM I P A VM e d i c a l I m a g e P r o c e s s i n g, A n a l y s i s, & V i s u a l i z a t i o nR ESTORING THE ORIGINAL LEVEL OFMAGNIFICATIONTo return the image to its original size or original level of magnification,click Original Magnification.M AGNIFYING REGIONS WITHIN IMAGESThe Magnify Region icon allows you to view a square portion, or region,of the image at a specific magnification level. If you have loaded twoimages into the same image window, the Window Region of Image B iconappears on the toolbar. Use this icon to view a region on the second image,or Image B.To use the Magnify Region icon1 Open an image.2 Click Magnify Region and move it over the image.As you move the mouse over the image, the Magnify Region icondisplays a magnified square region in the image in a red box. Thenumber at the left corner of the square is the magnification level. Seealso Figure 23.To change the size of the magnified regionYou can change the size of the magnifying region to allow you to view largeror smaller regions of the image.1 Right-click on the image while displaying a magnified region. TheMagnification dialog box (Figure 22) opens.2 Type either a higher number for a larger region or a lower number for asmaller region in the Width box. Valid values range from 64.0 to 198.0.3 Click Apply. The size of the magnified region, or square, either increasesor decreases in size.Changing the magnification level of the magnified region works similarly tochanging the size of the magnified region.MIPAV User’s Guide, Volume 1, Basics7912/2/08
MIPAV User’s Guide, Volume 1, BasicsM I P A VM e d i c a l I m a g e P r o c e s s i n g, A n a l y s i s, & V i s u a l i z a t i o nMagnificationMove the Magnificationslide to the right toincrease the magnification level or to the leftto decrease the magnification levelDisplayintensityvaluesWhen you slide theMagnification slider rightpast a certain point, thischeck box becomesactive.SizeType either a higher number for a larger region or alower number for a smaller region in the Width box.Valid values range from 64.0 to 198.0.ApplyApplies the changes.CloseCloses the dialog box.Figure 22. Magnification dialog box optionsTip: To review or compare a magnified region of the image with the same regionat its original magnification, press Shift. To return to the Magnified view, releasethe key.A–the magnified regionsize is set to 75; themagnification level 4 isshown in the magnifiedregion.B –the magnified regionsize is set to 130; themagnification level 4 isshown in the magnifiedregion.C– the magnified regionsize is set to 130; themagnification level 8 isshown in the magnifiedregion.Figure 23. The larger size magnifying gl
If you want to constantly monitor yo ur memory resources, you can leave the Memory Monitor dialog box open on your desktop. Otherwise, close it. 2 Click Free memory to free memory. If you need more memory, you can allocate virtual memory or disk swap space if there is free space on your hard drive. For instructions on how to do