Transcription
HD Digital Television RecorderUser’s ManualHDR-7500TThe default password is 0000.
NoticeEnglishThank you for purchasing a HUMAX product. Please read this user’s manual carefully to be able to safelyinstall, use and maintain the product at maximum performance. Keep this user’s manual next to yourproduct for future reference. The information in this user’s manual is subject to change without notice.Copyright (Copyright 2011 HUMAX Corporation)Not to be copied, used or translated in part or whole without HUMAX’s prior consent in writing exceptapproval of ownership of copyright and copyright law.The Copyright Act 1968 only permits to copy broadcasts for Private and Domestic purposes in limitedcircumstances. Humax does not authorise any use of this feature in any way which may amount to abreach of any law or the rights of the owner of copyright in film or broadcast.WarrantyThe warranty does not cover parts which may become defective due to misuse of the informationcontained in this manual.Meaning of SymbolsTo reduce the risk of electric shock, do not remove cover (or back). No user serviceableparts inside. Refer servicing to qualified service personnel.This symbol indicates dangerous voltage inside the product that presents a risk of electricshock or personal injury.This symbol indicates important instructions accompanying the product.Warnings, Cautions and NotesThroughout the whole manual, pay special attention to the following marks that indicate hazardoussituations.WarningIndicates a hazardous situation which could result in serious injury.CautionIndicates a situation which could damage the equipment or other apparatus.1
NoticeNoteIndicates additional information to make the user aware of possible problems and information of anyimportance to help understand, use and maintain the installation.Disposal InstructionsThis product should not be disposed with other household wastes at the end of its working life. Pleaseseparate this from other types of wastes and recycle it responsibly to promote the sustainable reuse ofmaterial resources. This will prevent possible harm to the environment or human health from uncontrolledwaste disposal.Trademarkst t .BOVGBDUVSFE VOEFS MJDFOTF GSPN %PMCZ -BCPSBUPSJFT %PMCZ BOE UIF EPVCMF % TZNCPM BSF USBEFNBSLT PG %PMCZ -BCPSBUPSJFT )%.* UIF )%.* -PHP BOE )JHI %FöOJUJPO .VMUJNFEJB JOUFSGBDF BSF USBEFNBSLT BOE SFHJTUFSFE USBEFNBSLT PG )%.* -JDFOTJOH -- This item incorporates copy protection technology that is protected by U.S. patents and otherintellectual property rights of Rovi Corporation. Reverse engineering and disassembly are prohibited.IceTV’s free trial, discounted annual subscription, life-time subscription, and other offers from time to timeare provided by IceTV only. Humax is not responsible for fulfillment of any of these offers and will notaccept liability for any loss, financial or otherwise, associated with the acceptance of any of these offers.Humax also does not make any representations or warranties, express or implied, in respect of the offersor such services.2
ContentsEnglishNotice1Quick Start Guide41. Checking Accessories2. Product Overview3. Connections4. Powering On5. First Installation Wizard6. Menu OverviewBasic OperationChanging ChannelsVolume / Mute / AudioDisplay Format / ResolutionProgramme Information (i-plate)Sleep TimerSubtitle0QUJPO 5FMFUFYU Channel ListChanging Channels&EJUJOH IBOOFMT JO IBOOFM -JTU Editing Favourite ChannelsEditing ChannelsTV GuideWatching ProgrammesSetting Reminders or RecordingsFinding Programmes4DIFEVMF Recording and PlaybackRecordingPlaybackPlayback Controls1BVTJOH BOE 3FXJOEJOH -JWF 57 543 Media ListSwitching StorageSwitching Media6TJOH UIF %-/" .FEJB 4FSWFS Connecting to Home Network Playing Files On Your Receiver Playing Files On Your PC 6TJOH 7JEFP -JTU Playing FilesUsing Play OptionsEditing FilesDeleting FilesSorting Files-PDLJOH 'JMFT44812131516161617181919 2121 232527272829 31313536 383838 414142424242Renaming FilesCreating FolderMoving / Copying Files6TJOH .VTJD -JTU Playing FilesMusic PlayerEditing Files6TJOH 1IPUP -JTU Photo SlideshowSlide ModeEditing Files424243 444545 464747HUMAX TV Portal48Preferences49Parental Control-BOHVBHF 4FUUJOH 4FUUJOH 1PXFS 0O 0ò 5JNFS Video SettingAudio SettingScreen DisplayEPG Type SettingInstallationAutomatic SearchManual SearchSoftware UpdateDynamic UpdateAntenna PowerFactory DefaultSystem4ZTUFN *OGPSNBUJPO 4JHOBM %FUFDUJPO Power ManagementData StorageInternet SettingAppendixSpecificationService and SupportSafety WarningTrouble Shooting&SSPS .FTTBHF Glossary3FNPUF POUSPM PEF -JTU 01&/ 4063 & 40'58"3& /05* & 1SPCMFN IFDL -JTU 49 515253535454555658585960 6161626363656668 72 3
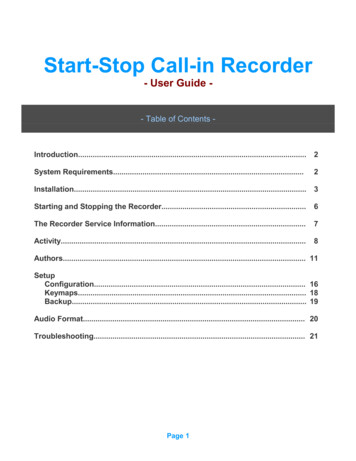
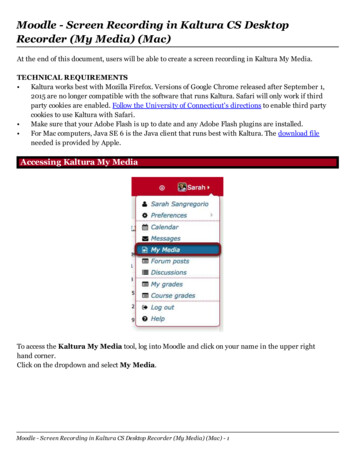
Quick Start Guide1. Checking AccessoriesQuick Start GuideIceTV FlyerUser's manualRemote Control/ BatteriesCD Manual/ Quick Start GuideHDMI CableIceTV Flyer(Quick Manual)RCA CableNote: The accessories may vary according to area.2. Product OverviewFront PanelSTANDBYSwitches between operationand standby modes.VOL /P /-USB PortConnect a USB storage device.Note: The image shown may differ from the actual product.4
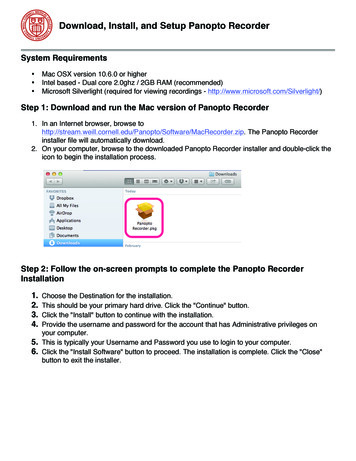
Quick Start GuideEnglishRear PanelANTENNA INConnect to TV antenna.ANTENNA OUTConnects to the TV or VCRusing an RF cable.COMPONENT(YPbPr) OUTConnects to the TV or VCRusing a component cable.ETHERNETService portUSB PortConnect a USB storage device.ON/OFFVIDEOConnect to the TV or VCR using anRCA cable.AUDIOConnect to the TV or VCR using anRCA cable.SPDIFConnect to the audiosystem using an S/PDIFcable. (digital audio)HDMIConnect to the TV usingan HDMI cable.Note: The image shown may differ from the actual product.5
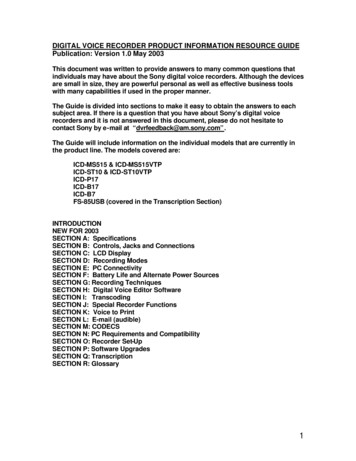
Quick Start GuideRemote Control12MUTEMutes audio.STANDBYSwitches between operation and standby modes.MODEChanges the mode of remote.NUMERIC TV PortalEnters HUMAX TV Portal.MENUDisplays the main menu. ݣ PlaybackControlButtonsX Play, II Pause, Stop, z Record,WW Rewind, XX Fast Forward, IWW Previous, XXI Next, ݤ COLOURButtonsColour keys for interactive applications.MEDIADisplays the media list.GUIDEDisplays the programme guide.ARROWButtonsMoves the cursor up, down, left or right.OKSelects (Enters) a menu or confirms a selection.EXITExits all On-Screen Display (OSD) screens.BACKReturns to the previous channel.Goes back to the previous screen. ݢ Instant Replay,Skip3Note:t 5IF JNBHF TIPXO NBZ EJòFS GSPN UIF BDUVBM QSPEVDU t 4PNF QMBZCBDL DPOUSPM CVUUPOT NBZ OPU GVODUJPO EFQFOEJOH PO UIF DPOUFOUT 6
Quick Start Guide ݥ 4English\ /-Adjusts the audio volume.PS/TChanges the channel or page.LISTDisplays the channel list.i (Information)Displays the channel and programme information.OPT Displays the channels attributes.AUDIODisplays the audio list.SUBTITLEDisplays the subtitle language list.TV/RADIOSwitches between TV and radio modes.TEXTEnters the digital text service.SOURCESwitches between the input sources.SLEEPSets the sleep timer.V-FORMATSets the resolution of video.WIDESets the display format.PlaybackControlButtons "EE #PPLNBSL #PPLNBSL -JTU 4MPXInserting Batteriesi 1. Press the hook upward and lift thebattery cover off.2. Insert the batteries (supplied)matching the plus( ) and minus(-)at each end.3. Close the cover.7
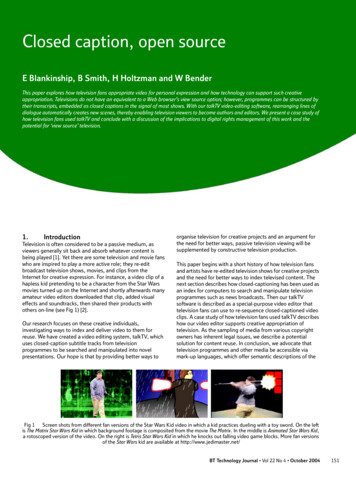
Quick Start Guide3. ConnectionsThis section describes how to connect your product to match your particular devices setup and to gainoptimum signal quality. The product provides various interfaces to connect to the TV, VCR or otherdevices. Select the most appropriate procedure depending on the device you have.Note: If you encounter any problems setting up your product, please contact HUMAX Customer Helpline.COMPONENT INAUDIOHDMIDVI for TVDVI ConnecterRCA CableCOMPONENT CableHDMI Cable231HDMI CableAntenna2S/PDIF CableEthernet CableS/PDIFLANRouter8
Quick Start GuideEnglishConnecting the AntennaConnect the aerial to the ANTENNA IN.Connecting the TVYou can select one of the following connections depending on the device you have. ݢ TV with the HDMI connector;For the best picture quality, connect the product and TV using a HDMI cable. ݣ TV with the DVI connector;For very good picture quality, connect the product and TV using a HDMI cable and a HDMI-to-DVIconverter for video.:PV XJMM BMTP SFRVJSF B 3 " DBCMF "VEJP - 3 DPOOFDUFE UP UIF OFDFTTBSZ DPOOFDUJPO T PO ZPVS 57 %JTQMBZ for Audio. ݤ TV with the Component(YPbPr) connector;For good picture quality, connect the product and TV using a component cable.For additional audio connections you can either POOFDU UIF QSPEVDU BOE 57 VTJOH BO 3 " DBCMF "VEJP - 3 2. When using the digital audio system, connect the product and the digital audio system using an S/PDIF cable.Note: Connecting your TV directly to the audio/video output of the product will assure a more vividpicture and enhance your viewing enjoyment.9
Quick Start GuideConnecting the Network ݢ Connecting to the LAN; POOFDU POF FOE PG UIF &UIFSOFU DBCMF UP UIF QSPEVDU BOE UIF PUIFS FOE UP UIF -"/ SPVUFS ݣ Connecting to the Wi-Fi (Wireless LAN);1. Power off the receiver and disconnect theEthernet cable.2. Insert the HUMAX Wi-Fi dongle into an USBport and power on the receiver.3. Go to MENU Settings System InternetSetting Configure Wi-Fi.Note: If Configure Wi-Fi is disabled, make surethat the Ethernet cable is disconnectedand check if the HUMAX Wi-Fi dongle isinserted correctly into an USB port on thereceiver.4. Select Network Name and press the OKbutton. The list of all available Wi-Fi Networksdetected will appear. Select the Network youwant to connect to and press the OK button.5. Select the Security Type of your Wi-Fi router.If you do not know the security type, do notchange this option. (Default: WPA-PSK(TKIP))10
Quick Start GuideEnglish6. Select Password and press the OK button.Enter the WEP key/Password of you router.(This information is normally written on yourrouter.)7. Press the YELLOW button to complete.8. Select APPLY and press the OK button.9. When the connection is complete, press theOK button and press the EXIT button to returnto the menu.Note:t .BLF TVSF UIF EJTUBODF CFUXFFO UIF 8J 'J BDDFTT QPJOU BOE UIF QSPEVDU JT OPU UPP GBS BXBZ 5IJT NBZlower the quality of service.t *U JT SFDPNNFOEFE UP QVSDIBTF B XJSFMFTT 64# EPOHMF EJTUSJCVUFE CZ )6."9 0UIFS QSPEVDUT NBZ OPUfunction or respond. Go to www.humaxdigital.com/au to purchase a HUMAX Wi-Fi dongle.21WLAN USB DongleEthernet CableLANWireless RouterRouter11
Quick Start Guide4. Powering On1. Connect the power cord of the product to a wall outlet.2. Ensure the ON/OFF switch at the rear of the product is switched to ON.3. Power on by pressing the STANDBY button on the remote control or the STANDBY button at the frontof the product.12
Quick Start GuideEnglish5. First Installation WizardWhen powering on your product for the first time after purchase or performing the factory default inmenu, the installation wizard will operate automatically.Note: If you exit the installation wizard without fully completing the channel searching procedure, youmay not have all of the channels available. In this case, you can use the Settings Installationmenu to search for more channels.1. RegionSelect the state you currently live in.2. DisplaySet the video output to your TV.3. Automatic SearchChannel search will begin automatically.Save the found channels when the search iscomplete.13
Quick Start Guide4. EPG TypeSelect the EPG Type you want.If you already have an IceTV account or wishto take advantage of the additional features ofIceTV, select IceTV.Note: To use the IceTV EPG, connect the receiverto the internet via Ethernet or USB wirelessdongle. Refer to Connecting the Network.5. ResultThe result of the Installation Wizard is shown.Select Finish to exit the wizard.14
Quick Start GuideEnglish6. Menu OverviewPreferencet 1BSFOUBM POUSPMt -BOHVBHFt 5JNFt 7JEFPt "VEJPt 3FDPSEJOHt 4DSFFO %JTQMBZt &1( 5ZQF IBOOFM -JTUTV GuideVideoMusicEdit Channelst &EJU 'BWPVSJUF -JTUt &EJU IBOOFM -JTUInstallationt "VUPNBUJD 4FBSDIt .BOVBM 4FBSDIt 4PGUXBSF 6QEBUFt %ZOBNJD 6QEBUFt "OUFOOB 1PXFSt 'BDUPSZ %FGBVMUPhotoHUMAX TV PortalSettingsSystemt 4ZTUFN *OGPSNBUJPOt 4JHOBM %FUFDUJPOt 1PXFS .BOBHFNFOUt %BUB 4UPSBHFt *OUFSOFU 4FUUJOHHow to NavigateorDisplays the main menuMoves among menus or optionsSelects (Enters) a menu orconfirms a selectionChanges or adjusts the optionGoes back to the previous screen&OUFST UIF OVNCFS Exits all On-Screen Display (OSD)screens15
Basic OperationChanging ChannelsYou can change the channels in several ways. Press the PS/T button.Enter the channel number directly. (0-9)Go to the channel list and select a channel.Note: Press the TV/RADIO button to switch between TV and radio channels.Volume / Mute / Audio To adjust the audio volume, press the \ /- button.To mute the audio temporarily, press the MUTE button.Setting Audio OptionsAudio options are available only when theprogramme supports multiple audio languages.Press the AUDIO button to change the audiolanguage and direction.Each time you press this button, the valuechanges.Note:t 5IF NVUF GVODUJPO SFNBJOT TFU XIJMF ZPV change channels.t :PV DBOOPU TFU UIF BVEJP EJSFDUJPO XIFO UIF programme is broadcast in Dolby Digital.Display16SelectConfirm
Basic OperationEnglishDisplay Format / ResolutionSetting Display FormatPress the WIDE button to set the display formataccording to the screen ratio.Each time you press this button, the valuechanges.h Screen ratio 4:3: Auto – Letterbox 16:9 –Letterbox 14:9 – Centreh Screen ratio 16:9: Auto – Pillarbox – ZoomDisplaySetting ResolutionPress the V-FORMAT button to set the resolutionof the screen.Each time you press this button, the valuechanges.h 576i - 576p - 720p - 1080i - OriginalNote: When connected with an HDMI cable,you can only change to resolutions the TVsupports.Display17
Basic OperationProgramme Information (i-plate)The i-plate is an information banner that is displayed for a certain period of time whenever you changechannels. Press the i button while watching a progamme to display the i-plate. Press the EXIT button tohide.Playing timeChannel number and nameProgramme nameIconsSignal strength and qualityCurrent time and dateDisplayGroup nameNavigation modeh Viewing detailed programme informationPress the i button again while the i-plate is displayed.h Viewing previous/next programme informationPress the W/X button while the i-plate is displayed.h Viewing programme information of other channelsPress the S/T button while the i-plate is displayed. Press the OK button to change to the selected channel.h Searching related contentsPress the OPT button while the i-plate is displayed. This option is supported only when the network isconnected.IconsThe icons represent the information and services provided.-PDLFE QSPHSBNNFTeletextPay TV / encrypted programmes (CAS icons)ResolutionParental guidance programmeHD programmeSubtitleMultiaudioDolby Digital audioDolby Digital Plus audioNote: Programme information is not displayed when there is no programme information.18
Basic OperationEnglishSleep TimerPress the SLEEP button to set the automatic turnoff time.Each time you press this button, the valuechanges.h 10 - 20 - 30 - 60 - 90 - 120 minutesDisplaySubtitleYou can select the subtitle language when subtitleinformation is provided.Press the SUBTITLE button to change the subtitlelanguage.Each time you press this button, the valuechanges.Note: You can choose to always display thesubtitle when available.DisplaySelectConfirm19
Basic OperationOptionYou can set the options for the watching channel.1. Press the OPT button.2. Select an option.h Favourite: Select the favourite group to add thechannel.h Lock: Select On or Off.h Delete: Press the OK button.h Rename: Press the OK button and enter thename in the keyboard.3. Select OK to save and exit.DisplaySelectConfirmTeletextTeletext is a free service broadcast which gives the latest information on news, weather and many othertopics. You can use interactive services in teletext mode.All teletext supporting channels have the teletext icon on the i-plate.1. Press the TEXT button.2. To display the teletext menu, press the MENUbutton in teletext mode.3. Select the teletext function you want andpress the OK button.Display20SelectConfirm
Channel ListEnglishThe channel list will help you find the channel you want to watch quickly and easily.You can access the channel list in several ways. Press the LIST button. Press the MENU button and select Channel List.Changing ChannelsSelect the channel you want to watch and press the OK button. The displayed channel will change.Note:t -PDLFE DIBOOFM : Scrambled channel (CAS icons)t 1SFTT UIF i button to view the detailed channel information.t 1SFTT UIF LIST or EXIT button to exit.Advanced OptionsChanging GroupYou can display the list of the selected channelgroup.h TV, Radio, Favourite 1 5, Recent1. Press the X button.2. Select a channel group.3. Press the OK button.Note: Press the TV/RADIO button to switchbetween TV and Radio groups.Sorting ChannelsPress the RED button to sort the list in numericalor alphabetical order.Display/ChangeSelectConfirm21
Channel ListEditing Channels in Channel ListYou can edit each channel in the channel list, as well as in menu. To edit the multiple channels, go to theMENU Settings Edit Channels.Locking / Deleting / Renaming Channels1. Select a channel you want to edit and pressthe GREEN button.2. Select an option.h Lock: Select On or Off.h Delete: Press the OK button.h Rename: Press the OK button and enter thename in the keyboard.3. Select OK to save and exit.Note: 5IF EFGBVMU QBTTXPSE JT *G ZPV IBWF forgotten your password, please contactHUMAX Customer Service.GREENDisplaySelectConfirmSetting Favourite ChannelsYou can select your favourite channels and include them in the favourite group.1. Select a channel and press the GREEN button.2. Select Favourite and press the OK button.3. Select a favourite group you want to include the channel in and press the OK button.To remove a channel from a favourite group, select the group and press the OK button again.4. Select OK to save and exit.22
Managing ChannelsEnglishEditing Favourite ChannelsThe Edit Favourite List menu will help you add or remove channels from the favourite groups.MENU J Settings J Edit Channels J Edit Favourite ListGroup nameMarked / Total channelsFavourite group nameFunction buttons: Coloured or OPT buttonSelectMark/ConfirmPage up/downNote:t 1SFTT UIF MENU or EXIT button to exit. Press the BACK button to return to the previous screen.t 5IF DIBOOFMT UIBU BSF BVUPNBUJDBMMZ OVNCFSFE CZ CSPBEDBTUFS DBOOPU CF EFMFUFE PS NPWFE Adding / Removing Favourite Channels1. Press the YELLOW button and select the favourite group you want to edit.2. To add channels to the favourite list, select the channels you want to add using the S/T and OKbutton in the left column and then press the RED button. The added channels will appear in the rightcolumn.3. To remove channels from the favourite list, select the channels you want to remove in the rightcolumn and then press the RED button.Moving Channels1. Select the channels using the S/T and OK button.2. Press the GREEN button.3. Move the selected channels to the location you want using the S/T and OK button.Note: You can move the channels in the right column only.23
Managing ChannelsRenaming Favourite Groups1.2.3.4.Press the YELLOW button and select the favourite group you want to edit.Press the OPT button.Select Rename Favourite.Enter the name in the keyboard.Advanced OptionsChanging GroupTo list the channels of other groups in the left column, press the GREEN button and select a group youwant.Note: Press the TV/RADIO button to switch between TV and Radio groups.Changing BackgroundYou can change the channel displayed in the background while editing.1. Select the channel you want to watch.2. Press the BLUE button. The displayed channel will change.Selecting / Releasing All Channels1. Press the OPT button.2. Select Select All.3. To release all, select Release All.24
Managing ChannelsEnglishEditing ChannelsThe Edit Channel List menu will help you delete, move lock or rename multiple channels.MENU J Settings J Edit Channels J Edit Channel ListGroup nameMarked / Total channelsFunction buttons: Coloured buttonSelectMark/ConfirmPage up/downNote:t -PDLFE DIBOOFM : Scrambled channel (CAS icons)t 1SFTT UIF MENU or EXIT button to exit.t 5IF DIBOOFMT UIBU BSF BVUPNBUJDBMMZ OVNCFSFE CZ CSPBEDBTUFS DBOOPU CF EFMFUFE PS NPWFE Deleting Channels1. Select the channels using the S/T and OK button.2. Press the RED button.25
Managing ChannelsLocking / Unlocking Channels1. Select the channels using the S/T and OK button.2. Press the BLUE button.3. Select Lock. To unlock, select Unlock.Advanced OptionsChanging GroupTo list the channels of other groups, press the GREEN button and select a group you want.Note: Press the TV/RADIO button to switch between TV and Radio groups.Changing BackgroundYou can change the channel displayed in the background while editing.1. Select the channel you want to watch.2. Press the YELLOW button. The displayed channel will change.Selecting / Releasing All Channels1. Press the BLUE button.2. Select Select All.3. To release all, select Release All.26
TV GuideEnglishThe TV guide is an on-screen guide of grid type which displays the programme information of channels intime and date order.You can access the TV guide in several ways. Press the GUIDE button. Press the MENU button and select TV Guide.Note: Press the GUIDE or EXIT button to exit. Press the BACK button to return to the previous screen.PreviewCurrent time and dateInformation of the selectedprogramme: channel number & name,programme name, simple information,favourite group, network type, andiconsTime barFunction buttons: Coloured buttonsSelectConfirmPage up/downNote:t 1SFTT UIF i button to view the detailed programme information.t : Scheduled programme (Red: Recording, Blue: Reminder), : Recording programme,: Present timeWatching Programmes1. Select a programme and press the OK button. The programme will be displayed in the preview.2. Press the OK button again to exit the TV guide and watch the programme.27
TV GuideSetting Reminders or Recordings1. Select a future programme and press the OKbutton.2. Select Record the whole programme orReminder and press the OK button.3. Press the OK button again to cancel thereservation.The reserved programmes will be addedautomatically in Schedule.Note:t #Z TFMFDUJOH Reminder an on-screennotification will appear prior to the selectedprogramme starts. Select OK to automatically change to the channel the programme commences.Select Cancel to continue watching the current programme and not change channels.t *G UIF QSPHSBNNF JT DPOøJDUFE XJUI BOPUIFS QSPHSBNNF BEKVTU UIF SFTFSWBUJPO BQQSPQSJBUFMZ t *G UIF DIBOOFM JT MPDLFE ZPV XJMM CF QSPNQUFE UP FOUFS ZPVS QBTTXPSE UP DPNQMFUF UIF SFTFSWBUJPO 5IF EFGBVMU QBTTXPSE JT *G ZPV IBWF GPSHPUUFO ZPVS QBTTXPSE QMFBTF DPOUBDU )6."9 VTUPNFS Service.t :PV DBO SFTDIFEVMF SFNJOEFST PS SFDPSEJOHT 3FGFS UP Scheduling Reminders and Recordings.)t *G UIF QSPHSBNNF ZPV XBOU UP SFDPSE JT B TFSJFT ZPV DBO TFMFDU UP SFDPSE UIF XIPMF TFSJFT )PXFWFS this function may not be available depending on the broadcasting environment.Advanced OptionsQuick NavigationPress the W/X button to move to the previous/next programme.Press the WW/XX button to jump back/ahead two hours.Press the IWW/XXI button to move to the previous/next day.Changing GroupTo list the channels of other groups, press the BLUE button and select a group you want.Note:t 1SFTT UIF TV/RADIO button to switch between TV and Radio groups.t 5P TFBSDI TQFDJöD QSPHSBNNFT HP UP Find Programmes by pressing the GREEN button. (Refer toFinding Programmes.)28
TV GuideEnglishFinding ProgrammesFind will help you find the programmes more specifically using the keyword or genre.By Keyword1.2.3.4.Press the GREEN button.Select Keyword and press the X button.Select a keyword and press the OK button.Press the YELLOW button to add the selectedprogramme to schedule.Note: To enter a new keyword, select NewKeyword. Type the new keyword and pressthe YELLOW button to confirm.By Genre1.2.3.4.Press the GREEN button.Select Genre and press the X button.Select a genre and press the OK button.Select the specific genre and press the OK or Xbutton.5. Scroll through the list and press the YELLOWbutton to add to t 1SFTT UIF J CVUUPO UP WJFX UIF EFUBJMFE QSPHSBNNF JOGPSNBUJPO t 1SFTT UIF OK button to watch a found programme. (Refer to Changing Channels.)t :PV DBO TFU SFNJOEFST PS SFDPSEJOHT GPS GVUVSF QSPHSBNNFT 3FGFS UP Setting Reminders orRecordings.)29
TV GuideScheduleSchedule lists all programmes that you have set for recordings or reminders and will help youmanage these reservations in more detail.Adding or editing schedule1. Press the YELLOW button.2. To add, select New Reservation and press theOK button.To edit, select a reminder or recording andpress the OK button.3. Reservation will pop up. You can changethe options you want using the S/T/W/X,NUMERIC(0 9) and OK buttons.4. Select OK to save and exit.Deleting scheduleYELLOWDisplayPageup/down1. Press the YELLOW button.2. To delete, select a reminder or recording and press the BLUE button.3. Select Yes and press the OK button.Note:t 1SFTT UIF J CVUUPO UP WJFX UIF EFUBJMFEprogramme information.t :PV DBO FBTJMZ TFU SFNJOEFST PS SFDPSEJOHT JO TV guide,Find Programmes or i-plate navigationmode. (Refer to Setting Reminders orRecordings, Find Programmes or ProgrammeInformation)30ConfirmSelect
Recording and PlaybackEnglishYou can record programmes in the built-in hard disk drive and playback the recorded programmeswhenever you want.Note: Recording or copying is for private and domestic use only.RecordingYou can watch another channel while recording a channel or record programmes from two differentchannels at the same time.Instant RecordingYou can record the currently watching programmeinstantly and change the recording duration.To instantly record the current programme you arewatching, press the RECORD button.The recording will start from the current broadcastpoint and the record banner will be displayed for afew seconds.Press the STOP button to stop recording theprogramme.The recording will continue till the end of the currentprogramme. However, if the programme ends in less than ten minutes, it will continue till the end of the nextprogramme. When no programme information is provided, the recording will continue for two hours.Note: You can also press the Record button while in the Guide to start recording a current programmeon a different channel.Delayed RecordingYou can record the scenes of a live broadcast you have been watching until now by rewinding with thetime shifted recording function.Find the starting point you want to record by using the WWREWIND, W or X buttons, then press the RECORDbutton.The recording will start from the point you select.Changing Recording Duration1. Press the RECORD button on the currentlyrecording channel.2. Set the duration manually or select till theend of the current prorgramme or the nextprogramme.RecordSelectConfirm&OUFS 31
Recording and PlaybackScheduled RecordingYou can easily set the recording reservations in TVGuide, Schedule or i-plate navigation mode. While in the TV Guide highlight a futureprogramme and press the OK button. Select from:Record Whole SeriesRecord the Whole Programme Press the OK button on a future programmein i-plate and select either Record the wholeseries or Record the Whole Programme.(Refer to Programme Information.)The recording will start at the scheduled time and the record banner will be displayed for a few seconds.Press the STOP button to stop recording the programme.Note:t 1SFTT UIF GUIDE button to go to TV Guide.t 1SFTT UIF GUIDE button and press YELLOW button to go to Schedule.t 1SFTT UIF i button while watching a progamme to display the i-plate.Editing Recording ScheduleYou can edit or delete your reservations inSchedule.h To edit, select a reservation and press the OKbutton. You can change the options such aschannel, date, time, repeat mode, etc.h To delete, select a reservation and press the BLUEbutton.Note: 3FGFS UP QBHF GPS JOTUSVDUJPOT PO IPX UP Add, Edit or Delete your reservations.Record32SelectConfirm&OUFS
Recording and PlaybackEnglishRecording ConflictYou can watch another channel while recording a channel or record programmes from two differentchannels at the same time.Recording Duration Conflict8IFO BO JOTUBOU SFDPSEJOH DPOøJDUT XJUI POF PG the scheduled recordings (or reminders), you caneither;h Record for the automatically modified duration.h Cancel either of the scheduled recordings (orreminders).h Cancel the previous recording.Watching ConflictWhen a scheduled recording starts on a differentchannel while you are watching a channel andrecording another channel, a record noticeXJMM QPQ VQ TFDPOET CFGPSF UIF TDIFEVMFE recording starts.h OK: The channel will change at the start time andthe scheduled recording will start automatically.h Cancel: The scheduled recording will becanceled.Scheduling Conflict8IFO B OFX TDIFEVMFE SFDPSEJOH DPOøJDUT with one of the previously set recordings (orreminders), you will be prompted to select up totwo programmes you want to keep.Select the programme using the S/T and OKbutton.RecordSelectConfirm&OUFS 33
Recording and PlaybackSetting Padding / Jump TimeMENU J Settings J Preferences J RecordingSetting Padding TimeYou can set the recording padding time in casethe recording starts earlier or ends later thanscheduled.h Start Padding Time: Additional recording timebefore the recording starts.h End Padding Time: Additional recording timeafter the recording ends.Setting Jump TimeYou
Connecting the TV You can select one of the following connections depending on the device you have. b TV with the HDMI connector; For the best picture quality, connect the product and TV using a HDMI cable. c TV with the DVI connector; For very good picture quality, connect the product and TV using a HDMI cable and a HDMI-to-DVI converter for .