Transcription
AUTORESPONDER UNLIMITED 2.0User’s GuideCopyright 2002-2003The 29th Floor Enterprises Inc.All rights reserved
Table of ContentsPlease Read this FirstSystem RequirementsOverview of How the Autoresponder WorksHow to Install the AutoresponderHow the Admin Control Panel worksAdd Account ButtonFrom NameFrom EmailAdd Unsubscribe LinkSend Report to AdminSave SettingsGenerate HTML CodeAdd New MessageIntervalsImport Active ProspectsExport Active ProspectsWhat to do after you have configured the Autoresponder Settings.Frequently Asked QuestionsLicense Agreement
Please read this first :Read everything first in this guide before you try to edit or upload the files to your webhost.This may seem to be intimidating if you are setting this up for the first time. But after you have set-upeverything, managing your autoresponder from your Admin Control Panel is so easy !Most of the questions you will have has already been answered in this user manual.You can allways view the most updated manual inhttp://www.autoresponderunlimited.comBack-up all the files first before editing anything. This way, you will always have your original files ifsomething goes wrong. You can install your autoresponder script in unlimited number of domains. So it isa good idea to have a back-up copy of the original files.System Requirements: Unix Operating system (linux/FreeBSD) Perl5 Interpreter (standard on unix machines) SendMail (standard on unix machines) Works without CRON jobs (which are not allowed on many servers) Your own cgi-bin directoryThe Autoresponder Unlimited scripts were tested to work in most servers. Follow these instructionscarefully and you should have no problems in installing it. If after installing and you are still havingproblems, please ask first your webhost before contacting us . Any decent webhost should be able to helpyou. On our part, we will help you with any script related concerns, but we could not help you in resolvingyour problems with your webhost.
Overview of how the autoresponder works:1) Setting up your activation page2) Installation of the autoresponder scripts3) Setting up and managing your autoresponder accounts in the Admin Control Panel4) Testing your autoresponderSetting up your Activation Page:If you are wondering why we put this step as number 1 is because a lot of first time users FORGET to dothis step and complain that the autoresponder is not working. This is a very important step so be sure youfollow the simple procedure here.The first thing that you need to do is to determine which page of your website will be the activation page.The activation page is the one which will “activate” your autoresponder scripts to work. In our experience,the best page to become your activation page is your homepage which is the most frequently visitedpage of your website.After you have determined which is your activation page, edit this page and paste the following scriptsanywhere between the body and body tags of your HTML. img src tivate.cgiwidth 1 height 1 border 0 Do not upload yet this webpage. You will still need add your subscription box in this webpage. Justremember, this is called your activation page.
Installation of the autoresponder scriptsUnzip the file called autoresponder.zip. Be sure you remember the directory where you unzip the files.After unzipping, you should have the following files(1) hml folder – there is nothing to edit /chnage in the files inside this folder.(2) autoresponder folder – open it, it should contain the following 4 files:config.cgiactivate.cgiar.cgiLite.pmYou need to edit only the file called config.cgi.When you first opened the file config.cgi you might notice that it looks garbled. There is nothing wrongwith the file. Close it. Open the same file in wordpad. You notice that it looks ok now.You will find detailed explanation in the config.cgi of what variables to change. What you are doing here isconfiguring the script. You only have to do this one time.After editing the config.cgi, you are now ready to upload your files to your web host.Uploading the Files to your WebHostUpload first the html folder to your root directory. This is the directory where you normally keep yourindex.html or your home page.Now look for your cgi-bin directory.Upload the autoresponder folder under the cgi-bin directory. BE SURE that you upload the autoresponderfolder as ASCII and NOT BINARY.
You need change the permission of your autoresponder folder and the files inside it. Set the permissions or CHMOD for the ar.cgi file to '755' or rwxr-xr-x Set the permissions or CHMOD for the config.cgi file to '755' or rwxr-xr-x Set the permissions or CHMOD for the activate.cgi file to '755' or rwxr-xr-x Set the permissions or CHMOD for the lite.pm file to '644' or rw-r-r Set the permission or CHMOD for the autoresponder folder to '755' or rwxr-xr-x Important Note : In some web host, you have to set the permission of the Autoresponder folder to'777' or drwxrwxrwx for it to work. Try first '755' , then if it doesn't work (like you cannot add anew account), then change it to '777' . If it still doesn’t work, try changing the autoresponder folderpermission '775' or drwxrwxr-x. This all depends on how your webhost is configured.If you have followed everything correctly, we’re now ready to manage our autoresponder.You can now log-out from your webhost while you study how your Admin Control Panel.How the Admin Control Panel WorksTo login into your admin control panel, open your browser and in the URL address iEnter the password that you created in the config.cgiWhen you are in the Admin Control Panel, the first thing that you want to do is to create yourautoresponder nickname.The nickname is how you will identify your different autoresponders. For example, you have severaldomains or several webpages where you wanted to put the subscription box. For each subscription box,you may want different autoresponder messages. So you may want to create different nicknames.Enter a nickname in the text box.
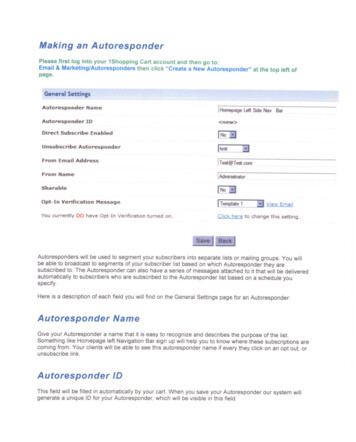
Click on the Add Account Button.Once you have created your nickname, click on the link.You will see Admin Settings.The Admin Settings will only show whenever you click on the nickname link.There is one Admin Settings for every nickname or autoresponder.This allows you to use as many subscription boxes that you can set-up in your webpage.How to configure your Autoresponder SettingsThis is the screenshot of how your Admin Settings would look like.
Here’s a very simple explanation of each item:Add Account Button : You can create as many account as you want. One account would correspond toone subscription box where your subscribers will enter their name and emailFrom Name : This is the name that will show in your email messages to your subscribers.From Email : This is the return email address that will show in your email messages. You can choose anyemail address that you want even the free ones like yahoo or hotmail. Just remember, the autoresponderwon’t create an email account for you.You need an existing email address. Why? This is the address thatyour subscribers will use when responding to your autoresponder messages.Add Unsubscribe Link : We highly recommend that you check this box. This link will appear in all youremail messages that will be sent to your subscribers. This will allow your subscribers click on the link ifthey don't want to receive anymore email messages from you.Send Report to Admin : We highly recommend that you check this box. An email will be sent to you tonotify you when someone subscribes. The email message will contain the subscriber's name, email, dateand even the IP address. This will serve as a proof that they actually subscribe to you. For this purposes,you will be called admin.Redirect After Registration to : Type in the path where you will send your subscriber’s after theysubscribe, or after they click on the subscribe button. This is normally the page where you tell them“thanks for subscribing” or an order page. This is entirely up your marketing stategy.Save Settings : Don't forget to click this to Save the information that you just entered above.Generate HTML Code : When you click this button, the HTML code for your subscription box will beautomatically generated for you.Add New Message : Click this button to start typing your email messages or your autorespondermessages. You can attach any kind of file up to a size of 2 MB. Remember you can customize youremail messages to include the first name, last name, email address and date today.
Intervals : This refers to the number of days when you want to send the messages or when you want yoursubscribers to receive the messages.For example,you want your new subscriber to receive the message immediately aftersubscription. Then you want them to receive emails from you daily for the next 3 days. Yourintervals should look like this:0 - send the message as soon as your visitor subscribes1 - send the message 1 day after your visitor's subscription2 - send message 2 days after your visitor's subscription3 - send message 2 days after your visitor's subscriptionThere is no limit to the number of messages you can send.You don't have to start with 0. You may want to start sending the messages 3 days after yourvisitor's subscription. In this case you will enter 3 in the interval box.Or you may want to send your messages at different intervals. For example, if you want to sendyour message every other day only, your intervals will look like this:0 - send the message as soon as your visitor subscribes2- send the message 2 days after your visitor's subscription4- send message 4 days after your visitor's subscriptionImport Prospects : Allows you to enter manually the name email addresses of anyone. You can also cutand paste the data from another file.Export Prospects : Allows you to view online the names of your active subscribers.
Some Important Reminders:After all the messages had been sent to your active prospects, it may look like some of yours users mayhave disappeared! Don't panic, your users did not disappear. If you check you cgi-bin folder, there is a filecalled collect.txt. This file contains all the names email addresses of your subscribers.If you want to send messages to these subscribers gain, just import them to any account that you want.To import these subscribers to your autoresponder, just copy and paste the email addresses from the textfile to your autoresponder, then click on the Import Prospects Button.What to do after you have configured the Autoresponder Settings :After you have set-up everything in the Admin Control Panel you need to test first that your autoresponderis working.From the Admin Control Panel, click on the the button Generate HTML code. Copy and paste the HTMLcode to the webpage where you wanted the subscription box to appear. Copy this to your activation page.Remember your Activation Page ? Go back to step 1 to review it.
Copy and paste the code into your HTML page where you wanted the subscription box to appear. Yoursubscription box will look like this. You can change how it looks.Save your activation page and upload your webpage to your webhost.Now you are ready to test if your autoresponder is working.Open your browser and go to your webpage (or activation page)Enter your name and email address in your subscription box.You will be re-directed to the webpage that you specified in the Admin Control Panel “Redirect afterregistration to”.Now check your email box which you have specified in the FROM EMAIL in the Admin Control Panel.You should receive the autoresponder message. This is the same message that your subscribers willreceive. You will notice that there is an link at the buttom of the email to unsubscribe.You will receive another email. Let’s call this the admin email. Everytime someone subscribes, you willreceive a notification email. There is also a unsubscribe link so you can also unsubscribe this subscriber.If you don’t want to receive any admin email after everyone subscribes, go back to the Admin ControlPanel and uncheck the box “Send Report to Admin”
This is a sample email that you will receive everytime someone subscribes. You will notice that the emailcontains a lot of information about the user. I highly suggest that you keep this emails. You can alsounsubscribe this user if you want by clicking on the link.If you receive the first email, you know that the autoresponder is working.Congratulations!
Frequently Asked Questions:Why do I have to set the permissions ?We have already set the correct permissions to the file. However sometimes after you unzip the files,these could be lost. Just be sure that you set the correct permission after you uploaded the filesWhen I opened the cgi scripts in Notepad, it looks corrupt.This can happen sometimes. There is nothing wrong with the files. Close the file that you just opened inNotepad. Just open the same file again in Wordpad.You will see that the files looked fine now.I am getting an internal server error when I access the login page.There is something wrong with one of the following: Check the config.cgi. Be sure that all the variables are set correctly. Check the page where you are activating the activate.cgi scripts. Check the permissions of each cgi script. Did you upload the scripts as ASCII and not binary?They should be uploaded as ASCII to work.How do I send an email to my subscribers every other day?Login to you admin control panel.Add a new account or edit the account that you have created.Under the Add Message be sure to set the interval to 2,4,6,8How do I activate the autoresponder script after I have imported the email addresses?There are 2 ways to do this:1) Visit the page where you posted your activate.cgi script . This is the normally the most visitedpage of your website.2) You can also type in tivate.cgi directly intoyour browser. This will also activate the autoresponder script.
License Agreement:According to our lawyer we should put this here. When agreeing to purchase the software, you are agreeing to these terms.Autoresponder Unlimited License AgreementTHESE TERMS AFFECT YOUR LEGAL RIGHTS AND OBLIGATIONSYOU SHOULD CAREFULLY READ THE FOLLOWING TERMS AND CONDITIONS BEFORE USING THISPRODUCT. IT CONTAINS SOFTWARE, THE USE OF WHICH IS LICENSED BY THE 29th FLOOR ENTERPRISESTO ITS CUSTOMERS FOR THEIR USE ONLY AS SET FORTH IN THE LICENSE AGREEMENT BELOW (the"License Agreement").End User License AgreementNote: This agreement applies to all software produced and/or distributed by and/or for The 29th Floor Enterprises (29thFloor) or any of its affiliated registrars ("software" or "Software").Before installing 29th Floor software, please read this License Agreement ("Agreement") carefully. This is a legallybinding Licensing Agreement between you ("End User") and 29th Floor . ("29th Floor "). By installing the enclosedsoftware programs and related applications ("Software"), you are agreeing to be bound by all the terms andconditions of this Agreement.The enclosed Software is licensed to the End User by 29th Floor for use only in accordance with this Agreement. Ifyou do not agree to be bound by its terms and conditions, do not install the Software.By installing this software, you are indicating that you have read the agreement in its entirety and that you acceptsuch terms and conditions and agree to be bound by them. If you are not willing to abide by the terms and conditionsof this Agreement, exit the application and do not install the software.Title and LicenseAll right, title and interest in the Software is owned by and shall remain the exclusive property of 29th Floor . The EndUser shall not do anything to contest or challenge 29th Floor 's intellectual property rights in the Software.Limited Grant29th Floor hereby grants to the End User the limited right to use the Software, including all data files comprising the
Software. The End User is strictly prohibited from renting, leasing, subleasing, reverse engineering, decompiling,disassembling, translating, merging, or other wise creating derivative works from the Software without writtenpermission of 29th Floor .Requirements and SpecificationsThe End User is responsible for obtaining the appropriate hardware, software and Internet access required to us theSoftware.Accountability and Liability29th Floor shall not be liable for the information, software, contents, products or services produced or accessed by orfrom the End User. The End User is strictly prohibited from using the Software on or in connection with any illegalactivities. Any unauthorized use(s) of the Software shall constitute a material breach of this Agreement.Any business relationship or transaction contemplated or consummated between the End User and any other thirdparty is strictly subject to the specific terms and conditions agreed to by the End User and the third party. It isexpressly acknowledged that 29th Floor and any of its affiliates, severally and/or collectively are not parties to thesetransactions and 29th Floor shall have no liability or obligation with respect to such business relationships ortransactions between the End User and third parties.IndemnityThe End User agrees to indemnify and hold harmless 29th Floor , its agents, employees, directors, officers andrepresentatives from and against any loss, liability, claim, damage and/or expense (including attorney's fees) arisingfrom or in connection with the installation and continued use of the Software, accessed or created Web Sites and/orthe sales of products or services from the End User to third parties.Warranties29th Floor warrants and represents that the media on which the Software is supplied is free of defects in materialsand workmanship, and will provide to the End User free of charge, withing ninety (90) days of purchase, areplacement copy of the Software upon return of any defective media.THE WARRANTIES CONTAINED IN THIS AGREEMENT ARE IN LIEU OF ALL OTHER REPRESENTATIONS,WARRANTIES AND CONDITIONS EXPRESS OR IMPLIED, INCLUDING BUT NOT LIMITED TO IMPLIEDREPRESENTATIONS, WARRANTIES AND CONDITIONS OF MERCHANTABILITY, AND FITNESS FOR APARTICULAR PURPOSE, WHETHER ARISING BY STATUE OR OTHERWISE IN LAW OR FROM A COURSE OFDEALING OR USAGE OF TRADE.29th Floor DOES NOT REPRESENT OR WARRANT THAT:(1) THE OPERATION OF THE SOFTWARE OR THE PERFORMANCE OF THE ORDER PROCESSING FUNCTION
WILL BE ERROR FREE, UNINTERRUPTED OR THAT THE RESULTS OBTAINED FROM THEIR USE WILL BEACCURATE OR MEET ALL THE END USERS SPECIFIC REQUIREMENTS; OR(2) ALL PROGRAMING ERRORS CAN BE CORRECTED OR FOUND IN ORDER TO BE CORRECTED.DisclaimersIN NO EVENT SHALL 29th Floor , ITS EMPLOYEES, AGENTS, OFFICERS, DIRECTORS OR REPRESENTATIVESBE LIABLE FOR ANY LOST REVENUES OR PROFITS, BUSINESS INTERRUPTION, LOSS OF INFORMATION,OR ANY OTHER INDIRECT SPECIAL, INCIDENTAL, OR CONSEQUENTIAL DAMAGES OF ANY KIND ARISINGOUT OF THE USE OF OR INABILITY TO USE THE SOFTWARE OR THE ORDER PROCESSING FUNCTION,EVEN IF 29th Floor HAS BEEN ADVISED OF THE POSSIBILITY OF SUCH DAMAGES. THE LIMITATIONS,EXCLUSIONS AND DISCLAIMERS IN THIS AGREEMENT SHALL APPLY IRRESPECTIVE OF THE NATURE OFTHE CAUSE OF ACTION OR DEMAND, INCLUDING BUT NOT LIMITED TO BREACH OF CONTRACT,NEGLIGENCE, TORT OR ANY OTHER LEGAL THEORY, AND SHALL SURVIVE ANY FUNDAMENTAL BREACHOR BREACHES AND/OR FAILURE OF THE ESSENTIAL PURPOSE OF THIS AGREEMENT, OR ANY REMEDYCONTAINED IN THIS AGREEMENT.Governing LawThis Agreement shall be governed by the laws of the province of Alberta, Canada. The End User agrees to subjectitself to the jurisdiction of Canada, court in Alberta.Thanks for purchasing the AutoresponderUnlimited software.Copyright 2002- 2003 The 29th Floor EnterpriseCalgary, Alberta, CanadaAll rights reserved
Unzip the file called autoresponder.zip. Be sure you remember the directory where you unzip the files. After unzipping, you should have the following files (1) hml folder - there is nothing to edit /chnage in the files inside this folder. (2) autoresponder folder - open it, it should contain the following 4 files: config.cgi activate.cgi ar.cgi