Transcription
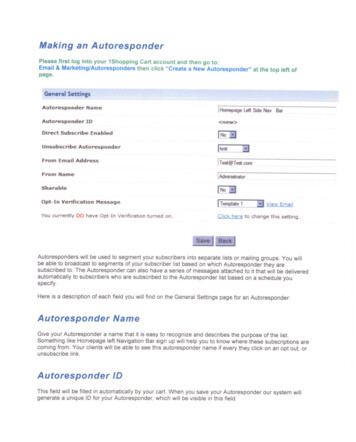
Making an AutoresponderPlease first log into your 1Shopping Cart account and then go to:Email & Marketing/Autorespondersthen click "Create a New Autoresponder"page.at the top left ofGeneral SettingsAutoresponderNameAutoresponderID[ HomepageBar new Direct Subscribe Enabled Unsubscribe AutoresponderItestFrom Email Address!.:1[T est@Test.comFrom NamefSharableOpt-In VerificationLeft Side NavAdministratorI No L:.1Messager Template 1You currently DO have Opt-In Verification turned on.EI View EmailClick here to change this setting.SaveI Back IAutoresponders will be used to segment your subscribers into separate lists or mailing groups. You willbe able to broadcast to segments of your subscriber list based on which Autoresponder they aresubscribed to. The Autoresponder can also have a series of messages attached to it that will be deliveredautomatically to subscribers who are subscribed to the Autoresponder list based on a schedule youspecify.Here is a description of each field you will find on the General Settings page for an Autoresponder:AutoresponderNameGive your Autoresponder a name that it is easy to recognize and describes the purpose of the list.Something like Homepage left Navigation Bar sign up will help you to know where these subscriptions arecoming from. Your clients will be able to see this auto responder name if every they click on an opt out, orunsubscribe link.AutoresponderIDThis field will be filled in automatically by your cart. When you save your Autorespondergenerate a unique ID for your Autoresponder, which will be visible in this field.our system will
Direct SubscribeEnabledIf this is set to "Yes" you will be given an email Address which will look like "usernameAutoresponderID@autocontactor.com".If a subscriber sends an email to this address their email addresswill be subscribed to the Autoresponder list (after confirming their subscription via a double opt-inmessage).UnsubscribeAutoresponderIf you have more than one Autoresponder created you will find that this field has a drop down box filledwith all of your Autoresponder names (except for the one you are currently working on). Selecting anAutoresponder here will cause your subscriber to be unsubscribed from the Autoresponder you choosewhen they subscribe to the one you are currently creating or editing. This feature is often used by peoplewho have all of their customers on one list, and prospects on another list and wish for them to remainseparate. Choosing the "prospect" Autoresponder as the unsubscribe Autoresponder in the "customer"Autoresponder, will cause them to be removed from the "prospect" Autoresponder when they buysomething and become a customer. In order for this scenario to work properly you will need to select the"customer" Autoresponder as your "Default Autoresponder" under the Setup » Orders menu.From Email AddressThis is the email address your Autoresponder messages will appear to come from. Make sure you tellyour subscribers to add this address to their email program's Address Book to ensure your messages gointo their inbox and not their Spam folder.From NameThis is the name your message will come from. Make sure you use a consistent from name in all of youremail messages so that your subscriber will recognize your message in their inbox. Changing your fromname all the time will cause you to have lower open rates and a higher unsubscribe rate.SharableThis is only important if you have more than one account with us and you wish to copy an Autoresponderand all of its messages to one of your other accounts. Unless you are actively trying to copyAutoresponders from one account to another, this option should be left at "No".Opt In VerificationMessageThis is the verification message your subscribers will receive when they are asked to "double opt-in".Subscribers will be required to confirm their subscription through double opt-in in certain sign-upscenarios. When you import your subscribers into your account for the first time, when the subscribersigned up through a web form when you had opt in verification turned on or if they subscribed through anAutoresponder's direct subscribe email address.
JBACKSave1Go To Mes geDays DelayMessage Typerr.- TextrrHTMLAlternate DestinationSubject lineMessage Bodv .:!tomorro'l1l s, II, stodll'. X ·'.SMe· mllmes· !,M!!!l:h!!murts M d1anter.'lll,: ."I.5 h8ntconm!t/'!". s.,.II,. Zme "tw()'\.; es' "!.Sme "'lIddre::::! !! !I"1\meS";jo' :ro:- ./.!!"'U'CloseISignatureOur system automaticallyIf YOlJappends your public contact Informllhonas a slQn.ature on all outgolOO ema,!.WOlJldlike to use a custom j9nll ure Instead. you can create one on YOlIr o"t .'"' F,.",1page.Copy this mMsap to another Auto spondorJust ,ele :t an lIutorcspondert)elow and yoyr saved m oeWill get COPIed to the selected AR.Oe tination AutoresponderDay Number for DestinationBACKJ Save JOnce you have filled in all of the fields, Click the Save button to create the Autoresponder.The next page you see after saving your Autoresponder will ask you to create the first message in theAutoresponder series your clients will receive after being subscribed to this list.
Go To MessageYou will not select anything from this box. This option is used for navigating from one message to anotherwithin the Autoresponder series. It's a shortcut that makes it easier to edit different messages in theseries without having to exit and re-enter the Autoresponder.Days DelayThe number of days delay you set for any message in the series will alwaysthe date the subscriber first signed up to this series. Day 0 would be the daywould be thirty days after they subscribed.For example, if you had five messages in the series all with days delay of 7,would be sent 7 days after the subscriber signed up. If you intended to senddays, you would set the days delay for each message as 7, 14, 21, 28 etc.Messagebe the number of days fromthey subscribed and day 30every message in the seriesone message every sevenTypeHere you can choose the format of your Autoresponder message. We currently support HTML, Text orMIME (both) email formats. HTML formatting works great for newsletter type messages where you wantto add pictures and color to the email, while text works best when trying to send a more personalizedmessage and all that is needed is plain text.AlternateDestinationThis field will typically be left empty. If you enter an email address in this Field, our system will redirect themessage to the "Alternate Destination" email address instead of it being sent to the subscriber. Thisfeature is typically used to inform other people in the company that someone has subscribed to theAutoresponder list and from there they would know to follow-up or enter the subscriber's information intoan external database.For example, if your secretary needs to know when someone subscribes to your Autoresponder list, youmight wish to place their email address in this field so they will receive the message instead of the client.Subject LineThis will be the subject line of your email. Subject lines should be used to get the attention of yoursubscriber when they see the email intheirinbox.Aninterestingsubject line that previews what thesubscriber will find within the email will prompt them to open and read your message. Generic subjectlines that blend in with the other emails in your subscriber's inbox may get lost and never read by yoursubscribers. It is a good idea to test different subject lines in your messages to see what type of subjectsyour subscribers respond to.Message BodyThis is where you create the email message. You can enter your text into this area or use the WYSIWIG(what you see is what you get) editor to create an HTML formatted message.
HTML Message BodyTimes New RomanSize Merge CodeDear %SfirstnameS%,IC4Normal18 HTML o.PreviewFDELETE DRAFT AFTER SENDINGMerge Insert Menu 1This can be found to the right of the message body and contains many different symbols. All symbolsbegin with % and end with %. You can click on these to insert them into your message body whereyour cursor is located. When you send your message out to your selected list these codes will beautomatically exchanged for the accurate information for each individual client.For example if you use "Hi % firstname %" to begin your message, and someone named Joe signs up toyour list, when they receive the message it will read "Hi Joe".This feature is very useful when you want to personalize your message to make it more appealing to yoursubscribers. You can get creative with the merge fields to make it seem as though you are sending themessage personally to each and every subscriber.SummarySave your changes using the Save button.If you would like to add another message to this Autoresponderbutton and repeat the steps above.series, just click the "New Message"There is no limit to the number of messages you can add to an Autoresponder. So feel free to be creativewith the number of messages and the days delay in-between each message. Just make sure that youremember that you want to keep in touch with your subscribers, not make them angry that you aresending too many messages to them. Sending too many messages to frequently to your subscribers canincrease your unsubscribe rates considerably.That is all it takes to create your first Autoresponder!
will be subscribed to the Autoresponder list (after confirming their subscription via a double opt-in message). Unsubscribe Autoresponder If you have more than one Autoresponder created you will find that this field has a drop down box filled with all of your Autoresponder names (except for the one you are currently working on). Selecting an