Transcription
Autoresponder GuideDavid Sharpe
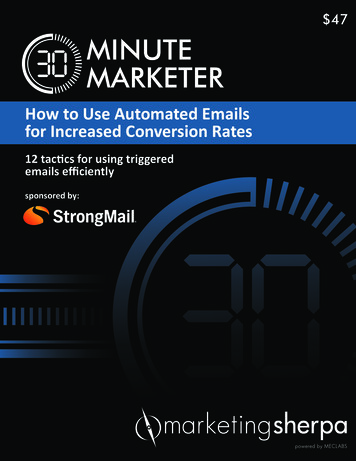
Autoresponder GuideThere are two autoresponders that I personally use and recommended AWeberand Sendlane.AWeberAWeber is a great service to use if you already have a website you are using. Youcan easily set up an opt in form, and plug the code directly into your site.How to Sign UpStep 1) Click here to be taken to the Sign Up page.Step 2) Click on the ‘Start Your 30-Day Free Trial Today’ button.Step 3) Choose your plan (monthly, quarterly, or annual).The Simple Sign-Up System
Autoresponder GuideStep 4) Scroll down and ll out your personal information in the ‘Create YourAccount’ section.The Simple Sign-Up System
Autoresponder GuideStep 5) Scroll down to the ‘Enter Billing Information’ and enter in yourinformation.Step 6) Once you have completely lled out all of the necessary informationabove, scroll down and agree to the terms by clicking on the ‘Complete My Order’button.The Simple Sign-Up System
Autoresponder GuideCongratulations! You have now set yourself up with your own AWeber account.Adding a Form to Your WebsiteStep 1) Click on the “Sign Up Forms” tab in the navigation menu.Step 2) Click on the “Create a Sign Up Form” button.The Simple Sign-Up System
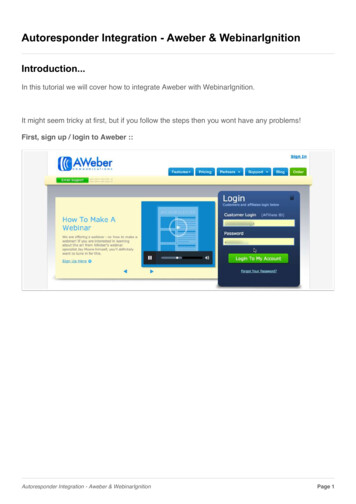
Autoresponder GuideStep 3) Choose a template for your form. Just click the “Show More” option tobring up a menu of the different categories.Browse through the different categories to nd a template that matches yourwebsites design and theme.When you nd one you want, click on it. Then choose your color scheme and click“Load Template.”The Simple Sign-Up System
Autoresponder GuideStep 4) To add text click on the “EDIT HEADER” tab.A headline will help your websites visitors understand why they should sign upand what kind of information they can expect to receive.Step 5) Once done, click “Go To Step 2.”The Simple Sign-Up System
Autoresponder GuideStep 6) Now, give your form a name. Your subscribers won’t see this name, it justhelps you tell this form apart from others you create later.Step 7) Then, choose where your subscribers go after they ll out your form. Weoffer several default thank you pages, and even a smart version that shows eachsubscriber how to confirm. Or you can send them to any page on your site.Step 8) Once done click “Save”, then click “Go To Step 3.”The Simple Sign-Up System
Autoresponder GuideStep 9) Now publish the form to your site. Do it yourself with the HTML providedor have us send that information to your web designer.You will publish the Javascript Snippet or Raw HTML Version anywhere betweenthe body tags of your site.The Simple Sign-Up System
Autoresponder GuideOnce the form has been added, test it by lling it out yourself. The form is nowready to turn visitors into subscribers!SendlaneSendlane is a service that has landing pages built right into it, as well as theautoresponder functionality. This is great if you currently do not have a websiteand would be needing a landing or opt in page to collect emails.How to Sign UpStep 1) Click here to be taken to the Sign Up page.Step 2) Watch the short introductory video and then click on the ‘Start Your FreeTrial’ button.The Simple Sign-Up System
Autoresponder GuideStep 3) Fill out your personal information and then click on ‘Proceed to Final Step’at the bottom of the page.The Simple Sign-Up System
Autoresponder GuideStep 4) Enter in your billing information.The Simple Sign-Up System
Autoresponder GuideStep 5) Scroll to bottom and click on the ‘Create My Account’ button.The Simple Sign-Up System
Autoresponder GuideCongratulations! You have now set yourself up with your own Sendlane account.Creating a Landing PageStep 1) Locate and click on the button labeled “Landing Pages” in the left landnavigation of your account Dashboard. Then click the green “ Create template”button in the upper right hand of your account Dashboard .Step 2) Choose a template for editing. A pop-up window will appear asking forPage Name* and URL slug*. Enter the name for your page and the URL slug willbe created and formatted automatically from your page. Click the green “Submit”to continue. Please be aware both the Page Name and URL slug can be editedlater.The Simple Sign-Up System
Autoresponder GuideStep 3) After clicking the green “Submit” you will be forwarded to the templateeditor. Edit your template by changing text, images, and buttons. Adding anddeleting content. Once you have nished editing your template to your pleasureclick the green “ Save” box in the upper right hand corner. It is recommended thatyou save often while editing your pages.The Simple Sign-Up System
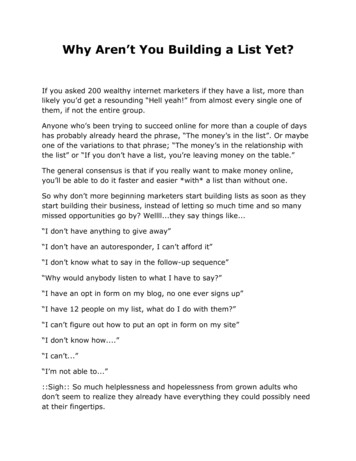
Autoresponder GuideWhen nished with your last edit and save you will arrive at the Landing PageSettings screen. From here you will be able to input SEO Settings for yourlanding page. Input a “Page Title*” and click the green “Save” button below the“Keywords” input box. The page title will be seen in the preview tab above wherea URL would be seen in most browsers. You may also ll in a short description ofthe page and keywords but this is not required.Step 4) Next click “ Opt-in Form Integration” in the left hand sub menu. Use thedrop down menu to “Choose your desired list*” from your current Lists . Enteryour Thank You Page (TYP) URL. If have yet to create a TYP leave this eld blankfor now as you can come back and paste it later. Click the green “Ok” button nearthe bottom.The Simple Sign-Up System
Autoresponder GuideFrom here you will want to click “ Tracking Code” to enter a third party analyticscode like Google Analytics . This optional as SendLane has built in trackingand reporting. Click the green “ Save” button when you have nished enteringyour tracking code.The Simple Sign-Up System
Autoresponder GuideStep 5) Click “ Exit Popup” If you want a popup message to display when a visitorcloses or leaves your page without registering, click the “Yes” radio button. Thenenter the text you want to display to the visitor before they leave. If the userchooses to stay because of your popup, you can redirect them to another page ofyours. So if you offer them an extra bonus to register, then paste the URL of yourextra bonus opt-in page. Click the “Yes” radio button and enter the URL you wantthem to be redirected to. Then click the green “ Save” button to finish.The Simple Sign-Up System
Autoresponder GuideStep 6) When you have nished editing your Landing Page Settings then click thegreen “Publish” button in the upper right hand corner. A popup will appear withyour SendLane hosted URL, Social Media sharing option, and a way for you todownload the HTML le for your Landing Page. You can use this le to upload toyour server. Finally to close the popup click the “X” in the upper right hand cornerof the popup.The Simple Sign-Up System
Autoresponder Guide Step 3) Choose a template for your form. Just click the "Show More" option to bring up a menu of the different categories. Browse through the different categories to 0nd a template that matches your websites design and theme. When you 0nd one you want, click on it. Then choose your color scheme and click "Load Template."